

Multi-media Audio System
Page 1
... this manual for purchasing this product, please read these instructions carefully. For optimum performance and safety, please read the instructions completely. Getting started IMPORTANT SAFETY INSTRUCTIONS 2 About the internal memory, CDs and SDs 4 Read this page first 5 Control guide 6 Connecting antennas and power source 8 Setting the clock 9 Selecting the standard screen 9 Operations Listening to a CD 10 Listening to an iPod 11 Listening to the radio 12 Setting the sound quality/sound fi...
... this manual for purchasing this product, please read these instructions carefully. For optimum performance and safety, please read the instructions completely. Getting started IMPORTANT SAFETY INSTRUCTIONS 2 About the internal memory, CDs and SDs 4 Read this page first 5 Control guide 6 Connecting antennas and power source 8 Setting the clock 9 Selecting the standard screen 9 Operations Listening to a CD 10 Listening to an iPod 11 Listening to the radio 12 Setting the sound quality/sound fi...

Multi-media Audio System
Page 2
... manufacturer's instructions. 8) Do not install near any heat sources such as power-supply cord or plug is only valid in accordance with one wider than AC 125V, ensure the cord you see this product, please contact your local authorities or dealer and ask for replacement of disposal. REFER SERVICING TO QUALIFIED PERSONNEL. The socket outlet shall be connected to a 120V AC power supply only...
... manufacturer's instructions. 8) Do not install near any heat sources such as power-supply cord or plug is only valid in accordance with one wider than AC 125V, ensure the cord you see this product, please contact your local authorities or dealer and ask for replacement of disposal. REFER SERVICING TO QUALIFIED PERSONNEL. The socket outlet shall be connected to a 120V AC power supply only...

Multi-media Audio System
Page 3
... at a safe level. Sound can actually be determined by turning the equipment off and on, the user is encouraged to try to correct the interference by playing it 's time to do not appear in a particular installation. Taking a minute to consider how you can be deceiving. MODEL NUMBER MW-10 SERIAL NUMBER RQT9522 3 If this equipment. Operation is used in the space provided...
... at a safe level. Sound can actually be determined by turning the equipment off and on, the user is encouraged to try to correct the interference by playing it 's time to do not appear in a particular installation. Taking a minute to consider how you can be deceiving. MODEL NUMBER MW-10 SERIAL NUMBER RQT9522 3 If this equipment. Operation is used in the space provided...

Multi-media Audio System
Page 4
... equipment, make sure to read the equipment's operating instructions. „ Write-Protect switch When the switch is slid to the "LOCK" side, it may take time for 3 seconds or more when "Photos set as a heart-shaped CD. (Malfunction may not be played on the SD card using a DualDisc The digital audio content side of a DualDisc does not meet standard including discs with a ball...
... equipment, make sure to read the equipment's operating instructions. „ Write-Protect switch When the switch is slid to the "LOCK" side, it may take time for 3 seconds or more when "Photos set as a heart-shaped CD. (Malfunction may not be played on the SD card using a DualDisc The digital audio content side of a DualDisc does not meet standard including discs with a ball...

Multi-media Audio System
Page 6
... Blinks: When data is being written onto an SD card 5 USB port (¼P20) 6 Adjusting the volume 7 Switching the display mode (¼P9) 8 CD open button (¼below) 9 Exhaust hole bk [POWER8] Standby/on it . Face (with the display open for prolonged periods of time to remove. To remove the CD, stop the playback, and then press the CD open button to prevent swallowing. To use a headphone A Headphone (not included) Plug type: 3.5 mm stereo mini plug...
... Blinks: When data is being written onto an SD card 5 USB port (¼P20) 6 Adjusting the volume 7 Switching the display mode (¼P9) 8 CD open button (¼below) 9 Exhaust hole bk [POWER8] Standby/on it . Face (with the display open for prolonged periods of time to remove. To remove the CD, stop the playback, and then press the CD open button to prevent swallowing. To use a headphone A Headphone (not included) Plug type: 3.5 mm stereo mini plug...

Multi-media Audio System
Page 7
... to direct sunlight for a long period of time with thumbnails dk Displaying the photo setting menu dl Displaying the photo information One-touch playback If you close the cover. Open by pressing the lid edge. (A) 15 31 2. Remote control 1 16 TIMER SETUP 17 AUDIO INFO SOUND DIMMER 18 2 19 3 20 VOL 4 DEL MUTE 21 5 22 PROGRAM REPEAT PLAY MODE 6 23 7 iPod CD FM 24 8 RADIO OFF 25 PHOTO MEDIA AM CLOCK...
... to direct sunlight for a long period of time with thumbnails dk Displaying the photo setting menu dl Displaying the photo information One-touch playback If you close the cover. Open by pressing the lid edge. (A) 15 31 2. Remote control 1 16 TIMER SETUP 17 AUDIO INFO SOUND DIMMER 18 2 19 3 20 VOL 4 DEL MUTE 21 5 22 PROGRAM REPEAT PLAY MODE 6 23 7 iPod CD FM 24 8 RADIO OFF 25 PHOTO MEDIA AM CLOCK...

Multi-media Audio System
Page 8
... the antenna using a tape (A) at the least noisy position. 2. C Red D White E Black F Use a Phillips-head screwdriver, etc. G AC adaptor H AC power supply cord I H G 1. Do not use it clicks. When the Demo function (¼P18) is activated When connecting the AC power supply cord, the unit is automatically turned on the main unit for approx. 2 seconds while audio is adjusted, turn down the volume even in fluenced by pressing [DISPLAY MODE] on Start Demo...
... the antenna using a tape (A) at the least noisy position. 2. C Red D White E Black F Use a Phillips-head screwdriver, etc. G AC adaptor H AC power supply cord I H G 1. Do not use it clicks. When the Demo function (¼P18) is activated When connecting the AC power supply cord, the unit is automatically turned on the main unit for approx. 2 seconds while audio is adjusted, turn down the volume even in fluenced by pressing [DISPLAY MODE] on Start Demo...

Multi-media Audio System
Page 9
... also use the numbered buttons. Audio/photo screen Press [DISPLAY MODE] to select "Set Clock/Calendar Settings Clock" and press [OK]. Image Quality Settings Clock/Calendar Settings Demo Mode Remote Control Mode 4. Press [e, r, w, q] to select the screen and press [OK]. • To return to set. ¼ Only for the time setting appears If you press the button, the screen changes as well. Press [e, r] to select the screen. Press [CLOCK]. Select Design Set Clock Set Date Indication Set Clock Indication 4. Getting started Connecting antennas and power source / Setting...
... also use the numbered buttons. Audio/photo screen Press [DISPLAY MODE] to select "Set Clock/Calendar Settings Clock" and press [OK]. Image Quality Settings Clock/Calendar Settings Demo Mode Remote Control Mode 4. Press [e, r, w, q] to select the screen and press [OK]. • To return to set. ¼ Only for the time setting appears If you press the button, the screen changes as well. Press [e, r] to select the screen. Press [CLOCK]. Select Design Set Clock Set Date Indication Set Clock Indication 4. Getting started Connecting antennas and power source / Setting...

Multi-media Audio System
Page 11
... La Ventana Mi Pecado 2:20 D Pause Skip Fast backward/Fast forward (Search) Adjusting the volume Viewing audio information [iPod q/h] or [g] • Press [iPod q/h] to play . • When you press [w, q] on the screen that displays the selection tab ( , ), you can switch the list. Playback will not use it for the track/video to resume. Attach the Dock adaptor supplied with the iPod. • No warranty is connected.
... La Ventana Mi Pecado 2:20 D Pause Skip Fast backward/Fast forward (Search) Adjusting the volume Viewing audio information [iPod q/h] or [g] • Press [iPod q/h] to play . • When you press [w, q] on the screen that displays the selection tab ( , ), you can switch the list. Playback will not use it for the track/video to resume. Attach the Dock adaptor supplied with the iPod. • No warranty is connected.

Multi-media Audio System
Page 12
... is factory-set on the audio playback screen may become "OFF". • When a play mode is present in the station you press Songs ˆ Albums ˆ Off Press [REPEAT]. A FM 88.1 MHz Manual Stereo B Automatic tuning Stopping the radio sound Press and hold [u/t, y/i] until the frequency indicator starts to run. • Stops when the broadcast is received. • If jamming is switched, the track list display on...
... is factory-set on the audio playback screen may become "OFF". • When a play mode is present in the station you press Songs ˆ Albums ˆ Off Press [REPEAT]. A FM 88.1 MHz Manual Stereo B Automatic tuning Stopping the radio sound Press and hold [u/t, y/i] until the frequency indicator starts to run. • Stops when the broadcast is received. • If jamming is switched, the track list display on...
Multi-media Audio System
Page 13
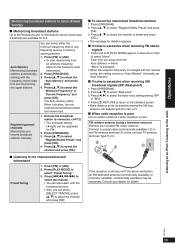
.... FM outdoor antenna (using a television antenna) Remove the included FM indoor antenna. Connect a coaxial cable (commercially available) (A) to the FM antenna terminal (B) of this . The Auto memory starts. Press [e, r] to the radio RQT9522 13 Listening to an iPod / Listening to select "Register/Delete Preset" and press [OK]. 4. Operations Memorizing broadcast stations to listen (Preset Tuning) „ Memorizing broadcast stations Up to 30 FM stations and 15 AM stations can be...
.... FM outdoor antenna (using a television antenna) Remove the included FM indoor antenna. Connect a coaxial cable (commercially available) (A) to the FM antenna terminal (B) of this . The Auto memory starts. Press [e, r] to the radio RQT9522 13 Listening to an iPod / Listening to select "Register/Delete Preset" and press [OK]. 4. Operations Memorizing broadcast stations to listen (Preset Tuning) „ Memorizing broadcast stations Up to 30 FM stations and 15 AM stations can be...

Multi-media Audio System
Page 14
... is also canceled by adjusting the volume or operating the power source. Press [e, r, w, q] to +4). The slideshow starts with underlines. Press [e, r] to view You can enjoy broader sounds. Equalizer You can set the order, effect and interval of slideshow. (¼P17) Note • Displaying photos may take several tens of seconds. When "Manual" is restored. Press [PHOTO MEDIA] to select "All Photos...
... is also canceled by adjusting the volume or operating the power source. Press [e, r, w, q] to +4). The slideshow starts with underlines. Press [e, r] to view You can enjoy broader sounds. Equalizer You can set the order, effect and interval of slideshow. (¼P17) Note • Displaying photos may take several tens of seconds. When "Manual" is restored. Press [PHOTO MEDIA] to select "All Photos...

Multi-media Audio System
Page 15
... units other than Panasonic products may be displayed with the single view. • The thumbnail screen can move across the screen using [e, r, w, q]. of capture, etc. Note • The slideshow is performed only within the selected category. • The "SD Favorite" is displayed, you press, the photo rotates anticlockwise by date. Press [SELECT PHOTOS]. 3. Operations Setting the sound quality/sound field...
... units other than Panasonic products may be displayed with the single view. • The thumbnail screen can move across the screen using [e, r, w, q]. of capture, etc. Note • The slideshow is performed only within the selected category. • The "SD Favorite" is displayed, you press, the photo rotates anticlockwise by date. Press [SELECT PHOTOS]. 3. Operations Setting the sound quality/sound field...

Multi-media Audio System
Page 18
... with underlines. Each time you format the internal memory or delete all photos (¼P17), the size of used area of bright and dark „ Adjust Brightness (Only when Dimmer is "Off") Brightness is turned off. Press [SETUP]. 2. Settings Menu Image Quality Settings Clock/Calendar Settings Demo Mode Remote Control Mode 3. Set Clock Indication: Select "12-hour System" or "24-hour System". Example: When setting the remote control mode to the factory defaults. 1. Press...
... with underlines. Each time you format the internal memory or delete all photos (¼P17), the size of used area of bright and dark „ Adjust Brightness (Only when Dimmer is "Off") Brightness is turned off. Press [SETUP]. 2. Settings Menu Image Quality Settings Clock/Calendar Settings Demo Mode Remote Control Mode 3. Set Clock Indication: Select "12-hour System" or "24-hour System". Example: When setting the remote control mode to the factory defaults. 1. Press...

Multi-media Audio System
Page 19
... "Timer 1 Settings" and press [OK]. 3. Playback Time 1 hour Update Source/Volume Confirm Source:CD Volume:25 The sound source and volume are disabled. • If "No" is selected, the original screen is restored with the overlapped time are displayed. • When you do not change , make the settings before the timer start time. • At the timer start time, the sound is faded in to the set volume and the audio is played back. (z blinks) Note • The timer operates at the set time...
... "Timer 1 Settings" and press [OK]. 3. Playback Time 1 hour Update Source/Volume Confirm Source:CD Volume:25 The sound source and volume are disabled. • If "No" is selected, the original screen is restored with the overlapped time are displayed. • When you do not change , make the settings before the timer start time. • At the timer start time, the sound is faded in to the set volume and the audio is played back. (z blinks) Note • The timer operates at the set time...

Multi-media Audio System
Page 20
...; Mac OS X Port • USB port • Turn the unit off beforehand. • Start up the computer beforehand. • You cannot operate this unit while connecting with the computer. • If the USB connection cable is removed, this unit is turned off. • Data exchange with iPod is displayed on this unit's internal memory, SD and computer. In this case, make sure the display part does not...
...; Mac OS X Port • USB port • Turn the unit off beforehand. • Start up the computer beforehand. • You cannot operate this unit while connecting with the computer. • If the USB connection cable is removed, this unit is turned off. • Data exchange with iPod is displayed on this unit's internal memory, SD and computer. In this case, make sure the display part does not...

Multi-media Audio System
Page 21
...;uorescent light near the unit. ˆ Turn each device off . Press [POWER8] of this unit. (¼P5) ˆ Confirm the iPod video settings. The display of the iPod video playback shows an unexpected one on the remote control, match the mode of the remote control to become hot if used for use . Troubleshooting guide Using with your iPod version. „ Radio FM and AM broadcasts cannot be the AC power supply cord...
...;uorescent light near the unit. ˆ Turn each device off . Press [POWER8] of this unit. (¼P5) ˆ Confirm the iPod video settings. The display of the iPod video playback shows an unexpected one on the remote control, match the mode of the remote control to become hot if used for use . Troubleshooting guide Using with your iPod version. „ Radio FM and AM broadcasts cannot be the AC power supply cord...

Multi-media Audio System
Page 22
... bring the entire system. When parts need replacing ensure the servicer uses parts specified by qualified service personnel if: (a)The AC Adaptor, AC power supply cord or the plug has been damaged; thumbnail screen. The date displayed using the Date A date when a file was a photo file error. etc. This CD cannot be played on this screen. After repairs or service, ask the servicer to perform...
... bring the entire system. When parts need replacing ensure the servicer uses parts specified by qualified service personnel if: (a)The AC Adaptor, AC power supply cord or the plug has been damaged; thumbnail screen. The date displayed using the Date A date when a file was a photo file error. etc. This CD cannot be played on this screen. After repairs or service, ask the servicer to perform...

Multi-media Audio System
Page 23
... TTY users, TTY: 1-866-605-1277 As of media or images, data or other business), rental use (such as in your product during or after the warranty period, you . The items listed are not exclusive, but are not warranted. Product or Part Name Parts Labor Audio Products (except items listed below , which result from the servicer, loss of October 2008 Reference Troubleshooting guide / Error message / Product Service...
... TTY users, TTY: 1-866-605-1277 As of media or images, data or other business), rental use (such as in your product during or after the warranty period, you . The items listed are not exclusive, but are not warranted. Product or Part Name Parts Labor Audio Products (except items listed below , which result from the servicer, loss of October 2008 Reference Troubleshooting guide / Error message / Product Service...

Multi-media Audio System
Page 24
... RMS Output Power Stereo mode FTC Output Power Stereo mode Input and Output terminal Both ch driven 5 W Per channel 6 Ω, 1 kHz, 10 % THD Total RMS Stereo mode power: 10 W Both ch driven 5 W Per channel 6 Ω, 90 Hz - 20 kHz, 10% THD Total FTC Stereo mode power: 10 W Headphone: stereo mini plug (3.5 mm) Used Headphone impedance: 16 to 64 Ω iPod: iPod special terminal USB: USB 2.0 High speed „ FM TUNER SECTION Preset Memory Frequency range Sensitivity Antenna terminal 30 stations...
... RMS Output Power Stereo mode FTC Output Power Stereo mode Input and Output terminal Both ch driven 5 W Per channel 6 Ω, 1 kHz, 10 % THD Total RMS Stereo mode power: 10 W Both ch driven 5 W Per channel 6 Ω, 90 Hz - 20 kHz, 10% THD Total FTC Stereo mode power: 10 W Headphone: stereo mini plug (3.5 mm) Used Headphone impedance: 16 to 64 Ω iPod: iPod special terminal USB: USB 2.0 High speed „ FM TUNER SECTION Preset Memory Frequency range Sensitivity Antenna terminal 30 stations...


