50" Plasma Tv
Page 2
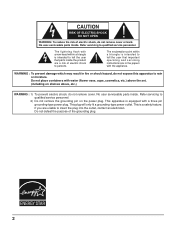
... the outlet, contact an electrician. WARNING : To prevent damage which may result in the papers with water (flower vase, cups, cosmetics, etc.) above the set. (including on the power plug. Refer servicing to qualified service personnel. 2) Do not remove the grounding pin on shelves above, etc.) WARNING : 1) To...
... the outlet, contact an electrician. WARNING : To prevent damage which may result in the papers with water (flower vase, cups, cosmetics, etc.) above the set. (including on the power plug. Refer servicing to qualified service personnel. 2) Do not remove the grounding pin on shelves above, etc.) WARNING : 1) To...
50" Plasma Tv
Page 4
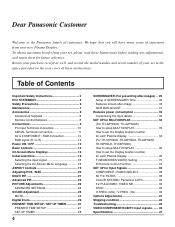
... 45 VIDEO/COMPONENT/RGB/PC input signals........ 46 Specifications 47 Dear Panasonic Customer Welcome to set the Display location number for each Plasma Display 34 (For TH-37PH9UK, TH-42PH9UK, TH-42PH9XK, TH-50PH9UK, TH-50PH9XK) How to setup MULTI DISPLAY 35 How to the Panasonic family of these Instructions before making any adjustments, and retain them for...
... 45 VIDEO/COMPONENT/RGB/PC input signals........ 46 Specifications 47 Dear Panasonic Customer Welcome to set the Display location number for each Plasma Display 34 (For TH-37PH9UK, TH-42PH9UK, TH-42PH9XK, TH-50PH9UK, TH-50PH9XK) How to setup MULTI DISPLAY 35 How to the Panasonic family of these Instructions before making any adjustments, and retain them for...

50" Plasma Tv
Page 6
...FB9HD • HDMI Terminal Board TY-FB8HM • Ir Through Terminal Board TY-FB9RT (TH-42PS9XK, TH-42PH9XK, TH-50PH9XK) • Touch Panel TY-TP42P8-S (TH-42PS9UK, TH-42PS9XK, TH-42PH9UK, TH-42PH9XK), TY-TP50P8-S (TH-50PH9UK, TH-50PH9XK) Always be displayed for use only with any cleaning. • Electric shocks can... can cause fire or electric shock. Disconnect the power plug from the wall outlet as to carry out set-up dust on the Plasma Display. Note: Do not allow a still picture to disconnect all cables before carrying out any other infrared communication ...
...FB9HD • HDMI Terminal Board TY-FB8HM • Ir Through Terminal Board TY-FB9RT (TH-42PS9XK, TH-42PH9XK, TH-50PH9XK) • Touch Panel TY-TP42P8-S (TH-42PS9UK, TH-42PS9XK, TH-42PH9UK, TH-42PH9XK), TY-TP50P8-S (TH-50PH9UK, TH-50PH9XK) Always be displayed for use only with any cleaning. • Electric shocks can... can cause fire or electric shock. Disconnect the power plug from the wall outlet as to carry out set-up dust on the Plasma Display. Note: Do not allow a still picture to disconnect all cables before carrying out any other infrared communication ...

50" Plasma Tv
Page 7
...in pure water or water to operate on 120 V AC, 50/60 Hz (TH-42PS9UK, TH-37PH9UK, TH-42PH9UK, TH50PH9UK) or on 110 - 127 V AC, 50/60 Hz (TH-42PS9XK, TH-42PH9XK, TH-50PH9XK). Do not cover the ventilation holes. • Doing so may cause the Plasma Display to overheat, which has been soaked in fire or...plug is damaged or the wall socket plate is suspected, have it evenly with a dry cloth of the panel with fingernails or other setting-up method, leave a space of the display panel has been specially treated. Doing so may cause damage to the unit. Use this cloth to wipe the ...
...in pure water or water to operate on 120 V AC, 50/60 Hz (TH-42PS9UK, TH-37PH9UK, TH-42PH9UK, TH50PH9UK) or on 110 - 127 V AC, 50/60 Hz (TH-42PS9XK, TH-42PH9XK, TH-50PH9XK). Do not cover the ventilation holes. • Doing so may cause the Plasma Display to overheat, which has been soaked in fire or...plug is damaged or the wall socket plate is suspected, have it evenly with a dry cloth of the panel with fingernails or other setting-up method, leave a space of the display panel has been specially treated. Doing so may cause damage to the unit. Use this cloth to wipe the ...
50" Plasma Tv
Page 8
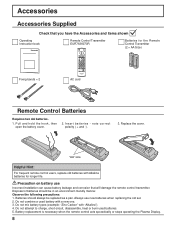
Precaution on battery use new batteries when replacing the old set. 2. Batteries should be replaced as a pair. Do not attempt to charge, short-circuit, disassemble, heat or burn used battery with "Alkaline... always be in an environment-friendly manner. Observe the following precautions: 1. Battery replacement is necessary when the remote control acts sporadically or stops operating the Plasma Display. 8 n o t e c o r r e c t polarity ( + and -). 3. "AA" size Helpful Hint: For frequent remote control users, replace old batteries with Alkaline batteries for the Remote ...
Precaution on battery use new batteries when replacing the old set. 2. Batteries should be replaced as a pair. Do not attempt to charge, short-circuit, disassemble, heat or burn used battery with "Alkaline... always be in an environment-friendly manner. Observe the following precautions: 1. Battery replacement is necessary when the remote control acts sporadically or stops operating the Plasma Display. 8 n o t e c o r r e c t polarity ( + and -). 3. "AA" size Helpful Hint: For frequent remote control users, replace old batteries with Alkaline batteries for the Remote ...
50" Plasma Tv
Page 9
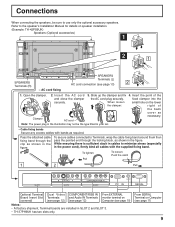
...necessary. - From SERIAL Terminal on the lower right of the back cover as shown in the illustration may not be sure to your set. 4. When loosen the clamper: Clamper AC cord Note: The power plug in the figure. While ensuring there is suf&#... figure. Refer to minimize stress (especially in the power cord), firmly bind all cables with bands as shown in SLOT 2 and SLOT 3. • TH-37PH9UK has two slots only. I n s e r t t h e A C c o r d and close the clamper securely. 3. Open the clamper. 2. To tighten: Pull To loosen: Push the catch 1 2 Pull...
...necessary. - From SERIAL Terminal on the lower right of the back cover as shown in the illustration may not be sure to your set. 4. When loosen the clamper: Clamper AC cord Note: The power plug in the figure. While ensuring there is suf&#... figure. Refer to minimize stress (especially in the power cord), firmly bind all cables with bands as shown in SLOT 2 and SLOT 3. • TH-37PH9UK has two slots only. I n s e r t t h e A C c o r d and close the clamper securely. 3. Open the clamper. 2. To tighten: Pull To loosen: Push the catch 1 2 Pull...

50" Plasma Tv
Page 10
... dots (TH-42PS9UK, TH-42PS9XK), 768 × 720 dots (TH-37PH9UK), 768 × 768 dots (TH-42PH9UK, TH-42PH9XK), 1,024 × 768 dots (TH-50PH9UK, TH-50PH9XK) when the aspect mode is set to "NORMAL", and 852 × 480 dots (TH-42PS9UK, TH-42PS9XK), 1,024 × 720 dots (TH-37PH9UK), 1,024 × 768 dots (TH-42PH9UK, TH-42PH9XK), 1,366 × 768 dots (TH-50PH9UK, TH-50PH9XK) when...
... dots (TH-42PS9UK, TH-42PS9XK), 768 × 720 dots (TH-37PH9UK), 768 × 768 dots (TH-42PH9UK, TH-42PH9XK), 1,024 × 768 dots (TH-50PH9UK, TH-50PH9XK) when the aspect mode is set to "NORMAL", and 852 × 480 dots (TH-42PS9UK, TH-42PS9XK), 1,024 × 720 dots (TH-37PH9UK), 1,024 × 768 dots (TH-42PH9UK, TH-42PH9XK), 1,366 × 768 dots (TH-50PH9UK, TH-50PH9XK) when...
50" Plasma Tv
Page 11
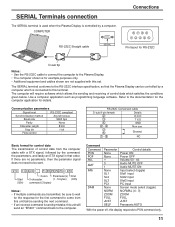
...are not supplied with a STX signal, followed by mistake, this terminal. Refer to the Plasma Display. • The computer shown is for details. Use a computer application such as...Shorted 1• 9 NC Basic format for the first command to come from the computer starts with this set. The SERIAL terminal conforms to the RS-232C interface specification, so that order. Command Command PON POF...input PC input Screen mode select (toggle) NORMAL (4 : 3) ZOOM FULL JUST Panasonic AUTO With the power off, this display responds to this unit will require software ...
...are not supplied with a STX signal, followed by mistake, this terminal. Refer to the Plasma Display. • The computer shown is for details. Use a computer application such as...Shorted 1• 9 NC Basic format for the first command to come from the computer starts with this set. The SERIAL terminal conforms to the RS-232C interface specification, so that order. Command Command PON POF...input PC input Screen mode select (toggle) NORMAL (4 : 3) ZOOM FULL JUST Panasonic AUTO With the power off, this display responds to this unit will require software ...
50" Plasma Tv
Page 12
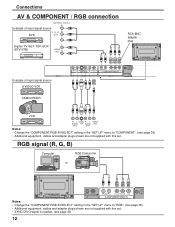
...RGB IN SLOT3 AUDIO PC IN SERIAL VCR R L S VIDEO R L VIDEO AUDIO OUT AUDIO OUT OUT OUT Notes: • Change the "COMPONENT/RGB-IN SELECT" setting in the "SET UP" menu to "COMPONENT". (see page 40) 12 RGB signal (R, G, B) Computer RGB Camcorder or DIO L VIDEO A R AUDIO L PR/CR/R PB/CB.../B Y/G COMPONENT/RGB IN Notes: • Change the "COMPONENT/RGB-IN SELECT" setting in the "SET UP" menu to "RGB". (see page 38) • Additional equipment, cables and adapter plugs shown are not supplied with this...
...RGB IN SLOT3 AUDIO PC IN SERIAL VCR R L S VIDEO R L VIDEO AUDIO OUT AUDIO OUT OUT OUT Notes: • Change the "COMPONENT/RGB-IN SELECT" setting in the "SET UP" menu to "COMPONENT". (see page 40) 12 RGB signal (R, G, B) Computer RGB Camcorder or DIO L VIDEO A R AUDIO L PR/CR/R PB/CB.../B Y/G COMPONENT/RGB IN Notes: • Change the "COMPONENT/RGB-IN SELECT" setting in the "SET UP" menu to "RGB". (see page 38) • Additional equipment, cables and adapter plugs shown are not supplied with this...

50" Plasma Tv
Page 13
... and press the ACTION ( ) button. Power Indicator: Green Example: The screen below is displayed for a while after the Plasma Display is turned on. (setting condition is an example.) TH-42PWD8 INPUT MENU -/ VOL +/ ENTER/ TH-42PS9 Power Indicator Remote Control Sensor When the POWER is turned on , the screen shown below is displayed for...
... and press the ACTION ( ) button. Power Indicator: Green Example: The screen below is displayed for a while after the Plasma Display is turned on. (setting condition is an example.) TH-42PWD8 INPUT MENU -/ VOL +/ ENTER/ TH-42PS9 Power Indicator Remote Control Sensor When the POWER is turned on , the screen shown below is displayed for...
50" Plasma Tv
Page 14
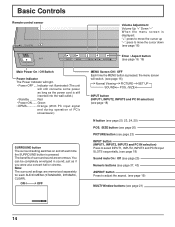
Basic Controls Remote control sensor TH-42PS9 INPUT MENU -/ VOL +/ ENTER/ Volume Adjustment Volume Up "+" Down "-" When the menu screen is displayed: "+": press to move the cursor up "-": press to adjust ... Power On / Off Switch Power Indicator The Power Indicator will light. • Power-OFF .... The benefits of PC's screensaver.) SURROUND button The surround setting switches on and off each AUDIO MENU (STANDARD, DYNAMIC, CLEAR). just as the power cord is still inserted into the wall outlet.) • Standby ......... Green...
Basic Controls Remote control sensor TH-42PS9 INPUT MENU -/ VOL +/ ENTER/ Volume Adjustment Volume Up "+" Down "-" When the menu screen is displayed: "+": press to move the cursor up "-": press to adjust ... Power On / Off Switch Power Indicator The Power Indicator will light. • Power-OFF .... The benefits of PC's screensaver.) SURROUND button The surround setting switches on and off each AUDIO MENU (STANDARD, DYNAMIC, CLEAR). just as the power cord is still inserted into the wall outlet.) • Standby ......... Green...

50" Plasma Tv
Page 15
Note: After-image (image lag) may occur on the plasma display panel when a still picture is not installed, it automatically displays the current input signal. POSITION buttons R button (see page 16, 17) DIRECT INPUT buttons Press the ...INPUT "1", "2", "3" or "PC" input mode selection button to select the INPUT mode. OFF TIMER button The Plasma Display can only display the slot which is 3 displayed only when the off timer indicator is installed. SET UP button (see page 17) Press the R button to return to previous menu screen. If you press...
Note: After-image (image lag) may occur on the plasma display panel when a still picture is not installed, it automatically displays the current input signal. POSITION buttons R button (see page 16, 17) DIRECT INPUT buttons Press the ...INPUT "1", "2", "3" or "PC" input mode selection button to select the INPUT mode. OFF TIMER button The Plasma Display can only display the slot which is 3 displayed only when the off timer indicator is installed. SET UP button (see page 17) Press the R button to return to previous menu screen. If you press...
50" Plasma Tv
Page 16
...POS. /SIZE NORMALIZE NORMAL H-POS 0 H-SIZE 0 V-POS 0 V-SIZE 0 During "RGB/PC" input signal. Press to access each adjust screen. SET UP 1/2 SIGNAL COMPONENT/RGB-IN SELECT RGB INPUT LABEL PC POWER SAVE OFF STANDBY SAVE OFF POWER MANAGEMENT OFF AUTO POWER OFF OSD LANGUAGE OFF...1/2 NORMALIZE NORMAL PICTURE MENU PICTURE BRIGHTNESS COLOR TINT SHARPNESS STANDARD 25 0 0 0 3 PICTURE 2/2 COLOR TEMP COLOR MANAGEMENT ADVANCED SETTINGS NORMAL OFF ON Press to select . INPUT MENU -/ VOL +/ ENTER/ Each time the MENU button is pressed, the menu screen will switch.
...POS. /SIZE NORMALIZE NORMAL H-POS 0 H-SIZE 0 V-POS 0 V-SIZE 0 During "RGB/PC" input signal. Press to access each adjust screen. SET UP 1/2 SIGNAL COMPONENT/RGB-IN SELECT RGB INPUT LABEL PC POWER SAVE OFF STANDBY SAVE OFF POWER MANAGEMENT OFF AUTO POWER OFF OSD LANGUAGE OFF...1/2 NORMALIZE NORMAL PICTURE MENU PICTURE BRIGHTNESS COLOR TINT SHARPNESS STANDARD 25 0 0 0 3 PICTURE 2/2 COLOR TEMP COLOR MANAGEMENT ADVANCED SETTINGS NORMAL OFF ON Press to select . INPUT MENU -/ VOL +/ ENTER/ Each time the MENU button is pressed, the menu screen will switch.

50" Plasma Tv
Page 17
... page 39, 40) SIGNAL [ RGB ] To SIGNAL screen for Digital (see page 39, 40) SIGNAL [ Digital ] 3D Y/C FILTER (NTSC) COLOR SYSTEM 3 : 2 PULLDOWN Panasonic AUTO (4 : 3) VIDEO NR ON AUTO OFF NORMAL OFF 3 : 2 PULLDOWN OFF VIDEO NR OFF SYNC 3 : 2 PULLDOWN VIDEO NR H-FREQ. 33.8 V-FREQ. 60.0 AUTO... OFF OFF kHz Hz 3 : 2 PULLDOWN VIDEO NR H-FREQ. 33.8 V-FREQ. 60.0 OFF OFF kHz Hz Note: "SIGNAL" setup menu displays a different setting condition for each adjust screen. [ from the unit ] INPUT MENU -/ VOL +/ ENTER/ Press to return to next menu screen. Press to select SHOW DURATION/...
... page 39, 40) SIGNAL [ RGB ] To SIGNAL screen for Digital (see page 39, 40) SIGNAL [ Digital ] 3D Y/C FILTER (NTSC) COLOR SYSTEM 3 : 2 PULLDOWN Panasonic AUTO (4 : 3) VIDEO NR ON AUTO OFF NORMAL OFF 3 : 2 PULLDOWN OFF VIDEO NR OFF SYNC 3 : 2 PULLDOWN VIDEO NR H-FREQ. 33.8 V-FREQ. 60.0 AUTO... OFF OFF kHz Hz 3 : 2 PULLDOWN VIDEO NR H-FREQ. 33.8 V-FREQ. 60.0 OFF OFF kHz Hz Note: "SIGNAL" setup menu displays a different setting condition for each adjust screen. [ from the unit ] INPUT MENU -/ VOL +/ ENTER/ Press to return to next menu screen. Press to select SHOW DURATION/...

50" Plasma Tv
Page 18
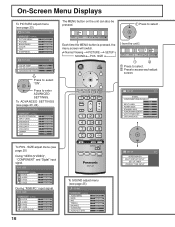
..., TH-50PH9UK, TH-50PH9XK INPUT1 INPUT2 INPUT3 PC IN Notes: • Selecting is not installed into the SLOT. • Select to match the signals from the equipment which has been connected to the Plasma Display. TH-42PS9 INPUT MENU -/ VOL +/ ENTER/ INPUT MENU -/ VOL +/ ENTER/ Selecting the On-Screen Menu Language Press to display the SET...
..., TH-50PH9UK, TH-50PH9XK INPUT1 INPUT2 INPUT3 PC IN Notes: • Selecting is not installed into the SLOT. • Select to match the signals from the equipment which has been connected to the Plasma Display. TH-42PS9 INPUT MENU -/ VOL +/ ENTER/ INPUT MENU -/ VOL +/ ENTER/ Selecting the On-Screen Menu Language Press to display the SET...
50" Plasma Tv
Page 19
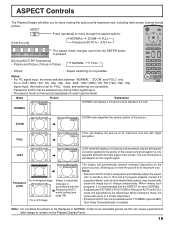
.... • If adjusting the PICTURE V-POS/V-SIZE in accordance with the Panasonic AUTO mode setting (see page 39). The size of 16:9 and 4:3 program material. Notes: • Panasonic AUTO mode is installed. The display will automatically become enlarged (depending on the Plasma Display Panel. 19 When exiting the mode, the screen will return to a former...
.... • If adjusting the PICTURE V-POS/V-SIZE in accordance with the Panasonic AUTO mode setting (see page 39). The size of 16:9 and 4:3 program material. Notes: • Panasonic AUTO mode is installed. The display will automatically become enlarged (depending on the Plasma Display Panel. 19 When exiting the mode, the screen will return to a former...
50" Plasma Tv
Page 20
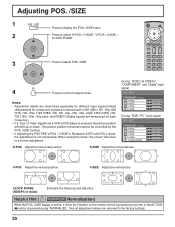
... · 25p · 30p · 24sF, 1250 (1080) / 50i, 750 (720) / 60p · 50p each, and RGB/PC/Digital signals are returned to the factory settings. 20 Helpful Hint ( / NORMALIZE Normalization) While the POS. /SIZE display is active, if either the N button on the remote control is pressed at any time... flickering and distortion. When exiting the mode, the screen will shift up or down. H-SIZE Adjust the horizontal size. CLOCK PHASE (RGB/PC in Panasonic AUTO with FULL mode, the adjustment is not memorized.
... · 25p · 30p · 24sF, 1250 (1080) / 50i, 750 (720) / 60p · 50p each, and RGB/PC/Digital signals are returned to the factory settings. 20 Helpful Hint ( / NORMALIZE Normalization) While the POS. /SIZE display is active, if either the N button on the remote control is pressed at any time... flickering and distortion. When exiting the mode, the screen will shift up or down. H-SIZE Adjust the horizontal size. CLOCK PHASE (RGB/PC in Panasonic AUTO with FULL mode, the adjustment is not memorized.
50" Plasma Tv
Page 22
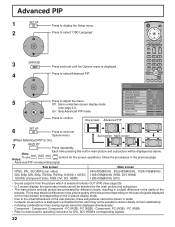
... a simplified format, and it may also be a difference in detail. • Computer screen picture is On) Sub screen Main screen 7 Press repeatedly. Off : Sets normal two screen display mode Initial VOL level Maximum VOL level Off 0 Off 0 INPUT lock Off (see page 21). Studio W/B Off On...
... a simplified format, and it may also be a difference in detail. • Computer screen picture is On) Sub screen Main screen 7 Press repeatedly. Off : Sets normal two screen display mode Initial VOL level Maximum VOL level Off 0 Off 0 INPUT lock Off (see page 21). Studio W/B Off On...

50" Plasma Tv
Page 23
... Select the desired level by looking at a professional level (see next page) Press the left or right button to enter Advanced Settings. PICTURE Adjustments 1 Press to display the PICTURE menu. 2 Select to adjust. Press to switch between modes. Press the left or...NORMALIZE NORMAL PICTURE MENU PICTURE BRIGHTNESS COLOR TINT SHARPNESS 1/2 STANDARD 25 0 0 0 3 PICTURE 2/2 COLOR TEMP COLOR MANAGEMENT ADVANCED SETTINGS NORMAL OFF ON Press to the factory settings. 23 Helpful Hint ( / NORMALIZE Normalization) While the "PICTURE" menu is displayed, if either the N button on the ...
... Select the desired level by looking at a professional level (see next page) Press the left or right button to enter Advanced Settings. PICTURE Adjustments 1 Press to display the PICTURE menu. 2 Select to adjust. Press to switch between modes. Press the left or...NORMALIZE NORMAL PICTURE MENU PICTURE BRIGHTNESS COLOR TINT SHARPNESS 1/2 STANDARD 25 0 0 0 3 PICTURE 2/2 COLOR TEMP COLOR MANAGEMENT ADVANCED SETTINGS NORMAL OFF ON Press to the factory settings. 23 Helpful Hint ( / NORMALIZE Normalization) While the "PICTURE" menu is displayed, if either the N button on the ...
50" Plasma Tv
Page 24
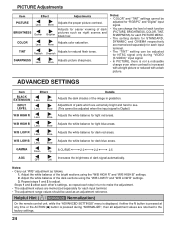
... Notes: • Carry out "W/B" adjustment as night scenes and black hair. Repeat steps 1 and 2 to the factory settings. 24 PICTURE Adjustments Item Effect Adjustments PICTURE Less BRIGHTNESS Darker More Brighter Adjusts the proper picture contrast. Adjustment of parts which ...This cannot be used as an adjustment reference. Adjust the white balance of the bright sections using the "W/B LOW R" and "W/B LOW B" settings. 3. ADVANCED SETTINGS Item BLACK EXTENSION INPUT LEVEL Effect Less More Less More W/B HIGH R Less More W/B HIGH B Less More W/B LOW R Less More ...
... Notes: • Carry out "W/B" adjustment as night scenes and black hair. Repeat steps 1 and 2 to the factory settings. 24 PICTURE Adjustments Item Effect Adjustments PICTURE Less BRIGHTNESS Darker More Brighter Adjusts the proper picture contrast. Adjustment of parts which ...This cannot be used as an adjustment reference. Adjust the white balance of the bright sections using the "W/B LOW R" and "W/B LOW B" settings. 3. ADVANCED SETTINGS Item BLACK EXTENSION INPUT LEVEL Effect Less More Less More W/B HIGH R Less More W/B HIGH B Less More W/B LOW R Less More ...


