
Operating Instructions
Page 2
... equipment with HDMI connection (p. 96) Enjoy high definition digital picture and high quality sound by using an HDMI cable. • This TV supports HDMI (Version 1.4 with Audio Return Channel), Deep Colour, x.v.Colour™. Display special feature icons for the network connection. (p. ...Digital Switchover for more convenient to receive Freeview channels via their aerial. (Your Analogue channel for visually-impaired viewers. SDXC Card This TV supports SDXC Card. VIERA TOOLS - You can enjoy watching photos and videos stored in the case of analogue channels. 2 Analogue...
... equipment with HDMI connection (p. 96) Enjoy high definition digital picture and high quality sound by using an HDMI cable. • This TV supports HDMI (Version 1.4 with Audio Return Channel), Deep Colour, x.v.Colour™. Display special feature icons for the network connection. (p. ...Digital Switchover for more convenient to receive Freeview channels via their aerial. (Your Analogue channel for visually-impaired viewers. SDXC Card This TV supports SDXC Card. VIERA TOOLS - You can enjoy watching photos and videos stored in the case of analogue channels. 2 Analogue...

Operating Instructions
Page 3
... Read Safety Precautions 4 Quick Start Guide Accessories / Options 6 Identifying Controls 8 Basic Connection 10 Auto Setup 12 Enjoy your TV! http://panasonic.jp/support/global/cs/tv/ FAQs, etc. Transport only in upright position The recording and playback of content on this or any other device complies with...AVC Video that content. Panasonic has no authority to and does not grant you wish to Use Menu Functions 30 Advanced Features Retuning from MPEG LA, LLC. See http://www.mpegla.com. Basic Features Using "VIERA Connect 16 Watching TV 17 Using TV Guide 21 Viewing Teletext ...
... Read Safety Precautions 4 Quick Start Guide Accessories / Options 6 Identifying Controls 8 Basic Connection 10 Auto Setup 12 Enjoy your TV! http://panasonic.jp/support/global/cs/tv/ FAQs, etc. Transport only in upright position The recording and playback of content on this or any other device complies with...AVC Video that content. Panasonic has no authority to and does not grant you wish to Use Menu Functions 30 Advanced Features Retuning from MPEG LA, LLC. See http://www.mpegla.com. Basic Features Using "VIERA Connect 16 Watching TV 17 Using TV Guide 21 Viewing Teletext ...

Operating Instructions
Page 4
... on the lead. Hold onto the mains plug body when disconnecting the plug. • Do not move the TV with the letter E or the earth symbol . A 5 amp fuse is unsuitable for the socket outlet in the...and that it . • Do not use a damaged mains plug or socket outlet. • Ensure the TV does not crush the mains lead. Blue: Neutral Brown: Live As the colours of the wire in this mains...Do not place the lead near a high temperature object. • Do not pull on the lead. This TV is coloured BROWN must not be connected to replace the fuse For plug type shown in any 13 amp socket...
... on the lead. Hold onto the mains plug body when disconnecting the plug. • Do not move the TV with the letter E or the earth symbol . A 5 amp fuse is unsuitable for the socket outlet in the...and that it . • Do not use a damaged mains plug or socket outlet. • Ensure the TV does not crush the mains lead. Blue: Neutral Brown: Live As the colours of the wire in this mains...Do not place the lead near a high temperature object. • Do not pull on the lead. This TV is coloured BROWN must not be connected to replace the fuse For plug type shown in any 13 amp socket...

Operating Instructions
Page 5
...the mains plug is still connected to a live parts are accessible when they are no user serviceable parts inside. • Do not expose the TV to direct sunlight and other open flames away from the headphones. Safety Precautions Warning ■ Take care To help prevent excessive heat, which Minimum...pedestal or not, always ensure the vents in the bottom of the (cm) TV are not blocked and there is not in use for a prolonged period of time. ■ Excessive volume Do not expose your local Panasonic dealer to perform the setup or installation of approved wall-hanging brackets. •...
...the mains plug is still connected to a live parts are accessible when they are no user serviceable parts inside. • Do not expose the TV to direct sunlight and other open flames away from the headphones. Safety Precautions Warning ■ Take care To help prevent excessive heat, which Minimum...pedestal or not, always ensure the vents in the bottom of the (cm) TV are not blocked and there is not in use for a prolonged period of time. ■ Excessive volume Do not expose your local Panasonic dealer to perform the setup or installation of approved wall-hanging brackets. •...

Operating Instructions
Page 6
.... • Additional information for Wireless LAN Adaptor and access point may be on the following website. (English only) http://panasonic.jp/support/global/cs/tv/ Communication Camera • TY-CC10W Caution • This camera can be grounded by yourself has the risk of wall-hanging... accessories. Any damage caused by radio wave interference, keep the TV away from its fixed wall position when it to use for this optional accessory may not be available. Optional accessories Please contact your local Panasonic dealer. Doing so may warp or damage plastic cabinet parts....
.... • Additional information for Wireless LAN Adaptor and access point may be on the following website. (English only) http://panasonic.jp/support/global/cs/tv/ Communication Camera • TY-CC10W Caution • This camera can be grounded by yourself has the risk of wall-hanging... accessories. Any damage caused by radio wave interference, keep the TV away from its fixed wall position when it to use for this optional accessory may not be available. Optional accessories Please contact your local Panasonic dealer. Doing so may warp or damage plastic cabinet parts....

Operating Instructions
Page 7
... impact during installation of the pedestal. • Ensure that the screws are replaced correctly, there is danger of damage or injury by the TV tipping or falling, please follow the warnings and cautions below: Warning • Do not disassemble or modify the pedestal. A Assembly screw (4)...old and new batteries. • Replace only with this occurs, contact your nearest Panasonic dealer immediately. • During setup, make sure that all screws are securely tightened. • Ensure that the TV does not suffer any pedestal other than the one provided with same or equivalent type...
... impact during installation of the pedestal. • Ensure that the screws are replaced correctly, there is danger of damage or injury by the TV tipping or falling, please follow the warnings and cautions below: Warning • Do not disassemble or modify the pedestal. A Assembly screw (4)...old and new batteries. • Replace only with this occurs, contact your nearest Panasonic dealer immediately. • During setup, make sure that all screws are securely tightened. • Ensure that the TV does not suffer any pedestal other than the one provided with same or equivalent type...

Operating Instructions
Page 8
... 11 24 abc def 12 ghi jkl mno pqrs tuv wxyz 13 25 LAST VIEW 14 26 REC PROGRAMME 27 DVD/VCR TV TV •1 Standby On / Off switch Switches TV On or Off standby •2 [Media Player] (p. 58) Switches to SD Card and USB device viewing / listening mode •3 [Main Menu]...VIERA Link connection • 17 [VIERA Connect] (p. 16, 80) Displays VIERA Connect home screen • 18 Exit Returns to the normal viewing screen 19 TV Guide (p. 21) • 20 Cursor buttons Makes selections and adjustments • 21 Return Returns to previously viewed channel or input mode 26 Channel Up / ...
... 11 24 abc def 12 ghi jkl mno pqrs tuv wxyz 13 25 LAST VIEW 14 26 REC PROGRAMME 27 DVD/VCR TV TV •1 Standby On / Off switch Switches TV On or Off standby •2 [Media Player] (p. 58) Switches to SD Card and USB device viewing / listening mode •3 [Main Menu]...VIERA Link connection • 17 [VIERA Connect] (p. 16, 80) Displays VIERA Connect home screen • 18 Exit Returns to the normal viewing screen 19 TV Guide (p. 21) • 20 Cursor buttons Makes selections and adjustments • 21 Return Returns to previously viewed channel or input mode 26 Channel Up / ...

Operating Instructions
Page 9
...flash : Standby with Mains power On / Off switch. • 11 Remote control signal receiver Do not place any objects between the TV remote control signal receiver and remote control. 12 C.A.T.S. (Contrast Automatic Tracking System) •sensor Senses brightness to adjust picture quality when ...8226; 13 Power and Timer LED Red : Standby Green : On Orange : Timer Programming On Orange (flash) : Recording of Timer Programming, Direct TV Recording or One Touch Recording in [Auto Standby] (p. 34) This function does not affect the recording of options Operation guide BACK/ RETURN Access ...
...flash : Standby with Mains power On / Off switch. • 11 Remote control signal receiver Do not place any objects between the TV remote control signal receiver and remote control. 12 C.A.T.S. (Contrast Automatic Tracking System) •sensor Senses brightness to adjust picture quality when ...8226; 13 Power and Timer LED Red : Standby Green : On Orange : Timer Programming On Orange (flash) : Recording of Timer Programming, Direct TV Recording or One Touch Recording in [Auto Standby] (p. 34) This function does not affect the recording of options Operation guide BACK/ RETURN Access ...
Operating Instructions
Page 10
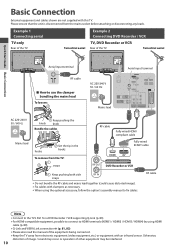
...the knob Bundle the cables RF cable Fully wired HDMI compliant cable Mains lead hooks Set the tip in the hooks To remove from the TV: Fully wired SCART cable HDMI AV snaps RF OUT DVD Recorder or VCR Keep pushing both side RF IN snaps • Do not bundle... connection (p. 81, 82) • Please also read the manual of other equipment may occur or operation of the equipment being connected. • Keep the TV away from the mains socket before attaching or disconnecting any leads. Otherwise, distortion of image / sound may be interfered. 10 Quick Start Guide Basic Connection...
...the knob Bundle the cables RF cable Fully wired HDMI compliant cable Mains lead hooks Set the tip in the hooks To remove from the TV: Fully wired SCART cable HDMI AV snaps RF OUT DVD Recorder or VCR Keep pushing both side RF IN snaps • Do not bundle... connection (p. 81, 82) • Please also read the manual of other equipment may occur or operation of the equipment being connected. • Keep the TV away from the mains socket before attaching or disconnecting any leads. Otherwise, distortion of image / sound may be interfered. 10 Quick Start Guide Basic Connection...
Operating Instructions
Page 11
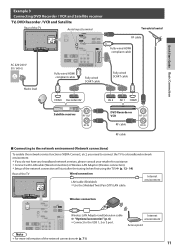
...Wired connection) or Wireless LAN Adaptor (Wireless connection). • Setup of the network connection will start after the tuning (when first using the TV) (p. 12 - 14) Rear of the network connections (p. 71) 11 Internet environment Access point Note • For more information of the... TV Wired connection •LAN cable (Shielded) Use the Shielded Twist Pair (STP) LAN cable. Internet environment Wireless connection Wireless LAN Adaptor and Extension ...
...Wired connection) or Wireless LAN Adaptor (Wireless connection). • Setup of the network connection will start after the tuning (when first using the TV) (p. 12 - 14) Rear of the network connections (p. 71) 11 Internet environment Access point Note • For more information of the... TV Wired connection •LAN cable (Shielded) Use the Shielded Twist Pair (STP) LAN cable. Internet environment Wireless connection Wireless LAN Adaptor and Extension ...
Operating Instructions
Page 12
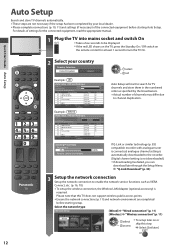
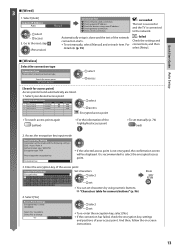
... Channel Name 62 CBBC Channel 62 BBC Radio Wales 62 E4 62 Cartoon Nwk 29 33 BBC1 Free TV: 8 Pay TV: 0 Radio: 0 Searching 69 99 H: 21 41 Type Free TV Free TV Free TV Free TV Analogue Analogue Quality 10 10 10 10 Analogue: 2 Sending Preset Data Please wait! 0% Remote control ... starting setup. CH Channel Name 62 CBBC Channel 62 BBC Radio Wales 62 E4 62 Cartoon Nwk 29 33 BBC1 Free TV: 8 Pay TV: 0 Radio: 0 Searching Type Free TV Free TV Free TV Free TV Analogue Analogue Data: 0 68 68 Quality 10 10 10 10 Analogue: 2 Example : Auto Setup - "Q-Link Download" (p. 34...
... Channel Name 62 CBBC Channel 62 BBC Radio Wales 62 E4 62 Cartoon Nwk 29 33 BBC1 Free TV: 8 Pay TV: 0 Radio: 0 Searching 69 99 H: 21 41 Type Free TV Free TV Free TV Free TV Analogue Analogue Quality 10 10 10 10 Analogue: 2 Sending Preset Data Please wait! 0% Remote control ... starting setup. CH Channel Name 62 CBBC Channel 62 BBC Radio Wales 62 E4 62 Cartoon Nwk 29 33 BBC1 Free TV: 8 Pay TV: 0 Radio: 0 Searching Type Free TV Free TV Free TV Free TV Analogue Analogue Data: 0 68 68 Quality 10 10 10 10 Analogue: 2 Example : Auto Setup - "Q-Link Download" (p. 34...
Operating Instructions
Page 13
... the encryption key, settings and positions of the network •connection starts. Go to confirm. Check server connection. : succeeded The test is successful and the TV is recommended to the network. Check for access point] Access points found automatically are listed. 1. Search for access point WPS(Push button) select access [Search...
... the encryption key, settings and positions of the network •connection starts. Go to confirm. Check server connection. : succeeded The test is successful and the TV is recommended to the network. Check for access point] Access points found automatically are listed. 1. Search for access point WPS(Push button) select access [Search...

Operating Instructions
Page 14
...;[Retry]. Check acquired IP address. Check server connection. 4. Check acquired IP address. Check server connection. : succeeded The test is successful and the TV is connected to input Owner ID 1 Enter the PIN number (4 digits) Owner ID Please enter new PIN PIN * * * * abc def ghi...NAME / HOUSE NO / POSTCODE) Owner ID-Data Entry PIN NAME HOUSE NO POSTCODE * * * * select access 14 Press the WPS button on TV. After the access point setting is finished, perform the connection test Connection Test Check access point connection. For details (p. 73) 4 Input Owner ID Owner...
...;[Retry]. Check acquired IP address. Check server connection. 4. Check acquired IP address. Check server connection. : succeeded The test is successful and the TV is connected to input Owner ID 1 Enter the PIN number (4 digits) Owner ID Please enter new PIN PIN * * * * abc def ghi...NAME / HOUSE NO / POSTCODE) Owner ID-Data Entry PIN NAME HOUSE NO POSTCODE * * * * select access 14 Press the WPS button on TV. After the access point setting is finished, perform the connection test Connection Test Check access point connection. For details (p. 73) 4 Input Owner ID Owner...
Operating Instructions
Page 15
...set characters by accessing Shipping Condition. [Shipping Condition] (p. 49) Auto Setup is now complete and your TV is the demonstration mode to explain main features of this TV. •Select [Home] viewing environment to use in your home environment. Please select your viewing environment.... select set 123 .!:# abc def 456 ghi jkl mno 789 pqrs tuv wxyz 0 • You can return to viewing environment selection screen at -a-glance "Using TV Guide" (p. 21) • To edit or hide (skip) channels "Tuning and Editing Channels" (p. 41 - 44) • To retune all channels [...
...set characters by accessing Shipping Condition. [Shipping Condition] (p. 49) Auto Setup is now complete and your TV is the demonstration mode to explain main features of this TV. •Select [Home] viewing environment to use in your home environment. Please select your viewing environment.... select set 123 .!:# abc def 456 ghi jkl mno 789 pqrs tuv wxyz 0 • You can return to viewing environment selection screen at -a-glance "Using TV Guide" (p. 21) • To edit or hide (skip) channels "Tuning and Editing Channels" (p. 41 - 44) • To retune all channels [...

Operating Instructions
Page 16
...; Depending on the usage conditions, it may not be available. 1 Turn power on • Press for some specific websites supported by Panasonic, and enjoy internet contents such as of VIERA Connect (p. 80) 16 Some content may be available for character input and playing games in... VIERA Connect. For more information "USB connection" (p. 97) Note • If you to read these instructions carefully and follow the on the TV, VIERA Connect introduction banner appears. Example : Welcome to VIERA Connect™ VIERA Connect™ home screen is subject to change . 2 Access...
...; Depending on the usage conditions, it may not be available. 1 Turn power on • Press for some specific websites supported by Panasonic, and enjoy internet contents such as of VIERA Connect (p. 80) 16 Some content may be available for character input and playing games in... VIERA Connect. For more information "USB connection" (p. 97) Note • If you to read these instructions carefully and follow the on the TV, VIERA Connect introduction banner appears. Example : Welcome to VIERA Connect™ VIERA Connect™ home screen is subject to change . 2 Access...

Operating Instructions
Page 17
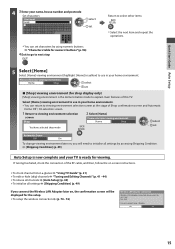
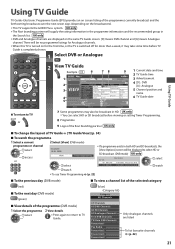
... ■ Select a channel using Information banner (p. 18) It is possible to confirm the channel name and programme information by using the TV Guide (EPG) before changing channels. 1 Display Information banner if it is not displayed 2 While the banner is displayed, select the channel...press any • buttons (except the buttons to confirm the channel and programme information by using the Information banner before changing channels. 1 Display TV Guide 2 Select a current 3 Select [View] (DVB mode) programme or channel select access Eastender 19:30- 20:00 View Timer Programming...
... ■ Select a channel using Information banner (p. 18) It is possible to confirm the channel name and programme information by using the TV Guide (EPG) before changing channels. 1 Display Information banner if it is not displayed 2 While the banner is displayed, select the channel...press any • buttons (except the buttons to confirm the channel and programme information by using the Information banner before changing channels. 1 Display TV Guide 2 Select a current 3 Select [View] (DVB mode) programme or channel select access Eastender 19:30- 20:00 View Timer Programming...
Operating Instructions
Page 18
...Channels Select favourites STTL TEXT Multi Audio 45 1 Channel position and name 2 Channel type ([Radio], [Data], [HDTV], etc.) / Encrypted channel ( ) / TV mode ( , ) 3 Programme 4 Current time Features available / Message meanings 5 Programme Start / Finish time (DVB) Channel number, etc. (Analogue) 6 Progress time...8226;7 [All DVB Channels] or [Favourites1-4] (p. 42) (DVB) To switch (blue) [Mute] Sound mute On [Bad signal] Poor TV signal quality [Also in ] Same programme available as the previously viewed channel or input mode. 18 Display the extra information to the present view...
...Channels Select favourites STTL TEXT Multi Audio 45 1 Channel position and name 2 Channel type ([Radio], [Data], [HDTV], etc.) / Encrypted channel ( ) / TV mode ( , ) 3 Programme 4 Current time Features available / Message meanings 5 Programme Start / Finish time (DVB) Channel number, etc. (Analogue) 6 Progress time...8226;7 [All DVB Channels] or [Favourites1-4] (p. 42) (DVB) To switch (blue) [Mute] Sound mute On [Bad signal] Poor TV signal quality [Also in ] Same programme available as the previously viewed channel or input mode. 18 Display the extra information to the present view...
Operating Instructions
Page 19
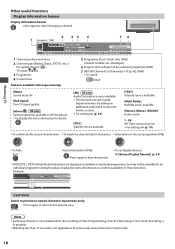
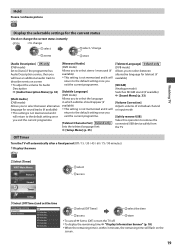
...] Adjusts volume of individual channel or input mode [Safely remove USB] Takes this operation to remove the connected USB device safely from the TV Off Timer Turn the TV off automatically after a fixed period (Off / 15 / 30 / 45 / 60 / 75 / 90 minutes) 1 Display the menu MENU 2 Select [Timer] Main ... 45 minutes 60 minutes 75 minutes 90 minutes select [Off Timer] select the time access store • To cancel Set to [Off] or turn the TV off. • To display the remaining time "Display Information banner" (p. 18) • When the remaining time is within 3 minutes, the remaining time ...
...] Adjusts volume of individual channel or input mode [Safely remove USB] Takes this operation to remove the connected USB device safely from the TV Off Timer Turn the TV off automatically after a fixed period (Off / 15 / 30 / 45 / 60 / 75 / 90 minutes) 1 Display the menu MENU 2 Select [Timer] Main ... 45 minutes 60 minutes 75 minutes 90 minutes select [Off Timer] select the time access store • To cancel Set to [Off] or turn the TV off. • To display the remaining time "Display Information banner" (p. 18) • When the remaining time is within 3 minutes, the remaining time ...
Operating Instructions
Page 20
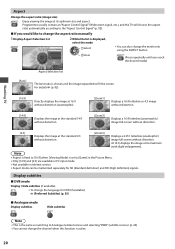
...). (p. 26) • You cannot change the channel when this function is chosen and the image expanded to fill the screen. Watching TV Aspect Change the aspect ratio (image size) ASPECT Enjoy viewing the image at its maximum (with slight enlargement). Programmes usually contain an "...Aspect Control Signal" (Widescreen signal, etc.), and the TV will choose the aspect ratio automatically according to the "Aspect Control Signal" (p. 92). ■ If you reach the desired mode) Aspect Selection...
...). (p. 26) • You cannot change the channel when this function is chosen and the image expanded to fill the screen. Watching TV Aspect Change the aspect ratio (image size) ASPECT Enjoy viewing the image at its maximum (with slight enlargement). Programmes usually contain an "...Aspect Control Signal" (Widescreen signal, etc.), and the TV will choose the aspect ratio automatically according to the "Aspect Control Signal" (p. 92). ■ If you reach the desired mode) Aspect Selection...
Operating Instructions
Page 21
... programmes may take some time before viewing or setting Timer Programming. 8 Programme 9 Logo of the Rovi branding partner ■ To change the layout of TV Guide [TV Guide View] (p. 34) ■ To watch • To use Timer Programming (p. 22) ■ To the previous day (DVB mode) ■...All Channels Also in the Search list. • DVB and Analogue channels are listed • To list favourite channels (p. 42) 21 Using TV Guide TV Guide−Electronic Programme Guide (EPG) provides an on screen listing of the programme (DVB mode) 1 Select the programme 2 View details ...
... programmes may take some time before viewing or setting Timer Programming. 8 Programme 9 Logo of the Rovi branding partner ■ To change the layout of TV Guide [TV Guide View] (p. 34) ■ To watch • To use Timer Programming (p. 22) ■ To the previous day (DVB mode) ■...All Channels Also in the Search list. • DVB and Analogue channels are listed • To list favourite channels (p. 42) 21 Using TV Guide TV Guide−Electronic Programme Guide (EPG) provides an on screen listing of the programme (DVB mode) 1 Select the programme 2 View details ...


