

WVCP300 User Guide
Page 1
Operating Instructions Color CCTV Camera Model No: WV-CP310, WV-CP314 WV-CP300, WV-CP304 This illustration represents WV-CP300. Lens: Option Before attempting to connect or operate this product, please read these instructions carefully and save this manual. The model number is abbreviated in some descriptions in this manual for future use.
Operating Instructions Color CCTV Camera Model No: WV-CP310, WV-CP314 WV-CP300, WV-CP304 This illustration represents WV-CP300. Lens: Option Before attempting to connect or operate this product, please read these instructions carefully and save this manual. The model number is abbreviated in some descriptions in this manual for future use.
WVCP300 User Guide
Page 2
... this notation are used when describing the functions limited for further information about how to configue the settings of the camera. This document explains how to install the camera. CP310 CP310 : The functions with this notation are available when using the model WV-CP300 and WV-CP304.... 2 When the Adobe® Reader® is required to read PDF. Preface About the user manuals The operating instructions of the camera consist of Adobe Systems Incorporated in the United States and/or other countries. Adobe® Reader® is not installed on the PC...
... this notation are used when describing the functions limited for further information about how to configue the settings of the camera. This document explains how to install the camera. CP310 CP310 : The functions with this notation are available when using the model WV-CP300 and WV-CP304.... 2 When the Adobe® Reader® is required to read PDF. Preface About the user manuals The operating instructions of the camera consist of Adobe Systems Incorporated in the United States and/or other countries. Adobe® Reader® is not installed on the PC...
WVCP300 User Guide
Page 4
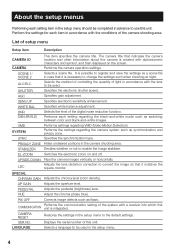
...Restores the settings in advance to use this unit is created with the conditions of setup menu Setup item Description CAMERA ID CAMERA This item specifies the camera title. About the setup menus Performing each setting item in the setup menu should be completed in the setup...Hides undesired portions in case that it is possible to convert the image so that it matches the square monitor. List of the camera shooting area. PIX OFF Corrects image defects such as switching between color and black-and-white images. COMMUNICATION Performs the communication setting...
...Restores the settings in advance to use this unit is created with the conditions of setup menu Setup item Description CAMERA ID CAMERA This item specifies the camera title. About the setup menus Performing each setting item in the setup menu should be completed in the setup...Hides undesired portions in case that it is possible to convert the image so that it matches the square monitor. List of the camera shooting area. PIX OFF Corrects image defects such as switching between color and black-and-white images. COMMUNICATION Performs the communication setting...
WVCP300 User Guide
Page 5
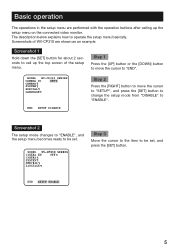
... mode changes to "ENABLE", and the setup menu becomes ready to be set , and press the [SET] button. MODEL WV-CP310 SERIES CAMERA ID OFF CAMERA SYSTEM SPECIAL LANGUAGE Step 3 Move the cursor to the item to be set . Screenshots of WV-CP310 are performed with the operation buttons after... calling up the top screen of the setup menu. The description below explains how to "ENABLE". MODEL WV-CP310 SERIES CAMERA ID OFF CAMERA SYSTEM SPECIAL LANGUAGE END SETUP DISABIE Step 2 Press the [right] button to move the cursor to call up the setup menu on ...
... mode changes to "ENABLE", and the setup menu becomes ready to be set , and press the [SET] button. MODEL WV-CP310 SERIES CAMERA ID OFF CAMERA SYSTEM SPECIAL LANGUAGE Step 3 Move the cursor to the item to be set . Screenshots of WV-CP310 are performed with the operation buttons after... calling up the top screen of the setup menu. The description below explains how to "ENABLE". MODEL WV-CP310 SERIES CAMERA ID OFF CAMERA SYSTEM SPECIAL LANGUAGE END SETUP DISABIE Step 2 Press the [right] button to move the cursor to call up the setup menu on ...
WVCP300 User Guide
Page 6
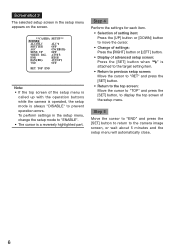
...highlighted part. Step 4 Perform the settings for each item. • Selection of setting item: Press the [up with the operation buttons while the camera is operated, the setup mode is attached to the target setting item. • Return to previous setup screen: Move the cursor to "RET" ... " is always "DISABLE" to prevent operation errors. Screenshot 3 The selected setup screen in the setup menu, change the setup mode to the camera image screen, or wait about 5 minutes and the setup menu will automatically close. 6 To perform settings in the setup menu appears on the screen...
...highlighted part. Step 4 Perform the settings for each item. • Selection of setting item: Press the [up with the operation buttons while the camera is operated, the setup mode is attached to the target setting item. • Return to previous setup screen: Move the cursor to "RET" ... " is always "DISABLE" to prevent operation errors. Screenshot 3 The selected setup screen in the setup menu, change the setup mode to the camera image screen, or wait about 5 minutes and the setup menu will automatically close. 6 To perform settings in the setup menu appears on the screen...
WVCP300 User Guide
Page 7
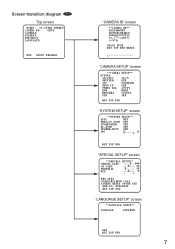
... CP310 Top screen CP310 CP300 MODEL WV-CP310 SERIES CAMERA ID OFF CAMERA SYSTEM SPECIAL LANGUAGE END SETUP DISABLE "CAMERA ID" screen **CAMERA ID** 0123456789 ABCDEFGHIJKLM NOPQRSTUVWXYZ SPACE POSI RET TOP END RESET "CAMERA SETUP" screen **CAMERA SETUP** SCENE1 ALC/ELC ALC SHUTTER OFF AGC ON..." screen **SPECIAL SETUP** CHROMA GAIN ....I..160 AP GAIN ...I... 32 PEDESTAL .I..... 15 HUE ...I... 0 - + PIX OFF COMMUNICATION COAX CAMERA RESET PUSH SET SER.NO. XXXXXXXX RET TOP END "LANGUAGE SETUP" screen **LANGUAGE SETUP** LANGUAGE ENGLISH SET RET TOP END 7
... CP310 Top screen CP310 CP300 MODEL WV-CP310 SERIES CAMERA ID OFF CAMERA SYSTEM SPECIAL LANGUAGE END SETUP DISABLE "CAMERA ID" screen **CAMERA ID** 0123456789 ABCDEFGHIJKLM NOPQRSTUVWXYZ SPACE POSI RET TOP END RESET "CAMERA SETUP" screen **CAMERA SETUP** SCENE1 ALC/ELC ALC SHUTTER OFF AGC ON..." screen **SPECIAL SETUP** CHROMA GAIN ....I..160 AP GAIN ...I... 32 PEDESTAL .I..... 15 HUE ...I... 0 - + PIX OFF COMMUNICATION COAX CAMERA RESET PUSH SET SER.NO. XXXXXXXX RET TOP END "LANGUAGE SETUP" screen **LANGUAGE SETUP** LANGUAGE ENGLISH SET RET TOP END 7

WVCP300 User Guide
Page 8
...transition diagram CP300 Top screen MODEL WV-CP300 SERIES CAMERA ID OFF CAMERA SYSTEM SPECIAL LANGUAGE END SETUP DISABLE 8 "CAMERA ID" screen **CAMERA ID** 0123456789 ABCDEFGHIJKLM NOPQRSTUVWXYZ SPACE POSI RET TOP END RESET "CAMERA SETUP" screen **CAMERA SETUP** SCENE1 ALC/ELC ALC SHUTTER OFF AGC ... screen **SPECIAL SETUP** CHROMA GAIN ....I..160 AP GAIN ...I... 32 PEDESTAL .I..... 15 HUE ...I... 0 - + PIX OFF COMMUNICATION COAX CAMERA RESET PUSH SET SER.NO. XXXXXXXX RET TOP END "LANGUAGE SETUP" screen **LANGUAGE SETUP** LANGUAGE ENGLISH SET RET TOP END
...transition diagram CP300 Top screen MODEL WV-CP300 SERIES CAMERA ID OFF CAMERA SYSTEM SPECIAL LANGUAGE END SETUP DISABLE 8 "CAMERA ID" screen **CAMERA ID** 0123456789 ABCDEFGHIJKLM NOPQRSTUVWXYZ SPACE POSI RET TOP END RESET "CAMERA SETUP" screen **CAMERA SETUP** SCENE1 ALC/ELC ALC SHUTTER OFF AGC ... screen **SPECIAL SETUP** CHROMA GAIN ....I..160 AP GAIN ...I... 32 PEDESTAL .I..... 15 HUE ...I... 0 - + PIX OFF COMMUNICATION COAX CAMERA RESET PUSH SET SER.NO. XXXXXXXX RET TOP END "LANGUAGE SETUP" screen **LANGUAGE SETUP** LANGUAGE ENGLISH SET RET TOP END

WVCP300 User Guide
Page 9
.... • To delete all the entered characters, move the cursor (↑) to an incorrect character with up to "RESET" and press the [SET] button. The camera title is specified. 9 The "CAMERA ID" display can be turned on or off on the monitor screen. Top screen MODEL WV-CP310 SERIES..." appears. Step 4 Use the [UP], [DOWN], [RIGHT], and [LEFT] buttons to "POSI" and press the [SET] button after setting the camera title. Step 3 Move the cursor to decide the title position and press the [SET] button. → The title position is named with use of the [...
.... • To delete all the entered characters, move the cursor (↑) to an incorrect character with up to "RESET" and press the [SET] button. The camera title is specified. 9 The "CAMERA ID" display can be turned on or off on the monitor screen. Top screen MODEL WV-CP310 SERIES..." appears. Step 4 Use the [UP], [DOWN], [RIGHT], and [LEFT] buttons to "POSI" and press the [SET] button after setting the camera title. Step 3 Move the cursor to decide the title position and press the [SET] button. → The title position is named with use of the [...
WVCP300 User Guide
Page 10
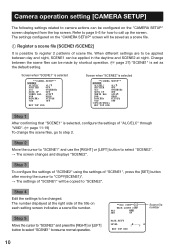
..."SCENE2". The number displayed at night. When different settings are to be applied between the scene files can be configured on the "CAMERA SETUP" screen displayed from the top screen. Step 4 Edit the settings to be saved as the default setting. Step 5 Move the...SET LEVEL .I..... 0 - + RET TOP END 10 The settings configured on each setting screen indicates a scene file number. Camera operation setting [CAMERA SETUP] The following settings related to camera actions can be made by shortcut operation. ( page 27) "SCENE1" is selected, configure the settings of "ALC...
..."SCENE2". The number displayed at night. When different settings are to be applied between the scene files can be configured on the "CAMERA SETUP" screen displayed from the top screen. Step 4 Edit the settings to be saved as the default setting. Step 5 Move the...SET LEVEL .I..... 0 - + RET TOP END 10 The settings configured on each setting screen indicates a scene file number. Camera operation setting [CAMERA SETUP] The following settings related to camera actions can be made by shortcut operation. ( page 27) "SCENE1" is selected, configure the settings of "ALC...
WVCP300 User Guide
Page 11
This selection is suitable at shooting a bright subject such as an outdoor subject with the electronic shutter. "CAMERA SETUP" screen **CAMERA SETUP** SCENE1 ALC/ELC ALC SHUTTER OFF AGC ON(HIGH) SENS UP OFF WHITE BAL ATW1 DNR HIGH D&N(ELE) OFF VMD OFF RET TOP END "...
This selection is suitable at shooting a bright subject such as an outdoor subject with the electronic shutter. "CAMERA SETUP" screen **CAMERA SETUP** SCENE1 ALC/ELC ALC SHUTTER OFF AGC ON(HIGH) SENS UP OFF WHITE BAL ATW1 DNR HIGH D&N(ELE) OFF VMD OFF RET TOP END "...

WVCP300 User Guide
Page 13
... check the color temperature of AUTO. "CAMERA SETUP" screen **CAMERA SETUP** SCENE1 ALC/ELC ALC SHUTTER OFF AGC ON(HIGH) SENS UP OFF WHITE BAL ATW1 DNR HIGH D&N(IR) AUTO1 VMD OFF RET TOP END ... performed and "---" appears. • When the magnification of the light illuminating the subject is insufficient. ATW1 (default): Activates the automatic color temperature tracking mode. The camera automatically achieves an optimal white balance under the bright blue sky or at nightfall. • The illumination of "SENS UP" is increased, the screen becomes...
... check the color temperature of AUTO. "CAMERA SETUP" screen **CAMERA SETUP** SCENE1 ALC/ELC ALC SHUTTER OFF AGC ON(HIGH) SENS UP OFF WHITE BAL ATW1 DNR HIGH D&N(IR) AUTO1 VMD OFF RET TOP END ... performed and "---" appears. • When the magnification of the light illuminating the subject is insufficient. ATW1 (default): Activates the automatic color temperature tracking mode. The camera automatically achieves an optimal white balance under the bright blue sky or at nightfall. • The illumination of "SENS UP" is increased, the screen becomes...
WVCP300 User Guide
Page 14
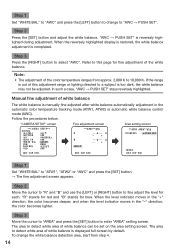
... → PUSH SET". Step 3 Press the [right ] button to "ATW1", "ATW2" or "AWC" and press the [SET ] button. → The fine adjustment screen appears. "CAMERA SETUP" screen **CAMERA SETUP** SCENE1 ALC/ELC ALC SHUTTER OFF AGC ON(HIGH) SENS UP OFF WHITE BAL ATW1 DNR HIGH D&N(IR) AUTO1 VMD OFF RET TOP...
... → PUSH SET". Step 3 Press the [right ] button to "ATW1", "ATW2" or "AWC" and press the [SET ] button. → The fine adjustment screen appears. "CAMERA SETUP" screen **CAMERA SETUP** SCENE1 ALC/ELC ALC SHUTTER OFF AGC ON(HIGH) SENS UP OFF WHITE BAL ATW1 DNR HIGH D&N(IR) AUTO1 VMD OFF RET TOP...

WVCP300 User Guide
Page 15
... the [up ], [down ], [right] and [left] buttons to move to the upper-left ] buttons to move to the lower-right part of low illu- "CAMERA SETUP" screen **CAMERA SETUP** SCENE1 ALC/ELC ALC SHUTTER OFF AGC ON(HIGH) SENS UP OFF WHITE BAL ATW1 DNR HIGH D&N(IR) AUTO1 VMD OFF RET TOP...
... the [up ], [down ], [right] and [left] buttons to move to the upper-left ] buttons to move to the lower-right part of low illu- "CAMERA SETUP" screen **CAMERA SETUP** SCENE1 ALC/ELC ALC SHUTTER OFF AGC ON(HIGH) SENS UP OFF WHITE BAL ATW1 DNR HIGH D&N(IR) AUTO1 VMD OFF RET TOP...
WVCP300 User Guide
Page 16
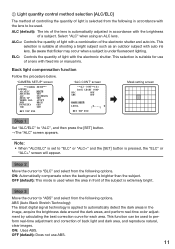
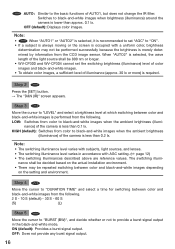
...information from the CCD image sensor. LOW: Switches from color to black-and-white images when the ambient brightness (illuminance) of the camera is less than approx. 0.1 lx. OFF: Does not provide any burst signal output. 16 OFF (default): Displays color images. ...in accordance with a uniform color, brightness determination may be performed successfully because the brightness is performed from the following . nance) of the camera is less than 0.1 lx. Note: • The switching illuminance level varies with subjects, light sources, and lenses. • The ...
...information from the CCD image sensor. LOW: Switches from color to black-and-white images when the ambient brightness (illuminance) of the camera is less than approx. 0.1 lx. OFF: Does not provide any burst signal output. 16 OFF (default): Displays color images. ...in accordance with a uniform color, brightness determination may be performed successfully because the brightness is performed from the following . nance) of the camera is less than 0.1 lx. Note: • The switching illuminance level varies with subjects, light sources, and lenses. • The ...
WVCP300 User Guide
Page 17
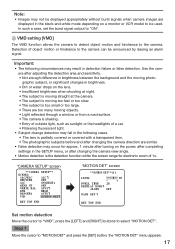
...+ 2S OFF MASK SET RET TOP END Set motion detection Move the cursor to "VMD", press the [LEFT] and [RIGHT ] buttons to the camera. Important: • The following cases. • The lens is partially covered or covered with a transparent item. • The photographic subjects before ...hindrance to "MOTION DET" and press the [SET] button, the "MOTION DET" menu appears. 17 Detection of 1x. Use the camera after adjusting the detection area and sensitivity. • Not enough difference in brightness between the background and the moving photographic subject, or significant...
...+ 2S OFF MASK SET RET TOP END Set motion detection Move the cursor to "VMD", press the [LEFT] and [RIGHT ] buttons to the camera. Important: • The following cases. • The lens is partially covered or covered with a transparent item. • The photographic subjects before ...hindrance to "MOTION DET" and press the [SET] button, the "MOTION DET" menu appears. 17 Detection of 1x. Use the camera after adjusting the detection area and sensitivity. • Not enough difference in brightness between the background and the moving photographic subject, or significant...

WVCP300 User Guide
Page 19
... [left ] button to select "SCENE CHANGE". 19 Use the [right] or [left ] button to adjust the level. Repeat step 5 and 6 to adjust to "VMD". "CAMERA SETUP" screen **CAMERA SETUP** SCENE1 ALC/ELC ALC SHUTTER OFF AGC ON(HIGH) SENS UP OFF WHITE BAL ATW1 DNR HIGH D&N(IR) AUTO1 VMD SCENE CHANGE RET... TIME ". Step 7 Move the cursor to "Level". Setting of scene change detection This function detects a change in the subject state that occurs by covering the camera with a cloth, a cap, or others, or by changing the...
... [left ] button to select "SCENE CHANGE". 19 Use the [right] or [left ] button to adjust the level. Repeat step 5 and 6 to adjust to "VMD". "CAMERA SETUP" screen **CAMERA SETUP** SCENE1 ALC/ELC ALC SHUTTER OFF AGC ON(HIGH) SENS UP OFF WHITE BAL ATW1 DNR HIGH D&N(IR) AUTO1 VMD SCENE CHANGE RET... TIME ". Step 7 Move the cursor to "Level". Setting of scene change detection This function detects a change in the subject state that occurs by covering the camera with a cloth, a cap, or others, or by changing the...
WVCP300 User Guide
Page 20
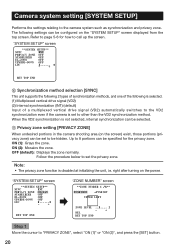
... selected. (1) Multiplexed vertical drive signal (VD2) (2) Internal synchronization (INT) (default) Input of the following settings can be configured on the power. Camera system setting [SYSTEM SETUP] Performs the settings relating to "PRIVACY ZONE", select "ON (1)" or "ON (2)", and press the [SET ] button. 20...2 types of synchronization methods, and one of a multiplexed vertical drive signal (VD2) automatically switches to the VD2 synchronization even if the camera is set to page 5-6 for the privacy zone. ON (2): Mosaics the zone. Follow the procedure below to set to call up ...
... selected. (1) Multiplexed vertical drive signal (VD2) (2) Internal synchronization (INT) (default) Input of the following settings can be configured on the power. Camera system setting [SYSTEM SETUP] Performs the settings relating to "PRIVACY ZONE", select "ON (1)" or "ON (2)", and press the [SET ] button. 20...2 types of synchronization methods, and one of a multiplexed vertical drive signal (VD2) automatically switches to the VD2 synchronization even if the camera is set to page 5-6 for the privacy zone. ON (2): Mosaics the zone. Follow the procedure below to set to call up ...
WVCP300 User Guide
Page 21
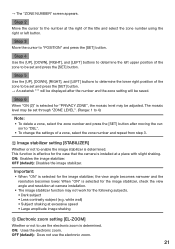
... the [up ], [down ], [right], and [left ] buttons to determine the left button. This function is effective for the case that the camera is selected for the image stabilizer, check the view angle and resolution at a place with slight shaking. Important: • When "ON" is installed at... camera installation. • The image stabilizer function may not work for "PRIVACY ZONE", the mosaic level may be set through "ZONE LEVEL". (Range: 1...
... the [up ], [down ], [right], and [left ] buttons to determine the left button. This function is effective for the case that the camera is selected for the image stabilizer, check the view angle and resolution at a place with slight shaking. Important: • When "ON" is installed at... camera installation. • The image stabilizer function may not work for "PRIVACY ZONE", the mosaic level may be set through "ZONE LEVEL". (Range: 1...
WVCP300 User Guide
Page 23
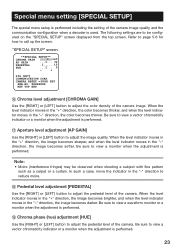
.... XXXXXXXX RET TOP END F Chroma level adjustment [CHROMA GAIN] Use the [right ] or [left] button to adjust the color density of the camera. H Pedestal level adjustment [PEDESTAL] Use the [right] or [left ] button to be observed when shooting a subject with fine pattern such as ... becomes darker. Be sure to view a monitor when the adjustment is performed. The following settings are to adjust the pedestal level of the camera image quality and the communication configuration when a decoder is used. "SPECIAL SETUP" screen **SPECIAL SETUP** CHROMA GAIN ....I..160 AP GAIN ...I... 32...
.... XXXXXXXX RET TOP END F Chroma level adjustment [CHROMA GAIN] Use the [right ] or [left] button to adjust the color density of the camera. H Pedestal level adjustment [PEDESTAL] Use the [right] or [left ] button to be observed when shooting a subject with fine pattern such as ... becomes darker. Be sure to view a monitor when the adjustment is performed. The following settings are to adjust the pedestal level of the camera image quality and the communication configuration when a decoder is used. "SPECIAL SETUP" screen **SPECIAL SETUP** CHROMA GAIN ....I..160 AP GAIN ...I... 32...
WVCP300 User Guide
Page 24
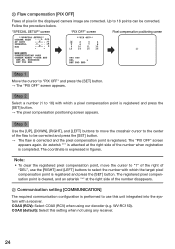
.... The registered pixel compensation point is cleared, and an asterisk "*" at the right side of pixel in figures. An asterisk "*" is expressed in the displayed camera image are corrected. Up to "PIX OFF" and press the [SET] button. → The "PIX OFF" screen appears. J Flaw compensation [PIX OFF] Flaws of the...
.... The registered pixel compensation point is cleared, and an asterisk "*" at the right side of pixel in figures. An asterisk "*" is expressed in the displayed camera image are corrected. Up to "PIX OFF" and press the [SET] button. → The "PIX OFF" screen appears. J Flaw compensation [PIX OFF] Flaws of the...


