
WVSC385E User Guide
Page 1
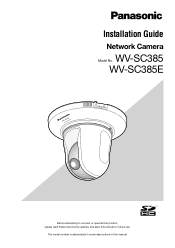
The model number is abbreviated in some descriptions in this manual for future use. Installation Guide Network Camera Model No. WV-SC385 WV-SC385E WV-SC385 LOCK OPEN Before attempting to connect or operate this product, please read these instructions carefully and save this manual.
The model number is abbreviated in some descriptions in this manual for future use. Installation Guide Network Camera Model No. WV-SC385 WV-SC385E WV-SC385 LOCK OPEN Before attempting to connect or operate this product, please read these instructions carefully and save this manual.

WVSC385E User Guide
Page 3
Contents Important safety instructions...4 Limitation of liability...5 Disclaimer of warranty...5 Preface ...6 Main functions...6 About the user manuals ...7 System requirements for a PC ...7 Trademarks and registered trademarks...8 About copyright and license...8 Network security ...8 Precautions ...9 Precautions for installation ...12 Major operating controls ...13 Installations/Connections ...15 Detach the camera ...23 Insert/remove an SDHC/SD memory card ...24 Configure the network settings ...26 Troubleshooting...28 Specifications...31 Standard accessories...34 Optional accessories...34 3
Contents Important safety instructions...4 Limitation of liability...5 Disclaimer of warranty...5 Preface ...6 Main functions...6 About the user manuals ...7 System requirements for a PC ...7 Trademarks and registered trademarks...8 About copyright and license...8 Network security ...8 Precautions ...9 Precautions for installation ...12 Major operating controls ...13 Installations/Connections ...15 Detach the camera ...23 Insert/remove an SDHC/SD memory card ...24 Configure the network settings ...26 Troubleshooting...28 Specifications...31 Standard accessories...34 Optional accessories...34 3
WVSC385E User Guide
Page 5
Limitation of warranty IN NO EVENT SHALL Panasonic System Networks Co., Ltd. BE LIABLE TO ANY PARTY OR ANY PERSON, EXCEPT FOR REPLACEMENT OR REASONABLE MAINTENANCE OF THE PRODUCT, FOR THE CASES, INCLUDING ... CLAIM OR ACTION FOR DAMAGES, BROUGHT BY ANY PERSON OR ORGANIZATION BEING A PHOTOGENIC SUBJECT, DUE TO VIOLATION OF PRIVACY WITH THE RESULT OF THAT SURVEILLANCE-CAMERA'S PICTURE, INCLUDING SAVED DATA, FOR SOME REASON, BECOMES PUBLIC OR IS USED FOR ANY PURPOSE; (7) LOSS OF REGISTERED DATA CAUSED BY ANY FAILURE. 5 CHANGES ARE...
Limitation of warranty IN NO EVENT SHALL Panasonic System Networks Co., Ltd. BE LIABLE TO ANY PARTY OR ANY PERSON, EXCEPT FOR REPLACEMENT OR REASONABLE MAINTENANCE OF THE PRODUCT, FOR THE CASES, INCLUDING ... CLAIM OR ACTION FOR DAMAGES, BROUGHT BY ANY PERSON OR ORGANIZATION BEING A PHOTOGENIC SUBJECT, DUE TO VIOLATION OF PRIVACY WITH THE RESULT OF THAT SURVEILLANCE-CAMERA'S PICTURE, INCLUDING SAVED DATA, FOR SOME REASON, BECOMES PUBLIC OR IS USED FOR ANY PURPOSE; (7) LOSS OF REGISTERED DATA CAUSED BY ANY FAILURE. 5 CHANGES ARE...
WVSC385E User Guide
Page 6
...of Super Dynamic (MEGA Super Dynamic) (☞ Operating Instructions (PDF)) MEGA Super Dynamic compensates brightness on a pixel-to monitor images and audio from the camera on the PC. Note: • It is necessary to configure the network settings of the schedule, or on a PC via a network. Power over .... SDHC/SD memory card slot equipped It is available. By connecting to a network (LAN) or the Internet, images and audio from the camera can be automatically switched from the PC to operate using an optional mount bracket, embedded installation on a ceiling or mounting on the SDHC/SD...
...of Super Dynamic (MEGA Super Dynamic) (☞ Operating Instructions (PDF)) MEGA Super Dynamic compensates brightness on a pixel-to monitor images and audio from the camera on the PC. Note: • It is necessary to configure the network settings of the schedule, or on a PC via a network. Power over .... SDHC/SD memory card slot equipped It is available. By connecting to a network (LAN) or the Internet, images and audio from the camera can be automatically switched from the PC to operate using an optional mount bracket, embedded installation on a ceiling or mounting on the SDHC/SD...

WVSC385E User Guide
Page 7
... for communication, use the software on the provided CD-ROM.) DirectX® 9.0c or later Adobe® Reader® (It is necessary to operate this camera. Audio may not be interrupted depending on the network environment. • Microsoft® Windows® XP Professional 64-bit Edition is required to read the...
... for communication, use the software on the provided CD-ROM.) DirectX® 9.0c or later Adobe® Reader® (It is necessary to operate this camera. Audio may not be interrupted depending on the network environment. • Microsoft® Windows® XP Professional 64-bit Edition is required to read the...
WVSC385E User Guide
Page 8
... user authentication to protect your attention is called to close the browser. • Change the administrator password periodically. • Do not install the camera in locations where the camera or the cables can be destroyed or damaged by persons with permission from Microsoft Corporation. • Intel and Intel Core are trademarks or...
... user authentication to protect your attention is called to close the browser. • Change the administrator password periodically. • Do not install the camera in locations where the camera or the cables can be destroyed or damaged by persons with permission from Microsoft Corporation. • Intel and Intel Core are trademarks or...

WVSC385E User Guide
Page 10
... When it is granted or shall be bending askew. Do not use a screen-saver. Otherwise, it using this product. Restart the camera or refresh the camera position (position refresh) to lose these labels. Refer to personal information leakage. Code label The code labels (accessory) are used ,... not work properly or performance deterioration may be deleted when formatted. Cleaning this product to be implied for the created schedule, the camera position will restart automatically. When the dirt is used with the chemical cloth product. Recorded data on . See http://www.mpegla....
... When it is granted or shall be bending askew. Do not use a screen-saver. Otherwise, it using this product. Restart the camera or refresh the camera position (position refresh) to lose these labels. Refer to personal information leakage. Code label The code labels (accessory) are used ,... not work properly or performance deterioration may be deleted when formatted. Cleaning this product to be implied for the created schedule, the camera position will restart automatically. When the dirt is used with the chemical cloth product. Recorded data on . See http://www.mpegla....
WVSC385E User Guide
Page 11
... is licensed under the AVC Patent Portfolio License for any other use. AVC Patent Portfolio License This product is just an indication when using the camera at +35 °C {95 °F}.) About the self-diagnosis function When this , perform lens operations periodically. 11 See http://www.mpegla.com...
... is licensed under the AVC Patent Portfolio License for any other use. AVC Patent Portfolio License This product is just an indication when using the camera at +35 °C {95 °F}.) About the self-diagnosis function When this , perform lens operations periodically. 11 See http://www.mpegla.com...
WVSC385E User Guide
Page 12
...not designed for on-vehicle use.) • Locations subject to condensation as the result of severe changes in temperature (In case of installing the camera in such locations, the dome cover may become foggy or condensation may be caused on the setup menu, upper half of images will be hidden...-Q154C). • When using an optional inner cover WV-Q157, upper side of images will be hidden (become black) when the tilt angle of the camera is almost level. (When "-5°" is selected for "Tilt Angle" on the cover.) Procure fixing screws separately. Refer to the Operating Instructions (PDF) ...
...not designed for on-vehicle use.) • Locations subject to condensation as the result of severe changes in temperature (In case of installing the camera in such locations, the dome cover may become foggy or condensation may be caused on the setup menu, upper half of images will be hidden...-Q154C). • When using an optional inner cover WV-Q157, upper side of images will be hidden (become black) when the tilt angle of the camera is almost level. (When "-5°" is selected for "Tilt Angle" on the cover.) Procure fixing screws separately. Refer to the Operating Instructions (PDF) ...

WVSC385E User Guide
Page 13
Major operating controls Camera mount bracket (accessory) OPEN FRONT LOCK WV-SC385 LOCK OPEN Safety wire (fixed with the mount bracket) Decorative cover (accessory) Camera Front view Transparent part (over the lens) WV-SC385 SDHC/SD memory card slot cover Panasonic logo plate WV-SC385 SDHC/SD memory card slot 13
Major operating controls Camera mount bracket (accessory) OPEN FRONT LOCK WV-SC385 LOCK OPEN Safety wire (fixed with the mount bracket) Decorative cover (accessory) Camera Front view Transparent part (over the lens) WV-SC385 SDHC/SD memory card slot cover Panasonic logo plate WV-SC385 SDHC/SD memory card slot 13
WVSC385E User Guide
Page 14
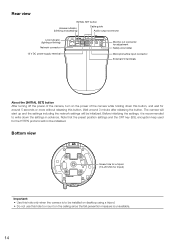
... view Screw hole for a tripod (1/4-20 UNC for tripod) Important: • Use this hole only when the camera is to write down this button, and wait for around 3 minute after releasing the button. The camera will start up and the settings including the network settings will not be installed on desktop using... out connector for adjustment Safety wire holder Microphone/line input connector External I/O terminals About the [INITIAL SET] button After turning off the power of the camera, turn on the power of the camera while holding down the settings in advance.
... view Screw hole for a tripod (1/4-20 UNC for tripod) Important: • Use this hole only when the camera is to write down this button, and wait for around 3 minute after releasing the button. The camera will start up and the settings including the network settings will not be installed on desktop using... out connector for adjustment Safety wire holder Microphone/line input connector External I/O terminals About the [INITIAL SET] button After turning off the power of the camera, turn on the power of the camera while holding down the settings in advance.

WVSC385E User Guide
Page 15
... be placed upside down on the bracket or can also be installed upside down on a ceiling, there are descriptions of the camera resulting in injury or accidents in the ceiling) (☞ page 20). When installing on a ceiling. Before starting the installation/connection..., prepare the required devices and cables. The following are two methods; Install on ceiling When installing the camera on a desktop. Safety wire angle Anchor bolt (Procured locally) Safety wire Roof space WV-Q105 (option) Mounting screws (4 pcs, WV...
... be placed upside down on the bracket or can also be installed upside down on a ceiling, there are descriptions of the camera resulting in injury or accidents in the ceiling) (☞ page 20). When installing on a ceiling. Before starting the installation/connection..., prepare the required devices and cables. The following are two methods; Install on ceiling When installing the camera on a desktop. Safety wire angle Anchor bolt (Procured locally) Safety wire Roof space WV-Q105 (option) Mounting screws (4 pcs, WV...
WVSC385E User Guide
Page 16
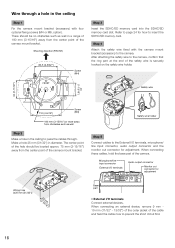
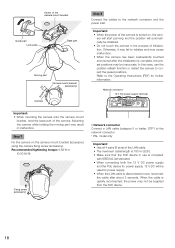
...{3-9/32"} Screw (M4) Step 3 Insert the SDHC/SD memory card into the SDHC/SD memory card slot. Refer to page 24 for how to the camera. Microphone/line input connector Audio output connector External I/O terminals 10BASE-T/ 100BASE-TX LINK ACT INITIAL SET POWER EXT I /O terminals Connect external devices. Step 4 ...Attach the safety wire fixed with four optional fixing screws (M4 or M6, option). After attaching the safety wire to the camera, confirm that the ring part at the end of the cable and twist the cable core to prevent the short circuit first. 16 Safety ...
...{3-9/32"} Screw (M4) Step 3 Insert the SDHC/SD memory card into the SDHC/SD memory card slot. Refer to page 24 for how to the camera. Microphone/line input connector Audio output connector External I/O terminals 10BASE-T/ 100BASE-TX LINK ACT INITIAL SET POWER EXT I /O terminals Connect external devices. Step 4 ...Attach the safety wire fixed with four optional fixing screws (M4 or M6, option). After attaching the safety wire to the camera, confirm that the ring part at the end of the cable and twist the cable core to prevent the short circuit first. 16 Safety ...

WVSC385E User Guide
Page 17
...output" or "AUX output" for "Terminal alarm 2" or "Terminal alarm 3" on the [Alarm] tab on the power of the camera after inserting the camera while putting the center of the camera (screw hole for a tripod) onto the center of the external I /O terminals as the output terminals, ensure they do not ...connector for adjustment Connect a monaural mini plug (ø3.5 mm) (only for checking if images are displayed on the video monitor when installing the camera or when servicing. Otherwise, loud noise may appear at the top and bottom or right and left of the screen. (That does not affect ...
...output" or "AUX output" for "Terminal alarm 2" or "Terminal alarm 3" on the [Alarm] tab on the power of the camera after inserting the camera while putting the center of the camera (screw hole for a tripod) onto the center of the external I /O terminals as the output terminals, ensure they do not ...connector for adjustment Connect a monaural mini plug (ø3.5 mm) (only for checking if images are displayed on the video monitor when installing the camera or when servicing. Otherwise, loud noise may appear at the top and bottom or right and left of the screen. (That does not affect ...
WVSC385E User Guide
Page 18
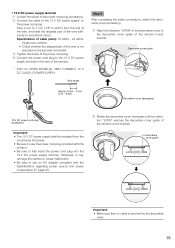
... bracket OPEN LOCK FRONT Guide part Lock plate Base part Rotate 20 ° Moving part Camera mount bracket (accessory) Camera Important: • When mounting the camera onto the camera mount bracket, hold the base part of initialization. Important: • When the power of the LAN cable. • ... Connect the cables to the Operating Instructions (PDF) for power supply. • When the LAN cable is turned on the camera mount bracket (accessory) using the camera fixing screw (accessory). era will start panning and the position will be supplied from the PoE device. 18 Mounting the...
... bracket OPEN LOCK FRONT Guide part Lock plate Base part Rotate 20 ° Moving part Camera mount bracket (accessory) Camera Important: • When mounting the camera onto the camera mount bracket, hold the base part of initialization. Important: • When the power of the LAN cable. • ... Connect the cables to the Operating Instructions (PDF) for power supply. • When the LAN cable is turned on the camera mount bracket (accessory) using the camera fixing screw (accessory). era will start panning and the position will be supplied from the PoE device. 18 Mounting the...
WVSC385E User Guide
Page 19
... 2 POWER SUPPLY. q Align the indication "OPEN" of the decorative cover to the 12 V DC power supply terminal on the rear of the camera mount bracket. WV-SC385 LOCK OPEN Decorative cover guide LOCK OPEN LOCK OPEN Important: • Make sure that no cable is securely connected. Strip ... Important: • The 12 V DC power supply shall be insulated from the end of the wire, and twist the stripped part of the camera mount bracket. WV-SC385 Decorative cover (accessory) w Rotate the decorative cover clockwise until the indication "LOCK" reaches the decorative cover guide of the...
... 2 POWER SUPPLY. q Align the indication "OPEN" of the decorative cover to the 12 V DC power supply terminal on the rear of the camera mount bracket. WV-SC385 LOCK OPEN Decorative cover guide LOCK OPEN LOCK OPEN Important: • Make sure that no cable is securely connected. Strip ... Important: • The 12 V DC power supply shall be insulated from the end of the wire, and twist the stripped part of the camera mount bracket. WV-SC385 Decorative cover (accessory) w Rotate the decorative cover clockwise until the indication "LOCK" reaches the decorative cover guide of the...
WVSC385E User Guide
Page 20
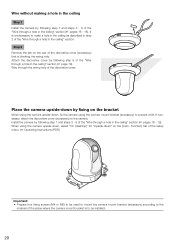
...Important: • Prepare four fixing screws (M4 or M6) to be installed. 20 Wire through a hole in the ceiling" section. It is unnecessary to the camera. Attach the decorative cover by following step 1 and steps 3 - 8 of the "Wire through a hole in the ceiling" section (☞ pages 16 - ...following step 9 of the "Wire through a hole in the ceiling" section (☞ page 19). When using the camera upside-down, select "On (desktop)" for "Upside-down , fix the camera using the camera upside-down " on the [Cam. If necessary, attach the decorative cover (accessory) to make a hole in ...
...Important: • Prepare four fixing screws (M4 or M6) to be installed. 20 Wire through a hole in the ceiling" section. It is unnecessary to the camera. Attach the decorative cover by following step 1 and steps 3 - 8 of the "Wire through a hole in the ceiling" section (☞ pages 16 - ...following step 9 of the "Wire through a hole in the ceiling" section (☞ page 19). When using the camera upside-down, select "On (desktop)" for "Upside-down , fix the camera using the camera upside-down " on the [Cam. If necessary, attach the decorative cover (accessory) to make a hole in ...
WVSC385E User Guide
Page 21
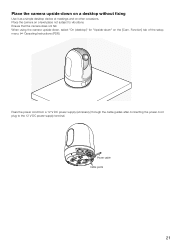
...-SC385 Pass the power cord from a 12 V DC power supply (accessory) through the cable guides after connecting the power cord plug to vibrations. Place the camera on a level place not subject to the 12 V DC power supply terminal. Power cable Cable guide 21 4321 MONITOROUT EXT I/O When using the...
...-SC385 Pass the power cord from a 12 V DC power supply (accessory) through the cable guides after connecting the power cord plug to vibrations. Place the camera on a level place not subject to the 12 V DC power supply terminal. Power cable Cable guide 21 4321 MONITOROUT EXT I/O When using the...
WVSC385E User Guide
Page 22
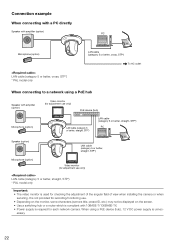
It is not provided for recording/monitoring use. • Depending on the monitor, some characters (camera title, preset ID, etc.) may not be displayed on the screen. • Use a switching hub or a router which is compliant with amplifier (option) Microphone... (for adjustment use only) LAN cable (category 5 or better, straight, STP*) * PAL model only Important: • The video monitor is used for each network camera. Connection example When connecting with a PC directly Speaker with amplifier (option) PC Microphone (option) LAN cable (category 5 or better, cross, STP*) * PAL model ...
It is not provided for recording/monitoring use. • Depending on the monitor, some characters (camera title, preset ID, etc.) may not be displayed on the screen. • Use a switching hub or a router which is compliant with amplifier (option) Microphone... (for adjustment use only) LAN cable (category 5 or better, straight, STP*) * PAL model only Important: • The video monitor is used for each network camera. Connection example When connecting with a PC directly Speaker with amplifier (option) PC Microphone (option) LAN cable (category 5 or better, cross, STP*) * PAL model ...
WVSC385E User Guide
Page 23
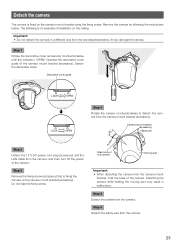
...176; Rotate Step 2 Detach the 12 V DC power cord plug (accessory) and the LAN cable from the camera. 23 Detach the camera The camera is fixed on the camera mount bracket (accessory). Step 1 Rotate the decorative cover (accessory) counterclockwise until the indication "OPEN" reached the... decorative cover guide of the camera. Detaching the camera while holding the moving part may damage the camera. Remove the camera by following is fixing the camera on the camera mount bracket using the fixing screw. Step 6 Detach the safety wire...
...176; Rotate Step 2 Detach the 12 V DC power cord plug (accessory) and the LAN cable from the camera. 23 Detach the camera The camera is fixed on the camera mount bracket (accessory). Step 1 Rotate the decorative cover (accessory) counterclockwise until the indication "OPEN" reached the... decorative cover guide of the camera. Detaching the camera while holding the moving part may damage the camera. Remove the camera by following is fixing the camera on the camera mount bracket using the fixing screw. Step 6 Detach the safety wire...


