
WVSC385E User Guide
Page 1
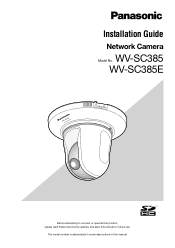
WV-SC385 WV-SC385E WV-SC385 LOCK OPEN Before attempting to connect or operate this product, please read these instructions carefully and save this manual. The model number is abbreviated in some descriptions in this manual for future use. Installation Guide Network Camera Model No.
WV-SC385 WV-SC385E WV-SC385 LOCK OPEN Before attempting to connect or operate this product, please read these instructions carefully and save this manual. The model number is abbreviated in some descriptions in this manual for future use. Installation Guide Network Camera Model No.
WVSC385E User Guide
Page 2
...product waarop deze verklaring betrekking heeft, voldoet aan de volgende normen of this unit in the ON position. and Canada: WV-SC385 For Europe and other normative documents following the provisions of this apparatus to rain or moisture. • The apparatus should ...be made by the party responsible for a Class A digital device, pursuant to computer or peripheral devices). WV-SC385 For Canada This Class A digital apparatus complies with the instruction manual, may apply. Ilmoitamme yksinomaisella vastuullamme, että tuote, jota tä...
...product waarop deze verklaring betrekking heeft, voldoet aan de volgende normen of this unit in the ON position. and Canada: WV-SC385 For Europe and other normative documents following the provisions of this apparatus to rain or moisture. • The apparatus should ...be made by the party responsible for a Class A digital device, pursuant to computer or peripheral devices). WV-SC385 For Canada This Class A digital apparatus complies with the instruction manual, may apply. Ilmoitamme yksinomaisella vastuullamme, että tuote, jota tä...
WVSC385E User Guide
Page 6
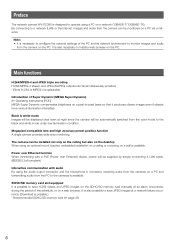
... the cameras is also necessary to -pixel basis so that it produces clearer images even if objects have various illumination intensities. Preface The network camera WV-SC385 is selectable. Note: • It is available. The camera can be installed not only on the ceiling but also on the desktop When using the...
... the cameras is also necessary to -pixel basis so that it produces clearer images even if objects have various illumination intensities. Preface The network camera WV-SC385 is selectable. Note: • It is available. The camera can be installed not only on the ceiling but also on the desktop When using the...

WVSC385E User Guide
Page 7
...inoperable. • Audio may be heard if a sound card is not installed on a PC. "WV-SC385" or "SC385" shown in the instructions and illustrations used in these operating instructions indicates the WV-SC385 and WV-SC385E. Note: • Refer to "Notes on Windows Vista® / Windows® 7" (... when using IPv6 for communication, use Microsoft® Windows® 7 or Microsoft® Windows Vista®. System requirements for the WV-SC385 (NTSC model), WV-SC385E (PAL model) as follows. • Installation Guide: Explains how to install and connect devices, as well as how to...
...inoperable. • Audio may be heard if a sound card is not installed on a PC. "WV-SC385" or "SC385" shown in the instructions and illustrations used in these operating instructions indicates the WV-SC385 and WV-SC385E. Note: • Refer to "Notes on Windows Vista® / Windows® 7" (... when using IPv6 for communication, use Microsoft® Windows® 7 or Microsoft® Windows Vista®. System requirements for the WV-SC385 (NTSC model), WV-SC385E (PAL model) as follows. • Installation Guide: Explains how to install and connect devices, as well as how to...

WVSC385E User Guide
Page 13
Major operating controls Camera mount bracket (accessory) OPEN FRONT LOCK WV-SC385 LOCK OPEN Safety wire (fixed with the mount bracket) Decorative cover (accessory) Camera Front view Transparent part (over the lens) WV-SC385 SDHC/SD memory card slot cover Panasonic logo plate WV-SC385 SDHC/SD memory card slot 13
Major operating controls Camera mount bracket (accessory) OPEN FRONT LOCK WV-SC385 LOCK OPEN Safety wire (fixed with the mount bracket) Decorative cover (accessory) Camera Front view Transparent part (over the lens) WV-SC385 SDHC/SD memory card slot cover Panasonic logo plate WV-SC385 SDHC/SD memory card slot 13

WVSC385E User Guide
Page 15
... the total weight, the area shall be sufficiently reinforced or the optional ceiling mount bracket for the camera, WV-Q105, or the optional ceiling embedding bracket, WV-Q155S/ WV-Q155C, shall be used. When installing on a desktop. The following are two methods; The camera can be... board such as plaster board is 196 N {19.99 lbf} or more. • If a ceiling board such as plaster board WV-SC385 Camera mount bracket (accessory) Decorative cover (accessory) Camera 15 Before starting the installation/connection, prepare the required devices and cables. Installations/Connections...
... the total weight, the area shall be sufficiently reinforced or the optional ceiling mount bracket for the camera, WV-Q105, or the optional ceiling embedding bracket, WV-Q155S/ WV-Q155C, shall be used. When installing on a desktop. The following are two methods; The camera can be... board such as plaster board is 196 N {19.99 lbf} or more. • If a ceiling board such as plaster board WV-SC385 Camera mount bracket (accessory) Decorative cover (accessory) Camera 15 Before starting the installation/connection, prepare the required devices and cables. Installations/Connections...
WVSC385E User Guide
Page 19
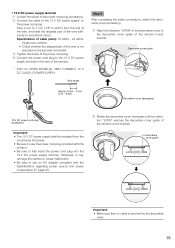
... (accessory). e Tighten the screw of the wire sufficiently to fully insert the power cord plug into the 12 V DC power supply terminal. WV-SC385 LOCK OPEN Decorative cover guide LOCK OPEN LOCK OPEN Important: • Make sure that no cable is securely connected. Strip 3 mm to 7... Be sure to avoid short circuit. • 12 V DC power supply terminal q Loosen the screw of the camera mount bracket. WV-SC385 Decorative cover (accessory) w Rotate the decorative cover clockwise until the indication "LOCK" reaches the decorative cover guide of the power cord plug (accessory...
... (accessory). e Tighten the screw of the wire sufficiently to fully insert the power cord plug into the 12 V DC power supply terminal. WV-SC385 LOCK OPEN Decorative cover guide LOCK OPEN LOCK OPEN Important: • Make sure that no cable is securely connected. Strip 3 mm to 7... Be sure to avoid short circuit. • 12 V DC power supply terminal q Loosen the screw of the camera mount bracket. WV-SC385 Decorative cover (accessory) w Rotate the decorative cover clockwise until the indication "LOCK" reaches the decorative cover guide of the power cord plug (accessory...
WVSC385E User Guide
Page 20
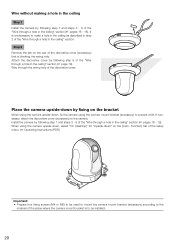
... (desktop)" for "Upside-down , fix the camera using the camera upside-down " on the [Cam. Function] tab of the setup menu. (☞ Operating Instructions (PDF)) WV-SC385 Important: • Prepare four fixing screws (M4 or M6) to be installed. 20 Attach the decorative cover by following step 1 and steps 3 - 9 of the "Wire...
... (desktop)" for "Upside-down , fix the camera using the camera upside-down " on the [Cam. Function] tab of the setup menu. (☞ Operating Instructions (PDF)) WV-SC385 Important: • Prepare four fixing screws (M4 or M6) to be installed. 20 Attach the decorative cover by following step 1 and steps 3 - 9 of the "Wire...
WVSC385E User Guide
Page 21
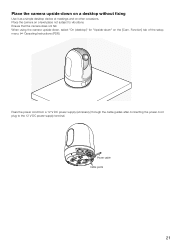
Function] tab of the setup menu. (☞ Operating Instructions (PDF)) WV-SC385 Pass the power cord from a 12 V DC power supply (accessory) through the cable guides after connecting the power cord plug to vibrations. Place the camera ...
Function] tab of the setup menu. (☞ Operating Instructions (PDF)) WV-SC385 Pass the power cord from a 12 V DC power supply (accessory) through the cable guides after connecting the power cord plug to vibrations. Place the camera ...
WVSC385E User Guide
Page 23
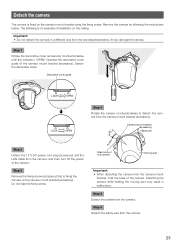
The following the instructions below . It may result in a different way from the camera mount bracket, hold the base of the camera. Decorative cover guide WV-SC385 LOCK OPEN LOCK OPEN LOCK OPEN Step 4 Rotate the camera counterclockwise to detach the camera from the camera. Do not lose the fixing screw. Step 5 ...
The following the instructions below . It may result in a different way from the camera mount bracket, hold the base of the camera. Decorative cover guide WV-SC385 LOCK OPEN LOCK OPEN LOCK OPEN Step 4 Rotate the camera counterclockwise to detach the camera from the camera. Do not lose the fixing screw. Step 5 ...

