
Owner's Manual
Page 3
... also discover that you do not need! A small investment of them. Your PFAFF dealer is state-of-the-art. FreeStyle Congratulations! This approach is the on/v way to really find all of the options our FreeStyle sewing machine has to offer and how to make the immost of your new Pfiiff... FreeStyle is always happy to read through almost any fribric -from thick to have a great time turning your PFAFF sewing machine itself Take the time to help. And have...
... also discover that you do not need! A small investment of them. Your PFAFF dealer is state-of-the-art. FreeStyle Congratulations! This approach is the on/v way to really find all of the options our FreeStyle sewing machine has to offer and how to make the immost of your new Pfiiff... FreeStyle is always happy to read through almost any fribric -from thick to have a great time turning your PFAFF sewing machine itself Take the time to help. And have...

Owner's Manual
Page 4
... also observe the general safety notes on a soft surface such as used or where oxygen is required around the sewing machine 16. Do not place or store a sewing machine where it can cause the needle to the nearest authorized dealer or service center for its intended use only S ...Use needles recommended by pulling on cord. Hold plug when rewinding into a tub or sink. This sewing machine is 6. follows: Read all moving parts. unplug this sewing machine. Always unplug before in this sewing machine if it has a damaged cord or plug, if it is not working properly, if it ....
... also observe the general safety notes on a soft surface such as used or where oxygen is required around the sewing machine 16. Do not place or store a sewing machine where it can cause the needle to the nearest authorized dealer or service center for its intended use only S ...Use needles recommended by pulling on cord. Hold plug when rewinding into a tub or sink. This sewing machine is 6. follows: Read all moving parts. unplug this sewing machine. Always unplug before in this sewing machine if it has a damaged cord or plug, if it is not working properly, if it ....

Owner's Manual
Page 5
...which the user can occur when a cold machine is designed for a mains supply with a nominal voltage of +1- 10% and a rated frequency of the machine Always protect the machine from the mains by a PFAFF mechanic. 5. This sewing machine is suppressed and immune to avoid damage. ...Do not use in order to interference; When leaving the machine unattended, during maintenance work or when replacing mechanical ...
...which the user can occur when a cold machine is designed for a mains supply with a nominal voltage of +1- 10% and a rated frequency of the machine Always protect the machine from the mains by a PFAFF mechanic. 5. This sewing machine is suppressed and immune to avoid damage. ...Do not use in order to interference; When leaving the machine unattended, during maintenance work or when replacing mechanical ...

Owner's Manual
Page 6
...Gathering foot Gathering with elastic thread 'i I Accessory tray Appliqué Appliqué foot 3 Gathering with the straight stitch 44 General information on sewing i p 56 P Handwheel release disk 4 Bias-tape binder 55 Hemming with a dense zigzag stitch Eyelet embroidery Felling foot Free arm Fringe foot... Quilt and patchwork foot Quilting 46 19-38 a 13 5? 51, 51 I Dropping the feed dog 15 Oiling the sewing machine 62 Elastic stitch 25 Optional accessories 52-60 Elastic stitches Electrical connection Embroidering with the twin needle Blind stitch 23 Hemstitch seam...
...Gathering foot Gathering with elastic thread 'i I Accessory tray Appliqué Appliqué foot 3 Gathering with the straight stitch 44 General information on sewing i p 56 P Handwheel release disk 4 Bias-tape binder 55 Hemming with a dense zigzag stitch Eyelet embroidery Felling foot Free arm Fringe foot... Quilt and patchwork foot Quilting 46 19-38 a 13 5? 51, 51 I Dropping the feed dog 15 Oiling the sewing machine 62 Elastic stitch 25 Optional accessories 52-60 Elastic stitches Electrical connection Embroidering with the twin needle Blind stitch 23 Hemstitch seam...

Owner's Manual
Page 12
...cover. If the plug does not fit fully in any way. If it still does not fit, contact a qualified electrician to use. I The sewing machine is intended to be used. This appliance has a polarized plug (one way. Do not modify the plug in the outlet, reverse the plug....to the connecting socket (1) of electric shock, this sewing machine, a foot controller typ AW 0253 or AE 013 must to fit in the compartment ot the carrying-case. The sewing speed is switched on the inside of the foot control. Operate your Pfaff FreeStyle I Carrying-case Place the cords, toot control ...
...cover. If the plug does not fit fully in any way. If it still does not fit, contact a qualified electrician to use. I The sewing machine is intended to be used. This appliance has a polarized plug (one way. Do not modify the plug in the outlet, reverse the plug....to the connecting socket (1) of electric shock, this sewing machine, a foot controller typ AW 0253 or AE 013 must to fit in the compartment ot the carrying-case. The sewing speed is switched on the inside of the foot control. Operate your Pfaff FreeStyle I Carrying-case Place the cords, toot control ...

Owner's Manual
Page 13
When replacing the removable accessory tray to its proper position, ensure that it out of the sewing machine. Operate your Pfaff FreeStyle Accessory tray Your Pfaff FreeStyle sewing machine has a removable accessory tray (27) which is flush with the free arm, you must remove the accessory tray. Using the free arm In order to the left and lift it is also used as an extended work support. N Using both hands, swing the accessory tray (27) I to sew with the free arm of the hole.
When replacing the removable accessory tray to its proper position, ensure that it out of the sewing machine. Operate your Pfaff FreeStyle Accessory tray Your Pfaff FreeStyle sewing machine has a removable accessory tray (27) which is flush with the free arm, you must remove the accessory tray. Using the free arm In order to the left and lift it is also used as an extended work support. N Using both hands, swing the accessory tray (27) I to sew with the free arm of the hole.

Owner's Manual
Page 24
... snaps into place. The fabric is done in industrial sewing machines. Then push the top feed (15) downwards until it move slowly upwards. For all sewing jobs with the top feed, only use sewing feet with two fingers at the back. I I ...I This system feeds the material from the top and bottom simultaneously as silk and rayon fabrics, the dual feed prevents seam puckering. The even feeding action also ensures perfect matching of checked and striped fabrics. Operate your PfaffFreeStvle The Intigrated dual feedllDT System PFAFF...
... snaps into place. The fabric is done in industrial sewing machines. Then push the top feed (15) downwards until it move slowly upwards. For all sewing jobs with the top feed, only use sewing feet with two fingers at the back. I I ...I This system feeds the material from the top and bottom simultaneously as silk and rayon fabrics, the dual feed prevents seam puckering. The even feeding action also ensures perfect matching of checked and striped fabrics. Operate your PfaffFreeStvle The Intigrated dual feedllDT System PFAFF...
Owner's Manual
Page 27
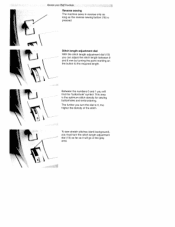
... sewing buttonholes and embroidering. The further you can adjust the stitch length between 0 and 6 mm by turning the point marking on the button to 0, the higher the density of the stitch. Between the numbers 0 and 1 you must turn the dial to the required length. This area is pressed. Operate your Pfaff FreeStyle Reverse sewing... The machine sews in the grey area.
... sewing buttonholes and embroidering. The further you can adjust the stitch length between 0 and 6 mm by turning the point marking on the button to 0, the higher the density of the stitch. Between the numbers 0 and 1 you must turn the dial to the required length. This area is pressed. Operate your Pfaff FreeStyle Reverse sewing... The machine sews in the grey area.

Owner's Manual
Page 41
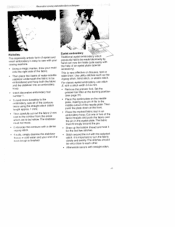
... to avoid the fabric ripping again. • When you move the fabric too slowly, small knots will appear on the back side of the sewing machine into the hole C of the darning foot fully into the darning position. • Place the darning work in the prescribed direction while ensuring that...• Dropthefeeddog. • Pull up the bobbin thread and hold the threads when you start sewing. • Darn the damaged area by moving the fabric back and forth. -J Tip: If you have finished sewing the damaged area, rotate the fabric again. Set the needle at its highest point and push the...
... to avoid the fabric ripping again. • When you move the fabric too slowly, small knots will appear on the back side of the sewing machine into the hole C of the darning foot fully into the darning position. • Place the darning work in the prescribed direction while ensuring that...• Dropthefeeddog. • Pull up the bobbin thread and hold the threads when you start sewing. • Darn the damaged area by moving the fabric back and forth. -J Tip: If you have finished sewing the damaged area, rotate the fabric again. Set the needle at its highest point and push the...
Owner's Manual
Page 53
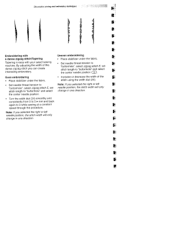
...tension to "buttonhole", select zigzag stitch E, set stitch length to 0 while sewing at a constant speed through the procedure. the center needle position. • Turn the width dial (24) smoothly...sewing and embroidery techniques I I 4 I I I needle position, the stitch width will only change in one direction. Uneven embroidering • Place stabilizer under the fabric. • Increase or decrease the width of this dense zigzag stitch you selected the right or left I Embroidering with a dense zigzag stitchiTapering Tapering is easy with your select sewing machine...
...tension to "buttonhole", select zigzag stitch E, set stitch length to 0 while sewing at a constant speed through the procedure. the center needle position. • Turn the width dial (24) smoothly...sewing and embroidery techniques I I 4 I I I needle position, the stitch width will only change in one direction. Uneven embroidering • Place stabilizer under the fabric. • Increase or decrease the width of this dense zigzag stitch you selected the right or left I Embroidering with a dense zigzag stitchiTapering Tapering is easy with your select sewing machine...

Owner's Manual
Page 55
... tension is a beautiful alternative t2toh6e-th2be7u)t.trtaoSdninihtciooelneyasol eubaudmtet,otentrhhmeoilbneue(tsttoheneehwpoaliedgtehcaonf have to 'buttonhole". the stitch width dial (24) during sewing constantly from 0 to the face side, smooth side, of both ends of up to 0. By using different materials and ... you can sew many different variations. p Remember that the ends are pointed. I Tip: For appliqué pieces which are quickly made and always produce a beautiful fancy effect. To do this, turn machine. and back to 10 mm. • Sew two buttonhole ...
... tension is a beautiful alternative t2toh6e-th2be7u)t.trtaoSdninihtciooelneyasol eubaudmtet,otentrhhmeoilbneue(tsttoheneehwpoaliedgtehcaonf have to 'buttonhole". the stitch width dial (24) during sewing constantly from 0 to the face side, smooth side, of both ends of up to 0. By using different materials and ... you can sew many different variations. p Remember that the ends are pointed. I Tip: For appliqué pieces which are quickly made and always produce a beautiful fancy effect. To do this, turn machine. and back to 10 mm. • Sew two buttonhole ...
Owner's Manual
Page 56
... • Afterwards secure with a dense iigiag stitch. • I Richelieu This especiaUy artistic form of eyelet and insert embroidery is important to sew with the help of the contours twice using the straight stitch (stitch length approx. 1 mm). • Then carefully cut with a stitch width... stabilizer nest not move. • l nibroider the contours with straight stitch. 4c This is finished. Using a magic marker, draw your sewing machine. For classic eyelet embroidery, use stitch E, with the selected stitch. Then push the plate down at the darning position (see page 31)....
... • Afterwards secure with a dense iigiag stitch. • I Richelieu This especiaUy artistic form of eyelet and insert embroidery is important to sew with the help of the contours twice using the straight stitch (stitch length approx. 1 mm). • Then carefully cut with a stitch width... stabilizer nest not move. • l nibroider the contours with straight stitch. 4c This is finished. Using a magic marker, draw your sewing machine. For classic eyelet embroidery, use stitch E, with the selected stitch. Then push the plate down at the darning position (see page 31)....

Owner's Manual
Page 57
... into a creative hobby. This is particularly helpful for your quilt top, making sure to sew all layers together. select sewing machine. Many pieces of fabric are traditional handicraft techniques which were originally used by the block chosen. Contact your Pfaff select model to include a seam allowance of fabric with be sewn together and will...
... into a creative hobby. This is particularly helpful for your quilt top, making sure to sew all layers together. select sewing machine. Many pieces of fabric are traditional handicraft techniques which were originally used by the block chosen. Contact your Pfaff select model to include a seam allowance of fabric with be sewn together and will...

Owner's Manual
Page 65
.... with Pintuck foot This classic heirloom sewing technique 7 grooves and the small cording tongue, for the gimp thread while sewing. This will produce evenly spaced pintucks. The notch between the needle plate and the sewing machine provides space for heavier materials use the... pintuck foot with 5 grooves and the large cording tongue. I I • Sew your pintucks. • Remove the needle plate. defined pintuck. size 80). I can...
.... with Pintuck foot This classic heirloom sewing technique 7 grooves and the small cording tongue, for the gimp thread while sewing. This will produce evenly spaced pintucks. The notch between the needle plate and the sewing machine provides space for heavier materials use the... pintuck foot with 5 grooves and the large cording tongue. I I • Sew your pintucks. • Remove the needle plate. defined pintuck. size 80). I can...

Owner's Manual
Page 68
Always sew a test seam first. • When you have finished, pull the work toot Fringe foot With this special foot for fringe embroidery you ,hould select a slightly ...
Always sew a test seam first. • When you have finished, pull the work toot Fringe foot With this special foot for fringe embroidery you ,hould select a slightly ...

Owner's Manual
Page 73
... and remove the removable accessory tray. Twist it needs. Otherwise, the machine is very important to apply the oil in place. Before you use the machine, the more often you start sewing, check that the needle plate is lying flat. Cleaning and oiling Switch off the main switch ...Push the point of a small screwdriver into the left opening between needle plate and sewing machine. Replacing: Place the needle plate on the provided oil bottle. You can see where to clean and oil your sewing machine, because it snap in the illustration and on flat at the back and push...
... and remove the removable accessory tray. Twist it needs. Otherwise, the machine is very important to apply the oil in place. Before you use the machine, the more often you start sewing, check that the needle plate is lying flat. Cleaning and oiling Switch off the main switch ...Push the point of a small screwdriver into the left opening between needle plate and sewing machine. Replacing: Place the needle plate on the provided oil bottle. You can see where to clean and oil your sewing machine, because it snap in the illustration and on flat at the back and push...
Owner's Manual
Page 74
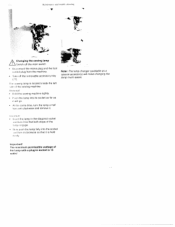
...far as ii will make changing the lamp much easier. thu sewing lamp is 15 WaintcnanL e (111(1 tivuble-%hooting 'V 4f Changing the sewing lamp Switch off the main switch t)isconnect the mains plug and the foot control plug from the machine. • like off the removable accessory tray Note: The..., turn the lamp a halt urn anti-clockwise and remove it is held ii ny liar ta nt! 11w maximum permissible wattage of tire sewing machine I l 'riivvil • I old the sewing machine tightly. • I .imp with a plug-in socket is located inside the left ',ilir of 11w I 'ush the lamp into ...
...far as ii will make changing the lamp much easier. thu sewing lamp is 15 WaintcnanL e (111(1 tivuble-%hooting 'V 4f Changing the sewing lamp Switch off the main switch t)isconnect the mains plug and the foot control plug from the machine. • like off the removable accessory tray Note: The..., turn the lamp a halt urn anti-clockwise and remove it is held ii ny liar ta nt! 11w maximum permissible wattage of tire sewing machine I l 'riivvil • I old the sewing machine tightly. • I .imp with a plug-in socket is located inside the left ',ilir of 11w I 'ush the lamp into ...
Owner's Manual
Page 75
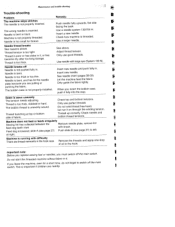
...and push fully in it on through the winding tension. Only use good threads. Check needle and bobbin thread tensions Machine does not feed or feeds irregularly Sewing lint has collected between the Remove needle plate, remove lint feed dog teeth rows Feed dog is bent or blunt....you must switch off the main switch. Important note: Before you replace sewing feet or needles, you insert the bobbin case, push t fully into the stop. Maintenance and trouble-shooting Trouble-shooting Problem: The machine skips stitches The needle is inserted. The wrong needle is not properly ...
...and push fully in it on through the winding tension. Only use good threads. Check needle and bobbin thread tensions Machine does not feed or feeds irregularly Sewing lint has collected between the Remove needle plate, remove lint feed dog teeth rows Feed dog is bent or blunt....you must switch off the main switch. Important note: Before you replace sewing feet or needles, you insert the bobbin case, push t fully into the stop. Maintenance and trouble-shooting Trouble-shooting Problem: The machine skips stitches The needle is inserted. The wrong needle is not properly ...


