

Owner's Manual
Page 4
..."Alphabet" "Alphabet" BSDDDDDDDDDlDaiiiiiridsririiirirerereerrreeeeeceececcccctcctpctfttttotttlssssasrssesesseeeteeeleellellleleleollleeeeeceeccwcccccctcttttititietttiioioioiiioroooooonninnnnnnnnngkkkkkkkkkekeeeeeteyeeyyeyhyyyyyye"""""""C"E""SFBfSZEBLllteaatorliliueriggaasnsnetdtsziegettidgtoanccdoishgdcnhtttsiboionttsbatguscivtrglttthitieictittpnta"rchosclldchtnoheihs"wt-h"ctcisikoinhtttcrlgh"seaht"i"i2pgtcrhhpot"egsrrtfaiotmcrha"t"ions" (29) (30) (31) Detachable work support Presser foot holder with Integrated dual feed/IDF presser foot (32) Needle threader (33) ,,Reverse sewing" key...
..."Alphabet" "Alphabet" BSDDDDDDDDDlDaiiiiiridsririiirirerereerrreeeeeceececcccctcctpctfttttotttlssssasrssesesseeeteeeleellellleleleollleeeeeceeccwcccccctcttttititietttiioioioiiioroooooonninnnnnnnnngkkkkkkkkkekeeeeeteyeeyyeyhyyyyyye"""""""C"E""SFBfSZEBLllteaatorliliueriggaasnsnetdtsziegettidgtoanccdoishgdcnhtttsiboionttsbatguscivtrglttthitieictittpnta"rchosclldchtnoheihs"wt-h"ctcisikoinhtttcrlgh"seaht"i"i2pgtcrhhpot"egsrrtfaiotmcrha"t"ions" (29) (30) (31) Detachable work support Presser foot holder with Integrated dual feed/IDF presser foot (32) Needle threader (33) ,,Reverse sewing" key...

Owner's Manual
Page 9
... sewing aids Hemstitching IDF system Info menu Invisible hems, blind stitch Knit edge foot/ruffler Lace-work support Display, adjusting the contrast Elastic utility stitches Electrical connection Embroidery stitch programs, tiptronic 2040 Embroidery stitch programs, tiptronic 2030 Embroidery, general notes Eyelet embroidery Feed dog, lowering Felling foot/Appliqué foot Foot control, connecting Free...
... sewing aids Hemstitching IDF system Info menu Invisible hems, blind stitch Knit edge foot/ruffler Lace-work support Display, adjusting the contrast Elastic utility stitches Electrical connection Embroidery stitch programs, tiptronic 2040 Embroidery stitch programs, tiptronic 2030 Embroidery, general notes Eyelet embroidery Feed dog, lowering Felling foot/Appliqué foot Foot control, connecting Free...
Owner's Manual
Page 19
Contents Carrying case Top cover with stitch program chart Electrical connection Voltage switchover Accessories Detachable work support Bobbin winding Bobbin case Needle/bobbin thread tension Threading the needle thread Needle threader Pulling up the bobbin thread Presser foot lifter Thread cutter Changing ...
Contents Carrying case Top cover with stitch program chart Electrical connection Voltage switchover Accessories Detachable work support Bobbin winding Bobbin case Needle/bobbin thread tension Threading the needle thread Needle threader Pulling up the bobbin thread Presser foot lifter Thread cutter Changing ...
Owner's Manual
Page 23
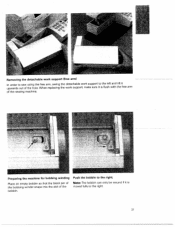
Removing the detachable work support, make sure to the right 21 When replacing the the detachable work support work support (free arm) In order to sew upwards out of the sewing machine. L Preparing the machine for bobbing winding Place an empty bobbin so that the black pin of the bobbing winder snaps into the slot of the bobbin. Push the bobbin to the right Note: The bobbin can only be wound if it is flush with lift the it is moved fully to the left and it free arm of using the free arm, swing the hole.
Removing the detachable work support, make sure to the right 21 When replacing the the detachable work support work support (free arm) In order to sew upwards out of the sewing machine. L Preparing the machine for bobbing winding Place an empty bobbin so that the black pin of the bobbing winder snaps into the slot of the bobbin. Push the bobbin to the right Note: The bobbin can only be wound if it is flush with lift the it is moved fully to the left and it free arm of using the free arm, swing the hole.

Owner's Manual
Page 63
... precise feeding at the same time, thus serging the raw edge is especially suitable for hand sewing. - Place the fabric under the presser foot to support it must only pick up . - If the stitches are visible on itself so approximately 1 /2 inch (1 cm) of the hem. Serge the edge of the serge...
... precise feeding at the same time, thus serging the raw edge is especially suitable for hand sewing. - Place the fabric under the presser foot to support it must only pick up . - If the stitches are visible on itself so approximately 1 /2 inch (1 cm) of the hem. Serge the edge of the serge...

Owner's Manual
Page 98
... ntucks. A cording tongue is not used when inserting a gimp thread in the foot This will help form well- Feed the gimp thread under the work support so that it does not become knotted during sewing. - Pintuck foot Teaaashnsidcsiloyccthltdaoiulsndsprilaceinnch'daseteilcridlgloohootthnmwemsosoeaalwnreeyningstgy.ivpUteeennscdhaoenfrnigfqoaausbrtermailccgeaniscnutscbhe touch by making the pintuck appear even more raised. Thread the...
... ntucks. A cording tongue is not used when inserting a gimp thread in the foot This will help form well- Feed the gimp thread under the work support so that it does not become knotted during sewing. - Pintuck foot Teaaashnsidcsiloyccthltdaoiulsndsprilaceinnch'daseteilcridlgloohootthnmwemsosoeaalwnreeyningstgy.ivpUteeennscdhaoenfrnigfqoaausbrtermailccgeaniscnutscbhe touch by making the pintuck appear even more raised. Thread the...

Owner's Manual
Page 132
... and remove the bulb. 1 39 Guide the bulb into the holder as far as it half a rotation in the lamp changer. Remove the detachable work support Important: The maximum wattage of the bulb Insert the bulb in a clock-wise direction. Insertion of the bulb is held firmly. Remove the bulb changer... from the bulb, the bulb is 5 watts. Now turn it will go . Disconnect the lead cord and the foot control plug from your PFAFF dealer (order No. 92-329 975-05).
... and remove the bulb. 1 39 Guide the bulb into the holder as far as it half a rotation in the lamp changer. Remove the detachable work support Important: The maximum wattage of the bulb Insert the bulb in a clock-wise direction. Insertion of the bulb is held firmly. Remove the bulb changer... from the bulb, the bulb is 5 watts. Now turn it will go . Disconnect the lead cord and the foot control plug from your PFAFF dealer (order No. 92-329 975-05).

Owner's Manual
Page 136
Parts of the sewing machine (model 2030) (1) Key pair a (stitch width/pattern width controls) (2) Key pair b (stitch length/pattern length controls) (3 Key pair c (stitch density/balance controls) (4) Info key (5) Carrying handle (6) Handwheel (7) ... stitch" Direct selection key "Elastic stitch with 2 perforations" Direct selection key "Closed overlock stitch" Slide for lowering the feed dog Base plate (29) Detachable work support (30> Presser foot holder with presser foot (31) Integrated dual feed/IDF (32) Needle threader (33) "Reverse sewing" key (34) Threading slots (35) Needle thread...
Parts of the sewing machine (model 2030) (1) Key pair a (stitch width/pattern width controls) (2) Key pair b (stitch length/pattern length controls) (3 Key pair c (stitch density/balance controls) (4) Info key (5) Carrying handle (6) Handwheel (7) ... stitch" Direct selection key "Elastic stitch with 2 perforations" Direct selection key "Closed overlock stitch" Slide for lowering the feed dog Base plate (29) Detachable work support (30> Presser foot holder with presser foot (31) Integrated dual feed/IDF (32) Needle threader (33) "Reverse sewing" key (34) Threading slots (35) Needle thread...

