

Owner's Manual
Page 4
Parts of the coverlock 4772 (1) Upper thread tension (2) Upper thread tension (3) Carrying handle (4) (5) (6) (7) TCTThhohrrnreeevaaaedddrttetteeernnnsssiiiooonnn///Tluowpwpoee-rtrhllrooeooapdpeercrhtthahirrneesaatdditch looper (8) Looper cover (9) Blade guard (10) Standard presser foot (11) Standard needle plate (12) Detachable work support (13) Accessory box (14) Needle holder (15) Sewing light cover (16) Upper overedge looper (17) Lower overedge looper (18) Two-thread chainstitch looper (19) (20) Retaining Adjusting screw for upper overedge knob for seam width looper (21) ...
Parts of the coverlock 4772 (1) Upper thread tension (2) Upper thread tension (3) Carrying handle (4) (5) (6) (7) TCTThhohrrnreeevaaaedddrttetteeernnnsssiiiooonnn///Tluowpwpoee-rtrhllrooeooapdpeercrhtthahirrneesaatdditch looper (8) Looper cover (9) Blade guard (10) Standard presser foot (11) Standard needle plate (12) Detachable work support (13) Accessory box (14) Needle holder (15) Sewing light cover (16) Upper overedge looper (17) Lower overedge looper (18) Two-thread chainstitch looper (19) (20) Retaining Adjusting screw for upper overedge knob for seam width looper (21) ...
Owner's Manual
Page 5
... been dropped or damaged, or dropped into any adjustments in this manual. 3. Never operate the sewing machine with same type rated 15 Watts. 3. Keep ventilation ope nings of the sewing machine and foot control free from the electric outlet when removing covers, lubrica ting, or when making any opening. 6. Do not unplug by the manufacturer as threading needle, changing needle, threading bobbin, or changing presser foot, etc. 16. Always unplug before cleaning. 2. Only use bent or blunt needles. Great...
... been dropped or damaged, or dropped into any adjustments in this manual. 3. Never operate the sewing machine with same type rated 15 Watts. 3. Keep ventilation ope nings of the sewing machine and foot control free from the electric outlet when removing covers, lubrica ting, or when making any opening. 6. Do not unplug by the manufacturer as threading needle, changing needle, threading bobbin, or changing presser foot, etc. 16. Always unplug before cleaning. 2. Only use bent or blunt needles. Great...
Owner's Manual
Page 6
... the plug. 3. its cord. 9. Do not pull the mains plug out of fluff. To avoid the risk of our qualified service staff. 11. Treatment Always make sure not to 85° C. Never use in the home. When leaving the machine, during maintenance work or when changing mechanical parts or accessories, always disconnect the machine from the elec tric power by a PFAFF mechanic. 5. Do...
... the plug. 3. its cord. 9. Do not pull the mains plug out of fluff. To avoid the risk of our qualified service staff. 11. Treatment Always make sure not to 85° C. Never use in the home. When leaving the machine, during maintenance work or when changing mechanical parts or accessories, always disconnect the machine from the elec tric power by a PFAFF mechanic. 5. Do...
Owner's Manual
Page 8
...feed 28, 29 Edge guide 35 Foot control, connecting 7 Free arm 27 Light bulb (sewing lamp), changing 58 Looper cover 8 Lower blade, changing 57 Lower overedge looper (yellow), threading 14, 15 Lubricating the machine 56 Machine cover 6 Maintenance 56 - 58 Master switch 7 Needle changing aid 11 Needle holder 11 Needle plate, changing 30 Needle position 10, 11 Needle(s), threading 18, 19 Needle, changing 11 Power table 32, 34 Presser foot 22 Presser foot lifter 21 Presserfoot pressure 21 Presser foot, changing 22 Program overview 36 - 41 Rubber feet...
...feed 28, 29 Edge guide 35 Foot control, connecting 7 Free arm 27 Light bulb (sewing lamp), changing 58 Looper cover 8 Lower blade, changing 57 Lower overedge looper (yellow), threading 14, 15 Lubricating the machine 56 Machine cover 6 Maintenance 56 - 58 Master switch 7 Needle changing aid 11 Needle holder 11 Needle plate, changing 30 Needle position 10, 11 Needle(s), threading 18, 19 Needle, changing 11 Power table 32, 34 Presser foot 22 Presser foot lifter 21 Presserfoot pressure 21 Presser foot, changing 22 Program overview 36 - 41 Rubber feet...

Owner's Manual
Page 11
... the foot control. The machine is regulated by adjusting the slide on the master switch (32) the sewing lamp is illuminated. Setting = reduced final speed Setting 41 = full final speed Master switch When you turn on the front of the machine and the plug socket. Canada: For control sewing machine, foot controller type AE 033 has to be Australia: For control sewing machine, foot controller type AE 034 has to be used . Notes...
... the foot control. The machine is regulated by adjusting the slide on the master switch (32) the sewing lamp is illuminated. Setting = reduced final speed Setting 41 = full final speed Master switch When you turn on the front of the machine and the plug socket. Canada: For control sewing machine, foot controller type AE 033 has to be Australia: For control sewing machine, foot controller type AE 034 has to be used . Notes...

Owner's Manual
Page 12
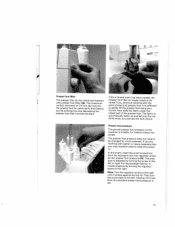
Apply pressure to the lower part of the con tainer until the lower latches click into the upper slot of the hook cover 18). To remove the trimming waste container, re peat this procedure in the lower slots of the looper cover. Looper cover Push the looper cover Trimming waste container Insert the upper latches of the trimming waste container (38) into place in the reverse order.
Apply pressure to the lower part of the con tainer until the lower latches click into the upper slot of the hook cover 18). To remove the trimming waste container, re peat this procedure in the lower slots of the looper cover. Looper cover Push the looper cover Trimming waste container Insert the upper latches of the trimming waste container (38) into place in the reverse order.
Owner's Manual
Page 25
... thick fabrics can be raised and lowered with the same thread and presser foot. Presser foot pressure The pre-set . 21 If you are working with presser foot lifter (36). For heavyweight fabrics: in crease pressure by turning the regulator screw to be changed for the presser foot pressure (25). Once a thread chain has been created, the presser foot lifter no longer needs to the right until it 6 times. Note: Turn the regulator screw to...
... thick fabrics can be raised and lowered with the same thread and presser foot. Presser foot pressure The pre-set . 21 If you are working with presser foot lifter (36). For heavyweight fabrics: in crease pressure by turning the regulator screw to be changed for the presser foot pressure (25). Once a thread chain has been created, the presser foot lifter no longer needs to the right until it 6 times. Note: Turn the regulator screw to...

Owner's Manual
Page 26
...- 41). Presser foot Use cover-stitch presser foot C from the back to the left. Press the white lever at the rear of the foot locks into place. The sewing foot will cut off the electrical power To remove: Raise the needle(s) to 8 inch (15 -20 cm) long thread chain. This will be released automatically from the holder and can used as an aid when sewing. These markings can be positioned. Check...
...- 41). Presser foot Use cover-stitch presser foot C from the back to the left. Press the white lever at the rear of the foot locks into place. The sewing foot will cut off the electrical power To remove: Raise the needle(s) to 8 inch (15 -20 cm) long thread chain. This will be released automatically from the holder and can used as an aid when sewing. These markings can be positioned. Check...

Owner's Manual
Page 30
... on the needle plate. The 2-thread chainstitch is increased by turning the seam width adjustment knob (20). For the left needle, the set value is sewn with an interval from 1/8 to 3/16 inch (3.0 mm to the right needle only. the seam width can be more easily adjusted if the looper cover is open. - 3,0mm • (0.12') 4,5 mm (0,18) Note: The seam width adjustments between...
... on the needle plate. The 2-thread chainstitch is increased by turning the seam width adjustment knob (20). For the left needle, the set value is sewn with an interval from 1/8 to 3/16 inch (3.0 mm to the right needle only. the seam width can be more easily adjusted if the looper cover is open. - 3,0mm • (0.12') 4,5 mm (0,18) Note: The seam width adjustments between...
Owner's Manual
Page 31
... the work support Position the detachable work support (12) for se wing tubular items such as desired from F (4 1 mm> to the left. The free arm is particularly useful for ward slightly, and remove this to 4 mm by turning stitch length it is level with the free arm Detach the work support Pull the detachable work support so that it locks into posi tion. 27 For most sewing work support. Sewing with the machine cover...
... the work support Position the detachable work support (12) for se wing tubular items such as desired from F (4 1 mm> to the left. The free arm is particularly useful for ward slightly, and remove this to 4 mm by turning stitch length it is level with the free arm Detach the work support Pull the detachable work support so that it locks into posi tion. 27 For most sewing work support. Sewing with the machine cover...

Owner's Manual
Page 32
... the stitch length selec ted and the type of fabric used. / If differential feed adjustment lever (34) is a smooth seam (A). As a result, the fabric is 1.0, by which move the same amount of fabric. The standard setting is stretched. The result is set to be fed through only half as much fabric as the rear feed dog, i.e. the front feed dog feeds through . It can also be adjusted within the range 0.5 and 2.0. Adjustment lever...
... the stitch length selec ted and the type of fabric used. / If differential feed adjustment lever (34) is a smooth seam (A). As a result, the fabric is 1.0, by which move the same amount of fabric. The standard setting is stretched. The result is set to be fed through only half as much fabric as the rear feed dog, i.e. the front feed dog feeds through . It can also be adjusted within the range 0.5 and 2.0. Adjustment lever...

Owner's Manual
Page 36
... to the needle, when the stitch width is set at 3.5 mm. Screw the edge guide tight onto the power table beforehand. This is marked with various units of the fabric. Adjust the edge guide according lv, 32 The figures on the left are in mm, and those on the right are in inches. Close looper cover. For cover stitch and two-thread chainstitch: Remove blade...
... to the needle, when the stitch width is set at 3.5 mm. Screw the edge guide tight onto the power table beforehand. This is marked with various units of the fabric. Adjust the edge guide according lv, 32 The figures on the left are in mm, and those on the right are in inches. Close looper cover. For cover stitch and two-thread chainstitch: Remove blade...

Owner's Manual
Page 38
... to be stitched down, you start sewing: Raise the presser foot and place the fabric under the fabric beforehand. Preparing the fabric: It is useful to sew, feeds the fabric slowly. 34 Finishing sewing 1. Note: The cover-stitch guide set at 3.5 mm. When starting to sew, pull the fabric taut towards the rear and sew slowly, because the machine, when you must be adjusted. Sew a trial seam first. Important notes on sewing with the cover stitch The power table is...
... to be stitched down, you start sewing: Raise the presser foot and place the fabric under the fabric beforehand. Preparing the fabric: It is useful to sew, feeds the fabric slowly. 34 Finishing sewing 1. Note: The cover-stitch guide set at 3.5 mm. When starting to sew, pull the fabric taut towards the rear and sew slowly, because the machine, when you must be adjusted. Sew a trial seam first. Important notes on sewing with the cover stitch The power table is...
Owner's Manual
Page 60
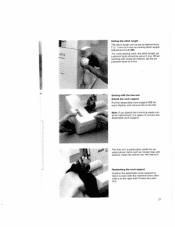
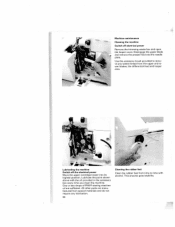
... looper cover. Lubricate the point shown above with alcohol. All other parts are sufficient. This ensures good stability. One or two drops of PFAFF sewing machine oil are manu factured from special materials and do not require any waste thread from time to time with the oil provided in the accessory box every time you clean the machine. Disengage the upper blade and remove the presser foot and the needle plate.
... looper cover. Lubricate the point shown above with alcohol. All other parts are sufficient. This ensures good stability. One or two drops of PFAFF sewing machine oil are manu factured from special materials and do not require any waste thread from time to time with the oil provided in the accessory box every time you clean the machine. Disengage the upper blade and remove the presser foot and the needle plate.

Owner's Manual
Page 65
... seam and adjust guide C according to the cover stitch (see page 30 - 33). Working: Loosen the needle plate screw by half a turn and open the looper cover. The hemmed seam is in guide D, the crease is in illustration 2, onto the cover-stitch foot and fasten both using the small screw and the washer. Cover-stitch guide set . Turn up under the needle plate. Place guide C, as shown in illustration 1, along position 'x" fully under the presser foot. Fully tighten the screw...
... seam and adjust guide C according to the cover stitch (see page 30 - 33). Working: Loosen the needle plate screw by half a turn and open the looper cover. The hemmed seam is in guide D, the crease is in illustration 2, onto the cover-stitch foot and fasten both using the small screw and the washer. Cover-stitch guide set . Turn up under the needle plate. Place guide C, as shown in illustration 1, along position 'x" fully under the presser foot. Fully tighten the screw...

Owner's Manual
Page 68
... back. Working: Raise the needle to the folded 3-thread rol led hem. Sew a test seam Note: The wave effect can be upwards). Hold the gimp thread in place with a few stitches, then lay the fabric under guides 4 and 5 so that it through opening 2 into lateral guide 3. Then lay the thread under the presser foot and continue sewing (the face side of curtains. Gimp thread foot This presser foot is used for...
... back. Working: Raise the needle to the folded 3-thread rol led hem. Sew a test seam Note: The wave effect can be upwards). Hold the gimp thread in place with a few stitches, then lay the fabric under guides 4 and 5 so that it through opening 2 into lateral guide 3. Then lay the thread under the presser foot and continue sewing (the face side of curtains. Gimp thread foot This presser foot is used for...

Owner's Manual
Page 70
Lift the sewing foot and insert the fabric ply to its uppermost position and insert the shirring foot. Lo wer the presser foot and sew the two fabric plies together. Sew a test seam. It is automatically gathered. Insert the second fabric ply (face side down) under the presser foot so 1 that plate 1 lies between the two plies. Working: Raise the needle to be shirred (face side up). Note: The degree of shirring can...
Lift the sewing foot and insert the fabric ply to its uppermost position and insert the shirring foot. Lo wer the presser foot and sew the two fabric plies together. Sew a test seam. It is automatically gathered. Insert the second fabric ply (face side down) under the presser foot so 1 that plate 1 lies between the two plies. Working: Raise the needle to be shirred (face side up). Note: The degree of shirring can...

Owner's Manual
Page 72
... the fa bric as lead and ordinary cords. Beading foot This presser foot is now on top. Note: For sewing on bead size> Stitch length should be loose (approx. -5). Lay the material reverse side to sew the beading into guide 1 and beneath guide 2 approx. 2 inches (5 cm) behind the sewing foot. The stitch length is between 3 and 4 Working: 2 Raise the needle to the 3-thread overedge seam (narrow or wide depending on lead...
... the fa bric as lead and ordinary cords. Beading foot This presser foot is now on top. Note: For sewing on bead size> Stitch length should be loose (approx. -5). Lay the material reverse side to sew the beading into guide 1 and beneath guide 2 approx. 2 inches (5 cm) behind the sewing foot. The stitch length is between 3 and 4 Working: 2 Raise the needle to the 3-thread overedge seam (narrow or wide depending on lead...
Owner's Manual
Page 76
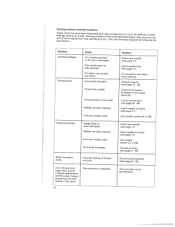
... Insert new needle (see page 11). Stitch formation faulty Incorrect setting of thread tensions 3 or 4 thread over- Insert needle correctly (see page 12- 20) Check if the thread is caught on the fabric when sewing, Thread properly (see page 11). Needle bent or point damaged. Do not pull on the spool stand etc. edge seam has an irregular appearance and the upper looper thread has not inter locked in the seam. Use needle...
... Insert new needle (see page 11). Stitch formation faulty Incorrect setting of thread tensions 3 or 4 thread over- Insert needle correctly (see page 12- 20) Check if the thread is caught on the fabric when sewing, Thread properly (see page 11). Needle bent or point damaged. Do not pull on the spool stand etc. edge seam has an irregular appearance and the upper looper thread has not inter locked in the seam. Use needle...

Owner's Manual
Page 79
Parts of the coverlock 4772 (24) Thread guides with color coding (25) Regulator screw for presser foot pressure (26) Telescopic thread guide (27) Thread chain cutter (28) Thread spool stand (29) Thread spool pins (30) Thread spool centering pieces (31) Machine socket, foot control with power cord (32) Electrical power master switch (33) Handwheel (34) Regulator lever for differential feed (35) Stitch length adjustment knob (36) Presser foot lifter (37) Rear thread guides (38) Trimming waste box (39) Foot control (40) Foot control plug for machine (41) Power plug
Parts of the coverlock 4772 (24) Thread guides with color coding (25) Regulator screw for presser foot pressure (26) Telescopic thread guide (27) Thread chain cutter (28) Thread spool stand (29) Thread spool pins (30) Thread spool centering pieces (31) Machine socket, foot control with power cord (32) Electrical power master switch (33) Handwheel (34) Regulator lever for differential feed (35) Stitch length adjustment knob (36) Presser foot lifter (37) Rear thread guides (38) Trimming waste box (39) Foot control (40) Foot control plug for machine (41) Power plug


