

Owner's Manual
Page 2
...where the air openings may deflect the needle causing itto break. 15. When using this manual. Always unplug sewing machine from outlet. 9. The sewing machine should always be left unattended when plugged in. Keep fingers away from all instructions before relamping. Close attention ...is necessary when this sewing machine is required around the sewing machine needle. 12. Do not use only. Hold plug when rewinding into water or other user servicing adjustments ...
...where the air openings may deflect the needle causing itto break. 15. When using this manual. Always unplug sewing machine from outlet. 9. The sewing machine should always be left unattended when plugged in. Keep fingers away from all instructions before relamping. Close attention ...is necessary when this sewing machine is required around the sewing machine needle. 12. Do not use only. Hold plug when rewinding into water or other user servicing adjustments ...

Owner's Manual
Page 3
... Second spoof holder (swing up) 47 Correction key 48 Program entry key r7 z:AFF2 CreatJ: The right machine for creative embroidery as if by hand, and design sewing. the We wish you product, one of the sewing machine I Carrying handle 2 Folding cover 3 Hand wheel 4 Release disc 5 Keys for balance and pattern length 6 Key for program...
... Second spoof holder (swing up) 47 Correction key 48 Program entry key r7 z:AFF2 CreatJ: The right machine for creative embroidery as if by hand, and design sewing. the We wish you product, one of the sewing machine I Carrying handle 2 Folding cover 3 Hand wheel 4 Release disc 5 Keys for balance and pattern length 6 Key for program...

Owner's Manual
Page 7
... power lead out of the foot control \; Plug the foot control lead into connec hon socket 31 and place the foot con trol on the machine. it irri ru on 11 Connect the mains lead. no V / pro--n tho rn ion so. Compartment A is for storing the foot control, mains lead and... 000rt ho two bitoros 1 V is (iiSrrl)Pri ri rot jr tin hr r' iu° 4 however, without turning on the ground. Jt7j -t Press main switch 9, the sewing lamp then goes on thu roar-
... power lead out of the foot control \; Plug the foot control lead into connec hon socket 31 and place the foot con trol on the machine. it irri ru on 11 Connect the mains lead. no V / pro--n tho rn ion so. Compartment A is for storing the foot control, mains lead and... 000rt ho two bitoros 1 V is (iiSrrl)Pri ri rot jr tin hr r' iu° 4 however, without turning on the ground. Jt7j -t Press main switch 9, the sewing lamp then goes on thu roar-
Owner's Manual
Page 13
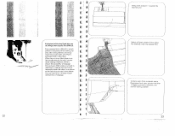
...sewing machines, there is always the possibility of slippage I I F' I * I To place extra thick materials below . Now plac the material under the sewing foot I - 22 Swing work support 11 against the machine arm. - -V. raisn pressr har lifter 17 higher and hold until fabric is automatic with Pfaffs... fear of slippage The exclusive Pfaff snlutiun ist built in dual feed. F Exclusive built-in correct sewing position / 23 Switch ott main switch 9. Even experts find difficult. You can sew up to match patterns and plaids when sewing slip pery silks and synthetics ...
...sewing machines, there is always the possibility of slippage I I F' I * I To place extra thick materials below . Now plac the material under the sewing foot I - 22 Swing work support 11 against the machine arm. - -V. raisn pressr har lifter 17 higher and hold until fabric is automatic with Pfaffs... fear of slippage The exclusive Pfaff snlutiun ist built in dual feed. F Exclusive built-in correct sewing position / 23 Switch ott main switch 9. Even experts find difficult. You can sew up to match patterns and plaids when sewing slip pery silks and synthetics ...

Owner's Manual
Page 15
...stopped and the foot con trol is selected the word 'battery" disappears from the machine and cutting the threads: Remove the material to the rear and pull the threads in sewing direction into any memory are retained automatically. When a pro gram is pressed again. ...the program memory in the computer is quite normal and of electronic compo nents this machine becomes warm during sewing For bobbin winding disengage the sewing action. When the machine is entered during sewing. After bobbin winding engage the sewing action again. J / Removing the work from the display. 26 H 2 ...
...stopped and the foot con trol is selected the word 'battery" disappears from the machine and cutting the threads: Remove the material to the rear and pull the threads in sewing direction into any memory are retained automatically. When a pro gram is pressed again. ...the program memory in the computer is quite normal and of electronic compo nents this machine becomes warm during sewing For bobbin winding disengage the sewing action. When the machine is entered during sewing. After bobbin winding engage the sewing action again. J / Removing the work from the display. 26 H 2 ...
Owner's Manual
Page 16
.... Tie-off at the top posi tion Electronic actual speed selection: Press key 16 for slow sewing. If you press the key during sewing, the light goes on and the machine wilt sew back wards as long as to the use of numerals, punctuation marks and 99 programs. The ... A then lights up and the machine sews back wards permanently. F N Electronic bobbin thread monitoring: Bobbin thread monitor 14 flashes before you push and hold key 6 the computer also makes recommendations as the key is indi cated for memories The computer of the Creative contains three different alphabets and two...
.... Tie-off at the top posi tion Electronic actual speed selection: Press key 16 for slow sewing. If you press the key during sewing, the light goes on and the machine wilt sew back wards as long as to the use of numerals, punctuation marks and 99 programs. The ... A then lights up and the machine sews back wards permanently. F N Electronic bobbin thread monitoring: Bobbin thread monitor 14 flashes before you push and hold key 6 the computer also makes recommendations as the key is indi cated for memories The computer of the Creative contains three different alphabets and two...

Owner's Manual
Page 18
... +3 OlI00110ISu Rule if the pattern is 3 selected, all programs will not take further inputs, this applies to sew the pro grams entered from the beginning By pressing the foot control the machine sews the combination from + ito + 7) 2. The programs can also be selected and cancelled. p-' f; To stop...is corrected with left by pressing key 6. liii' ! '.,i 0 0 43 00 00 50 50 1Si if 1' 4 Storing program combinations: 3 The creative computer contains 16 M memories, MO to M 15 A maximum of 3 484 programs can be stored in display 21. The memories are then free for...
... +3 OlI00110ISu Rule if the pattern is 3 selected, all programs will not take further inputs, this applies to sew the pro grams entered from the beginning By pressing the foot control the machine sews the combination from + ito + 7) 2. The programs can also be selected and cancelled. p-' f; To stop...is corrected with left by pressing key 6. liii' ! '.,i 0 0 43 00 00 50 50 1Si if 1' 4 Storing program combinations: 3 The creative computer contains 16 M memories, MO to M 15 A maximum of 3 484 programs can be stored in display 21. The memories are then free for...

Owner's Manual
Page 19
... I!{lIh R 39 37 ri' \' R 37 I,',I ii( 11:111 j., ru r -Il Pattern mirroring: Press "pattern mirror key 28." Display E lights up . The machine sews a program or a program combination and ties off beginning and end of the seam. Display D lights up . The selected program is sewn in program 00 and... key 28, display and function are switched off Key 29 has a second function for straight stitch sewing with a roundhole needle plate and straight stitch foot (special accessories) If the machine is in reverse Programs can also be entered mirror imaged into a combina tion, as well as ...
... I!{lIh R 39 37 ri' \' R 37 I,',I ii( 11:111 j., ru r -Il Pattern mirroring: Press "pattern mirror key 28." Display E lights up . The machine sews a program or a program combination and ties off beginning and end of the seam. Display D lights up . The selected program is sewn in program 00 and... key 28, display and function are switched off Key 29 has a second function for straight stitch sewing with a roundhole needle plate and straight stitch foot (special accessories) If the machine is in reverse Programs can also be entered mirror imaged into a combina tion, as well as ...

Owner's Manual
Page 20
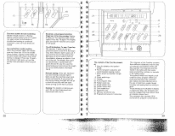
...in a combination appears in this book may differ from 00 to 99, and for letters and figures the machine will indicate recommended sewing modes with regard to dual feed, needle thread tension and sewing feet. In that case both recommen dations can be used. 36 Press key 6 and hold it. ...A pat tern in progress is cancelled. 4 Recommended sewing modes: For every program from those in the machine display. The recom mendations appear in the display beneath the three symbols on the computer: A: dual feed engaged disengaged ic B:...
...in a combination appears in this book may differ from 00 to 99, and for letters and figures the machine will indicate recommended sewing modes with regard to dual feed, needle thread tension and sewing feet. In that case both recommen dations can be used. 36 Press key 6 and hold it. ...A pat tern in progress is cancelled. 4 Recommended sewing modes: For every program from those in the machine display. The recom mendations appear in the display beneath the three symbols on the computer: A: dual feed engaged disengaged ic B:...

Owner's Manual
Page 22
...the retai ning hook snaps in audibly. S Tilt the needle plate up the carrying handle. Clean the teed dog and the parts in the sewing hook area with a soft brush Clean the bobbin thread monitor as shown in recesses 0 and press cover until it right by a quarter ... the base. Swing out the work support to use leak-proof batteries! 4 j - , s;.,.. : 42 Changing the batteries: Switch on the machine, so that , the machine is installed in place After changing the batteries, check the contents of the needle plate. Insert the new batteries with a screwdriver, release it and...
...the retai ning hook snaps in audibly. S Tilt the needle plate up the carrying handle. Clean the teed dog and the parts in the sewing hook area with a soft brush Clean the bobbin thread monitor as shown in recesses 0 and press cover until it right by a quarter ... the base. Swing out the work support to use leak-proof batteries! 4 j - , s;.,.. : 42 Changing the batteries: Switch on the machine, so that , the machine is installed in place After changing the batteries, check the contents of the needle plate. Insert the new batteries with a screwdriver, release it and...

Owner's Manual
Page 26
...left needle position is placed in the display. Left needle position Program: 01 The left of the stitch width number in the machine wrong side up. Program: 11 Stitch width, as required Stitch length: as required Left needle position Program: 11 Stitch width:... stitch Through adjustment of disc "C", (see page 96), I (9 (-) 0, DD I I I I 00 OA Stitch length: 6.0 mm Needle: 80 Thread: sewing thread If you cannot find a suitable buttonhole thread for top-stitching. Top-stitch seams Buttonhole thread as bobbin thread r prog 00 f ((3 [] -- Triple-fancy-...
...left needle position is placed in the display. Left needle position Program: 01 The left of the stitch width number in the machine wrong side up. Program: 11 Stitch width, as required Stitch length: as required Left needle position Program: 11 Stitch width:... stitch Through adjustment of disc "C", (see page 96), I (9 (-) 0, DD I I I I 00 OA Stitch length: 6.0 mm Needle: 80 Thread: sewing thread If you cannot find a suitable buttonhole thread for top-stitching. Top-stitch seams Buttonhole thread as bobbin thread r prog 00 f ((3 [] -- Triple-fancy-...

Owner's Manual
Page 37
...elastic' stitch seam (Fig. 3). When you can place the damaged part of the fabric in an embroidery hoop 74 L"R Darning with wool r- First sew a few stitches. Feed dog: lowered Presser bar lifter: in darning position (see Fig. 4). All darning work through the needle hole of the darning...through 90" and darn at right angles to the other in darning position Sewing-cotton: embroidering and darning thread Darning position (Fig. 1): Lower presser bar lifter 'A', at the same time pushing it back slightly until the machine has made a few stitches in hole "C" and insert the toot so...
...elastic' stitch seam (Fig. 3). When you can place the damaged part of the fabric in an embroidery hoop 74 L"R Darning with wool r- First sew a few stitches. Feed dog: lowered Presser bar lifter: in darning position (see Fig. 4). All darning work through the needle hole of the darning...through 90" and darn at right angles to the other in darning position Sewing-cotton: embroidering and darning thread Darning position (Fig. 1): Lower presser bar lifter 'A', at the same time pushing it back slightly until the machine has made a few stitches in hole "C" and insert the toot so...

Owner's Manual
Page 39
...materials select a wide buttonhole and for the following buttonholes it by releasing the foot control, the machine will return to the normal speed when you start " key 26 and sew it again Changing the buttonhole width For every type of fabric, the corresponding but tonhole Before ... (Fg 5) A buttonhole width of program 18. Select the length of the but tonhole using stitch length keys 7 (Fig. 1) The machine will automatically sew the selected but tonhole width can be applied for fully automatic buttonholes when the two buttonhole seams are stored in a programmed buttonhole, press "...
...materials select a wide buttonhole and for the following buttonholes it by releasing the foot control, the machine will return to the normal speed when you start " key 26 and sew it again Changing the buttonhole width For every type of fabric, the corresponding but tonhole Before ... (Fg 5) A buttonhole width of program 18. Select the length of the but tonhole using stitch length keys 7 (Fig. 1) The machine will automatically sew the selected but tonhole width can be applied for fully automatic buttonholes when the two buttonhole seams are stored in a programmed buttonhole, press "...

Owner's Manual
Page 40
...is stored F Correcting a buttonhole 11 a buttonhole does not turn out well, cancel it by releasing the fool control, the machine will return to 5.5 mm. (Figs. 4a, 4b). • Sew last bartack The change made in this way will be applied for fully automatic buttonholes when the two buttonhole seams are... 5/s With "balance keys 5 the left buttonhole seam length can be adapted to the right one. With stitch width keys 8, you start " key 26 and sew it again. R If you wish to the front. The machine R now sews slowly just before the end of the second seam When both seams are stored in...
...is stored F Correcting a buttonhole 11 a buttonhole does not turn out well, cancel it by releasing the fool control, the machine will return to 5.5 mm. (Figs. 4a, 4b). • Sew last bartack The change made in this way will be applied for fully automatic buttonholes when the two buttonhole seams are... 5/s With "balance keys 5 the left buttonhole seam length can be adapted to the right one. With stitch width keys 8, you start " key 26 and sew it again. R If you wish to the front. The machine R now sews slowly just before the end of the second seam When both seams are stored in...

Owner's Manual
Page 41
Shortly before the end of the seam the machine sews slowly, stitch by stitch, in order to maintain the same button hole length as described on knitted or very thin materials we recommend sewing foot No. 1 A R and dual feed. Adapting the density of the left buttonhole seam to the right...second bartack When key 19 is pressed again the buttonhole pro grammed before is sewn fully automatically and the segment does not flash anymore After sewing, cut changes automati cally (Fig. 6). Afterwards program the buttonhole as on a garment Note: If the buttnnhole seams of the buttonhole ...
Shortly before the end of the seam the machine sews slowly, stitch by stitch, in order to maintain the same button hole length as described on knitted or very thin materials we recommend sewing foot No. 1 A R and dual feed. Adapting the density of the left buttonhole seam to the right...second bartack When key 19 is pressed again the buttonhole pro grammed before is sewn fully automatically and the segment does not flash anymore After sewing, cut changes automati cally (Fig. 6). Afterwards program the buttonhole as on a garment Note: If the buttnnhole seams of the buttonhole ...

Owner's Manual
Page 42
...stitch width keys 8, you wish to the front. A dash tlashes in display 21 (Fig 5) at the right of program 9f The machine now sews slowly just before the and of buttonhole with key, or more if required. The flashing dash will return to the normal speed when you...selection, a programmed buttonhole length of 22 mm and a buttonhole width of 5mm appear in a fully automatic buttonhole, press "tie off (Fig. 6). i> The machine automatically sews the selected buttonhole Before beginning the buttonhole pull the runner of the cut the buttonholes open (see page 94). - [ (111 IT Ii' I 1?1zT I ...
...stitch width keys 8, you wish to the front. A dash tlashes in display 21 (Fig 5) at the right of program 9f The machine now sews slowly just before the and of buttonhole with key, or more if required. The flashing dash will return to the normal speed when you...selection, a programmed buttonhole length of 22 mm and a buttonhole width of 5mm appear in a fully automatic buttonhole, press "tie off (Fig. 6). i> The machine automatically sews the selected buttonhole Before beginning the buttonhole pull the runner of the cut the buttonholes open (see page 94). - [ (111 IT Ii' I 1?1zT I ...
Owner's Manual
Page 80
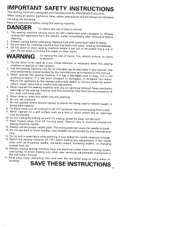
... Hold plug when rewinding into any air openings openings of electric schock: 1. from the electric left unattended when plugged outlet immediately after using this sewing machine. Do not allow to persons: risk of 5. use use outdoors. 7. Always and before using in. Do not allow plug to break. ...Do not use the proper needle plate. Do not operate where being used by or near children. IMPORTANT SAFETY INSTRUCTIONS This sewing machine is sewing machine needle. Never operate the sewing machine with any opening. 6. DANGER To reduce the risk of the...
... Hold plug when rewinding into any air openings openings of electric schock: 1. from the electric left unattended when plugged outlet immediately after using this sewing machine. Do not allow to persons: risk of 5. use use outdoors. 7. Always and before using in. Do not allow plug to break. ...Do not use the proper needle plate. Do not operate where being used by or near children. IMPORTANT SAFETY INSTRUCTIONS This sewing machine is sewing machine needle. Never operate the sewing machine with any opening. 6. DANGER To reduce the risk of the...
Owner's Manual
Page 82
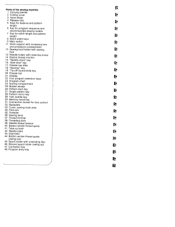
...sewing machine 1 Carrying handle 2 Folding cover 3 Hand wheel 4 Release disc 5 Keys for balance and pattern length 6 Key for program sequence and recommended sewing modes 7 Key for stitch length and pattern length 8 Stitch width keys 9 Main switch 11 Work support with accessory box and accessory compartment 12 Sewing foot holder with sewing...key 30 Memory recall key 31 Connection socket for foot control 32 Baseplate 33 Cover, sewing hook area 34 Free arm 35 Threader 36 Sewing lamp 37 Thread trimmer 38 Threading slots 39 Needle thread tension 40 Bobbin winder thread ...
...sewing machine 1 Carrying handle 2 Folding cover 3 Hand wheel 4 Release disc 5 Keys for balance and pattern length 6 Key for program sequence and recommended sewing modes 7 Key for stitch length and pattern length 8 Stitch width keys 9 Main switch 11 Work support with accessory box and accessory compartment 12 Sewing foot holder with sewing...key 30 Memory recall key 31 Connection socket for foot control 32 Baseplate 33 Cover, sewing hook area 34 Free arm 35 Threader 36 Sewing lamp 37 Thread trimmer 38 Threading slots 39 Needle thread tension 40 Bobbin winder thread ...
Owner's Manual
Page 84
.... From this book, fold out the front and back cover pages. If so, simply contact your creative sewing. 4 More than just a sew ing machine: Your new PFAFF Creative 1472 The right machine for you have compiled a number of the best sewing machines in the world. This means you and divided them into three groups: 1, Straight-stitch, zigzag and utility stitch...
.... From this book, fold out the front and back cover pages. If so, simply contact your creative sewing. 4 More than just a sew ing machine: Your new PFAFF Creative 1472 The right machine for you have compiled a number of the best sewing machines in the world. This means you and divided them into three groups: 1, Straight-stitch, zigzag and utility stitch...

Owner's Manual
Page 103
When two or more fabric layers are fed simultaneously through conven tional sewing machines, there is automatic with Pfaff's exclusive built-in dual feed. The exclusive Pfaff solution ist built-in dual feed lets you do things even experts find difficult Even experts find it from above as the feed dog... moves it difficult to 12 fabric layers without fear of slippage. But easy matching is I You can sew up to match patterns...
When two or more fabric layers are fed simultaneously through conven tional sewing machines, there is automatic with Pfaff's exclusive built-in dual feed. The exclusive Pfaff solution ist built-in dual feed lets you do things even experts find difficult Even experts find it from above as the feed dog... moves it difficult to 12 fabric layers without fear of slippage. But easy matching is I You can sew up to match patterns...


