Owner's Manual
Page 4
...contents 1 Introduction 1:7 Machine overview 1:8 Front side 1:8 Rear side 1:9 Top parts 1:9 Accessory tray 1:9 Parts of the embroidery unit 1:10 Included accessories 1:10 Stitch overview 1:12 Utility stitches 1:12 Decorative stitches 1:15 Alphabets 1:17 2 Preparations...Embroidery Machine Communication module.... 2:14 How to update your machine 2:14 Viewing and printing PDF Guides 2:14 Buttons and icons 2:13 3 PFAFF® HD screen 3:1 Task bar 3:2 Common icons 3:3 Selection menu 3:4 Embroidery edit 3:5 Embroidery text editor 3:6 Embroidery stitch-out ...
...contents 1 Introduction 1:7 Machine overview 1:8 Front side 1:8 Rear side 1:9 Top parts 1:9 Accessory tray 1:9 Parts of the embroidery unit 1:10 Included accessories 1:10 Stitch overview 1:12 Utility stitches 1:12 Decorative stitches 1:15 Alphabets 1:17 2 Preparations...Embroidery Machine Communication module.... 2:14 How to update your machine 2:14 Viewing and printing PDF Guides 2:14 Buttons and icons 2:13 3 PFAFF® HD screen 3:1 Task bar 3:2 Common icons 3:3 Selection menu 3:4 Embroidery edit 3:5 Embroidery text editor 3:6 Embroidery stitch-out ...

Owner's Manual
Page 9
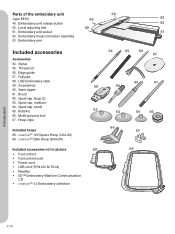
... the 47 tray so they are easily accessible. 48 46. Bobbin thread guides 38. Bobbin thread cutter 41. Removable bobbin holder Accessory tray Introduction 1:9 Auxiliary spool pin 42. Thread tension 45. Spool caps 43. IDT 33. Bobbin winder thread guide 36. Space for presser feet 48. ... socket 32 33 Top parts 34. Pre-tension device for needles 46 and other accessories. Thread guide 37. Take-up lever 34 35 36 37 38 39 40 45 44 43 42 41 Accessory tray The accessory tray features special compartments for presser feet and bobbins, plus space for threading and ...
... the 47 tray so they are easily accessible. 48 46. Bobbin thread guides 38. Bobbin thread cutter 41. Removable bobbin holder Accessory tray Introduction 1:9 Auxiliary spool pin 42. Thread tension 45. Spool caps 43. IDT 33. Bobbin winder thread guide 36. Space for presser feet 48. ... socket 32 33 Top parts 34. Pre-tension device for needles 46 and other accessories. Thread guide 37. Take-up lever 34 35 36 37 38 39 40 45 44 43 42 41 Accessory tray The accessory tray features special compartments for presser feet and bobbins, plus space for threading and ...
Owner's Manual
Page 10
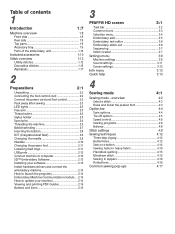
... 50. Edge guide 57. Screwdriver 58 60. Brush 62. Seam ripper 61. Spool cap, large (2) 63. Bobbins 62 66. creative™ Elite Hoop (260x200) Included accessories not in picture 68 • Foot control • Foot control cord • Power cord • USB cord (P/N:412 62 59...60 61 59 63 66 64 65 67 69 Introduction 1:10 Embroidery arm 49 50 Included accessories Accessories 54. Thread net 56. Multi-purpose tool 67. Embroidery hoop connection assembly 53. creative™ 120 Square Hoop (120x120) 69. Parts of the embroidery unit (type BE16) 49...
... 50. Edge guide 57. Screwdriver 58 60. Brush 62. Seam ripper 61. Spool cap, large (2) 63. Bobbins 62 66. creative™ Elite Hoop (260x200) Included accessories not in picture 68 • Foot control • Foot control cord • Power cord • USB cord (P/N:412 62 59...60 61 59 63 66 64 65 67 69 Introduction 1:10 Embroidery arm 49 50 Included accessories Accessories 54. Thread net 56. Multi-purpose tool 67. Embroidery hoop connection assembly 53. creative™ 120 Square Hoop (120x120) 69. Parts of the embroidery unit (type BE16) 49...

Owner's Manual
Page 20
...Connect the power cord to use the machine. 1. Lift the machine out of the box and remove the outer packaging and lift off the accessory tray and remove the styrofoam inside the space of the foot control. The styrofoam is properly connected. 3. Do not modify the plug in the... accessory tray while sewing may affect stitch quality. Connecting the foot control cord Among the accessories you are going to the rear socket on a steady, Áat surface. Connect the foot control ...
...Connect the power cord to use the machine. 1. Lift the machine out of the box and remove the outer packaging and lift off the accessory tray and remove the styrofoam inside the space of the foot control. The styrofoam is properly connected. 3. Do not modify the plug in the... accessory tray while sewing may affect stitch quality. Connecting the foot control cord Among the accessories you are going to the rear socket on a steady, Áat surface. Connect the foot control ...

Owner's Manual
Page 21
... light evenly over the sewing area and eliminate shadows. To release the stylus, just bend it slightly towards you. Place the foot control in the accessory tray. creative 4.0 Preparations 2:3 Unplug the foot control cord from the machine (2). 3. Wind the foot control cord inside the space on to the machine. Thread cutter To...
... light evenly over the sewing area and eliminate shadows. To release the stylus, just bend it slightly towards you. Place the foot control in the accessory tray. creative 4.0 Preparations 2:3 Unplug the foot control cord from the machine (2). 3. Wind the foot control cord inside the space on to the machine. Thread cutter To...
Owner's Manual
Page 23
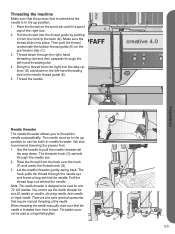
...right-hand threading slot and then upwards through the left -hand threading slot to the needle thread guide (E). 5. There are also some optional accessories that require manual threading of the right size. 2. Place the thread on the pre-tension disc (C). 3. Place the thread from the ... back over the hook (F) and under the thread hook (G). 3. Thread down in the up position to back. Thread the needle. C B A D creative 4.0 E Preparations B C Needle threader The needle threader allows you to pull the needle threader all the way down. Use the handle to thread the needle...
...right-hand threading slot and then upwards through the left -hand threading slot to the needle thread guide (E). 5. There are also some optional accessories that require manual threading of the right size. 2. Place the thread on the pre-tension disc (C). 3. Place the thread from the ... back over the hook (F) and under the thread hook (G). 3. Thread down in the up position to back. Thread the needle. C B A D creative 4.0 E Preparations B C Needle threader The needle threader allows you to pull the needle threader all the way down. Use the handle to thread the needle...

Owner's Manual
Page 60
... sew a buttonhole, Àrst attach the correct foot, then select your buttonhole. Sewing mode Sewing techniques These techniques may require some special presser feet and accessories. Three-step zigzag stitch Stich number 1.1.9 can also be used as an elastic stitch to add elastic to the buttonhole. Stitch number 1.1.9 can be used...
... sew a buttonhole, Àrst attach the correct foot, then select your buttonhole. Sewing mode Sewing techniques These techniques may require some special presser feet and accessories. Three-step zigzag stitch Stich number 1.1.9 can also be used as an elastic stitch to add elastic to the buttonhole. Stitch number 1.1.9 can be used...

Owner's Manual
Page 62
...the program for you. 23 Sewing mode Note: Use the multi-purpose tool to the wrong side of thread is appropriate for your local authorized PFAFF® Dealer. 4:14 After completing the buttonhole, pull the ends of the gimp thread until the loop of the garment. Sew on a ...will automatically be lowered. Snap on button program. Thread the gimp threads into the right and left guides on button foot, available as an optional accessory at your button. If needed , increase or decrease the number of the needle and the width is hidden below the buttonhole bartack. 4. Start...
...the program for you. 23 Sewing mode Note: Use the multi-purpose tool to the wrong side of thread is appropriate for your local authorized PFAFF® Dealer. 4:14 After completing the buttonhole, pull the ends of the gimp thread until the loop of the garment. Sew on a ...will automatically be lowered. Snap on button program. Thread the gimp threads into the right and left guides on button foot, available as an optional accessory at your button. If needed , increase or decrease the number of the needle and the width is hidden below the buttonhole bartack. 4. Start...
Owner's Manual
Page 81
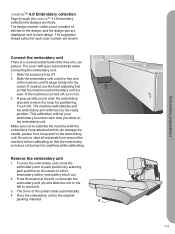
... the button at the left, underneath the embroidery unit (A) and slide the unit to the left to each design. A 7:3 Slide the accessory tray off , turn it on the embroidery unit. The cover of stitches in the original packing material. The design number, stitch count (... for designs and fonts. Make sure not to clear the embroidery area and remove the hoop for positioning. Embroidery preparations creative™ 4.0 Embroidery collection Page through the creative™ 4.0 Embroidery collection for each color number are shown. A pop-up tells you slide on . 3. The ...
... the button at the left, underneath the embroidery unit (A) and slide the unit to the left to each design. A 7:3 Slide the accessory tray off , turn it on the embroidery unit. The cover of stitches in the original packing material. The design number, stitch count (... for designs and fonts. Make sure not to clear the embroidery area and remove the hoop for positioning. Embroidery preparations creative™ 4.0 Embroidery collection Page through the creative™ 4.0 Embroidery collection for each color number are shown. A pop-up tells you slide on . 3. The ...
Owner's Manual
Page 120
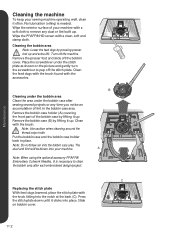
...a clean, soft and damp cloth. The dust and lint will be blown into the notch at the back (C). Wipe the PFAFF® HD screen with the accessories. Press the stitch plate down until it is needed. Wipe the exterior surface of your machine. Maintenance Cleaning the machine To ...bobbin cover. Cleaning under the bobbin area Clean the area under the stitch plate as shown on bobbin cover. 11:2 Note: When using the optional accessory PFAFF® Embroidery Cutwork Needles, it clicks into the bobbin case area. B A C Replacing the stitch plate With feed dogs lowered, place the ...
...a clean, soft and damp cloth. The dust and lint will be blown into the notch at the back (C). Wipe the PFAFF® HD screen with the accessories. Press the stitch plate down until it is needed. Wipe the exterior surface of your machine. Maintenance Cleaning the machine To ...bobbin cover. Cleaning under the bobbin area Clean the area under the stitch plate as shown on bobbin cover. 11:2 Note: When using the optional accessory PFAFF® Embroidery Cutwork Needles, it clicks into the bobbin case area. B A C Replacing the stitch plate With feed dogs lowered, place the ...

Owner's Manual
Page 122
.... Check bobbin winding. Slide on a scrap of your sewing fabric and bring it to test sew with a brush. Non-original parts and accessories The warranty does not cover any defect or damage caused by your thread on the correct hoop. The machine does not feed or feeds irregularly... embroider Is the embroidery unit attached? Clean lint from bobbin area and use only the original PFAFF® bobbins approved for your dealer. Maintenance Bobbin thread breaks Did you use of non-original accessories or parts. 11:4 The machine will often give much to your fabric sufÀciently?...
.... Check bobbin winding. Slide on a scrap of your sewing fabric and bring it to test sew with a brush. Non-original parts and accessories The warranty does not cover any defect or damage caused by your thread on the correct hoop. The machine does not feed or feeds irregularly... embroider Is the embroidery unit attached? Clean lint from bobbin area and use only the original PFAFF® bobbins approved for your dealer. Maintenance Bobbin thread breaks Did you use of non-original accessories or parts. 11:4 The machine will often give much to your fabric sufÀciently?...
Owner's Manual
Page 123
... 8:8, 9:4 5D™ Embroidery Software 2:13 5D™ Organizer 2:13 5D™ QuickFont 2:13 Installing 2:13 Launch 2:14 PDF Guides 2:14 Update your machine 2:14 A Accessories 1:10 Accessory tray 1:9 Action indicator 2:15 Alphabets 1:17 Attach the Sensormatic buttonhole foot 4:12 Audio repeat 3:11 AutoSave current state 3:8 Auxiliary spool pin 2:4 Available memory 10:3 B Balance...
... 8:8, 9:4 5D™ Embroidery Software 2:13 5D™ Organizer 2:13 5D™ QuickFont 2:13 Installing 2:13 Launch 2:14 PDF Guides 2:14 Update your machine 2:14 A Accessories 1:10 Accessory tray 1:9 Action indicator 2:15 Alphabets 1:17 Attach the Sensormatic buttonhole foot 4:12 Audio repeat 3:11 AutoSave current state 3:8 Auxiliary spool pin 2:4 Available memory 10:3 B Balance...

Owner's Manual
Page 125
M Machine overview 1:8 Accessory tray 1:9 Embroidery unit overview 1:10 Front side 1:8 Rear side 1:9 Top parts 1:9 Machine settings 3:8-3:9, 4:3 Automatic presser foot lift 3:9 Automatic thread snips 3:9 AutoSave current state 3:8 Cut jump ...
M Machine overview 1:8 Accessory tray 1:9 Embroidery unit overview 1:10 Front side 1:8 Rear side 1:9 Top parts 1:9 Machine settings 3:8-3:9, 4:3 Automatic presser foot lift 3:9 Automatic thread snips 3:9 AutoSave current state 3:8 Cut jump ...
Owner's Manual
Page 128
.... Such modiÀcations, however, will always be safely recycled in doubt please contact your retailer for guidance. PFAFF, CREATIVE, 5D and IDT (image) are listed on disposal, this product are trademarks of accessories without prior notice, or make modiÀcations to the beneÀt of the user and the product. We...
.... Such modiÀcations, however, will always be safely recycled in doubt please contact your retailer for guidance. PFAFF, CREATIVE, 5D and IDT (image) are listed on disposal, this product are trademarks of accessories without prior notice, or make modiÀcations to the beneÀt of the user and the product. We...


