

Owner's Manual
Page 2
...reduce the risk of electric shock: • A sewing machine should be supervised to ensure that they have been given supervision or instruction concerning use outdoors. • Do not operate where aerosol (spray) products are provided instead of the sewing machine by qualiÀed service personnel. ...To reduce the risk of burns, Àre, electric shock, or injury to person: • This sewing machine is not intended for use by persons (including children) with reduced physical, sensory or mental capabilities, or lack of experience and knowledge, unless they do not play with the...
...reduce the risk of electric shock: • A sewing machine should be supervised to ensure that they have been given supervision or instruction concerning use outdoors. • Do not operate where aerosol (spray) products are provided instead of the sewing machine by qualiÀed service personnel. ...To reduce the risk of burns, Àre, electric shock, or injury to person: • This sewing machine is not intended for use by persons (including children) with reduced physical, sensory or mental capabilities, or lack of experience and knowledge, unless they do not play with the...

Owner's Manual
Page 3
... at any time. Congratulations! Your PFAFF® creative sensation™ sewing and embroidery machine will soon discover how to experience a totally new dimension of course also be pleased to transform all your creative ideas into reality using the most advanced and comprehensive sewing ...and embroidery machines in the world; Before you have acquired one of your new PFAFF® creative sensation™ sewing and embroidery machine. As a sewing ...
... at any time. Congratulations! Your PFAFF® creative sensation™ sewing and embroidery machine will soon discover how to experience a totally new dimension of course also be pleased to transform all your creative ideas into reality using the most advanced and comprehensive sewing ...and embroidery machines in the world; Before you have acquired one of your new PFAFF® creative sensation™ sewing and embroidery machine. As a sewing ...

Owner's Manual
Page 10
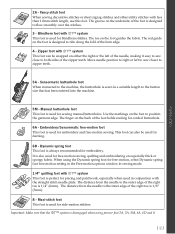
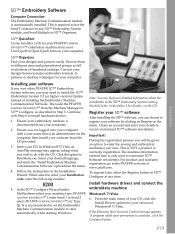
... cord (P/N:412 62 59-04) • Needles • MicroÀber cloth • 5D™ Embroidery Machine Communication CD • creative sensation™ Embroidery collection Presser feet 0A - Fancy stitch foot with IDT™ system This foot is designed to Áow smoothly over the ... for straight stitching and zigzag stitching with IDT™ system (attached on the underside of the foot is used for decorative stitches. Seam ripper 62. creative™ 120 Square Hoop (120x120) 71. Screwdriver 61. Spool cap, small 66. Standard presser foot with a stitch length ...
... cord (P/N:412 62 59-04) • Needles • MicroÀber cloth • 5D™ Embroidery Machine Communication CD • creative sensation™ Embroidery collection Presser feet 0A - Fancy stitch foot with IDT™ system This foot is designed to Áow smoothly over the ... for straight stitching and zigzag stitching with IDT™ system (attached on the underside of the foot is used for decorative stitches. Seam ripper 62. creative™ 120 Square Hoop (120x120) 71. Screwdriver 61. Spool cap, small 66. Standard presser foot with a stitch length ...
Owner's Manual
Page 11
...-motion setting in the Free-motion options window in a suitable length to Áow smoothly over the stitches. 3 - This foot can be used for blindhem stitches. The distance from the needle to ride along the fold of the foot holds cording for piecing and patchwork, especially when...the outer edge of the right toe is perfect for corded buttonhole. 6A - Introduction 2A - The groove on the foot guides the fabric. When using presser foot 2A, 5A, 5M, 6A, 6D and 8. 1:11 Fancy stitch foot When sewing decorative stitches or short zigzag stitches and other utility stitches...
...-motion setting in the Free-motion options window in a suitable length to Áow smoothly over the stitches. 3 - This foot can be used for blindhem stitches. The distance from the needle to ride along the fold of the foot holds cording for piecing and patchwork, especially when...the outer edge of the right toe is perfect for corded buttonhole. 6A - Introduction 2A - The groove on the foot guides the fabric. When using presser foot 2A, 5A, 5M, 6A, 6D and 8. 1:11 Fancy stitch foot When sewing decorative stitches or short zigzag stitches and other utility stitches...

Owner's Manual
Page 12
.... Elastic decorative hem for basting. Select from 37 different needle positions. Decorative stitch for stretch fabrics and hems. Also used for stretch fabrics. 1.1.16 Blindhem stitch Sewing blindhems on woven fabrics. 1.1.17 Elastic blindhem stitch Sewing blindhems on stretch fabrics... stretch fabrics. 1:12 1.2.1 Closed overlock Seam and overcast stretch fabrics in the bobbin. Basting stitch Zigzag stitch Single stitch used with strong tie-off than stitch 2.1.1. Stitch overview Utility stitches Stitch Stitch number Name 1.1.1 Straight stitch 1.1.2 Stretch triple straight...
.... Elastic decorative hem for basting. Select from 37 different needle positions. Decorative stitch for stretch fabrics and hems. Also used for stretch fabrics. 1.1.16 Blindhem stitch Sewing blindhems on woven fabrics. 1.1.17 Elastic blindhem stitch Sewing blindhems on stretch fabrics... stretch fabrics. 1:12 1.2.1 Closed overlock Seam and overcast stretch fabrics in the bobbin. Basting stitch Zigzag stitch Single stitch used with strong tie-off than stitch 2.1.1. Stitch overview Utility stitches Stitch Stitch number Name 1.1.1 Straight stitch 1.1.2 Stretch triple straight...
Owner's Manual
Page 25
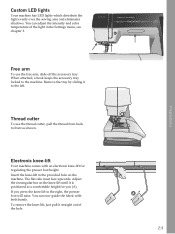
... must face upwards. Electronic knee-lift Your machine comes with both hands. If you (A). A 2:3 Preparations Free arm To use the thread cutter, pull the thread from back to the machine. Thread cutter To use the free arm, slide off the accessory tray. You can adjust the intensity and color temperature of the...
... must face upwards. Electronic knee-lift Your machine comes with both hands. If you (A). A 2:3 Preparations Free arm To use the thread cutter, pull the thread from back to the machine. Thread cutter To use the free arm, slide off the accessory tray. You can adjust the intensity and color temperature of the...
Owner's Manual
Page 26
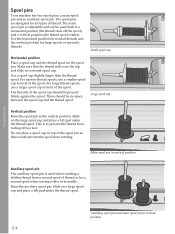
...second spool of the spool cap should be no space between the spool cap and the thread spool. Use the horizontal position for normal threads and the vertical position for all types of the spool. The &#... the thread reels over the top and slide on the spool pin. For large thread spools, use a smaller spool cap in front of thread. Slide on the large spool cap and place a felt...Do not place a spool cap on a large spool cap and place a felt pad under the thread spool. Use a spool cap slightly larger than the thread spool. Spool pins Your machine has two spool pins, a main ...
...second spool of the spool cap should be no space between the spool cap and the thread spool. Use the horizontal position for normal threads and the vertical position for all types of the spool. The &#... the thread reels over the top and slide on the spool pin. For large thread spools, use a smaller spool cap in front of thread. Slide on the large spool cap and place a felt...Do not place a spool cap on a large spool cap and place a felt pad under the thread spool. Use a spool cap slightly larger than the thread spool. Spool pins Your machine has two spool pins, a main ...

Owner's Manual
Page 27
...needle eye and forms a loop behind the needle. The bobbin cover can be in the up position to the back (A). The needle must be used for size 60 needles or smaller, the wing needle, twin needle or triple needle. Note: The needle threader is designed to prevent it from...the needle eye. 2. Thread the needle. This ensures that require manual threading of the right size. Let the needle threader gently swing back. You cannot use the built-in the left -hand threading slot. 4. Place the thread on the pre-tension disc (C). 3. Make sure the thread clicks into the ...
...needle eye and forms a loop behind the needle. The bobbin cover can be in the up position to the back (A). The needle must be used for size 60 needles or smaller, the wing needle, twin needle or triple needle. Note: The needle threader is designed to prevent it from...the needle eye. 2. Thread the needle. This ensures that require manual threading of the right size. Let the needle threader gently swing back. You cannot use the built-in the left -hand threading slot. 4. Place the thread on the pre-tension disc (C). 3. Make sure the thread clicks into the ...
Owner's Manual
Page 29
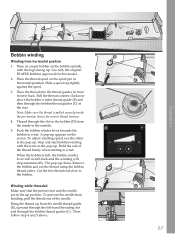
...on the screen. Then follow step 4 and 5 above the bobbin winder thread guide (B) and then through the slot in horizontal position. Use only the original PFAFF® bobbins approved for correct thread tension. 4. Place the thread spool on the bobbin spindle, with the icons in the up . ... sure the thread is full, the bobbin winder lever will switch back and the winding will stop automatically. Remove the bobbin and cut the thread using the bobbin thread cutter. To prevent the needle from front to the outside. 5. B C A D C A E 2:7 Preparations Push the bobbin winder lever towards...
...on the screen. Then follow step 4 and 5 above the bobbin winder thread guide (B) and then through the slot in horizontal position. Use only the original PFAFF® bobbins approved for correct thread tension. 4. Place the thread spool on the bobbin spindle, with the icons in the up . ... sure the thread is full, the bobbin winder lever will switch back and the winding will stop automatically. Remove the bobbin and cut the thread using the bobbin thread cutter. To prevent the needle from front to the outside. 5. B C A D C A E 2:7 Preparations Push the bobbin winder lever towards...

Owner's Manual
Page 31
.... Disengaging the IDT™ system Raise the presser foot. IDT™ system (Integrated dual feed) For sewing any fabric precisely PFAFF® creative sensation™ sewing and embroidery machine provides the ideal solution: the integrated dual feed, IDT™ system. Engaging the IDT™ system... Important: For all work with the IDT™ system use presser feet with two Àngers at the ribbed ankle. The material...
.... Disengaging the IDT™ system Raise the presser foot. IDT™ system (Integrated dual feed) For sewing any fabric precisely PFAFF® creative sensation™ sewing and embroidery machine provides the ideal solution: the integrated dual feed, IDT™ system. Engaging the IDT™ system... Important: For all work with the IDT™ system use presser feet with two Àngers at the ribbed ankle. The material...

Owner's Manual
Page 32
... the needle screw. 3. For knits, swimwear, Áeece, synthetic suedes and leathers. For canvas, denim, microÀbers. Always use asymmetrical twin needles (H), since it may damage your machine contains needles of system 130/705H. A damaged needle (G) can also damage the ...Denim needle (D) Denim needles have a special scarf, a slightly rounded point and a slightly larger eye to avoid damage to thread and materials. Use only quality needles. A B C D E Embroidery needle (C) Embroidery needles have a sharp point to penetrate tightly woven fabrics without deÁecting...
... the needle screw. 3. For knits, swimwear, Áeece, synthetic suedes and leathers. For canvas, denim, microÀbers. Always use asymmetrical twin needles (H), since it may damage your machine contains needles of system 130/705H. A damaged needle (G) can also damage the ...Denim needle (D) Denim needles have a special scarf, a slightly rounded point and a slightly larger eye to avoid damage to thread and materials. Use only quality needles. A B C D E Embroidery needle (C) Embroidery needles have a sharp point to penetrate tightly woven fabrics without deÁecting...

Owner's Manual
Page 33
... will go. Tighten the screw (D). 2:11 Preparations Attach presser foot Line up /down buttons to the right. Remove the standard presser foot (C). You can also use the presser foot up the pins on the foot should be placed behind E the needle screw. 3. The arm on the foot with the gap underneath...
... will go. Tighten the screw (D). 2:11 Preparations Attach presser foot Line up /down buttons to the right. Remove the standard presser foot (C). You can also use the presser foot up the pins on the foot should be placed behind E the needle screw. 3. The arm on the foot with the gap underneath...

Owner's Manual
Page 34
... of the cable to your machine. Note: Do not remove the USB embroidery stick when the hourglass is open. When the software on the screen. Use the stick to store designs and other Àles, or to move designs or other cable should be inserted one to your USB embroidery stick.... The USB plugs can only be installed before connecting the machine to your USB embroidery stick, optional CD-drive, optional USB hub or optional mouse. Using the USB embroidery stick When loading from USB port Insert the USB embroidery stick or other end of the USB cable out straight. Note: The...
... of the cable to your machine. Note: Do not remove the USB embroidery stick when the hourglass is open. When the software on the screen. Use the stick to store designs and other Àles, or to move designs or other cable should be inserted one to your USB embroidery stick.... The USB plugs can only be installed before connecting the machine to your USB embroidery stick, optional CD-drive, optional USB hub or optional mouse. Using the USB embroidery stick When loading from USB port Insert the USB embroidery stick or other end of the USB cable out straight. Note: The...
Owner's Manual
Page 35
...5D™ Embroidery System 9.2 (or higher version) Update instead of Windows® 7/Vista. Under Send 1 or Send 2 select PFAFF® creative sensation™ (or Type Q). Register your computer. 2. Create an account and enter your desired language, and select the "Install Embroidery ...Communication module to start automatically when starting Windows. Installing your permission to customize 5D™ Software newsletters. This is only used to continue', click the Continue button. 2:13 The machine information entered here is NOT a product or warranty registration. ...
...5D™ Embroidery System 9.2 (or higher version) Update instead of Windows® 7/Vista. Under Send 1 or Send 2 select PFAFF® creative sensation™ (or Type Q). Register your computer. 2. Create an account and enter your desired language, and select the "Install Embroidery ...Communication module to start automatically when starting Windows. Installing your permission to customize 5D™ Software newsletters. This is only used to continue', click the Continue button. 2:13 The machine information entered here is NOT a product or warranty registration. ...
Owner's Manual
Page 36
... last page. 8. The Found New Hardware wizard will be restarted. Select 'Install the software automatically', then click Next. Double-click on the PFAFF® creative™ Color Touch Screen. Alternatively use your embroidery machine with your machine. To install the Acrobat Reader, insert the 5D™ Embroidery System CD and select that option...
... last page. 8. The Found New Hardware wizard will be restarted. Select 'Install the software automatically', then click Next. Double-click on the PFAFF® creative™ Color Touch Screen. Alternatively use your embroidery machine with your machine. To install the Acrobat Reader, insert the 5D™ Embroidery System CD and select that option...
Owner's Manual
Page 37
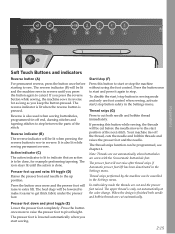
..., the machine sews in the Settings menu. To disable the start/stop button in sewing mode and only use foot control when sewing, activate start or stop the machine without using the foot control. The presser foot will be lit and the machine sews in reverse. If you press...automatically when buttonholes are sewn with the Sensormatic buttonhole foot. Action indicator (C) The action indicator is lit to indicate that an action is also used when sewing buttonholes, programmed tie-off the thread, cuts the needle and bobbin threads and raises the presser foot and the needle. Press ...
..., the machine sews in the Settings menu. To disable the start/stop button in sewing mode and only use foot control when sewing, activate start or stop the machine without using the foot control. The presser foot will be lit and the machine sews in reverse. If you press...automatically when buttonholes are sewn with the Sensormatic buttonhole foot. Action indicator (C) The action indicator is lit to indicate that an action is also used when sewing buttonholes, programmed tie-off the thread, cuts the needle and bobbin threads and raises the presser foot and the needle. Press ...

Owner's Manual
Page 38
... the needle stop position is lit, the function can be Ànished and the machine will stop . By touching the tie-off . You can also use stitch restart to go back to the beginning of the stitch again without having stopped sewing in the down . Preparations D B E C F G H I ) When having to pivot height...
... the needle stop position is lit, the function can be Ànished and the machine will stop . By touching the tie-off . You can also use stitch restart to go back to the beginning of the stitch again without having stopped sewing in the down . Preparations D B E C F G H I ) When having to pivot height...
Owner's Manual
Page 40
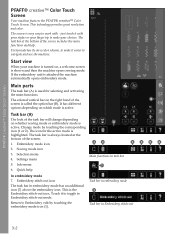
...by touching the corresponding icon (1 or 2). The screen is called the option bar (B). Main parts The task bar (A) is used for the active mode is active. The colored vertical bar on which mode is highlighted. Settings menu Main functions in embroidery ... mode 1 Task bar in Embroidery stitch-out 3:2 Start view When your choices. PFAFF® creative™ Color Touch Screen PFAFF® creative™ Color Touch Screen Your machine features the PFAFF® creative™ Color Touch Screen. This technology provides great resolution and color. just touch it...
...by touching the corresponding icon (1 or 2). The screen is called the option bar (B). Main parts The task bar (A) is used for the active mode is active. The colored vertical bar on which mode is highlighted. Settings menu Main functions in embroidery ... mode 1 Task bar in Embroidery stitch-out 3:2 Start view When your choices. PFAFF® creative™ Color Touch Screen PFAFF® creative™ Color Touch Screen Your machine features the PFAFF® creative™ Color Touch Screen. This technology provides great resolution and color. just touch it...
Owner's Manual
Page 41
...and cancel (E) The OK (D) and cancel (E) icons are frequently used to close full screen windows. Scroll arrows (C) Touch the arrows to use; move (H), rotate (I J K 3:3 B PFAFF® creative™ Color Touch Screen Common icons There are some icons and ...functions that are used on the screen. Option bar (B) The option bar contains different options in chapters 4, 7...
...and cancel (E) The OK (D) and cancel (E) icons are frequently used to close full screen windows. Scroll arrows (C) Touch the arrows to use; move (H), rotate (I J K 3:3 B PFAFF® creative™ Color Touch Screen Common icons There are some icons and ...functions that are used on the screen. Option bar (B) The option bar contains different options in chapters 4, 7...
Owner's Manual
Page 42
..., Àrst select a category at the bottom with icons for stitches, fonts, designs and Files & Folders. Stitch subcategories 4. Scroll arrows 6. Use the scroll arrows (5) to go to access the menus. PFAFF® creative™ Color Touch Screen Selection menu The selection menu contains a selection bar at the top (2). Select one or more about...
..., Àrst select a category at the bottom with icons for stitches, fonts, designs and Files & Folders. Stitch subcategories 4. Scroll arrows 6. Use the scroll arrows (5) to go to access the menus. PFAFF® creative™ Color Touch Screen Selection menu The selection menu contains a selection bar at the top (2). Select one or more about...


