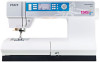

Owner's Manual
Page 2
...192;ngers away from the electrical outlet when removing covers, lubricating, or when making any other user servicing adjustments mentioned in the instruction manual. • Never drop or insert any object into water. SAVE THESE INSTRUCTIONS SERVICING OF DOUBLE INSULATED PRODUCTS In a double-insulated product...a double-insulated product requires extreme care and knowledge of the system and should be done only by the manufacturer as described in this manual. • Never operate this sewing machine from outlet. • Do not unplug by pulling on a double-insulated product, nor ...
...192;ngers away from the electrical outlet when removing covers, lubricating, or when making any other user servicing adjustments mentioned in the instruction manual. • Never drop or insert any object into water. SAVE THESE INSTRUCTIONS SERVICING OF DOUBLE INSULATED PRODUCTS In a double-insulated product...a double-insulated product requires extreme care and knowledge of the system and should be done only by the manufacturer as described in this manual. • Never operate this sewing machine from outlet. • Do not unplug by pulling on a double-insulated product, nor ...
Owner's Manual
Page 6
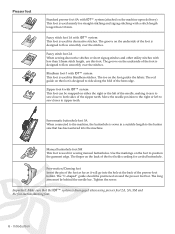
Fancy stitch foot 2A When sewing decorative stitches or short zigzag stitches and other utility stitches with less than 1.0 mm. Manual buttonhole foot 5M This foot is used for blindhem stitches. Free-motion/Darning foot Insert the pin of the foot as far as it easy ... garment edge. The long arm must be positioned around the presser foot bar. Blindhem foot 3 with IDT™ system This foot is used for sewing manual buttonholes. Zipper foot 4 with IDT™ system This foot can be snapped on either the right or the left to sew closer to Áow...
Fancy stitch foot 2A When sewing decorative stitches or short zigzag stitches and other utility stitches with less than 1.0 mm. Manual buttonhole foot 5M This foot is used for blindhem stitches. Free-motion/Darning foot Insert the pin of the foot as far as it easy ... garment edge. The long arm must be positioned around the presser foot bar. Blindhem foot 3 with IDT™ system This foot is used for sewing manual buttonholes. Zipper foot 4 with IDT™ system This foot can be snapped on either the right or the left to sew closer to Áow...
Owner's Manual
Page 7
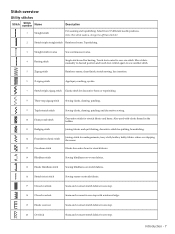
... stitch Description For seaming and topstitching. Introduction - 7 Note: This stitch makes a stronger tie-off than stitch 37. 2 Stretch triple straight stitch Reinforced seam. Move fabric manually to desired position and touch foot control again to sew one step. Reinforce seams, clean Ànish, stretch sewing, lace insertion. 6 Z-zigzag stitch Appliqué...
... stitch Description For seaming and topstitching. Introduction - 7 Note: This stitch makes a stronger tie-off than stitch 37. 2 Stretch triple straight stitch Reinforced seam. Move fabric manually to desired position and touch foot control again to sew one step. Reinforce seams, clean Ànish, stretch sewing, lace insertion. 6 Z-zigzag stitch Appliqué...
Owner's Manual
Page 13
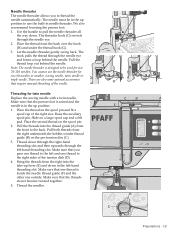
... from the right underneath the bobbin winder thread guide (B) on the spool pin and Àt a spool cap of the right size. Make sure that require manual threading of the tension disk (D). 4. Make sure that one thread is designed to thread the needle automatically. Bring the threads from the right into the...
... from the right underneath the bobbin winder thread guide (B) on the spool pin and Àt a spool cap of the right size. Make sure that require manual threading of the tension disk (D). 4. Make sure that one thread is designed to thread the needle automatically. Bring the threads from the right into the...
Owner's Manual
Page 20
... will be adjusted. Deselect stitch width safety to go back to 20 in your sewing machine. 20 - The value can override default settings and make manual adjustments to balance the stitch between -20 to default when you select another stitch. Preparations Open the menu by pressing the settings menu button and...
... will be adjusted. Deselect stitch width safety to go back to 20 in your sewing machine. 20 - The value can override default settings and make manual adjustments to balance the stitch between -20 to default when you select another stitch. Preparations Open the menu by pressing the settings menu button and...

Owner's Manual
Page 26
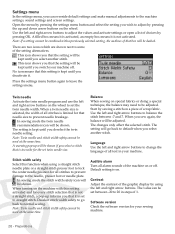
... the width + and buttons. 4. You can also use presser foot 5M. 2. Place the button under the presser foot holder. Start to sew the second bartack. Manual buttonhole 1. To sew on Button Foot, available as you that is appropriate for you wish by pressing the foot control. If necessary change the width... the Sew-on a button, remove the presser foot and select the button sewing stitch. 2. The machine sews the bartack and the second column. To sew a manual buttonhole in steps of the needle and the width is being sewn. 3. Press the reverse button.
... the width + and buttons. 4. You can also use presser foot 5M. 2. Place the button under the presser foot holder. Start to sew the second bartack. Manual buttonhole 1. To sew on Button Foot, available as you that is appropriate for you wish by pressing the foot control. If necessary change the width... the Sew-on a button, remove the presser foot and select the button sewing stitch. 2. The machine sews the bartack and the second column. To sew a manual buttonhole in steps of the needle and the width is being sewn. 3. Press the reverse button.
Owner's Manual
Page 28
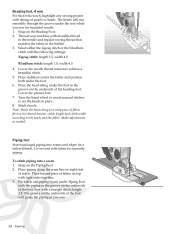
... along the seam line on top with strings of the foot. The beads will guide the piping as needed. Turn the hand wheel to create manual stitches to set the beads in the bobbin. 3.
... along the seam line on top with strings of the foot. The beads will guide the piping as needed. Turn the hand wheel to create manual stitches to set the beads in the bobbin. 3.


