Owner's Manual
Page 2
... manufacturer as threading needle, changing needle, threading bobbin, or changing presser foot, etc. • Always unplug the sewing machine from the electric outlet immediately after using this sewing machine if it has a damaged cord or plug, if it is designed to comply with IEC/EN 60335-2-28 and...not use bent needles. • Do not pull or push fabric while stitching. WARNING - Replace bulb with any air openings blocked. This household sewing machine is not working properly, if it has been dropped or damaged, or dropped into any opening. • Do not use outdoors. • ...
... manufacturer as threading needle, changing needle, threading bobbin, or changing presser foot, etc. • Always unplug the sewing machine from the electric outlet immediately after using this sewing machine if it has a damaged cord or plug, if it is designed to comply with IEC/EN 60335-2-28 and...not use bent needles. • Do not pull or push fabric while stitching. WARNING - Replace bulb with any air openings blocked. This household sewing machine is not working properly, if it has been dropped or damaged, or dropped into any opening. • Do not use outdoors. • ...
Owner's Manual
Page 4
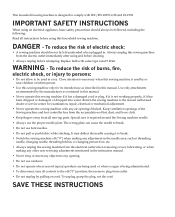
Parts of the sewing machine (model 2048) 1 23 4 14 5 15 16 35 34 6 17 33 18 32 31 30 36 37...Presser foot holder with presser foot Integrated dual feed/IDT Integrated needle threader "Reverse sewing" button Threading slots Needle thread tension "Tie-off" button "Needle up/down" button "Slow sewing" button "Pattern mirror" button/ "Lock" button Take-up lever Thread guide ...Hole for second spool pin Lid with stitch program chart Bobbin winder Bobbin door Free arm Sewing bulb (max. 5 W) Thread cutter Thread take-up Presser foot lifter Needle holder with retaining (set) screw Needle plate ...
Parts of the sewing machine (model 2048) 1 23 4 14 5 15 16 35 34 6 17 33 18 32 31 30 36 37...Presser foot holder with presser foot Integrated dual feed/IDT Integrated needle threader "Reverse sewing" button Threading slots Needle thread tension "Tie-off" button "Needle up/down" button "Slow sewing" button "Pattern mirror" button/ "Lock" button Take-up lever Thread guide ...Hole for second spool pin Lid with stitch program chart Bobbin winder Bobbin door Free arm Sewing bulb (max. 5 W) Thread cutter Thread take-up Presser foot lifter Needle holder with retaining (set) screw Needle plate ...
Owner's Manual
Page 5
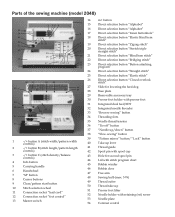
Parts of the sewing machine (model 2038) 14 123 4 5 16 17 35 18 34 6 33 36 19 32 37 38 39 20 19 7... foot holder with presser foot Integrated dual feed/IDT Integrated needle threader "Reverse sewing" button Threading slots Needle thread tension "Tie-off" button "Needle up/down" button "Slow sewing" button "Pattern mirror" button/ "Lock" button Take-up lever Thread guide... for second spool pin Lid with stitch program chart Bobbin winder Bobbin door Free arm Sewing bulb (max. 5 W) Thread cutter Thread take-up Presser foot lifter Needle holder with retaining (set) screw Needle plate...
Parts of the sewing machine (model 2038) 14 123 4 5 16 17 35 18 34 6 33 36 19 32 37 38 39 20 19 7... foot holder with presser foot Integrated dual feed/IDT Integrated needle threader "Reverse sewing" button Threading slots Needle thread tension "Tie-off" button "Needle up/down" button "Slow sewing" button "Pattern mirror" button/ "Lock" button Take-up lever Thread guide... for second spool pin Lid with stitch program chart Bobbin winder Bobbin door Free arm Sewing bulb (max. 5 W) Thread cutter Thread take-up Presser foot lifter Needle holder with retaining (set) screw Needle plate...
Owner's Manual
Page 7
...to study the instruction book, nothing can go wrong. If you can do, and to the 2038. So now you now take time enough to learn all , this instruction book is no problem! Your PFAFF dealer will be any help or advice you need. You have any further questions, that is ...just as uncomplicated as your fashion ideas. It applies both to the 2048 model and to make full use of creating your PFAFF® sewing machine. After all the things the machine can get started! If you many enjoyable hours of them. It features the very latest in operation we have pointed that ...
...to study the instruction book, nothing can go wrong. If you can do, and to the 2038. So now you now take time enough to learn all , this instruction book is no problem! Your PFAFF dealer will be any help or advice you need. You have any further questions, that is ...just as uncomplicated as your fashion ideas. It applies both to the 2048 model and to make full use of creating your PFAFF® sewing machine. After all the things the machine can get started! If you many enjoyable hours of them. It features the very latest in operation we have pointed that ...

Owner's Manual
Page 17
The stitches of the sewing machine are illustrated on the inside of the carrying case. Preparations Preparations Carrying case Place the enclosed lead cord, the foot control and instruction book into the compartment of the lid. 2:1 Lid Open the folding lid (44) upwards. 2.
The stitches of the sewing machine are illustrated on the inside of the carrying case. Preparations Preparations Carrying case Place the enclosed lead cord, the foot control and instruction book into the compartment of the lid. 2:1 Lid Open the folding lid (44) upwards. 2.
Owner's Manual
Page 18
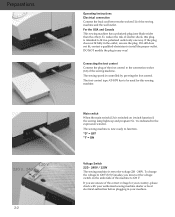
...ON Voltage Switch 220 - 240V / 120V The sewing machine is set the voltage switch on the underside of the sewing machine. For the USA and Canada This sewing machine has a polarized plug (one way. To reduce the risk of electric shock, this sewing machine. To change the voltage to 120V (US/... control type AT 0070 has to be used for your country, please check with your authorized sewing machine dealer or local electrical authorities before plugging in the expression window. The sewing machine is now ready to install the proper outlet. Preparations 120 V 220 V... 240 V 2:2 Operating...
...ON Voltage Switch 220 - 240V / 120V The sewing machine is set the voltage switch on the underside of the sewing machine. For the USA and Canada This sewing machine has a polarized plug (one way. To reduce the risk of electric shock, this sewing machine. To change the voltage to 120V (US/... control type AT 0070 has to be used for your country, please check with your authorized sewing machine dealer or local electrical authorities before plugging in the expression window. The sewing machine is now ready to install the proper outlet. Preparations 120 V 220 V... 240 V 2:2 Operating...

Owner's Manual
Page 19
... the free arm, swing the accessory tray to the left and lift it upwards out of the sewing machine. Fleece and denim fabric in the respective compartments of the accessory tray. Arrange the parts in especially red and blue often contain a lot of excess ... can cause discoloration on other fabric but also on the left of the lid and open the lid upwards and towards you suspect that your sewing machine. Preparations Accessory tray Open the accessory tray by placing your left index finger on the ridged area on your fabric/ready-to-wear garment...
... the free arm, swing the accessory tray to the left and lift it upwards out of the sewing machine. Fleece and denim fabric in the respective compartments of the accessory tray. Arrange the parts in especially red and blue often contain a lot of excess ... can cause discoloration on other fabric but also on the left of the lid and open the lid upwards and towards you suspect that your sewing machine. Preparations Accessory tray Open the accessory tray by placing your left index finger on the ridged area on your fabric/ready-to-wear garment...

Owner's Manual
Page 20
...that the pin of the bobbin winder snaps into guide A from the spool pin Place the sewing thread on the main switch Hold the end of the right size for the thread spool. Pull...and remove bobbin from back to the right. C Push the bobbin to the right. Preparations Preparing the machine for correct thread tension. To obtain free movement of the thread and hold the thread spool firmly,... firmly and press the foot control. A Switch on the spool pin. The Pfaff logo is full, the winding action will be wound if it counter clockwise around the bobbin several times in...
...that the pin of the bobbin winder snaps into guide A from the spool pin Place the sewing thread on the main switch Hold the end of the right size for the thread spool. Pull...and remove bobbin from back to the right. C Push the bobbin to the right. Preparations Preparing the machine for correct thread tension. To obtain free movement of the thread and hold the thread spool firmly,... firmly and press the foot control. A Switch on the spool pin. The Pfaff logo is full, the winding action will be wound if it counter clockwise around the bobbin several times in...

Owner's Manual
Page 22
...corrected. For decorative stitches and buttonholes the top thread should be corrected. Release the latch and take the empty bobbin out of the machine. Thread tension To obtain a perfect seam appearance and durability make sure the needle thread tension is too tight. The thread tension must... be visible on the underside of the fabric. 2:6 The following is valid for general sewing: Bobbin thread is visible on the underside of the fabric: The needle thread tension is correctly adjusted, i.e. Preparations Taking out the bobbin...
...corrected. For decorative stitches and buttonholes the top thread should be corrected. Release the latch and take the empty bobbin out of the machine. Thread tension To obtain a perfect seam appearance and durability make sure the needle thread tension is too tight. The thread tension must... be visible on the underside of the fabric. 2:6 The following is valid for general sewing: Bobbin thread is visible on the underside of the fabric: The needle thread tension is correctly adjusted, i.e. Preparations Taking out the bobbin...
Owner's Manual
Page 30
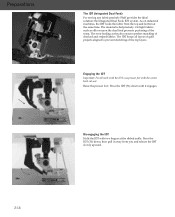
As on industrial machines, the IDT feeds the fabric from you and release the IDT slowly upward. 2:14 The even feeding action also ensures perfect matching of the top ... seam. Press the IDT (31) down until it away from the top and bottom at the ribbed ankle. Preparations The IDT (Integrated Dual Feed) For sewing any fabric precisely Pfaff provides the ideal solution: the Integrated Dual Feed, IDT system.
As on industrial machines, the IDT feeds the fabric from you and release the IDT slowly upward. 2:14 The even feeding action also ensures perfect matching of the top ... seam. Press the IDT (31) down until it away from the top and bottom at the ribbed ankle. Preparations The IDT (Integrated Dual Feed) For sewing any fabric precisely Pfaff provides the ideal solution: the Integrated Dual Feed, IDT system.

Owner's Manual
Page 31
Raise the presser foot before lowering or raising the feed dog. B 2:15 To engage the feed dog move the slide to the left . A You can also lower the feed dog by opening the bobbin door and moving slide B to be lowered. To engage the feed dog move the slide to the left . Push slide A to the right. Preparations Lowering the feed dog For certain sewing work such as free-motion quilting or darning and when the machine must be cleaned, the feed dog has to the right. Raise the presser foot before engaging the feed dog. Raise the presser foot before lowering the feed dog.
Raise the presser foot before lowering or raising the feed dog. B 2:15 To engage the feed dog move the slide to the left . A You can also lower the feed dog by opening the bobbin door and moving slide B to be lowered. To engage the feed dog move the slide to the left . Push slide A to the right. Preparations Lowering the feed dog For certain sewing work such as free-motion quilting or darning and when the machine must be cleaned, the feed dog has to the right. Raise the presser foot before engaging the feed dog. Raise the presser foot before lowering the feed dog.

Owner's Manual
Page 35
Sewing Altering the pattern length The pattern length of various stitches (buttonholes, satin stitches, ... not be changed . Altering the stitch density The stitch density of decorative stitches can change the reverse feed of the machine from -9 to adjust the density, when available. Balance Decorative stitches can be altered using -/+ button B. After having selected... so it is sewn in the best way for different fabrics. The balance adjusts the reverse feed of the expression window. This symbol indicates that the balance can vary on this stitch. In the minus range the stitches are...
Sewing Altering the pattern length The pattern length of various stitches (buttonholes, satin stitches, ... not be changed . Altering the stitch density The stitch density of decorative stitches can change the reverse feed of the machine from -9 to adjust the density, when available. Balance Decorative stitches can be altered using -/+ button B. After having selected... so it is sewn in the best way for different fabrics. The balance adjusts the reverse feed of the expression window. This symbol indicates that the balance can vary on this stitch. In the minus range the stitches are...

Owner's Manual
Page 36
... button has several functions: • when pressed, will reverse sew • for permanent reverse press this button before starting to sew, the machine sews in reverse until you the following information: needle size/type recommendation, needle thread tension setting, to receive information about the selected stitch. Info menu The ...
... button has several functions: • when pressed, will reverse sew • for permanent reverse press this button before starting to sew, the machine sews in reverse until you the following information: needle size/type recommendation, needle thread tension setting, to receive information about the selected stitch. Info menu The ...

Owner's Manual
Page 37
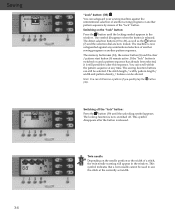
...by half. When the "pattern mirror" button has been pressed, a point will appear below the expression window. Press the foot control and the needle is pressed again. Once the machine has tied off at the beginning and/or the end of a seam or pattern. Press the button... is lowered into the fabric. "Pattern mirror" button (39) This symbol will appear in the window. "Sew slow" button (38) When you stop sewing. Sewing Sewing function buttons There are four sewing function buttons below the symbol indicating the pattern will be mirrored. 3:5 Tie-off . The pattern will then ...
...by half. When the "pattern mirror" button has been pressed, a point will appear below the expression window. Press the foot control and the needle is pressed again. Once the machine has tied off at the beginning and/or the end of a seam or pattern. Press the button... is lowered into the fabric. "Pattern mirror" button (39) This symbol will appear in the window. "Sew slow" button (38) When you stop sewing. Sewing Sewing function buttons There are four sewing function buttons below the symbol indicating the pattern will be mirrored. 3:5 Tie-off . The pattern will then ...
Owner's Manual
Page 38
...indicates that a twin needle cannot be selected. Sewing 3:6 "Lock" button: (39) You can safeguard your sewing machine against any time. Switching off . Switching on the needle position or the width of another sewing program or another pattern sequence. The machine is released. The sewing function buttons can still mirror a pattern if ... selection of a stitch, the twin needle warning will appear in the window. Note: You can still be used to sew the stitch at any unintentional selection of another sewing program or another pattern sequence by means of the "lock" button.
...indicates that a twin needle cannot be selected. Sewing 3:6 "Lock" button: (39) You can safeguard your sewing machine against any time. Switching off . Switching on the needle position or the width of another sewing program or another pattern sequence. The machine is released. The sewing function buttons can still mirror a pattern if ... selection of a stitch, the twin needle warning will appear in the window. Note: You can still be used to sew the stitch at any unintentional selection of another sewing program or another pattern sequence by means of the "lock" button.
Owner's Manual
Page 40
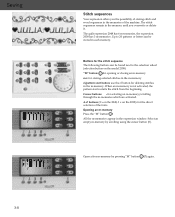
...the memories of storing stitch and word sequences in the expression window. Sewing 3:8 Stitch sequences Your expression offers you overwrite or delete it. The stitch sequences remain in the memory until you the possibility of the machine. Open a free m-memory by scrolling using the cursor ...button (8). A-Z buttons (2 x on the 2048, 1 x on the model 2038) "M" button...
...the memories of storing stitch and word sequences in the expression window. Sewing 3:8 Stitch sequences Your expression offers you overwrite or delete it. The stitch sequences remain in the memory until you the possibility of the machine. Open a free m-memory by scrolling using the cursor ...button (8). A-Z buttons (2 x on the 2048, 1 x on the model 2038) "M" button...

Owner's Manual
Page 41
...desired position in front of the memory moves up to sew immediately. Inserting a stitch into the stitch sequence If you switch off on completion and the machine stops automatically. The cursor must be deleted. The embroidery is to sew. All stitches that have started to be below the ...stitch which is tied-off the machine. The cursor must be inserted (the position of the...
...desired position in front of the memory moves up to sew immediately. Inserting a stitch into the stitch sequence If you switch off on completion and the machine stops automatically. The cursor must be deleted. The embroidery is to sew. All stitches that have started to be below the ...stitch which is tied-off the machine. The cursor must be inserted (the position of the...

Owner's Manual
Page 46
...: Lower the presser foot lifter (A) while pushing it lightly to the rear. the machine finishes sewing the darning program and the darning length is engaged for strengthening damaged areas of the sewing machine. The lever E must be repeated as often as needed. This snaps the presser ...foot lifter into the hole C of the sewing foot holder. When doing this position the thread tension is saved. Free Motion Sewing Insert the darning foot: Loosen screw...
...: Lower the presser foot lifter (A) while pushing it lightly to the rear. the machine finishes sewing the darning program and the darning length is engaged for strengthening damaged areas of the sewing machine. The lever E must be repeated as often as needed. This snaps the presser ...foot lifter into the hole C of the sewing foot holder. When doing this position the thread tension is saved. Free Motion Sewing Insert the darning foot: Loosen screw...
Owner's Manual
Page 61
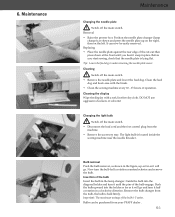
... you hear it half a rotation in place. The light bulb is lying flat the front until you start sewing, check that the needle plate is located inside the sewing machine near the needle threader. Important: The maximum wattage of the bulb Insert the bulb in the figure, up ... plate Switch off the main switch. Clean the feed dog and hook area with a soft, lint-free dry cloth. Remove the bulb changer from your PFAFF dealer . 6:1 It can be easily removed. 6. Now turn it snap in a clockwise direction. Bulbs can now be purchased from the bulb, the ...
... you hear it half a rotation in place. The light bulb is lying flat the front until you start sewing, check that the needle plate is located inside the sewing machine near the needle threader. Important: The maximum wattage of the bulb Insert the bulb in the figure, up ... plate Switch off the main switch. Clean the feed dog and hook area with a soft, lint-free dry cloth. Remove the bulb changer from your PFAFF dealer . 6:1 It can be easily removed. 6. Now turn it snap in a clockwise direction. Bulbs can now be purchased from the bulb, the ...
Owner's Manual
Page 66
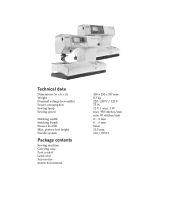
presser foot height Needle system Package contents Sewing machine Carrying case Foot control Lead cord Accessories Instruction manual 408 x 290 x 187 mm 8.3 kg 220 - 240 V / 120 V 75 W 12 V / max. 5 W max. 950 stitches/min min. 80 stitches/min 0 ... 9 mm 0 ... 6 mm 8mm 10.5 mm 130 / 705 H Technical data Dimensions (w x h x d) Weight Nominal voltage (reversible) Power consumption Sewing lamp Sewing speed Stitching width Stitching length Presser foot lift Max.
presser foot height Needle system Package contents Sewing machine Carrying case Foot control Lead cord Accessories Instruction manual 408 x 290 x 187 mm 8.3 kg 220 - 240 V / 120 V 75 W 12 V / max. 5 W max. 950 stitches/min min. 80 stitches/min 0 ... 9 mm 0 ... 6 mm 8mm 10.5 mm 130 / 705 H Technical data Dimensions (w x h x d) Weight Nominal voltage (reversible) Power consumption Sewing lamp Sewing speed Stitching width Stitching length Presser foot lift Max.


