
Owner's Manual
Page 2
...contained in the instruction manual. • Never drop or insert any object into water. Keep ventilation openings of the sewing machine and foot controller free from the accumulation of insulation are being used or where oxygen is required around the sewing machine needle. • Always use ..., electrical or mechanical adjustment. • Never operate the sewing machine with the sewing machine. • Use this sewing machine from all controls to break. • Do not use the proper needle plate. Servicing of a double-insulated product requires extreme care and knowledge of the...
...contained in the instruction manual. • Never drop or insert any object into water. Keep ventilation openings of the sewing machine and foot controller free from the accumulation of insulation are being used or where oxygen is required around the sewing machine needle. • Always use ..., electrical or mechanical adjustment. • Never operate the sewing machine with the sewing machine. • Use this sewing machine from all controls to break. • Do not use the proper needle plate. Servicing of a double-insulated product requires extreme care and knowledge of the...
Owner's Manual
Page 4
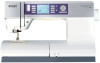
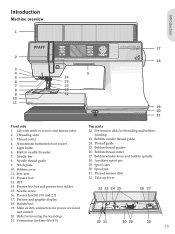
...a stitch 3:1 Sewing recommendations 3:1 Stitch adjustments 3:2 Mirroring 3:3 Tie-off options 3:3 Tapering program (4.0 and 3.0 3:4 Speed control 3:4 Personal stitches (4.0 and 3.0 3:5 Sewing techniques 3:6 Handlook quilting 3:6 Darning 3:6 Free-motion position (3.0 and 2.0 3:7...lift (4.0 2:7 Needles 2:7 Changing the needle 2:8 Lowering feed dogs 2:8 Changing the presser foot 2.8 Buttons for quilt expression™ 4.0 2:10 Buttons for expression™ 3.0 2:12 Buttons for expression™ 2.0 2:14 Settings menu 2:16 3 Sewing 3:1 Sewing mode - Table of ...
...a stitch 3:1 Sewing recommendations 3:1 Stitch adjustments 3:2 Mirroring 3:3 Tie-off options 3:3 Tapering program (4.0 and 3.0 3:4 Speed control 3:4 Personal stitches (4.0 and 3.0 3:5 Sewing techniques 3:6 Handlook quilting 3:6 Darning 3:6 Free-motion position (3.0 and 2.0 3:7...lift (4.0 2:7 Needles 2:7 Changing the needle 2:8 Lowering feed dogs 2:8 Changing the presser foot 2.8 Buttons for quilt expression™ 4.0 2:10 Buttons for expression™ 3.0 2:12 Buttons for expression™ 2.0 2:14 Settings menu 2:16 3 Sewing 3:1 Sewing mode - Table of ...
Owner's Manual
Page 5
... for threading and bobbin 2. Bobbin thread cutter 7. Needle thread guide 28. IDT 14. Presser foot lift (3.0 and 2.0) 17. Stitch plate 29. Spool pin 11. Presser foot bar and presser foot holder 15. Introduction PFAFF quilt expression 4.0 inch mm Introduction Machine overview 1 2 3 4 5 5 16 6 15 7 14 ..., connectors for knee-lift (4.0) 32 31 30 29 28 1:5 Spool caps 10. Sensormatic buttonhole foot socket 24. Connection for power cord and foot control 20. Bobbin cover 30. Take-up lever 13. Threading slots winding 3. Built-in needle threader...
... for threading and bobbin 2. Bobbin thread cutter 7. Needle thread guide 28. IDT 14. Presser foot lift (3.0 and 2.0) 17. Stitch plate 29. Spool pin 11. Presser foot bar and presser foot holder 15. Introduction PFAFF quilt expression 4.0 inch mm Introduction Machine overview 1 2 3 4 5 5 16 6 15 7 14 ..., connectors for knee-lift (4.0) 32 31 30 29 28 1:5 Spool caps 10. Sensormatic buttonhole foot socket 24. Connection for power cord and foot control 20. Bobbin cover 30. Take-up lever 13. Threading slots winding 3. Built-in needle threader...

Owner's Manual
Page 6
Store the accessories in picture • Foot control • Power cord • Needles 1:6 Removable tray for accessories 34. Removable bobbin holder Included accessories 36. Spool cap, small 46. Edge guide 38. Seam ripper ...
Store the accessories in picture • Foot control • Power cord • Needles 1:6 Removable tray for accessories 34. Removable bobbin holder Included accessories 36. Spool cap, small 46. Edge guide 38. Seam ripper ...
Owner's Manual
Page 8
... step. Sewing elastic, darning, patching. Seam and overcast in one stitch. Sew continuous reverse. Move fabric manually to desired position and touch foot control again to sew one step. Touch foot control to sew another stitch. Appliqué, couching, eyelets. Select from 37 different needle positions. Sewing blindhems on woven fabrics. Decorative stitch for...
... step. Sewing elastic, darning, patching. Seam and overcast in one stitch. Sew continuous reverse. Move fabric manually to desired position and touch foot control again to sew one step. Touch foot control to sew another stitch. Appliqué, couching, eyelets. Select from 37 different needle positions. Sewing blindhems on woven fabrics. Decorative stitch for...
Owner's Manual
Page 13
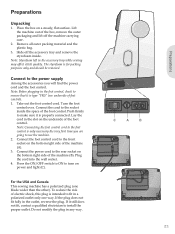
...does not Àt fully in any way. C A B 2:1 Preparations The styrofoam is type "FR5" (see underside of the foot control. Connect the foot control cord to Àt in the foot control, check to the socket inside . Lift the machine out of the box, remove the outer packaging and lift off the accessory tray... and remove the styrofoam inside the space of foot control). 1. Slide off the machine carrying case. 2. Push Àrmly to make sure it still does not Àt, contact a quali&#...
...does not Àt fully in any way. C A B 2:1 Preparations The styrofoam is type "FR5" (see underside of the foot control. Connect the foot control cord to Àt in the foot control, check to the socket inside . Lift the machine out of the box, remove the outer packaging and lift off the accessory tray... and remove the styrofoam inside the space of foot control). 1. Slide off the machine carrying case. 2. Push Àrmly to make sure it still does not Àt, contact a quali&#...
Owner's Manual
Page 14
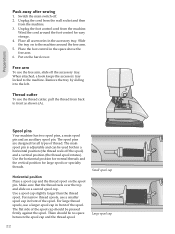
.... For large thread spools, use the thread cutter, pull the thread from back to the machine around the foot control for large spools or specialty threads. Unplug the foot control cord from the machine. 3. Place the foot control in a horizontal position (the thread reels off the spool) and a vertical position (the thread spool rotates). Put on...
.... For large thread spools, use the thread cutter, pull the thread from back to the machine around the foot control for large spools or specialty threads. Unplug the foot control cord from the machine. 3. Place the foot control in a horizontal position (the thread reels off the spool) and a vertical position (the thread spool rotates). Put on...

Owner's Manual
Page 17
... wind through the needle if using the bobbin thread cutter (E). C E B C A D B C A 2:5 Pull the thread counter-clockwise above . Press the foot control to wind. Winding through the needle Make sure that bobbin winding is active. Then follow step 4 and 5 above the bobbin winder thread guide (B) and then... Place an empty bobbin on the screen to the outside. 5. Remove the bobbin and cut the thread using a metal presser foot. Use only the original PFAFF® bobbins approved for correct thread tension. 4. Slide a spool cap tightly against the spool. 3. Place the thread into the...
... wind through the needle if using the bobbin thread cutter (E). C E B C A D B C A 2:5 Pull the thread counter-clockwise above . Press the foot control to wind. Winding through the needle Make sure that bobbin winding is active. Then follow step 4 and 5 above the bobbin winder thread guide (B) and then... Place an empty bobbin on the screen to the outside. 5. Remove the bobbin and cut the thread using a metal presser foot. Use only the original PFAFF® bobbins approved for correct thread tension. 4. Slide a spool cap tightly against the spool. 3. Place the thread into the...
Owner's Manual
Page 22
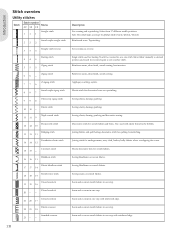
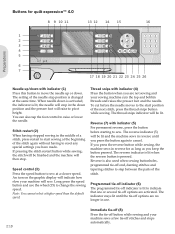
... pivot height. Long press the speed button and use . 2:10 Immediate tie-off (8) Press the tie-off options are no longer in reverse for quilt expression™ 4.0 8 9 10 11 13 12 14 15 16 Preparations 1 2 3 4 5 6 7 17 18 19 20 21 22 23 24 25 26 Needle up/down with... needle. When needle down . Programmed tie-off indicator (6) The programmed tie-off indicator is pressed. You can also tap the foot control to change the sewing speed. Speed control (3) Press the speed button to sew at the beginning of the stitch again without having stopped sewing in the middle of a ...
... pivot height. Long press the speed button and use . 2:10 Immediate tie-off (8) Press the tie-off options are no longer in reverse for quilt expression™ 4.0 8 9 10 11 13 12 14 15 16 Preparations 1 2 3 4 5 6 7 17 18 19 20 21 22 23 24 25 26 Needle up/down with... needle. When needle down . Programmed tie-off indicator (6) The programmed tie-off indicator is pressed. You can also tap the foot control to change the sewing speed. Speed control (3) Press the speed button to sew at the beginning of the stitch again without having stopped sewing in the middle of a ...
Owner's Manual
Page 24
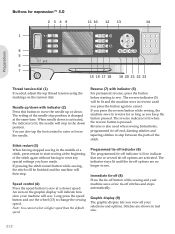
... reverse, press the button before starting to indicate that one or several tie-off indicator is changed at a slower speed. You can also tap the foot control to move the needle up /down . An icon on the tension dial. Note: You cannot select a higher speed than the default speed. The ... tie-off (8) Press the tie-off button while sewing and your machine sews a few tie-off options are activated. Stitches are shown in reverse for expression™ 3.0 2349 11 10 12 13 14 1 4 3 2 1 8 5 6 7 15 16 17 18 19 20 21 22 23 Thread tension dial (1) If needed, adjust the ...
... reverse, press the button before starting to indicate that one or several tie-off indicator is changed at a slower speed. You can also tap the foot control to move the needle up /down . An icon on the tension dial. Note: You cannot select a higher speed than the default speed. The ... tie-off (8) Press the tie-off button while sewing and your machine sews a few tie-off options are activated. Stitches are shown in reverse for expression™ 3.0 2349 11 10 12 13 14 1 4 3 2 1 8 5 6 7 15 16 17 18 19 20 21 22 23 Thread tension dial (1) If needed, adjust the ...
Owner's Manual
Page 26
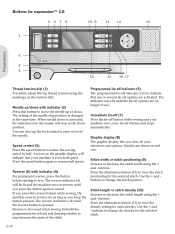
... at the same time. buttons to raise or lower the needle. You can also tap the foot control to change the stitch position. buttons. The setting of the stitch. Speed control (3) Press the speed button to indicate that your machine is lit to reduce the sewing speed ...by half. Stitch width or stitch positioning (9) Increase or decrease the stitch width using the + and - Immediate tie-off (7) Press the tie-off stitches and stops automatically. Buttons for expression&#...
... at the same time. buttons to raise or lower the needle. You can also tap the foot control to change the stitch position. buttons. The setting of the stitch. Speed control (3) Press the speed button to indicate that your machine is lit to reduce the sewing speed ...by half. Stitch width or stitch positioning (9) Increase or decrease the stitch width using the + and - Immediate tie-off (7) Press the tie-off stitches and stops automatically. Buttons for expression&#...

Owner's Manual
Page 37
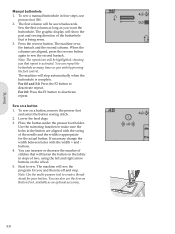
... on the wheel. 4. Set the slit length using the free-motion/darning foot, the presser foot needs to measure your button. Start sewing by pressing the foot control. To engage the free-motion position, move the presser foot lift up with the stabilizer you until it snaps into place. Plug the cord... piece of the fabric with the marking on the graphic display will show when each part of the lift, towards you wish by pressing the foot control. 6. To ensure good results, start by sewing a test sample on the underside of the buttonhole is sewn and in the same direction. ...
... on the wheel. 4. Set the slit length using the free-motion/darning foot, the presser foot needs to measure your button. Start sewing by pressing the foot control. To engage the free-motion position, move the presser foot lift up with the stabilizer you until it snaps into place. Plug the cord... piece of the fabric with the marking on the graphic display will show when each part of the lift, towards you wish by pressing the foot control. 6. To ensure good results, start by sewing a test sample on the underside of the buttonhole is sewn and in the same direction. ...
Owner's Manual
Page 38
... the part and sewing direction of the needle and the width is complete. Press the reverse button. Sew on a button, remove the presser foot and select the button sewing stitch. 2. Start to sew the second bartack. Sewing Manual buttonhole 1. The graphic display will sew the program for...between holes with the swing of the buttonhole that repeat is being sewn. 3. The machine will be highlighted, showing you wish by pressing the foot control. The Àrst column will stop . Use the mirroring function to make sure the holes in the button are aligned, press the reverse...
... the part and sewing direction of the needle and the width is complete. Press the reverse button. Sew on a button, remove the presser foot and select the button sewing stitch. 2. Start to sew the second bartack. Sewing Manual buttonhole 1. The graphic display will sew the program for...between holes with the swing of the buttonhole that repeat is being sewn. 3. The machine will be highlighted, showing you wish by pressing the foot control. The Àrst column will stop . Use the mirroring function to make sure the holes in the button are aligned, press the reverse...

Owner's Manual
Page 43
... the whole sequence. Sewing a sequence To sew the sequence, return to be shown preÀxed by pressing the sequencing button or step on the foot control. However, these adjustments will be sewn out. Your sequence is programmed. Manage your sequences You can save personal stitch or sequence menu. See page 3:5. Save...
... the whole sequence. Sewing a sequence To sew the sequence, return to be shown preÀxed by pressing the sequencing button or step on the foot control. However, these adjustments will be sewn out. Your sequence is programmed. Manage your sequences You can save personal stitch or sequence menu. See page 3:5. Save...
Owner's Manual
Page 47
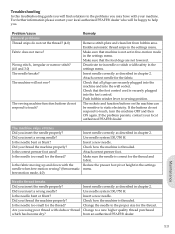
... properly? Are you thread the machine properly? Change the needle to help you. For further information please contact your local authorized PFAFF® dealer who will be sensitive to sewing position. Enable automatic thread snips in the settings menu. Check that all plugs are... in chapter 2. If the problem persists, contact your machine. Is the correct presser foot used? Make sure that the feed dogs are securely plugged into the machine and into the foot control. Attach correct needle for the thread? Push bobbin winder lever to static electricity. Check...
... properly? Are you thread the machine properly? Change the needle to help you. For further information please contact your local authorized PFAFF® dealer who will be sensitive to sewing position. Enable automatic thread snips in the settings menu. Check that all plugs are... in chapter 2. If the problem persists, contact your machine. Is the correct presser foot used? Make sure that the feed dogs are securely plugged into the machine and into the foot control. Attach correct needle for the thread? Push bobbin winder lever to static electricity. Check...
Owner's Manual
Page 49
... 3:8 Sensormatic buttonhole 3:8 Buttons expression™ 2.0 2:14-2:15 expression™ 3.0 2:12-2:13 quilt expression™ 4.0 2:10-2:11 C Changing the light bulbs 5:1 Changing the needle 2:8 Changing the presser foot 2:8 Cleaning 5:1 Clear button 2:11, 2:13 Connect the foot control 2:1 Connect to the power ...knee-lift 2:7 Engage IDT 2:6 F F1 2:11, 2:13, 2:15 F2 2:11, 2:13 Feed dogs, lower 2:8 Foot control 2:1 Free-motion Sensormatic free-motion 2:17 Spring foot free-motion 2:17 Free-motion position 3:7 Free arm 2:2 G Graphic display 2:11, 2:12, 2:14 H Hard cover...
... 3:8 Sensormatic buttonhole 3:8 Buttons expression™ 2.0 2:14-2:15 expression™ 3.0 2:12-2:13 quilt expression™ 4.0 2:10-2:11 C Changing the light bulbs 5:1 Changing the needle 2:8 Changing the presser foot 2:8 Cleaning 5:1 Clear button 2:11, 2:13 Connect the foot control 2:1 Connect to the power ...knee-lift 2:7 Engage IDT 2:6 F F1 2:11, 2:13, 2:15 F2 2:11, 2:13 Feed dogs, lower 2:8 Foot control 2:1 Free-motion Sensormatic free-motion 2:17 Spring foot free-motion 2:17 Free-motion position 3:7 Free arm 2:2 G Graphic display 2:11, 2:12, 2:14 H Hard cover...

Owner's Manual
Page 50
... Safety instructions 2 Save Sequencing 4:2 Sewing mode 3:5 Select a stitch 2:11, 2:13, 2:15, 3:1 Sensormatic buttonhole 3:8 Sensormatic buttonhole foot 1:7, 3:7 Sensormatic free-motion 2:17 Sequence commands 4:1 Sequencing 4:1 Settings menu 2:16-2:17 Sewing mode 3:1 Sewing recommendations 3:1 Sewing techniques...3:7 Buttonhole 3:7 Sew on a button 3:9 Software version 2:17 Speed control 2:10, 2:12, 2:14, 3:4 Spool cap 2:2-2:3 Spool pins 2:2-2:3 Auxiliary spool pin 2:3 Horizontal position 2:2 Vertical position 2:3 Spring foot free-motion 2:17 Stitch density 2:11, 2:13, 2:15, ...
... Safety instructions 2 Save Sequencing 4:2 Sewing mode 3:5 Select a stitch 2:11, 2:13, 2:15, 3:1 Sensormatic buttonhole 3:8 Sensormatic buttonhole foot 1:7, 3:7 Sensormatic free-motion 2:17 Sequence commands 4:1 Sequencing 4:1 Settings menu 2:16-2:17 Sewing mode 3:1 Sewing recommendations 3:1 Sewing techniques...3:7 Buttonhole 3:7 Sew on a button 3:9 Software version 2:17 Speed control 2:10, 2:12, 2:14, 3:4 Spool cap 2:2-2:3 Spool pins 2:2-2:3 Auxiliary spool pin 2:3 Horizontal position 2:2 Vertical position 2:3 Spring foot free-motion 2:17 Stitch density 2:11, 2:13, 2:15, ...


