

Owner's Manual
Page 4
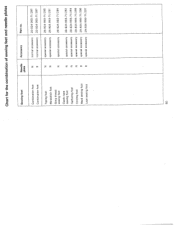
...) Program key - right (3) Handle to secure lower knife (44) Lower knife (45) Upper knife right (5) Looper thread tension - left (2) Upper thread tension - left Cursor key - Parts of the hobbylock 4860 (1) Upper thread tension -
...) Program key - right (3) Handle to secure lower knife (44) Lower knife (45) Upper knife right (5) Looper thread tension - left (2) Upper thread tension - left Cursor key - Parts of the hobbylock 4860 (1) Upper thread tension -
Owner's Manual
Page 5
... water. To unplug, hold the plug, not the cord. 11. Keep fingers away from the electric outlet immediately after using this appliance from all moving parts. Switch the sewing machine off (NO") position, then remove plug from the accumulation of burns, fire, electric shock, or injury to be used by the...
... water. To unplug, hold the plug, not the cord. 11. Keep fingers away from the electric outlet immediately after using this appliance from all moving parts. Switch the sewing machine off (NO") position, then remove plug from the accumulation of burns, fire, electric shock, or injury to be used by the...
Owner's Manual
Page 6
...Always make sure not to the up and down move ment of the socket by a Pfaff mechanic. 5. Please Note! When leaving the machine, during maintenance work or when changing mechanical parts or accessories, always disconnect the machine from the mains by knocking or dropping it. with ... the sewing machine if: - Notes on safety Notes on safety for supervised use in openings on the machine. 7. Do not use only original PFAFF parts. its cord. 9. it is a machine for domestic sewing machines according to : dust, severe dampness, direct sunlight, static elec tricity, heat-...
...Always make sure not to the up and down move ment of the socket by a Pfaff mechanic. 5. Please Note! When leaving the machine, during maintenance work or when changing mechanical parts or accessories, always disconnect the machine from the mains by knocking or dropping it. with ... the sewing machine if: - Notes on safety Notes on safety for supervised use in openings on the machine. 7. Do not use only original PFAFF parts. its cord. 9. it is a machine for domestic sewing machines according to : dust, severe dampness, direct sunlight, static elec tricity, heat-...
Owner's Manual
Page 9
... thread tension . . Lower knife Main switch Maintenance and malfunction Needle plates N and R Needle threader Normal accessories. Rolled hem . Stitch length adjusting knob Taping foot Technical part Thread chart Thread cutter Thread unreeling disc Threading the looper Threading the needles Threading the thread guides . Upper knife Upper knife lock Waste box 73...
... thread tension . . Lower knife Main switch Maintenance and malfunction Needle plates N and R Needle threader Normal accessories. Rolled hem . Stitch length adjusting knob Taping foot Technical part Thread chart Thread cutter Thread unreeling disc Threading the looper Threading the needles Threading the thread guides . Upper knife Upper knife lock Waste box 73...
Owner's Manual
Page 11
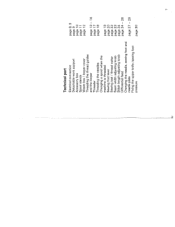
Technical part Electrical connection Detachable work support Accessory box Spool stands Waste box / looper cover Threading the thread guides and the looper Threader Threading the needles Changing a spool when the machine is threaded Sewing foot lever Sewing test / thread cutter Seam width adjusting knob Stitch length adjusting knob Differential feed Changing the needle, sewing foot and needle plate Fixing the upper knife /sewing foot pressure page 8, 9 page 9 page 10 page 11 page 1 2 page 1 3 - 1 6 page 17 page 1 8 page 1 9 page 20 page 22 page 23 page 24 page 24 - 26 page 27 - 29 page 30 7
Technical part Electrical connection Detachable work support Accessory box Spool stands Waste box / looper cover Threading the thread guides and the looper Threader Threading the needles Changing a spool when the machine is threaded Sewing foot lever Sewing test / thread cutter Seam width adjusting knob Stitch length adjusting knob Differential feed Changing the needle, sewing foot and needle plate Fixing the upper knife /sewing foot pressure page 8, 9 page 9 page 10 page 11 page 1 2 page 1 3 - 1 6 page 17 page 1 8 page 1 9 page 20 page 22 page 23 page 24 page 24 - 26 page 27 - 29 page 30 7

Owner's Manual
Page 32
... Switch off the main Note: To change the switch needle plate you can remove it to 3 mm. 28 Press the white lever on the back part of the sewing foot holder. Check: Please raise the sewing foot lever to check that when spring slightly and place the the sewing foot lever...
... Switch off the main Note: To change the switch needle plate you can remove it to 3 mm. 28 Press the white lever on the back part of the sewing foot holder. Check: Please raise the sewing foot lever to check that when spring slightly and place the the sewing foot lever...
Owner's Manual
Page 64
... Taping foot Blindstitch foot Gimp thread sewing foot Elastic tape sewing foot Gathering foot Cording foot Bead sewing foot Lace sewing foot Needle plate N R N N R N N N R R Accessory Part no.
... Taping foot Blindstitch foot Gimp thread sewing foot Elastic tape sewing foot Gathering foot Cording foot Bead sewing foot Lace sewing foot Needle plate N R N N R N N N R R Accessory Part no.

Owner's Manual
Page 66
... and sewn in the outer fabric is regulated as follows: Loosen the adusting screw 1 and adjust the edge guide 2 so that the folded hem part 3 is under the sewing foot so that only one operation. 12 43 Blindstitch sewing foot Blindstitch is caught by the needle. 62 Before sewing cut... 2 cm off hem part 3. Place the prepared hem under the edge guide 2. Preparation of the outer fabric is ideal for skirt and trouser seams and wherever the seam ...
... and sewn in the outer fabric is regulated as follows: Loosen the adusting screw 1 and adjust the edge guide 2 so that the folded hem part 3 is under the sewing foot so that only one operation. 12 43 Blindstitch sewing foot Blindstitch is caught by the needle. 62 Before sewing cut... 2 cm off hem part 3. Place the prepared hem under the edge guide 2. Preparation of the outer fabric is ideal for skirt and trouser seams and wherever the seam ...

Owner's Manual
Page 75
... the cutting edge of the lower knife to the machine. Place the pressure plate on the hole in the lower knife so that the longer part with the slanted corner is pointing backwards to the same level as the needle plate (see page 30). Raise the needles to 3. Secure the lower...
... the cutting edge of the lower knife to the machine. Place the pressure plate on the hole in the lower knife so that the longer part with the slanted corner is pointing backwards to the same level as the needle plate (see page 30). Raise the needles to 3. Secure the lower...

Owner's Manual
Page 77
Oiling the machine Before using your machine you should make a habit of a special material and do not need to be oiled. 73 One or two drops of PFAFF sewing machine oil are made of lightly oiling the marked points with the oil from the accessories (see page 66). Cleaning the knife Switch the main switch off the upper and lower knife with the brush from the accessories (see page 58). All the other parts are enough. You can now remove the upper knife (45) and clean the lint off Take out the upper knife retaining screw (42) with the screwdriver supplied.
Oiling the machine Before using your machine you should make a habit of a special material and do not need to be oiled. 73 One or two drops of PFAFF sewing machine oil are made of lightly oiling the marked points with the oil from the accessories (see page 66). Cleaning the knife Switch the main switch off the upper and lower knife with the brush from the accessories (see page 58). All the other parts are enough. You can now remove the upper knife (45) and clean the lint off Take out the upper knife retaining screw (42) with the screwdriver supplied.
Owner's Manual
Page 82
Parts of the hobbylock 4860 (22) Thread guide with coloured markings (23) Telescopic thread guide (24) Spool pins (25) Thread cutter (26) Spool centering (27) Spool stands (28) Power socket (29) Main switch (30) Foot control socket (31) Hand whe& (32) Sewing foot lever (33) Stitch length adjusting knob (34) Adjusting ring for the differential feed (35) Reverse thread guide (46) Waste box
Parts of the hobbylock 4860 (22) Thread guide with coloured markings (23) Telescopic thread guide (24) Spool pins (25) Thread cutter (26) Spool centering (27) Spool stands (28) Power socket (29) Main switch (30) Foot control socket (31) Hand whe& (32) Sewing foot lever (33) Stitch length adjusting knob (34) Adjusting ring for the differential feed (35) Reverse thread guide (46) Waste box


