

Owner's Manual
Page 2
...pull or push fabric while stitching. SAVE THESE INSTRUCTIONS 17. Always unplug before using this manual. 3. Close attention is necessary when this sewing machine is not working properly, if it is used by the manufacturer as a toy. Keep ventilation. Do not use bent or blunt ...threading bobbin, or changing presser foot, etc. 16. Hold plug when rewinding into water or other user servicing adjustments mentioned in this sewing machine. Replace bulb with any object into water. To disconnect, turn all moving parts. Keep fingers away from the electrical outlet when removing...
...pull or push fabric while stitching. SAVE THESE INSTRUCTIONS 17. Always unplug before using this manual. 3. Close attention is necessary when this sewing machine is not working properly, if it is used by the manufacturer as a toy. Keep ventilation. Do not use bent or blunt ...threading bobbin, or changing presser foot, etc. 16. Hold plug when rewinding into water or other user servicing adjustments mentioned in this sewing machine. Replace bulb with any object into water. To disconnect, turn all moving parts. Keep fingers away from the electrical outlet when removing...
Owner's Manual
Page 3
... converter (Hobbylock sewing with 2 threads Changing the needles Changing the knives Changing the upper knife Changing the lower knife Upper knife arresting Cleaning the knives Oiling the machine Stitch selection table Sewing problems and their removal Accessories Thread spool net/thread unreeling disc Mounting of the Converter Special accessories Specifications / contents of the sewing machine Accessory...
... converter (Hobbylock sewing with 2 threads Changing the needles Changing the knives Changing the upper knife Changing the lower knife Upper knife arresting Cleaning the knives Oiling the machine Stitch selection table Sewing problems and their removal Accessories Thread spool net/thread unreeling disc Mounting of the Converter Special accessories Specifications / contents of the sewing machine Accessory...
Owner's Manual
Page 5
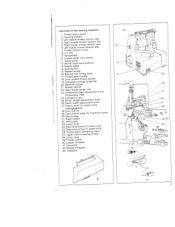
...1 3 Needle plate 14 Sewing foot 1 5 Needle holder 1 6 Sewing foot lifting lever 1 7 Thread spool holder 18 Color-coded thread guides 1 9 Telescopic thread guide bar 20 Machine socket 21 Master switch 22 23 Rear thread guide (4x) Differential feed adjustment knob (Hobbylock 788) 24 25 26 Accessory box... Stitch length adjustment knob Seam width adjustment knob 27 Rotary lever for upper knife disengagement 28 29 Foot Foot control control plug for machine socket 30 Mains plug 31 Right looper...
...1 3 Needle plate 14 Sewing foot 1 5 Needle holder 1 6 Sewing foot lifting lever 1 7 Thread spool holder 18 Color-coded thread guides 1 9 Telescopic thread guide bar 20 Machine socket 21 Master switch 22 23 Rear thread guide (4x) Differential feed adjustment knob (Hobbylock 788) 24 25 26 Accessory box... Stitch length adjustment knob Seam width adjustment knob 27 Rotary lever for upper knife disengagement 28 29 Foot Foot control control plug for machine socket 30 Mains plug 31 Right looper...
Owner's Manual
Page 7
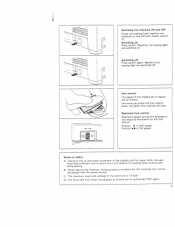
... the Hobbylock is 1 5 watt. D) The drive belt must take sufficient care to the up and down , the faster the machine will sew. B) When leaving the machine, changing parts or accessories, the machine muzt be adjusted by the switch on : Press switch. Switching on the foot control. Machine and sewing light ...are switched off. Switching off with master switch 21. Electronic foot control Maximum speed can be pre-selected in two steps by anyone but an authorized Pfaff agent. 5 Foot contro' The speed of the ...
... the Hobbylock is 1 5 watt. D) The drive belt must take sufficient care to the up and down , the faster the machine will sew. B) When leaving the machine, changing parts or accessories, the machine muzt be adjusted by the switch on : Press switch. Switching on the foot control. Machine and sewing light ...are switched off. Switching off with master switch 21. Electronic foot control Maximum speed can be pre-selected in two steps by anyone but an authorized Pfaff agent. 5 Foot contro' The speed of the ...

Owner's Manual
Page 13
...thread will then automatically be pulled until small hook C engages in hook C, too. Thread spool change on spool holders 1 7. Place new thread spools on threaded machine Cut the threads close to -gether. Now pull at the rear side of the needle until past the last thread guide before the needles. Cut... needle located between the two guide lugs B move the needle threader slowly downwards at the thread ends until right looper 31 is Lower the sewing foot by means of the needles. Pull the thread completey through the eye. Pull the needle threads out of lif ting lever 16.
...thread will then automatically be pulled until small hook C engages in hook C, too. Thread spool change on spool holders 1 7. Place new thread spools on threaded machine Cut the threads close to -gether. Now pull at the rear side of the needle until past the last thread guide before the needles. Cut... needle located between the two guide lugs B move the needle threader slowly downwards at the thread ends until right looper 31 is Lower the sewing foot by means of the needles. Pull the thread completey through the eye. Pull the needle threads out of lif ting lever 16.

Owner's Manual
Page 16
...it up to the needle before starting to observe during sewing Sew the first stitches slowly. Draw the resulting thread chain through the thread cutter from the rear (see illustration below left). If the machine has been rethreaded, place the fabric under sewing foot 14 and push it is fed automatically, do ...not pull or push the fabric. Turn the workpiece around and sew a few stitches over the seam just sewn without cutting the ...
...it up to the needle before starting to observe during sewing Sew the first stitches slowly. Draw the resulting thread chain through the thread cutter from the rear (see illustration below left). If the machine has been rethreaded, place the fabric under sewing foot 14 and push it is fed automatically, do ...not pull or push the fabric. Turn the workpiece around and sew a few stitches over the seam just sewn without cutting the ...
Owner's Manual
Page 29
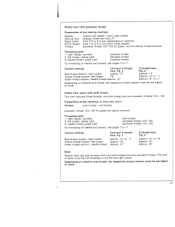
... must then be set higher or lower. 27 Tension setting: Red thread tension, right looper Yellow thread tension, left looper, yellow path 3. Preparation of the machine, as described above. left needle / insert right needle engage rolled-hem foot ,,R" from 3.0 to -3 approx. + 5 approx. The bulk threads must be...bulk thread - Rolled hem, sewn with bulk thread: This hem requires three threads, one polyester thread. Rolled hem with polyester thread Preparation of the sewing machine: Needle: Sewing foot: Seam width: Stitch length: Thread: remove left looper, yellow path 3.
... must then be set higher or lower. 27 Tension setting: Red thread tension, right looper Yellow thread tension, left looper, yellow path 3. Preparation of the machine, as described above. left needle / insert right needle engage rolled-hem foot ,,R" from 3.0 to -3 approx. + 5 approx. The bulk threads must be...bulk thread - Rolled hem, sewn with bulk thread: This hem requires three threads, one polyester thread. Rolled hem with polyester thread Preparation of the sewing machine: Needle: Sewing foot: Seam width: Stitch length: Thread: remove left looper, yellow path 3.

Owner's Manual
Page 31
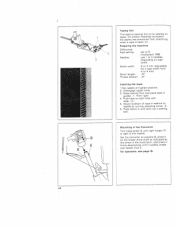
... will and skipped stitches. Change lower knife 33, see page 30. Changing the needles Pull out the sewing foot. Hsderoinvldesrct,hreaewndneApeudollrleBthwewitihnthetehtdheleetwsdmeoeawzllenrwssc,arrledowso. Changing the knives The top and bottom knives are used on these machines: System 130/705 H (75-90) Adsiezltpeheounusdgeshd,otnhweethcreoecrmroeamcttemrnieaenleddalnendesetihdzeele thread size 75-90. upper knife 11, see page 31...
... will and skipped stitches. Change lower knife 33, see page 30. Changing the needles Pull out the sewing foot. Hsderoinvldesrct,hreaewndneApeudollrleBthwewitihnthetehtdheleetwsdmeoeawzllenrwssc,arrledowso. Changing the knives The top and bottom knives are used on these machines: System 130/705 H (75-90) Adsiezltpeheounusdgeshd,otnhweethcreoecrmroeamcttemrnieaenleddalnendesetihdzeele thread size 75-90. upper knife 11, see page 31...

Owner's Manual
Page 34
Note: When sewing thin or medium fabrics, screw 37 of the upper knife arresting system must be tightened, as shown in the illustration. Cleaning the knives Disengage the ... remove lint from extremely thin to extremely thick can be loosened by about 2 turns, so that the upper knife can move axially. Upper knife arresting Sewing very thick fabrics and workpie ces with different thicknesses, the screw of the upper knife must be processed. By tightening screw 37, the upper knife...
Note: When sewing thin or medium fabrics, screw 37 of the upper knife arresting system must be tightened, as shown in the illustration. Cleaning the knives Disengage the ... remove lint from extremely thin to extremely thick can be loosened by about 2 turns, so that the upper knife can move axially. Upper knife arresting Sewing very thick fabrics and workpie ces with different thicknesses, the screw of the upper knife must be processed. By tightening screw 37, the upper knife...

Owner's Manual
Page 35
The bus hings and other important moving parts are sufficient. 33 Oiling the machine: Every time before you take the machine into operation, you should apply a little oil to be oiled only once or twice a month. One to two drops of PFAFF sewing machine oil are made of special material and need to the places indicated.
The bus hings and other important moving parts are sufficient. 33 Oiling the machine: Every time before you take the machine into operation, you should apply a little oil to be oiled only once or twice a month. One to two drops of PFAFF sewing machine oil are made of special material and need to the places indicated.

Owner's Manual
Page 42
Sewing problems and solutions These machines have been developed for easy operation, and there are no difficult adjustments to be corrected by following the instructions below may occur due to minor ... seam The converter is in its left position A (see p. 18> Solution Insert new needle Insert new needle correctly (see p. 29> Do not pull material during sewing Thread corrcetly (see p. 18> 40 Sewing problems of thread tensions The 3-
Sewing problems and solutions These machines have been developed for easy operation, and there are no difficult adjustments to be corrected by following the instructions below may occur due to minor ... seam The converter is in its left position A (see p. 18> Solution Insert new needle Insert new needle correctly (see p. 29> Do not pull material during sewing Thread corrcetly (see p. 18> 40 Sewing problems of thread tensions The 3-

Owner's Manual
Page 43
Prob'em Machine does not run although master switch is on Fabric not neatly trimmed Puckered seams Puckered seams Edge thread too loose Cause So'ution Power supply interrupted looper cover 1 0 or work support 1 2 (see p. 7( Close looper cover 10 or work support 1 2 (see p. 7( Sewing lint between upper...16) Re-adjust differential feed Thread correctly (pp. 7-11) Inadequate sewing foot used for seam width sewn Insert sewing foot adequate for the seam width (see top of p. 35> Inadequate sewing foot used for seam width sewn insert sewing foot adequate for the seam width (see top of p. 35) ...
Prob'em Machine does not run although master switch is on Fabric not neatly trimmed Puckered seams Puckered seams Edge thread too loose Cause So'ution Power supply interrupted looper cover 1 0 or work support 1 2 (see p. 7( Close looper cover 10 or work support 1 2 (see p. 7( Sewing lint between upper...16) Re-adjust differential feed Thread correctly (pp. 7-11) Inadequate sewing foot used for seam width sewn Insert sewing foot adequate for the seam width (see top of p. 35> Inadequate sewing foot used for seam width sewn insert sewing foot adequate for the seam width (see top of p. 35) ...
Owner's Manual
Page 44
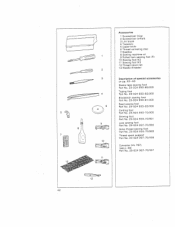
...) 2 Screwdriver (small) 3 Lint brush 4 Tweezers 5 Upper knife 6 Thread unreeling disc 7 Needles 8 9 Sewing machine oii Rolled hem sewing foot (R) 10 Sewing foot N2 11 Sewing foot N3 1 2 Thread spool net 13 Needle threader 2 Description of specia' accessories on pp.43-50 Elastic tape sewing foot Part No. 29-924 993-80/000 Taping foot Part No... Cording foot Part No. 29-924 993-70/900 Shirring foot Part No. 29-924 993-70/901 9 Lace sewing foot Part No. 29-924 997-70/906 8 Gimp thread sewing foot Part No. 29-924 924-70/908 7 Thread spool support Part No. 29-924 997-70/936 10...
...) 2 Screwdriver (small) 3 Lint brush 4 Tweezers 5 Upper knife 6 Thread unreeling disc 7 Needles 8 9 Sewing machine oii Rolled hem sewing foot (R) 10 Sewing foot N2 11 Sewing foot N3 1 2 Thread spool net 13 Needle threader 2 Description of specia' accessories on pp.43-50 Elastic tape sewing foot Part No. 29-924 993-80/000 Taping foot Part No... Cording foot Part No. 29-924 993-70/900 Shirring foot Part No. 29-924 993-70/901 9 Lace sewing foot Part No. 29-924 997-70/906 8 Gimp thread sewing foot Part No. 29-924 924-70/908 7 Thread spool support Part No. 29-924 997-70/936 10...
Owner's Manual
Page 45
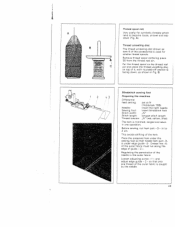
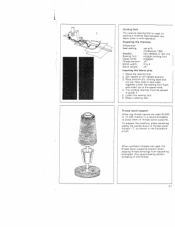
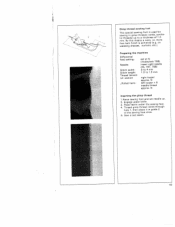
... place the thread unreeling disc on top of the outer fabric is caught by 2 cm. Regulating the penetration of the hem. Before sewing, cut hem part -3- This avoids shifting of the needle in Fig. and adjust edge guide -2- A>. B. in one thread of ...of the accessories is trimmed, serged and sewn in by the needle. 43 TE Bfindstitch sewing foot 43 Preparing the machine Differential feed setting: set at N (Hobbylock 788) Needle: insert the right needle Sewing foot: insert blindstitch foot Stitch width: Stitch length: longest stitch length Thread tension: N"...
... place the thread unreeling disc on top of the outer fabric is caught by 2 cm. Regulating the penetration of the hem. Before sewing, cut hem part -3- This avoids shifting of the needle in Fig. and adjust edge guide -2- A>. B. in one thread of ...of the accessories is trimmed, serged and sewn in by the needle. 43 TE Bfindstitch sewing foot 43 Preparing the machine Differential feed setting: set at N (Hobbylock 788) Needle: insert the right needle Sewing foot: insert blindstitch foot Stitch width: Stitch length: longest stitch length Thread tension: N"...
Owner's Manual
Page 47
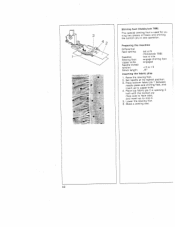
Preparing the machine Differential feed setting: Needles: Sewing foot: Thread tension: Stitch width: Stitch length: set at opening -4- at N (Hobbylock 788) use 1 or 2 needles, depending on the elastic tape and thus the greater the gather effect. Tighten brake -1 - with screw -2- on tape width insert elastic taping foot 4 to 2 mm. .1 213 E'astic tape sewing foot This special...
Preparing the machine Differential feed setting: Needles: Sewing foot: Thread tension: Stitch width: Stitch length: set at opening -4- at N (Hobbylock 788) use 1 or 2 needles, depending on the elastic tape and thus the greater the gather effect. Tighten brake -1 - with screw -2- on tape width insert elastic taping foot 4 to 2 mm. .1 213 E'astic tape sewing foot This special...
Owner's Manual
Page 48
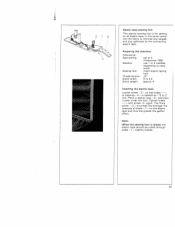
Preparing the machine Differential feed setting: Needles: set at N (Hobbylock 788) use 1 or 2 needles, deoending on the looper drive shaft as indicated by turning adjusting screw -3-. 6. Push tape to 5 mm (adjustable for sewing on . Set the converter at position B, place it audibly snaps over looper stud E. Disengage upper knife. 3. For operation, see page 18. 46...
Preparing the machine Differential feed setting: Needles: set at N (Hobbylock 788) use 1 or 2 needles, deoending on the looper drive shaft as indicated by turning adjusting screw -3-. 6. Push tape to 5 mm (adjustable for sewing on . Set the converter at position B, place it audibly snaps over looper stud E. Disengage upper knife. 3. For operation, see page 18. 46...
Owner's Manual
Page 49
...) it is recommendable to the upper knife. 4. Make a sewing test. Cording foot 1 This special sewing foot s used for sewing a cording tape between two fabric plies in one operation Preparing the machine Differential feed setting: Needles: Sewing foot: Upper knife: Thread tension: Stitch width: Stitch length:...to face sidel together under the sewing foot flush, and insert up to place them on thread spool holders 1 7, as shown in guide 1. 5. Set needle at N (Hobbylock 788) two needles or left . Raise the sewing foot 2. To prepare the machine, place centering pieces 36 upside ...
...) it is recommendable to the upper knife. 4. Make a sewing test. Cording foot 1 This special sewing foot s used for sewing a cording tape between two fabric plies in one operation Preparing the machine Differential feed setting: Needles: Sewing foot: Upper knife: Thread tension: Stitch width: Stitch length:...to face sidel together under the sewing foot flush, and insert up to place them on thread spool holders 1 7, as shown in guide 1. 5. Set needle at N (Hobbylock 788) two needles or left . Raise the sewing foot 2. To prepare the machine, place centering pieces 36 upside ...
Owner's Manual
Page 50
... one engage shirring foot engaged ±3 to +5 Inserting the fabric plies 1. Preparing the machine Differential feed setting: set at Place bottom its highest position. 3 1 Shirring foot (Hobbylock 788) This special sewing foot is used for joi ning two pieces of fabric and shIrring the bottom ply in ...opening 3 lush with the bottom ply (face side to face side), and insert up to stop 4. 5. Raise the sewing foot. 2. 3. fabric ply...
... one engage shirring foot engaged ±3 to +5 Inserting the fabric plies 1. Preparing the machine Differential feed setting: set at Place bottom its highest position. 3 1 Shirring foot (Hobbylock 788) This special sewing foot is used for joi ning two pieces of fabric and shIrring the bottom ply in ...opening 3 lush with the bottom ply (face side to face side), and insert up to stop 4. 5. Raise the sewing foot. 2. 3. fabric ply...
Owner's Manual
Page 51
Preparing the machine Differential feed setting: Needle: Stitch width: Stitch length: Thread tension (cf. Place fabric under the sewing foot. 4. N Inserting the gimp thread 1 .Raise sewing foot and set at N (Hobbylock 788) insert right needle (HL 787, 788) 3 to 4 mm 1.0 to a thickness of the sewing foot shoe. 5. Gimp thread sewing foot This special sewing foot is achieved (e.g. Thread gimp thread...
Preparing the machine Differential feed setting: Needle: Stitch width: Stitch length: Thread tension (cf. Place fabric under the sewing foot. 4. N Inserting the gimp thread 1 .Raise sewing foot and set at N (Hobbylock 788) insert right needle (HL 787, 788) 3 to 4 mm 1.0 to a thickness of the sewing foot shoe. 5. Gimp thread sewing foot This special sewing foot is achieved (e.g. Thread gimp thread...

Owner's Manual
Page 52
Needle system Needle size Number of cardboard box 1 machine with motor 1 foot control 1 instruction manual/guarantee certificate 1 lint box 1 machine cover • 1,300 stitches/mm. 3-7.2mm 1-4mm(HL788) 1 - 5 mm (HL 787) inged Manual 5mm 130/705 H or 1 5 x 1 H 75-9Oorll-14 2,3,4/3,4 315x280x330mm 8.5 kg/8.Okg 51 Contents of threads 788/787 Dimensions Weight 788 / 787 . A Specifications: Maximum sewing speed Seam width Stitch length Sewing foot Lubrication Sewing foot height .
Needle system Needle size Number of cardboard box 1 machine with motor 1 foot control 1 instruction manual/guarantee certificate 1 lint box 1 machine cover • 1,300 stitches/mm. 3-7.2mm 1-4mm(HL788) 1 - 5 mm (HL 787) inged Manual 5mm 130/705 H or 1 5 x 1 H 75-9Oorll-14 2,3,4/3,4 315x280x330mm 8.5 kg/8.Okg 51 Contents of threads 788/787 Dimensions Weight 788 / 787 . A Specifications: Maximum sewing speed Seam width Stitch length Sewing foot Lubrication Sewing foot height .


