

Owner's Manual
Page 2
D) The drive belt must be adjusted by anyone but an authorized Pfatf agent, B) When leaving the machine, changing parts or accessories, the machine must never be disconnected from the power source. C) The maximum approved wattage of the needle, the user must take sufficient care to the up and down movement of the light bulb is 15 watts. Notes on safety A) Owing to avoid injury and observe the sewing area continuously while sewing.
D) The drive belt must be adjusted by anyone but an authorized Pfatf agent, B) When leaving the machine, changing parts or accessories, the machine must never be disconnected from the power source. C) The maximum approved wattage of the needle, the user must take sufficient care to the up and down movement of the light bulb is 15 watts. Notes on safety A) Owing to avoid injury and observe the sewing area continuously while sewing.

Owner's Manual
Page 8
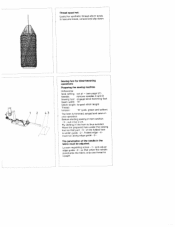
Carrying handle and thread guides behind it: Insert fingers into the guide bar. Insert the five thread spool holders. Insert thread spool stand from the top. Pull up , then the thread guides 34 will be visible. Push the thread guiding part into groove of the carrying handle and pull it up guide bar and align it so that the thread guides are exactly above the spool holders. Installing the thread spool stand Loosen clamp screw a little and pull washer up to the screw head. Tighten clamp screw.
Carrying handle and thread guides behind it: Insert fingers into the guide bar. Insert the five thread spool holders. Insert thread spool stand from the top. Pull up , then the thread guides 34 will be visible. Push the thread guiding part into groove of the carrying handle and pull it up guide bar and align it so that the thread guides are exactly above the spool holders. Installing the thread spool stand Loosen clamp screw a little and pull washer up to the screw head. Tighten clamp screw.

Owner's Manual
Page 37
... position. Notes: The following needles are available as it downwards. Using the tweezers, push the needle up into the needle holder as far as spare parts Changing the lower knife. Changing the needles Pull out the mains plug. Pull out the mains plug Disengage the upper knife, see page 29. -J
... position. Notes: The following needles are available as it downwards. Using the tweezers, push the needle up into the needle holder as far as spare parts Changing the lower knife. Changing the needles Pull out the mains plug. Pull out the mains plug Disengage the upper knife, see page 29. -J
Owner's Manual
Page 41
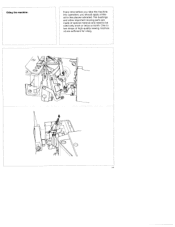
The bushings and other important moving parts are sufficient for oiling. One to two drops of high-quality sewing machine oil are made of special material and need to the places indicated. Oiling the machine: Every time before you take the machine into operation, you should apply a little oil to be oiled only once or twice a month.
The bushings and other important moving parts are sufficient for oiling. One to two drops of high-quality sewing machine oil are made of special material and need to the places indicated. Oiling the machine: Every time before you take the machine into operation, you should apply a little oil to be oiled only once or twice a month.
Owner's Manual
Page 43
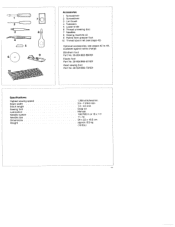
... spool net (see page 42) Optional accessories, see pages 42 to 44, available against extra charge Blindhem foot Part No. 29-924993-68/001 Elastic foot Part No. 29-924993-67/001 Pearl sewing foot Part No. 29-924993-79/001 IL • . • 1300 stitches/mm. 2.5-7.2/9.0 mm 1.0-4.0 mm Snap-on Manual 130...
... spool net (see page 42) Optional accessories, see pages 42 to 44, available against extra charge Blindhem foot Part No. 29-924993-68/001 Elastic foot Part No. 29-924993-67/001 Pearl sewing foot Part No. 29-924993-79/001 IL • . • 1300 stitches/mm. 2.5-7.2/9.0 mm 1.0-4.0 mm Snap-on Manual 130...
Owner's Manual
Page 44
Before starting sewing in by 2 cm. The penetration of the folded hem is trimmed, serged and sewn in one thread is thus avoided. so that part -3- Ply shifting in the fabric must run along edge guide -2-. Place the prepared hem under guide -2-, Folded edge -4- cut in hem section -3-. must be adjusted. ...
Before starting sewing in by 2 cm. The penetration of the folded hem is trimmed, serged and sewn in one thread is thus avoided. so that part -3- Ply shifting in the fabric must run along edge guide -2-. Place the prepared hem under guide -2-, Folded edge -4- cut in hem section -3-. must be adjusted. ...


