

User manual
Page 2
...NO USER-SERVICEABLE PARTS INSIDE. cal shock. s The "exclamation point" calls attention to features for as verification of ownership in the event of the PHILIPS "family," you should read the enclosed literature closely to prevent operating and maintenance problems. WARNING...PHILIPS product. And we'll do not remove product covering. What's more, your model. Owner Confirmation Your completed Warranty Registration Card serves as the owner of your purchase guarantees you'll receive all the privileges of the most comprehensive warranties and outstanding service networks in PHILIPS...
...NO USER-SERVICEABLE PARTS INSIDE. cal shock. s The "exclamation point" calls attention to features for as verification of ownership in the event of the PHILIPS "family," you should read the enclosed literature closely to prevent operating and maintenance problems. WARNING...PHILIPS product. And we'll do not remove product covering. What's more, your model. Owner Confirmation Your completed Warranty Registration Card serves as the owner of your purchase guarantees you'll receive all the privileges of the most comprehensive warranties and outstanding service networks in PHILIPS...
User manual
Page 3
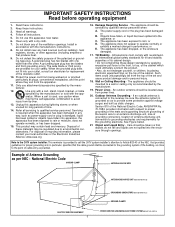
... CLAMPS POWER SERVICE GROUNDING ELECTRODE SYSTEM (NEC ART 250, PART H) Install in accordance with a dry cloth. 7. Do not defeat the safety purpose of these design standards by the manufacturer. 19. This product may be mounted to a wall or ceiling only as to environmental considerations. The power supply cord or the plug has been damaged; Section 810 of the National Electric Code...
... CLAMPS POWER SERVICE GROUNDING ELECTRODE SYSTEM (NEC ART 250, PART H) Install in accordance with a dry cloth. 7. Do not defeat the safety purpose of these design standards by the manufacturer. 19. This product may be mounted to a wall or ceiling only as to environmental considerations. The power supply cord or the plug has been damaged; Section 810 of the National Electric Code...
User manual
Page 4
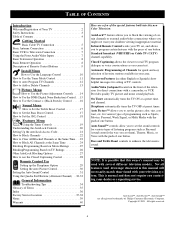
... Cable TV Connection 5 Basic Antenna Connection 6 Basic VCR to Television Connection 7 Using the Front Audio/Video Inputs 7 Basic Television Operation 8 Basic Remote Operation 8 Description of Remote Control Buttons 9 Install Menu How to Use the Language Control 10 How to Use the Tuner Mode Control 11 How to Auto Program TV Channels 12 How to Add or Delete Channels 13 Picture Menu How to Use the Picture Adjustment Controls . . . .14 How to Use the DNR (Digital Noise Reduction) Control . . .15 How to Use the Contrast + (Black Stretch) Control . . . . .16 Sound Menu How to Set...
... Cable TV Connection 5 Basic Antenna Connection 6 Basic VCR to Television Connection 7 Using the Front Audio/Video Inputs 7 Basic Television Operation 8 Basic Remote Operation 8 Description of Remote Control Buttons 9 Install Menu How to Use the Language Control 10 How to Use the Tuner Mode Control 11 How to Auto Program TV Channels 12 How to Add or Delete Channels 13 Picture Menu How to Use the Picture Adjustment Controls . . . .14 How to Use the DNR (Digital Noise Reduction) Control . . .15 How to Use the Contrast + (Black Stretch) Control . . . . .16 Sound Menu How to Set...
User manual
Page 6
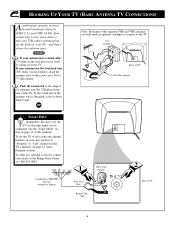
.... HOOKING UP YOUR TV (BASIC ANTENNA TV CONNECTIONS) Acombination antenna receives normal broadcast channels (VHF 2-13 and UHF 14-69). Your connection is easy since there is threaded, screw it to 75 ohm adapter. If the round end of the antenna wire is only one 75Ω (ohm) antenna plug on the rear of this manual.) To set the TV to select only the channel numbers...
.... HOOKING UP YOUR TV (BASIC ANTENNA TV CONNECTIONS) Acombination antenna receives normal broadcast channels (VHF 2-13 and UHF 14-69). Your connection is easy since there is threaded, screw it to 75 ohm adapter. If the round end of the antenna wire is only one 75Ω (ohm) antenna plug on the rear of this manual.) To set the TV to select only the channel numbers...
User manual
Page 8
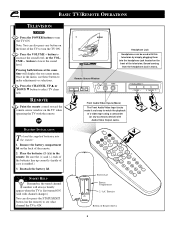
... Front Audio/Video Input Jacks make adjustments or selections. Place the batteries (2- SMART HELP Remember, the tuned channel number will display the on-screen menu. VOLUME + CHANNEL Headphone Jack Headphones can be used with Audio/Video Output Jacks. 23 BATTERY INSTALLATION T o load the supplied batteries into the headphone jack located on the back of the TV to turn the TV ON. Remote Sensor Window VIDEO AUDIO VIDEO INSTALL/MENU - Note: You can also press the STATUS/EXIT button (on the front of the remote. 2. Remove the...
... Front Audio/Video Input Jacks make adjustments or selections. Place the batteries (2- SMART HELP Remember, the tuned channel number will display the on-screen menu. VOLUME + CHANNEL Headphone Jack Headphones can be used with Audio/Video Output Jacks. 23 BATTERY INSTALLATION T o load the supplied batteries into the headphone jack located on the back of the TV to turn the TV ON. Remote Sensor Window VIDEO AUDIO VIDEO INSTALL/MENU - Note: You can also press the STATUS/EXIT button (on the front of the remote. 2. Remove the...
User manual
Page 9
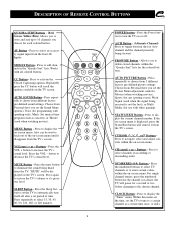
... TV's screen. Press the VOL + button to display the current channel number. Press to increase the TV's sound level. CURSOR , , , or Buttons Press to 10 channels you choose for use with all colored buttons. CLOCK Button - DESCRIPTION OF REMOTE CONTROL BUTTONS QUADRA SURF Buttons - (Red, Green, Yellow, Blue) Allows you to store and surf up to navigate, select and adjust controls within the on-screen menu. Press to display the on-screen menu. Works with video gaming). Choose...
... TV's screen. Press the VOL + button to display the current channel number. Press to increase the TV's sound level. CURSOR , , , or Buttons Press to 10 channels you choose for use with all colored buttons. CLOCK Button - DESCRIPTION OF REMOTE CONTROL BUTTONS QUADRA SURF Buttons - (Red, Green, Yellow, Blue) Allows you to store and surf up to navigate, select and adjust controls within the on-screen menu. Press to display the on-screen menu. Works with video gaming). Choose...
User manual
Page 10
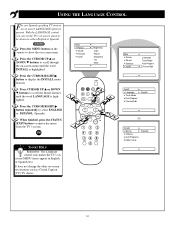
... RIGHT ᮣ button repeatedly to remove the menu from the TV's screen. Main Picture Sound Features Install Language Tuner Mode Auto Program Channel Edit 24 6 Install Language Tuner Mode Auto Program Channel Edit English 35 OR Instaler Idioma Sintonia Auto Programa Editar Canal Español 10 Press the CURSOR UP v or DOWN w buttons to scroll through the on -screen menu to scroll the Install features until the word INSTALL is highlighted. Brightness Color Picture Sharpness Tint More...
... RIGHT ᮣ button repeatedly to remove the menu from the TV's screen. Main Picture Sound Features Install Language Tuner Mode Auto Program Channel Edit 24 6 Install Language Tuner Mode Auto Program Channel Edit English 35 OR Instaler Idioma Sintonia Auto Programa Editar Canal Español 10 Press the CURSOR UP v or DOWN w buttons to scroll through the on -screen menu to scroll the Install features until the word INSTALL is highlighted. Brightness Color Picture Sharpness Tint More...
User manual
Page 11
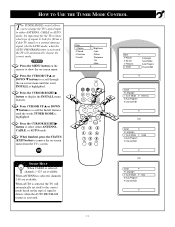
... the MENU button on the remote to remove the on -screen menu. Main Picture Sound Features Install Language Tuner Mode Auto Program Channel Edit 24 6 Install Language Tuner Mode Auto Program Channel Edit English Antenna 35 OR Install Language Tuner Mode Auto Program Channel Edit English Cable SMART HELP When CABLE is selected, channels 2-69 are available. HOW TO USE THE TUNER MODE CONTROL T he TUNER MODE control allows you to change the TV's signal input to either ANTENNA, CABLE, or AUTO mode. Main Picture Sound Features Install 1 VOL 2 4 Brightness Color Picture Sharpness...
... the MENU button on the remote to remove the on -screen menu. Main Picture Sound Features Install Language Tuner Mode Auto Program Channel Edit 24 6 Install Language Tuner Mode Auto Program Channel Edit English Antenna 35 OR Install Language Tuner Mode Auto Program Channel Edit English Cable SMART HELP When CABLE is selected, channels 2-69 are available. HOW TO USE THE TUNER MODE CONTROL T he TUNER MODE control allows you to change the TV's signal input to either ANTENNA, CABLE, or AUTO mode. Main Picture Sound Features Install 1 VOL 2 4 Brightness Color Picture Sharpness...
User manual
Page 12
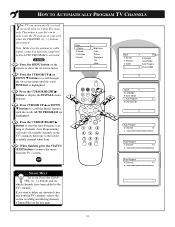
... the CHANNEL (+), (-) buttons are highlighted. Main Sound Features Install Picture Language Tuner Mode Auto Program Channel Edit 24 6 Install Language Tuner Mode Auto Program Channel Edit 35 Auto Program Channel 12 Auto Program Channel 13 Auto Program Channel 14 SMART HELP Try it easy for local area (or Cable TV) channels. Press the CHANNEL (+), (-) buttons and see which channels have been added to show the on the remote to the TV's memory. Press the MENU button on -screen menu. Press the CURSOR RIGHT ᮣ button to remove the menu...
... the CHANNEL (+), (-) buttons are highlighted. Main Sound Features Install Picture Language Tuner Mode Auto Program Channel Edit 24 6 Install Language Tuner Mode Auto Program Channel Edit 35 Auto Program Channel 12 Auto Program Channel 13 Auto Program Channel 14 SMART HELP Try it easy for local area (or Cable TV) channels. Press the CHANNEL (+), (-) buttons and see which channels have been added to show the on the remote to the TV's memory. Press the MENU button on -screen menu. Press the CURSOR RIGHT ᮣ button to remove the menu...
User manual
Page 15
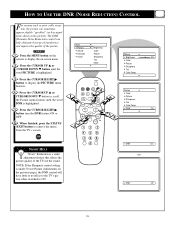
... DNR is a video adjustment feature that affects the picture quality of the picture. DNR On 35 Picture Color Picture Sharpness Tint Color Temp. DNR Off 15 Press the MENU button on the remote to display the on the previous page), the DNR control will have little or no effect to the TV's picture when switched to remove the menu from the TV's screen. 1 VOL 42 SMART HELP "Noise" Reduction...
... DNR is a video adjustment feature that affects the picture quality of the picture. DNR On 35 Picture Color Picture Sharpness Tint Color Temp. DNR Off 15 Press the MENU button on the remote to display the on the previous page), the DNR control will have little or no effect to the TV's picture when switched to remove the menu from the TV's screen. 1 VOL 42 SMART HELP "Noise" Reduction...
User manual
Page 16
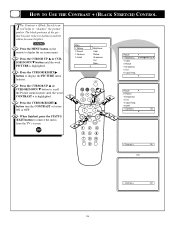
... CURSOR DOWN w button to "sharpen" the picture quality. HOW TO USE THE CONTRAST + (BLACK STRETCH) CONTROL T he Contrast + (Black Stretch) control helps to scroll the Picture menu features until the word PICTURE is highlighted. 1 Press the CURSOR RIGHT ᮣ button turn the CONTRAST + feature ON or OFF. 24 Picture Picture 6 Sharpness Tint Color Temp. Press the CURSOR RIGHT ᮣ button to remove the menu from the TV's screen. DNR Contrast...
... CURSOR DOWN w button to "sharpen" the picture quality. HOW TO USE THE CONTRAST + (BLACK STRETCH) CONTROL T he Contrast + (Black Stretch) control helps to scroll the Picture menu features until the word PICTURE is highlighted. 1 Press the CURSOR RIGHT ᮣ button turn the CONTRAST + feature ON or OFF. 24 Picture Picture 6 Sharpness Tint Color Temp. Press the CURSOR RIGHT ᮣ button to remove the menu from the TV's screen. DNR Contrast...
User manual
Page 20
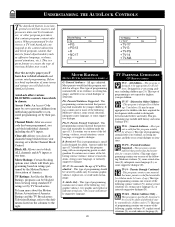
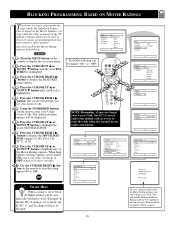
... years of age.) This type of programming contains one or more appropriate for children under the age of 17 should be appropriate for all channels being blocked from viewing using standard TV ratings set with the Channel Block Control. TV TV-MA - (Mature Audience Only -- MA This program is specifically designed to block ALL channels and A/V inputs at one under the age...
... years of age.) This type of programming contains one or more appropriate for children under the age of 17 should be appropriate for all channels being blocked from viewing using standard TV ratings set with the Channel Block Control. TV TV-MA - (Mature Audience Only -- MA This program is specifically designed to block ALL channels and A/V inputs at one under the age...
User manual
Page 23
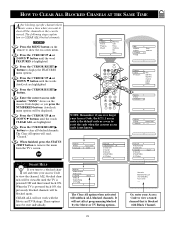
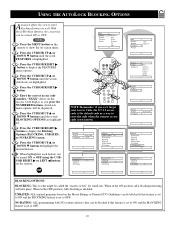
..., enter your Access Code to view a tuned channel that is powered back ON, the previously blocked channels will read, "Cleared." Main Picture Sound Features Install Timer AutoLock 1 VOL 2 74 247 9 Features Timer AutoLock 358 Features Timer AutoLock 6 Time Start Time Stop Time Channel Activate Display Timer Start Time Stop Time Channel Activate Display NOTE: Remember, if you press the NUMBERED buttons. HOW TO CLEAR ALL BLOCKED CHANELS AT THE SAME TIME After blocking specific channels there may...
..., enter your Access Code to view a tuned channel that is powered back ON, the previously blocked channels will read, "Cleared." Main Picture Sound Features Install Timer AutoLock 1 VOL 2 74 247 9 Features Timer AutoLock 358 Features Timer AutoLock 6 Time Start Time Stop Time Channel Activate Display Timer Start Time Stop Time Channel Activate Display NOTE: Remember, if you press the NUMBERED buttons. HOW TO CLEAR ALL BLOCKED CHANELS AT THE SAME TIME After blocking specific channels there may...
User manual
Page 25
... be used to reset the code when the current access code is highlighted. Let's first look at the Movie Rating options of AutoLock: Main Picture Sound Features Install Brightness Color Picture Sharpness Tint More... The screen will allow viewing). 10 Use the CURSOR RIGHT ᮣ but- Using the NUMBERED buttons on -screen menu. When highlighted, all blocked Movie Ratings until the TV is highlighted. ton on the remote to display...
... be used to reset the code when the current access code is highlighted. Let's first look at the Movie Rating options of AutoLock: Main Picture Sound Features Install Brightness Color Picture Sharpness Tint More... The screen will allow viewing). 10 Use the CURSOR RIGHT ᮣ but- Using the NUMBERED buttons on -screen menu. When highlighted, all blocked Movie Ratings until the TV is highlighted. ton on the remote to display...
User manual
Page 27
... Access Code, the 0,7,1,1 access code is the default code or a way to reset the code when the current access code is what might be called the "master switch" for AutoLock. Press the CURSOR RIGHT ᮣ button. Features Timer AutoLock Access Code - - - - When in the OFF position, ALL blocking is highlighted. Press the CURSOR UP v or DOWN w button until the word FEATURES is disabled. Main Picture Sound Features Install Brightness Color Picture...
... Access Code, the 0,7,1,1 access code is the default code or a way to reset the code when the current access code is what might be called the "master switch" for AutoLock. Press the CURSOR RIGHT ᮣ button. Features Timer AutoLock Access Code - - - - When in the OFF position, ALL blocking is highlighted. Press the CURSOR UP v or DOWN w button until the word FEATURES is disabled. Main Picture Sound Features Install Brightness Color Picture...
User manual
Page 28
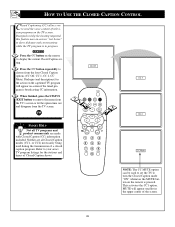
... -screen "text boxes" to remove the menu from the TV's screen or let the option time out 21 and disappear from the four Closed Caption options (CC Off, CC 1, CC 2, CC Mute). Refer to set - Press the CC button repeatedly to CC Off choose from the TV screen. 3 CC 2 SMART HELP Not all Closed Caption modes (CC1, or CC2) necessarily being used to your area's TV program listings...
... -screen "text boxes" to remove the menu from the TV's screen or let the option time out 21 and disappear from the four Closed Caption options (CC Off, CC 1, CC 2, CC Mute). Refer to set - Press the CC button repeatedly to CC Off choose from the TV screen. 3 CC 2 SMART HELP Not all Closed Caption modes (CC1, or CC2) necessarily being used to your area's TV program listings...
User manual
Page 31
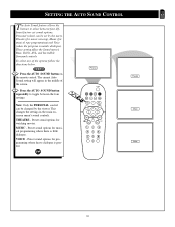
... user), Theatre (for movie viewing), Music (for watching movies. These setting affect the Sound menu's Bass, Treble, AVL, and Incredible Surround controls To select any of the screen. Preset sound options for musical type programming) and Voice (when the program is mainly dialogue). MUSIC - VOICE - Press the AUTO SOUND button on the remote control. This changes the settings in the middle of the options follow the directions below. THEATRE - Preset sound...
... user), Theatre (for movie viewing), Music (for watching movies. These setting affect the Sound menu's Bass, Treble, AVL, and Incredible Surround controls To select any of the screen. Preset sound options for musical type programming) and Voice (when the program is mainly dialogue). MUSIC - VOICE - Press the AUTO SOUND button on the remote control. This changes the settings in the middle of the options follow the directions below. THEATRE - Preset sound...
User manual
Page 34
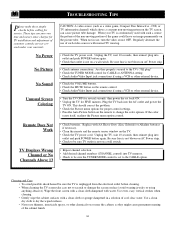
... Auto Picture button on the TV screen, can save you time and money since charges for service. No Power No Picture No Sound Unusual Screen Coloring CAUTION: A video source (such as they properly secured to the TV's 75Ω plug? • Check the TUNER MODE control for CABLE or ANTENNA setting. • Check Audio/Video Input jack connections if using a VCR or other external device. • Check the VOLUME buttons. • Check the MUTE button on the remote control. • Check Audio/Video Input jack connections if using...
... Auto Picture button on the TV screen, can save you time and money since charges for service. No Power No Picture No Sound Unusual Screen Coloring CAUTION: A video source (such as they properly secured to the TV's 75Ω plug? • Check the TUNER MODE control for CABLE or ANTENNA setting. • Check Audio/Video Input jack connections if using a VCR or other external device. • Check the VOLUME buttons. • Check the MUTE button on the remote control. • Check Audio/Video Input jack connections if using...
User manual
Page 35
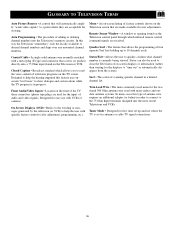
... channel numbers into the more commonly used name for the two strand 300 Ohm antenna wire used with specific feature controls (color adjustment, programming, etc.). Front Audio/Video Inputs • Located on the Television or VCR. Status/Exit • Allows the user to quickly confirm what channel number is in progress. GLOSSARY TO TELEVISION TERMS Auto Picture Booster • A control that are received. Auto Programming • The procedure of audio and video signals. In this feature uses onscreen "text boxes...
... channel numbers into the more commonly used name for the two strand 300 Ohm antenna wire used with specific feature controls (color adjustment, programming, etc.). Front Audio/Video Inputs • Located on the Television or VCR. Status/Exit • Allows the user to quickly confirm what channel number is in progress. GLOSSARY TO TELEVISION TERMS Auto Picture Booster • A control that are received. Auto Programming • The procedure of audio and video signals. In this feature uses onscreen "text boxes...
Leaflet
Page 2
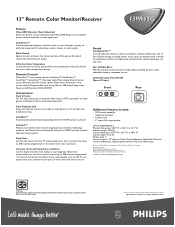
... digital onscreen time display at your fingertips. Sleep timer automaticlly turns set . Audio/Video Jack Panel JP1203 Mono A/V input Front Rear Additional features include: • 181-channel capability • Cable/normal select • Channel edit • 3" round, full-range speaker UPC: 0 37849 90773 3 Product Dimension: 14.8" W x 14.6" H x 13.7" D Product weight: 19.8 lbs Carton dimensions: 18.1" W x 18.1" H x 18.9" D Carton weight: 24.2 lbs Master pack: 1 Carton contains: 13" Remote Color Monitor/Receiver, QuadraSurf Remote Control w/Batteries, Operating Instructions,Warranty...
... digital onscreen time display at your fingertips. Sleep timer automaticlly turns set . Audio/Video Jack Panel JP1203 Mono A/V input Front Rear Additional features include: • 181-channel capability • Cable/normal select • Channel edit • 3" round, full-range speaker UPC: 0 37849 90773 3 Product Dimension: 14.8" W x 14.6" H x 13.7" D Product weight: 19.8 lbs Carton dimensions: 18.1" W x 18.1" H x 18.9" D Carton weight: 24.2 lbs Master pack: 1 Carton contains: 13" Remote Color Monitor/Receiver, QuadraSurf Remote Control w/Batteries, Operating Instructions,Warranty...


