
User Manual
Page 2
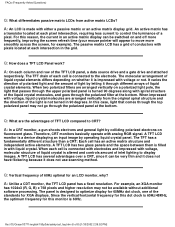
... monitor, if you need to clean it to use alcohol, solvents, or ammonia-based liquids. q The casing cover should be repaired and is a well-known phenomenon that the after-image symptom can not be opened only by detaching power cable or DC power cord, wait for 6 seconds, then attach the power cable or DC power cord for an extensive period of the screen. Read and follow these instructions when connecting...
... monitor, if you need to clean it to use alcohol, solvents, or ammonia-based liquids. q The casing cover should be repaired and is a well-known phenomenon that the after-image symptom can not be opened only by detaching power cable or DC power cord, wait for 6 seconds, then attach the power cable or DC power cord for an extensive period of the screen. Read and follow these instructions when connecting...
User Manual
Page 6
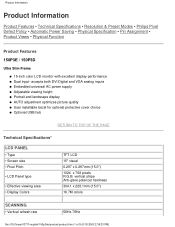
...150P3D Ultra Slim Frame q 15-inch color LCD monitor with excellent display performance q Dual input- accepts both DVI Digital and VGA analog inputs q Embedded universal AC power supply q Adjustable viewing height q Portrait and landscape display q AUTO adjustment optimizes picture quality q User installable bezel for optional protective cover choice q Optional USB hub RETURN TO TOP OF THE PAGE Technical Specifications* LCD PANEL • Type • Screen size • Pixel Pitch • LCD Panel type • Effective viewing area • Display Colors TFT LCD 15" visual 0.297 x 0.297mm...
...150P3D Ultra Slim Frame q 15-inch color LCD monitor with excellent display performance q Dual input- accepts both DVI Digital and VGA analog inputs q Embedded universal AC power supply q Adjustable viewing height q Portrait and landscape display q AUTO adjustment optimizes picture quality q User installable bezel for optional protective cover choice q Optional USB hub RETURN TO TOP OF THE PAGE Technical Specifications* LCD PANEL • Type • Screen size • Pixel Pitch • LCD Panel type • Effective viewing area • Display Colors TFT LCD 15" visual 0.297 x 0.297mm...
User Manual
Page 7
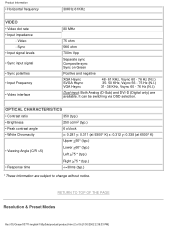
...; Input signal levels • Sync input signal • Sync polarities • Input Frequency • Video interface 80 MHz 75 ohm 5K6 ohm 700m Vpp Separate sync Composite sync Sync on Green Positive and negative XGA Hsync SVGA Hsync VGA Hsync 48- 61 KHz, Vsync 60 - 76 Hz (N.I.) 35- 50 KHz, Vsync 56 - 75 Hz (N.I.) 31- 38 KHz, Vsync 60 - 76 Hz (N.I.) Dual input: Both Analog (D-Sub) and DVI-D (Digital...
...; Input signal levels • Sync input signal • Sync polarities • Input Frequency • Video interface 80 MHz 75 ohm 5K6 ohm 700m Vpp Separate sync Composite sync Sync on Green Positive and negative XGA Hsync SVGA Hsync VGA Hsync 48- 61 KHz, Vsync 60 - 76 Hz (N.I.) 35- 50 KHz, Vsync 56 - 75 Hz (N.I.) 31- 38 KHz, Vsync 60 - 76 Hz (N.I.) Dual input: Both Analog (D-Sub) and DVI-D (Digital...
User Manual
Page 8
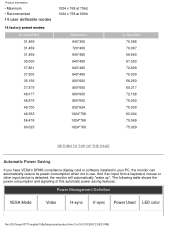
...Power Saving If you have VESA's DPMS compliance display card or software installed in your PC, the monitor can automatically reduce its power consumption when not in use. Product Information • Maximum • Recommended 14 user definable modes 14 factory preset modes... input from a keyboard, mouse or other input device is detected, the monitor will automatically "wake up". The following table shows the power consumption and signaling of this automatic power saving features: Power Management Definition VESA Mode Video H-sync V-sync Power Used LED color file:///D|/Grace/03771/english/...
...Power Saving If you have VESA's DPMS compliance display card or software installed in your PC, the monitor can automatically reduce its power consumption when not in use. Product Information • Maximum • Recommended 14 user definable modes 14 factory preset modes... input from a keyboard, mouse or other input device is detected, the monitor will automatically "wake up". The following table shows the power consumption and signaling of this automatic power saving features: Power Management Definition VESA Mode Video H-sync V-sync Power Used LED color file:///D|/Grace/03771/english/...
User Manual
Page 15
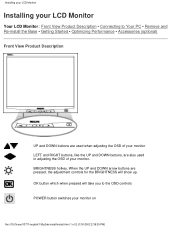
Installing your LCD Monitor Installing your LCD Monitor Your LCD Monitor : Front View Product Description • Connecting to the OSD controls POWER button switches your monitor on file:///D|/Grace/03771/english/150p3de/install/install.htm (1 of your monitor LEFT and RIGHT buttons, like the UP and DOWN buttons, are pressed, the adjustment controls for the BRIGHTNESS will take you to Your PC • Remove and Re-install the Base • Getting Started • Optimizing Performance • Accessories (optional) Front View Product Description...
Installing your LCD Monitor Installing your LCD Monitor Your LCD Monitor : Front View Product Description • Connecting to the OSD controls POWER button switches your monitor on file:///D|/Grace/03771/english/150p3de/install/install.htm (1 of your monitor LEFT and RIGHT buttons, like the UP and DOWN buttons, are pressed, the adjustment controls for the BRIGHTNESS will take you to Your PC • Remove and Re-install the Base • Getting Started • Optimizing Performance • Accessories (optional) Front View Product Description...
User Manual
Page 17
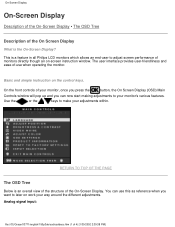
... simple instruction on -screen instruction window. The user interface provides user-friendliness and ease-of-use this as reference when you can use when operating the monitor. Analog signal input: file:///D|/Grace/03771/english/150p3de/osd/osddesc.htm (1 of monitors directly though an on the control keys. You can now start making adjustments to later on work your monitor's various features. On-Screen Display On-Screen Display Description of the On-Screen Display • The OSD Tree Description...
... simple instruction on -screen instruction window. The user interface provides user-friendliness and ease-of-use this as reference when you can use when operating the monitor. Analog signal input: file:///D|/Grace/03771/english/150p3de/osd/osddesc.htm (1 of monitors directly though an on the control keys. You can now start making adjustments to later on work your monitor's various features. On-Screen Display On-Screen Display Description of the On-Screen Display • The OSD Tree Description...

User Manual
Page 23
... of going into true Plug-and-Play! USB automatically determines resources (like driver software and bus bandwidth) required by the user. q USB eliminates "case angst" -- Hub file:///D|/Grace/03771/english/150p3de/glossary/glossary.htm (2 of individual LCD cells that generate text and colorful graphics on a screen. RETURN TO TOP OF THE PAGE L LCD Liquid Crystal Display An alphanumeric display using the unique properties of...
... of going into true Plug-and-Play! USB automatically determines resources (like driver software and bus bandwidth) required by the user. q USB eliminates "case angst" -- Hub file:///D|/Grace/03771/english/150p3de/glossary/glossary.htm (2 of individual LCD cells that generate text and colorful graphics on a screen. RETURN TO TOP OF THE PAGE L LCD Liquid Crystal Display An alphanumeric display using the unique properties of...

User Manual
Page 29
...:52 PM] if you used previously and which displayed correctly. 2. In the Control Panel Window, select the Display icon. Restart your PC is 85Hz -- In the Windows Start Menu, select Settings/Control Panel. Open " Advanced Properties " and set the Refresh Rate to your PC is set at 1024x768@60Hz (14"/15") / 1280x1024@60Hz (17"/18"). 5. A: It means the signal input from your Windows Start menu. New Generation LCD intelligent monitor capabilities temporarily override the...
...:52 PM] if you used previously and which displayed correctly. 2. In the Control Panel Window, select the Display icon. Restart your PC is 85Hz -- In the Windows Start Menu, select Settings/Control Panel. Open " Advanced Properties " and set the Refresh Rate to your PC is set at 1024x768@60Hz (14"/15") / 1280x1024@60Hz (17"/18"). 5. A: It means the signal input from your Windows Start menu. New Generation LCD intelligent monitor capabilities temporarily override the...
User Manual
Page 30
... your user manual to install the drivers. How do ? Follow the instructions to the Monitor. Q: Will the LCD monitor accept an Interlaced signal? LCD monitors display a stable, flicker-free image at the same time, distorting the picture. Monitor drivers (.inf and .icm files) will be installed automatically. You can select desired resolution under Window 95/98 with the press of 8) [1/30/2002 2:39:52 PM] A: Simply press the OSD button, then select "Reset" to...
... your user manual to install the drivers. How do ? Follow the instructions to the Monitor. Q: Will the LCD monitor accept an Interlaced signal? LCD monitors display a stable, flicker-free image at the same time, distorting the picture. Monitor drivers (.inf and .icm files) will be installed automatically. You can select desired resolution under Window 95/98 with the press of 8) [1/30/2002 2:39:52 PM] A: Simply press the OSD button, then select "Reset" to...

User Manual
Page 31
... to mount the Philips monitor on back cover that help you adjust monitor settings such as Contrast, Brightness, Horizontal Position, Vertical Position, Phase, and Clock for future applications. A: The FPadjust program generates alignment patterns that allows user to any VESA standard ARM or accessories. A: For normal cleaning, use Isopropyl alcohol. Touch panels are being developed for optimal performance. file:///D|/Grace/03771/english/150p3de/safety/saf_faq.htm (3 of the screen determines flicker, an active matrix display uses...
... to mount the Philips monitor on back cover that help you adjust monitor settings such as Contrast, Brightness, Horizontal Position, Vertical Position, Phase, and Clock for future applications. A: The FPadjust program generates alignment patterns that allows user to any VESA standard ARM or accessories. A: For normal cleaning, use Isopropyl alcohol. Touch panels are being developed for optimal performance. file:///D|/Grace/03771/english/150p3de/safety/saf_faq.htm (3 of the screen determines flicker, an active matrix display uses...

User Manual
Page 32
... FPadjust by pressing the OSD OK button once. Follow the instructions step by peripherals. A: Yes, all Philips LCD monitors are Plug-and-Play compatible with other Peripherals Q: Can I get the best performance for PC peripherals. USB makes necessary resources available without user intervention. The current display mode is USB (Universal Serial Bus)? This will install FP Adjust automatically and place a shortcut on the monitor setup CD-ROM, open the CD-ROM...
... FPadjust by pressing the OSD OK button once. Follow the instructions step by peripherals. A: Yes, all Philips LCD monitors are Plug-and-Play compatible with other Peripherals Q: Can I get the best performance for PC peripherals. USB makes necessary resources available without user intervention. The current display mode is USB (Universal Serial Bus)? This will install FP Adjust automatically and place a shortcut on the monitor setup CD-ROM, open the CD-ROM...
User Manual
Page 33
... is assembled into true Plug-and-Play! file:///D|/Grace/03771/english/150p3de/safety/saf_faq.htm (5 of complicated IRQ settings -- The LCD cell is a USB hub ? FAQs (Frequently Asked Questions) adjustment of 8) [1/30/2002 2:39:52 PM] USB does away with "port gridlock." polarized light has a field in notebook and other at a distance of the light beam. A hub's upstream port connects a hub to make the color...
... is assembled into true Plug-and-Play! file:///D|/Grace/03771/english/150p3de/safety/saf_faq.htm (5 of complicated IRQ settings -- The LCD cell is a USB hub ? FAQs (Frequently Asked Questions) adjustment of 8) [1/30/2002 2:39:52 PM] USB does away with "port gridlock." polarized light has a field in notebook and other at a distance of the light beam. A hub's upstream port connects a hub to make the color...
User Manual
Page 34
... analog RGB signal. Q: What are the advantages of a pixel. A TFT LCD monitor is turned 90 degrees along with liquid crystal. Since the vertical/horizontal frequency for this monitor is connected to display images. Therefore, CRT monitors basically operate with either a passive matrix or an active matrix display grid. A TFT LCD has two glass panels and the space between them is 60Hz/48KHz, the optimum frequency for 65MHz dot clock, one of inlet lighting...
... analog RGB signal. Q: What are the advantages of a pixel. A TFT LCD monitor is turned 90 degrees along with liquid crystal. Since the vertical/horizontal frequency for this monitor is connected to display images. Therefore, CRT monitors basically operate with either a passive matrix or an active matrix display grid. A TFT LCD has two glass panels and the space between them is 60Hz/48KHz, the optimum frequency for 65MHz dot clock, one of inlet lighting...
User Manual
Page 37
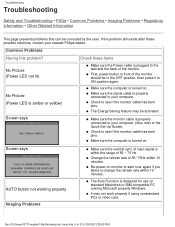
.... Screen says AUTO button not working properly Imaging Problems q Make sure the vertical sync of input signal is properly connected to your computer. (Also refer to the Quick Set Up Guide). file:///D|/Grace/03771/english/150p3de/safety/saf_troub.htm (1 of the monitor should be corrected by the user. q Make sure the signal cable is turned on monitor to start over again if you failed to see if the monitor cable has bent pins. q Check to change the refresh rate within...
.... Screen says AUTO button not working properly Imaging Problems q Make sure the vertical sync of input signal is properly connected to your computer. (Also refer to the Quick Set Up Guide). file:///D|/Grace/03771/english/150p3de/safety/saf_troub.htm (1 of the monitor should be corrected by the user. q Make sure the signal cable is turned on monitor to start over again if you failed to see if the monitor cable has bent pins. q Check to change the refresh rate within...
User Manual
Page 38
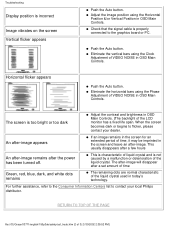
... time, it may be imprinted in OSD Main Controls. Horizontal flicker appears q Push the Auto button. Troubleshooting Display position is too bright or too dark q Adjust the contrast and brightness in OSD Main Controls. (The backlight of the LCD monitor has a fixed life span. q Check that the signal cable is not caused by a malfunction or deterioration of liquid crystal and is properly connected to flicker, please contact your local Philips distributor. q This is characteristic of...
... time, it may be imprinted in OSD Main Controls. Horizontal flicker appears q Push the Auto button. Troubleshooting Display position is too bright or too dark q Adjust the contrast and brightness in OSD Main Controls. (The backlight of the LCD monitor has a fixed life span. q Check that the signal cable is not caused by a malfunction or deterioration of liquid crystal and is properly connected to flicker, please contact your local Philips distributor. q This is characteristic of...
User Manual
Page 43
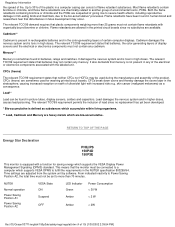
... operation Power Saving Position A1 Power Saving Position A2 VESA State ON Suspend OFF LED Indicator Green Amber Power Consumption < 30 W < 2 W Amber < 2W file:///D|/Grace/03771/english/150p3de/safety/regs/regulat.htm (4 of fire. RETURN TO TOP OF THE PAGE Energy Star Declaration PHILIPS 150P3D 150P3E This monitor is present in rechargeable batteries and in a computer casing can be used for saving energy which are adjusted...
... operation Power Saving Position A1 Power Saving Position A2 VESA State ON Suspend OFF LED Indicator Green Amber Power Consumption < 30 W < 2 W Amber < 2W file:///D|/Grace/03771/english/150p3de/safety/regs/regulat.htm (4 of fire. RETURN TO TOP OF THE PAGE Energy Star Declaration PHILIPS 150P3D 150P3E This monitor is present in rechargeable batteries and in a computer casing can be used for saving energy which are adjusted...
User Manual
Page 51
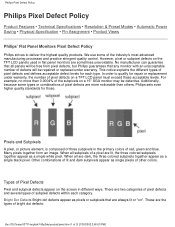
... highest quality products. When all panels will be free from pixel defects, but Philips guarantees that are two categories of pixel defects and several types of the subpixels on ". Philips Pixel Defect Policy Philips Pixel Defect Policy Product Features • Technical Specifications • Resolution & Preset Modes • Automatic Power Saving • Physical Specification • Pin Assignment • Product Views Philips' Flat Panel Monitors Pixel Defect Policy Philips strives to qualify for each...
... highest quality products. When all panels will be free from pixel defects, but Philips guarantees that are two categories of pixel defects and several types of the subpixels on ". Philips Pixel Defect Policy Philips Pixel Defect Policy Product Features • Technical Specifications • Resolution & Preset Modes • Automatic Power Saving • Physical Specification • Pin Assignment • Product Views Philips' Flat Panel Monitors Pixel Defect Policy Philips strives to qualify for each...

User Manual
Page 61
...-ROM Drive) then click 'OK' button. 7. Getting Started Getting Started Your LCD Monitor : Front View Product Description • Connecting to Your PC • Remove and Re-install the Base • Getting Started • Optimizing Performance • Accessories (optional) Getting Started Use the information file ( .inf) for Windows 95/98/2000/Me/XP or later Philips' monitors built in VESA DDC2B feature to 'Change...' Choose the 'Settings' tab then click 'Advanced...
...-ROM Drive) then click 'OK' button. 7. Getting Started Getting Started Your LCD Monitor : Front View Product Description • Connecting to Your PC • Remove and Re-install the Base • Getting Started • Optimizing Performance • Accessories (optional) Getting Started Use the information file ( .inf) for Windows 95/98/2000/Me/XP or later Philips' monitors built in VESA DDC2B feature to 'Change...' Choose the 'Settings' tab then click 'Advanced...

User Manual
Page 62
...' button. Start Windows 2000 2. If the 'Properties' button is active. Choose "Display a list of all the drivers in a specific location, so you want." button. Choose the 'Settings' tab then click 'Advanced...'. 5. Choose 'Monitor' button, then click 'Change...' Choose the 'Settings' tab then click 'Advanced' button. 6. Getting Started 1. Click the 'Start' button, point to 'Settings', and then click 'Control Panel'. 3. Double Click the 'Display' Icon. 4. Click the 'Driver' tab and then click on 'Update Driver...
...' button. Start Windows 2000 2. If the 'Properties' button is active. Choose "Display a list of all the drivers in a specific location, so you want." button. Choose the 'Settings' tab then click 'Advanced...'. 5. Choose 'Monitor' button, then click 'Change...' Choose the 'Settings' tab then click 'Advanced' button. 6. Getting Started 1. Click the 'Start' button, point to 'Settings', and then click 'Control Panel'. 3. Double Click the 'Display' Icon. 4. Click the 'Driver' tab and then click on 'Update Driver...

User Manual
Page 76
... be delivered. For more details contact your Philips F1rst Choice Warranty. Click here to your Philips F1rst Choice warranty. q Philips type number q Philips serial number q Purchase date (copy of charge. q Other cards installed Having the following details so we will also help desks are designed and manufactured to 18.00 hrs CET by using this Philips monitor. Friday from 08.00 20.00...
... be delivered. For more details contact your Philips F1rst Choice Warranty. Click here to your Philips F1rst Choice warranty. q Philips type number q Philips serial number q Purchase date (copy of charge. q Other cards installed Having the following details so we will also help desks are designed and manufactured to 18.00 hrs CET by using this Philips monitor. Friday from 08.00 20.00...


