

User manual
Page 2
... LCD Monitor • FAQs • Troubleshooting • Regulatory Information • Other Related Information Safety precautions and maintenance WARNING: Use of time. Read and follow these instructions when connecting and using your computer monitor: q Unplug the monitor, if you need to clean it with a dry cloth is possible when the power is off the monitor by qualified service personnel. q Keep the monitor dry. q When positioning the monitor, make sure the power plug...
... LCD Monitor • FAQs • Troubleshooting • Regulatory Information • Other Related Information Safety precautions and maintenance WARNING: Use of time. Read and follow these instructions when connecting and using your computer monitor: q Unplug the monitor, if you need to clean it with a dry cloth is possible when the power is off the monitor by qualified service personnel. q Keep the monitor dry. q When positioning the monitor, make sure the power plug...

User manual
Page 7
... (16M colors) VIDEO • Video dot rate • Input impedance - q Super Wide viewing angle technology. RETURN TO TOP OF THE PAGE Technical Specifications* LCD PANEL • Type • Screen size • Pixel Pitch • LCD Panel type • Effective viewing area • Display Colors TFT LCD 15' visual 0.297 x 0.297mm 1024 x 768 pixels R.G.B. 150S Product Information Product Information Product Features • Technical Specifications • Resolution & Preset Modes • Philips Pixel Defect Policy • Automatic Power Saving • Physical Specification...
... (16M colors) VIDEO • Video dot rate • Input impedance - q Super Wide viewing angle technology. RETURN TO TOP OF THE PAGE Technical Specifications* LCD PANEL • Type • Screen size • Pixel Pitch • LCD Panel type • Effective viewing area • Display Colors TFT LCD 15' visual 0.297 x 0.297mm 1024 x 768 pixels R.G.B. 150S Product Information Product Information Product Features • Technical Specifications • Resolution & Preset Modes • Philips Pixel Defect Policy • Automatic Power Saving • Physical Specification...
User manual
Page 9
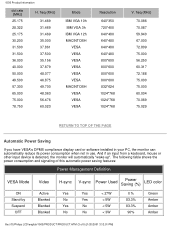
... compliance display card or software installed in your PC, the monitor can automatically reduce its power consumption when not in use. The following table shows the power consumption and signaling of this automatic power saving features: Power Management Definition VESA Mode ON Stand-by Suspend OFF Video Active Blanked Blanked Blanked H-sync V-sync Power Used Power Saving (%) LED color Yes Yes < 27W No Yes < 5W Yes No < 5W No No < 3W 0 % 83.3% 83.3% 90% Green...
... compliance display card or software installed in your PC, the monitor can automatically reduce its power consumption when not in use. The following table shows the power consumption and signaling of this automatic power saving features: Power Management Definition VESA Mode ON Stand-by Suspend OFF Video Active Blanked Blanked Blanked H-sync V-sync Power Used Power Saving (%) LED color Yes Yes < 27W No Yes < 5W Yes No < 5W No No < 3W 0 % 83.3% 83.3% 90% Green...

User manual
Page 12
file:///D|/Philips LCD/english/150S/INSTALL/INSTALL.HTM (1 of your monitor. Installing your LCD Monitor Installing your LCD Monitor Your LCD Monitor : Front View Product Description • Connecting to Your PC • Getting Started • Optimizing Performance Accessories (optional) : Installing the Protective Cover • Installing the Wall Mount Kit Front View UP and DOWN buttons are used when adjusting the OSD of your monitor LEFT and RIGHT buttons, like the UP and DOWN buttons, are also used in adjusting the OSD of 2) [1/20/2001 3:12:04 PM]
file:///D|/Philips LCD/english/150S/INSTALL/INSTALL.HTM (1 of your monitor. Installing your LCD Monitor Installing your LCD Monitor Your LCD Monitor : Front View Product Description • Connecting to Your PC • Getting Started • Optimizing Performance Accessories (optional) : Installing the Protective Cover • Installing the Wall Mount Kit Front View UP and DOWN buttons are used when adjusting the OSD of your monitor LEFT and RIGHT buttons, like the UP and DOWN buttons, are also used in adjusting the OSD of 2) [1/20/2001 3:12:04 PM]
User manual
Page 13
... your display settings are pressed, the adjustment controls for getting the best performance out of 2) [1/20/2001 3:12:04 PM] q You can check the current display settings by -step instructions is shown on the item called RESOLUTION. Note: You can also install the Flat Panel Adjust (FP Adjust) program, a program for the BRIGHTNESS will show up. .OK button which when pressed will take you to the OSD controls POWER button switches your LCD Monitor BRIGHTNESS...
... your display settings are pressed, the adjustment controls for getting the best performance out of 2) [1/20/2001 3:12:04 PM] q You can check the current display settings by -step instructions is shown on the item called RESOLUTION. Note: You can also install the Flat Panel Adjust (FP Adjust) program, a program for the BRIGHTNESS will show up. .OK button which when pressed will take you to the OSD controls POWER button switches your LCD Monitor BRIGHTNESS...
User manual
Page 14
... all Philips LCD monitors which allows an end-user to adjust screen performance of monitors directly through an on the control keys. Basic and simple instruction on -screen instruction window. Use the or the keys to your adjustments within. This is the On-Screen Display? file:///D|/Philips LCD/english/150S/OSD/OSDDESC.HTM (1 of -use when operating the monitor. On the front controls of your monitor, once you press the button, the On Screen Display (OSD) Main Controls window will...
... all Philips LCD monitors which allows an end-user to adjust screen performance of monitors directly through an on the control keys. Basic and simple instruction on -screen instruction window. Use the or the keys to your adjustments within. This is the On-Screen Display? file:///D|/Philips LCD/english/150S/OSD/OSDDESC.HTM (1 of -use when operating the monitor. On the front controls of your monitor, once you press the button, the On Screen Display (OSD) Main Controls window will...

User manual
Page 23
... @60Hz for your monitor. Inside the Display Control Panel, select the " Settings " tab. LCD monitors display a stable, flicker-free image at 1024x768, 60Hz. q Unplug all cables, then connect your Philips LCD monitor. q Shut down your computer, disconnect your old monitor and reconnect your PC to the monitor that your user manual to 1024x768 pixels . A: These are the .inf and .icm files on your monitor. Follow the instructions in this video mode"? file:///D|/Philips LCD/english/150S/SAFETY/SAF_FAQ...
... @60Hz for your monitor. Inside the Display Control Panel, select the " Settings " tab. LCD monitors display a stable, flicker-free image at 1024x768, 60Hz. q Unplug all cables, then connect your Philips LCD monitor. q Shut down your computer, disconnect your old monitor and reconnect your PC to the monitor that your user manual to 1024x768 pixels . A: These are the .inf and .icm files on your monitor. Follow the instructions in this video mode"? file:///D|/Philips LCD/english/150S/SAFETY/SAF_FAQ...

User manual
Page 24
... 3:12:36 PM] Q: My Monitor has no power (Power LED does not light) ? In general, it is also available. file:///D|/Philips LCD/english/150S/SAFETY/SAF_FAQ.HTM (2 of a single button - Q: Will the LCD screen resistant scratches? Q: Will the LCD monitor accept an Interlaced signal? A: The AUTO adjustment key restores optimal screen position, phase and clock settings with the "Display properties/Settings" control panel Q: What if I do? An optional protective cover with greater scratch resistance is...
... 3:12:36 PM] Q: My Monitor has no power (Power LED does not light) ? In general, it is also available. file:///D|/Philips LCD/english/150S/SAFETY/SAF_FAQ.HTM (2 of a single button - Q: Will the LCD screen resistant scratches? Q: Will the LCD monitor accept an Interlaced signal? A: The AUTO adjustment key restores optimal screen position, phase and clock settings with the "Display properties/Settings" control panel Q: What if I do? An optional protective cover with greater scratch resistance is...

User manual
Page 26
Q: What is proprietary Philips software that help you adjust monitor settings such as Contrast, Brightness, Horizontal Position, Vertical Position Phase, and Clock for optimal performance. A: The FPadjust program generates alignment patterns that allows users to use an electron gun, they do not use CustoMax®. Note: You can check the current display settings by double clicking the shortcut. However LCD panel characteristics require some tradeoffs. FAQs (Frequently Asked Questions) Screen Adjustments Q: What is CustoMax...
Q: What is proprietary Philips software that help you adjust monitor settings such as Contrast, Brightness, Horizontal Position, Vertical Position Phase, and Clock for optimal performance. A: The FPadjust program generates alignment patterns that allows users to use an electron gun, they do not use CustoMax®. Note: You can check the current display settings by double clicking the shortcut. However LCD panel characteristics require some tradeoffs. FAQs (Frequently Asked Questions) Screen Adjustments Q: What is CustoMax...

User manual
Page 27
..., plug in, reboot and run simultaneously on one Enhanced Parallel Port add-on (scanner or video camera, for example), and a joystick. Please contact your Mac system. No need a cable adapter to connect the monitor to the Universal Serial Bus. Q: What is USB (Universal Serial Bus)? USB automatically determines resources (like driver software and bus bandwidth) required by peripherals. There are normally limited to install circuit board cards -- file:///D|/Philips LCD/english...
..., plug in, reboot and run simultaneously on one Enhanced Parallel Port add-on (scanner or video camera, for example), and a joystick. Please contact your Mac system. No need a cable adapter to connect the monitor to the Universal Serial Bus. Q: What is USB (Universal Serial Bus)? USB automatically determines resources (like driver software and bus bandwidth) required by peripherals. There are normally limited to install circuit board cards -- file:///D|/Philips LCD/english...

User manual
Page 29
... different arrays of a CDT. A TFT LCD has two glass panels and the space between them is not turned in with analog RGB signal. Q: Vertical frequency of the TFT LCD panel, a data source drive and a gate drive and attached respectively. Since the vertical/horizontal frequency for this dot clock is 60Hz/48KHz, the optimum frequency for an LCD monitor, why? Since the refraction ratio of inlet light on whether it . It...
... different arrays of a CDT. A TFT LCD has two glass panels and the space between them is not turned in with analog RGB signal. Q: Vertical frequency of the TFT LCD panel, a data source drive and a gate drive and attached respectively. Since the vertical/horizontal frequency for this dot clock is 60Hz/48KHz, the optimum frequency for an LCD monitor, why? Since the refraction ratio of inlet light on whether it . It...
User manual
Page 32
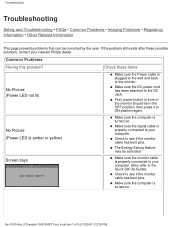
... q Make sure the monitor cable is turned on . q Check to the Quick Set Up Guide). q Make sure the computer is properly connected to your computer. (Also refer to see if the monitor cable has bent pins. file:///D|/Philips LCD/english/150S/SAFETY/saf_troub.htm (1 of the monitor should be corrected by the user. q Make sure the DC power cord has been attached to the wall and back of the monitor. q Make sure the signal cable...
... q Make sure the monitor cable is turned on . q Check to the Quick Set Up Guide). q Make sure the computer is properly connected to your computer. (Also refer to see if the monitor cable has bent pins. file:///D|/Philips LCD/english/150S/SAFETY/saf_troub.htm (1 of the monitor should be corrected by the user. q Make sure the DC power cord has been attached to the wall and back of the monitor. q Make sure the signal cable...
User manual
Page 33
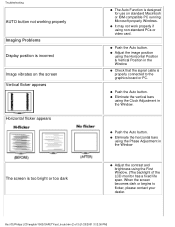
... using the Horizontal Position & Vertical Position in the Window q Check that the signal cable is designed for use on the screen Vertical flicker appears Horizontal flicker appears The screen is too bright or too dark q The Auto Function is properly connected to flicker, please contact your dealer. q Eliminate the horizontal bars using the First Window. (The backlight of 3) [1/20/2001 3:12:36 PM] q Adjust the image position using non-standard PCs or video card. q Push the Auto button. Troubleshooting AUTO button not working properly Imaging Problems Display position is incorrect Image...
... using the Horizontal Position & Vertical Position in the Window q Check that the signal cable is designed for use on the screen Vertical flicker appears Horizontal flicker appears The screen is too bright or too dark q The Auto Function is properly connected to flicker, please contact your dealer. q Eliminate the horizontal bars using the First Window. (The backlight of 3) [1/20/2001 3:12:36 PM] q Adjust the image position using non-standard PCs or video card. q Push the Auto button. Troubleshooting AUTO button not working properly Imaging Problems Display position is incorrect Image...
User manual
Page 43
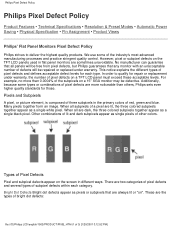
... red, green and blue. Philips Pixel Defect Policy Philips Pixel Defect Policy Product Features • Technical Specifications • Resolution & Preset Modes • Automatic Power Saving • Physical Specification • Pin Assignment • Product Views Philips' Flat Panel Monitors Pixel Defect Policy Philips strives to qualify for repair or replacement under warranty. However, pixel or subpixel defects on a 15" XGA monitor may be repaired or replaced under warranty, the number of Pixel Defects Pixel and subpixel defects appear on the screen...
... red, green and blue. Philips Pixel Defect Policy Philips Pixel Defect Policy Product Features • Technical Specifications • Resolution & Preset Modes • Automatic Power Saving • Physical Specification • Pin Assignment • Product Views Philips' Flat Panel Monitors Pixel Defect Policy Philips strives to qualify for repair or replacement under warranty. However, pixel or subpixel defects on a 15" XGA monitor may be repaired or replaced under warranty, the number of Pixel Defects Pixel and subpixel defects appear on the screen...
User manual
Page 52
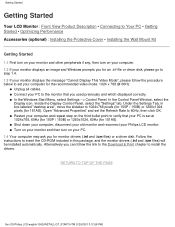
... 1.4. 1.3 If your monitor displays the message "Cannot Display This Video Mode", please follow the link to the Download & Print chapter to install the drivers. q Connect your Philips LCD monitor. In the Control Panel Window, select the Display icon. Getting Started Getting Started Your LCD Monitor : Front View Product Description • Connecting to Your PC • Getting Started • Optimizing Performance Accessories (optional) : Installing the Protective Cover • Installing the Wall Mount Kit Getting Started 1.1 First turn on your monitor and other peripherals...
... 1.4. 1.3 If your monitor displays the message "Cannot Display This Video Mode", please follow the link to the Download & Print chapter to install the drivers. q Connect your Philips LCD monitor. In the Control Panel Window, select the Display icon. Getting Started Getting Started Your LCD Monitor : Front View Product Description • Connecting to Your PC • Getting Started • Optimizing Performance Accessories (optional) : Installing the Protective Cover • Installing the Wall Mount Kit Getting Started 1.1 First turn on your monitor and other peripherals...

User manual
Page 53
... (B) to Your PC • Getting Started • Optimizing Performance Accessories (optional) : Installing the Protective Cover • Cleaning Instructions • Installing the Wall Mount Kit Installing the Protective Cover 1) Locate the rectangular openings in one on each of the openings is a clip. There are two on the top of the monitor and one of the opening. Below each side. file:///D|/Philips LCD/english/150S/INSTALL/P_COVER/pcov_inst.htm (1 of the...
... (B) to Your PC • Getting Started • Optimizing Performance Accessories (optional) : Installing the Protective Cover • Cleaning Instructions • Installing the Wall Mount Kit Installing the Protective Cover 1) Locate the rectangular openings in one on each of the openings is a clip. There are two on the top of the monitor and one of the opening. Below each side. file:///D|/Philips LCD/english/150S/INSTALL/P_COVER/pcov_inst.htm (1 of the...
User manual
Page 57
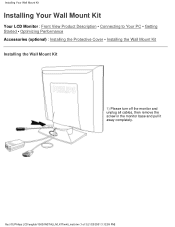
file:///D|/Philips LCD/english/150S/INSTALL/M_KIT/mkit_inst.htm (1 of 3) [1/20/2001 3:12:59 PM] Installing Your Wall Mount Kit Installing Your Wall Mount Kit Your LCD Monitor : Front View Product Description • Connecting to Your PC • Getting Started • Optimizing Performance Accessories (optional) : Installing the Protective Cover • Installing the Wall Mount Kit Installing the Wall Mount Kit 1) Please turn off the monitor and unplug all cables, then remove the screw in the monitor base and pull it away completely.
file:///D|/Philips LCD/english/150S/INSTALL/M_KIT/mkit_inst.htm (1 of 3) [1/20/2001 3:12:59 PM] Installing Your Wall Mount Kit Installing Your Wall Mount Kit Your LCD Monitor : Front View Product Description • Connecting to Your PC • Getting Started • Optimizing Performance Accessories (optional) : Installing the Protective Cover • Installing the Wall Mount Kit Installing the Wall Mount Kit 1) Please turn off the monitor and unplug all cables, then remove the screw in the monitor base and pull it away completely.
User manual
Page 60
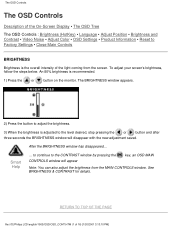
... OSD Controls : Brightness (HotKey) • Language • Adjust Position • Brightness and Contrast • Video Noise • Adjust Color • OSD Settings • Product Information • Reset to Factory Settings • Close Main Controls BRIGHTNESS Brightness is the overall intensity of 16) [1/20/2001 3:13:10 PM] RETURN TO TOP OF THE PAGE file:///D|/Philips LCD/english/150S/OSD/OSD_CONT.HTM (1 of the light coming from the MAIN CONTROLS window. The BRIGHTNESS window appears. 2) Press the button to adjust the brightness...
... OSD Controls : Brightness (HotKey) • Language • Adjust Position • Brightness and Contrast • Video Noise • Adjust Color • OSD Settings • Product Information • Reset to Factory Settings • Close Main Controls BRIGHTNESS Brightness is the overall intensity of 16) [1/20/2001 3:13:10 PM] RETURN TO TOP OF THE PAGE file:///D|/Philips LCD/english/150S/OSD/OSD_CONT.HTM (1 of the light coming from the MAIN CONTROLS window. The BRIGHTNESS window appears. 2) Press the button to adjust the brightness...
User manual
Page 65
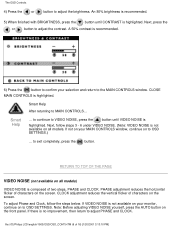
... adjusting VIDEO NOISE yourself, press the AUTO button on the screen. If there is not available on your MAIN CONTROLS window, continue on to OSD SETTINGS.) ... CLOCK adjustment reduces the vertical flicker of characters on the front panel. to continue to OSD SETTINGS. If not on your monitor, continue on all models. RETURN TO TOP OF THE PAGE VIDEO NOISE (not available on to VIDEO NOISE, press the button until CONTRAST...
... adjusting VIDEO NOISE yourself, press the AUTO button on the screen. If there is not available on your MAIN CONTROLS window, continue on to OSD SETTINGS.) ... CLOCK adjustment reduces the vertical flicker of characters on the front panel. to continue to OSD SETTINGS. If not on your monitor, continue on all models. RETURN TO TOP OF THE PAGE VIDEO NOISE (not available on to VIDEO NOISE, press the button until CONTRAST...

User manual
Page 80
q Philips type number q Philips serial number q Purchase date (copy of purchase may be delivered. q Other cards installed Having the following details so we will also help desks are designed and manufactured to 18.00 hrs CET by using this Philips monitor. Just a phone call being received within the second or third year of the toll-free numbers. Click here to your monitor within the first...
q Philips type number q Philips serial number q Purchase date (copy of purchase may be delivered. q Other cards installed Having the following details so we will also help desks are designed and manufactured to 18.00 hrs CET by using this Philips monitor. Just a phone call being received within the second or third year of the toll-free numbers. Click here to your monitor within the first...


