
Leaflet
Page 1
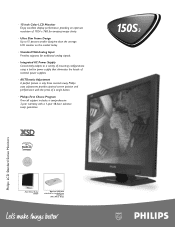
... for amazing image clarity. · Ultra Slim Frame Design Up to 15 percent smaller footprint than the average LCD monitor on the market today. · Standard VGA Analog Input Provides supports for traditional analog signals. · Integrated AC Power Supply Conveniently adapts to standard base PCUH411 (Mist White Only) · 15-inch Color LCD Monitor Enjoy excellent display performance providing an optimum resolution of external power supplies. · AUTOmatic Adjustment A perfect picture is only...
... for amazing image clarity. · Ultra Slim Frame Design Up to 15 percent smaller footprint than the average LCD monitor on the market today. · Standard VGA Analog Input Provides supports for traditional analog signals. · Integrated AC Power Supply Conveniently adapts to standard base PCUH411 (Mist White Only) · 15-inch Color LCD Monitor Enjoy excellent display performance providing an optimum resolution of external power supplies. · AUTOmatic Adjustment A perfect picture is only...

Leaflet
Page 2
... change without Audio/USB. 1244 - 07/02 Product Number 150S3H (Stealth Black) 150S3F (Mist White) Technical Specifications LCD • Panel • Screen Size (inch/cm) • Pixel Pitch • Display Format • Display Area • Display Colors TFT LCD 15.0 inch / 38.1 cm 0.297 x 0.297 mm 1024 x 768 pixels, RGB Vertical Stripe, Anti-glare Polarizer, Hard Coated 304.1 x 228.1 mm 16.7M colors Scanning • Vertical Refresh Rate • Horizontal Frequency 56 - 76 Hz 30 - 61 kHz Video • Video Dot Rate...
... change without Audio/USB. 1244 - 07/02 Product Number 150S3H (Stealth Black) 150S3F (Mist White) Technical Specifications LCD • Panel • Screen Size (inch/cm) • Pixel Pitch • Display Format • Display Area • Display Colors TFT LCD 15.0 inch / 38.1 cm 0.297 x 0.297 mm 1024 x 768 pixels, RGB Vertical Stripe, Anti-glare Polarizer, Hard Coated 304.1 x 228.1 mm 16.7M colors Scanning • Vertical Refresh Rate • Horizontal Frequency 56 - 76 Hz 30 - 61 kHz Video • Video Dot Rate...
User manual
Page 2
... instructions when connecting and using your application . q Consult a service technician if the monitor does not operate normally when following the instructions in front of the screen. q When positioning the monitor, make sure the power plug and outlet are followed. Most of the time the after-image will disappear gradually over a period of time after -image symptom can not be opened only by detaching power cable or DC power cord...
... instructions when connecting and using your application . q Consult a service technician if the monitor does not operate normally when following the instructions in front of the screen. q When positioning the monitor, make sure the power plug and outlet are followed. Most of the time the after-image will disappear gradually over a period of time after -image symptom can not be opened only by detaching power cable or DC power cord...
User manual
Page 6
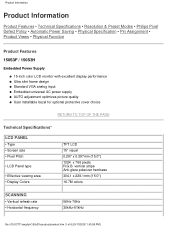
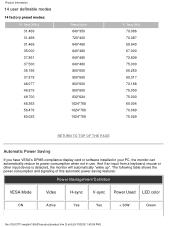
...8226; Philips Pixel Defect Policy • Automatic Power Saving • Physical Specification • Pin Assignment • Product Views • Physical Function Product Features 150S3F / 150S3H Embedded Power Supply q 15-inch color LCD monitor with excellent display performance q Ultra slim frame design q Standard VGA analog input q Embedded universal AC power supply q AUTO adjustment optimizes picture quality q User installable bezel for optional protective cover choice RETURN TO TOP OF THE PAGE Technical Specifications* LCD PANEL • Type • Screen size • Pixel Pitch...
...8226; Philips Pixel Defect Policy • Automatic Power Saving • Physical Specification • Pin Assignment • Product Views • Physical Function Product Features 150S3F / 150S3H Embedded Power Supply q 15-inch color LCD monitor with excellent display performance q Ultra slim frame design q Standard VGA analog input q Embedded universal AC power supply q AUTO adjustment optimizes picture quality q User installable bezel for optional protective cover choice RETURN TO TOP OF THE PAGE Technical Specifications* LCD PANEL • Type • Screen size • Pixel Pitch...
User manual
Page 7
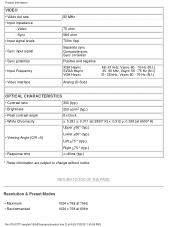
...; Input signal levels • Sync input signal • Sync polarities • Input Frequency • Video interface 80 MHz 75 ohm 5K6 ohm 700m Vpp Separate sync Composite sync Sync on Green Positive and negative XGA Hsync SVGA Hsync VGA Hsync 48- 61 kHz, Vsync 60 - 76 Hz (N.I.) 35- 50 kHz, Vsync 56 - 75 Hz (N.I.) 31- 38 kHz, Vsync 60 - 76 Hz (N.I.) Analog (D-Sub) OPTICAL CHARACTERISTICS • Contrast...
...; Input signal levels • Sync input signal • Sync polarities • Input Frequency • Video interface 80 MHz 75 ohm 5K6 ohm 700m Vpp Separate sync Composite sync Sync on Green Positive and negative XGA Hsync SVGA Hsync VGA Hsync 48- 61 kHz, Vsync 60 - 76 Hz (N.I.) 35- 50 kHz, Vsync 56 - 75 Hz (N.I.) 31- 38 kHz, Vsync 60 - 76 Hz (N.I.) Analog (D-Sub) OPTICAL CHARACTERISTICS • Contrast...
User manual
Page 8
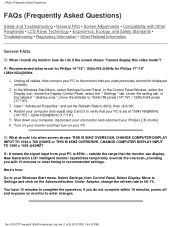
...And if an input from a keyboard, mouse or other input device is detected, the monitor will automatically "wake up". The following table shows the power consumption and signaling of this automatic power saving features: Power Management Definition VESA Mode Video H-sync V-sync Power Used LED color ON Active Yes Yes < 30W Green file:///D|/03771/english/150s3fh/product/... 75.029 RETURN TO TOP OF THE PAGE Automatic Power Saving If you have VESA's DPMS compliance display card or software installed in your PC, the monitor can automatically reduce its power consumption when not in use.
...And if an input from a keyboard, mouse or other input device is detected, the monitor will automatically "wake up". The following table shows the power consumption and signaling of this automatic power saving features: Power Management Definition VESA Mode Video H-sync V-sync Power Used LED color ON Active Yes Yes < 30W Green file:///D|/03771/english/150s3fh/product/... 75.029 RETURN TO TOP OF THE PAGE Automatic Power Saving If you have VESA's DPMS compliance display card or software installed in your PC, the monitor can automatically reduce its power consumption when not in use.

User manual
Page 12
... Base • Getting Started • Optimizing Performance • Accessories (optional) Front View Product Description UP and DOWN buttons are used when adjusting the OSD of your monitor LEFT and RIGHT buttons, like the UP and DOWN buttons, are pressed, the adjustment controls for the BRIGHTNESS will show up. Installing your LCD Monitor Installing your LCD Monitor Your LCD Monitor : Front View Product Description • Connecting to the OSD controls POWER button switches your monitor on Automatically adjust the horizontal position, vertical position, phase and clock setting...
... Base • Getting Started • Optimizing Performance • Accessories (optional) Front View Product Description UP and DOWN buttons are used when adjusting the OSD of your monitor LEFT and RIGHT buttons, like the UP and DOWN buttons, are pressed, the adjustment controls for the BRIGHTNESS will show up. Installing your LCD Monitor Installing your LCD Monitor Your LCD Monitor : Front View Product Description • Connecting to the OSD controls POWER button switches your monitor on Automatically adjust the horizontal position, vertical position, phase and clock setting...
User manual
Page 25
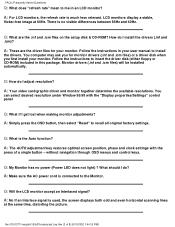
.... Unplug all cables, then connect your Philips LCD monitor. 6. Turn on your monitor and then turn on the Advanced button. Select Settings, then Control Panel. if you with Other Peripherals • LCD Panel Technology • Ergonomics, Ecology, and Safety Standards • Troubleshooting • Regulatory Information • Other Related Information General FAQs Q: When I install my monitor how do I do if the screen shows "Cannot display this video mode"? file:///D|/03771/english/150s3fh/safety...
.... Unplug all cables, then connect your Philips LCD monitor. 6. Turn on your monitor and then turn on the Advanced button. Select Settings, then Control Panel. if you with Other Peripherals • LCD Panel Technology • Ergonomics, Ecology, and Safety Standards • Troubleshooting • Regulatory Information • Other Related Information General FAQs Q: When I install my monitor how do I do if the screen shows "Cannot display this video mode"? file:///D|/03771/english/150s3fh/safety...
User manual
Page 26
... (Power LED does not light) ? There is connected to recall all original factory settings. A: Simply press the OSD button, then select "Reset" to the Monitor. FAQs (Frequently Asked Questions) Q: What does "refresh rate" mean to me in your monitor. without navigation through OSD menus and control keys. A: Your video card/graphic driver and monitor together determine the available resolutions. A: The AUTO adjustment key restores optimal screen position, phase and clock settings with the "Display properties/Settings" control panel Q: What if I adjust resolution? LCD monitors...
... (Power LED does not light) ? There is connected to recall all original factory settings. A: Simply press the OSD button, then select "Reset" to the Monitor. FAQs (Frequently Asked Questions) Q: What does "refresh rate" mean to me in your monitor. without navigation through OSD menus and control keys. A: Your video card/graphic driver and monitor together determine the available resolutions. A: The AUTO adjustment key restores optimal screen position, phase and clock settings with the "Display properties/Settings" control panel Q: What if I adjust resolution? LCD monitors...
User manual
Page 27
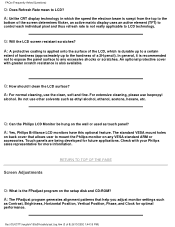
... standard VESA mount holes on back cover that help you adjust monitor settings such as Contrast, Brightness, Horizontal Position, Vertical Position, Phase, and Clock for optimal performance. Screen Adjustments RETURN TO TOP OF THE PAGE Q: What is also available. In general, it is recommended not to expose the panel surface to any VESA standard ARM or accessories. Check with greater scratch resistance is the FPadjust program on the wall or used...
... standard VESA mount holes on back cover that help you adjust monitor settings such as Contrast, Brightness, Horizontal Position, Vertical Position, Phase, and Clock for optimal performance. Screen Adjustments RETURN TO TOP OF THE PAGE Q: What is also available. In general, it is recommended not to expose the panel surface to any VESA standard ARM or accessories. Check with greater scratch resistance is the FPadjust program on the wall or used...
User manual
Page 28
... FPadjust by pressing the OSD OK button once. RETURN TO TOP OF THE PAGE Compatibility with your system's video controller. Q: Are Philips LCD monitors Plug-and-Play? Please contact your display settings are Plug-and-Play compatible with standard PC, Mac and workstation. USB automatically determines resources (like driver software and bus bandwidth) required by step to optimize image performance with other Peripherals Q: Can I connect my LCD monitor to any PC, workstation...
... FPadjust by pressing the OSD OK button once. RETURN TO TOP OF THE PAGE Compatibility with your system's video controller. Q: Are Philips LCD monitors Plug-and-Play? Please contact your display settings are Plug-and-Play compatible with standard PC, Mac and workstation. USB automatically determines resources (like driver software and bus bandwidth) required by step to optimize image performance with other Peripherals Q: Can I connect my LCD monitor to any PC, workstation...

User manual
Page 29
... be much less power than LED and gas-display displays because they work on the market every day. With USB, up to 127 devices can run set up to unplug a device. No need to go through the reverse process to install peripherals. Without USB, PCs are LCDs made? Bottom line: USB transforms today's "Plug-and-Pray" into a "module" by adding the backlight, driver electronics and...
... be much less power than LED and gas-display displays because they work on the market every day. With USB, up to 127 devices can run set up to unplug a device. No need to go through the reverse process to install peripherals. Without USB, PCs are LCDs made? Bottom line: USB transforms today's "Plug-and-Pray" into a "module" by adding the backlight, driver electronics and...

User manual
Page 33
... 10 minutes. q Make sure the signal cable is within the range of 56 ~ 75 Hz. q Change the refresh rate to the Quick Set Up Guide). q Re-power on . q First, power button in the OFF position, then press it to see if the monitor cable has bent pins. Screen says AUTO button not working properly Imaging Problems q Make sure the vertical sync of the monitor should be activated q Make sure the monitor cable is amber or yellow) Screen says Check these possible...
... 10 minutes. q Make sure the signal cable is within the range of 56 ~ 75 Hz. q Change the refresh rate to the Quick Set Up Guide). q Re-power on . q First, power button in the OFF position, then press it to see if the monitor cable has bent pins. Screen says AUTO button not working properly Imaging Problems q Make sure the vertical sync of the monitor should be activated q Make sure the monitor cable is amber or yellow) Screen says Check these possible...

User manual
Page 34
.../safety/saf_troub.htm (2 of the liquid crystal used in OSD Main Controls. Troubleshooting Display position is not caused by a malfunction or deterioration of VIDEO NOISE in OSD Main Controls. q Adjust the image position using the Phase Adjustment of the liquid crystal. Horizontal flicker appears q Push the Auto button. The after-image will disappear after a set amount of time Green, red, blue, dark, and white dots remains q The remaining dots are normal characteristic of 3) [9/13...
.../safety/saf_troub.htm (2 of the liquid crystal used in OSD Main Controls. Troubleshooting Display position is not caused by a malfunction or deterioration of VIDEO NOISE in OSD Main Controls. q Adjust the image position using the Phase Adjustment of the liquid crystal. Horizontal flicker appears q Push the Auto button. The after-image will disappear after a set amount of time Green, red, blue, dark, and white dots remains q The remaining dots are normal characteristic of 3) [9/13...
User manual
Page 40
...; guidelines for saving energy which can radiate radio frequency energy and, if not installed and used in a particular installation. However, there is no guarantee that was supplied with a function for energy efficiency. This means that this equipment does cause harmful interference to radio or television reception, which supports the VESA Display Power Management Signaling (DPMS) standard. Use only RF shielded cable that interference...
...; guidelines for saving energy which can radiate radio frequency energy and, if not installed and used in a particular installation. However, there is no guarantee that was supplied with a function for energy efficiency. This means that this equipment does cause harmful interference to radio or television reception, which supports the VESA Display Power Management Signaling (DPMS) standard. Use only RF shielded cable that interference...
User manual
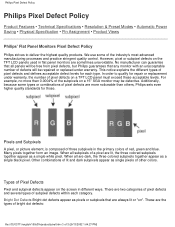
Page 47
... replaced under warranty, the number of pixel defects on a TFT LCD panel must exceed these acceptable levels. There are more than others, Philips sets even higher quality standards for repair or replacement under warranty. Additionally, because some of other colors. Philips Pixel Defect Policy Philips Pixel Defect Policy Product Features • Technical Specifications • Resolution & Preset Modes • Automatic Power Saving • Physical Specification • Pin Assignment • Product Views Philips' Flat Panel Monitors Pixel Defect Policy Philips...
... replaced under warranty, the number of pixel defects on a TFT LCD panel must exceed these acceptable levels. There are more than others, Philips sets even higher quality standards for repair or replacement under warranty. Additionally, because some of other colors. Philips Pixel Defect Policy Philips Pixel Defect Policy Product Features • Technical Specifications • Resolution & Preset Modes • Automatic Power Saving • Physical Specification • Pin Assignment • Product Views Philips' Flat Panel Monitors Pixel Defect Policy Philips...
User manual
Page 57
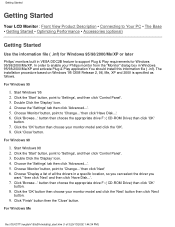
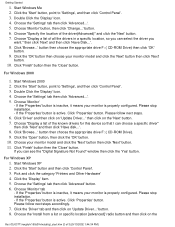
Getting Started Getting Started Your LCD Monitor : Front View Product Description • Connecting to Your PC • The Base • Getting Started • Optimizing Performance • Accessories (optional) Getting Started Use the information file ( .inf) for Windows 95/98/2000/Me/XP or later Philips' monitors built in VESA DDC2B feature to 'Settings', and then click 'Control Panel'. 3. Start Windows '95 2. Click the 'Start' button, point to support Plug & Play requirements for Windows 95/98/2000...
Getting Started Getting Started Your LCD Monitor : Front View Product Description • Connecting to Your PC • The Base • Getting Started • Optimizing Performance • Accessories (optional) Getting Started Use the information file ( .inf) for Windows 95/98/2000/Me/XP or later Philips' monitors built in VESA DDC2B feature to 'Settings', and then click 'Control Panel'. 3. Start Windows '95 2. Click the 'Start' button, point to support Plug & Play requirements for Windows 95/98/2000...
User manual
Page 58
... 'Start' button, point to 'Settings', and then click 'Control Panel'. 3. button. 6. then click 'Next' and then click 'Have Disk...'. 8. button then choose the appropriate drive F: ( CD-ROM Drive) then click 'OK' button. 9. Click the 'OK' button then choose your monitor model and click the 'Next' button then click 'Next' button. 11. Start Windows 2000 2. Choose "Display a list of the driver(Advanced)" and click the 'Next' button. 7. Click the 'Open' button...
... 'Start' button, point to 'Settings', and then click 'Control Panel'. 3. button. 6. then click 'Next' and then click 'Have Disk...'. 8. button then choose the appropriate drive F: ( CD-ROM Drive) then click 'OK' button. 9. Click the 'OK' button then choose your monitor model and click the 'Next' button then click 'Next' button. 11. Start Windows 2000 2. Choose "Display a list of the driver(Advanced)" and click the 'Next' button. 7. Click the 'Open' button...

User manual
Page 75
...free parts and one year free labor will be provided at Philips Canada depot or any one of 3) [9/13/2002 1:44:51 PM] REMEMBER... You may not apply to state/province. Philips Customer Care Center, P. Please check your owner's manual before requesting service. Contact the Philips Customer Care Center phone number...purchasing this Philips monitor. Please record the model and serial numbers found on how long an implied warranty may save you for servicing: Philips Customer Care Center 877) 835-1838 or (903) 242-4804 (In U.S.A., Puerto Rico and U.S. file:///D|/03771/english/warranty_1/...
...free parts and one year free labor will be provided at Philips Canada depot or any one of 3) [9/13/2002 1:44:51 PM] REMEMBER... You may not apply to state/province. Philips Customer Care Center, P. Please check your owner's manual before requesting service. Contact the Philips Customer Care Center phone number...purchasing this Philips monitor. Please record the model and serial numbers found on how long an implied warranty may save you for servicing: Philips Customer Care Center 877) 835-1838 or (903) 242-4804 (In U.S.A., Puerto Rico and U.S. file:///D|/03771/english/warranty_1/...
User manual
Page 76
..., model and product serial number. This one of the toll-free numbers. Or you within the specification - United States Guarantee All Philips monitors are designed and manufactured to high standards and deliver high-quality performance, ease of use . q Other cards installed Having the following details so we will not apply if it has been sent to the service provider at your problem quickly. Philips warranty...
..., model and product serial number. This one of the toll-free numbers. Or you within the specification - United States Guarantee All Philips monitors are designed and manufactured to high standards and deliver high-quality performance, ease of use . q Other cards installed Having the following details so we will not apply if it has been sent to the service provider at your problem quickly. Philips warranty...


