

User Manual
Page 3
... a wall or ceiling only as power-supply cord or plug is not used , use this apparatus during lightning storms or when unused for replacement of the cabinet which could unsuspectingly fall and liquids are provided for a long time. Unplug this apparatus near any strange object into your local authorities or the Electronic Industries Alliance:www.eiae.org. 16. Safety instructions...
... a wall or ceiling only as power-supply cord or plug is not used , use this apparatus during lightning storms or when unused for replacement of the cabinet which could unsuspectingly fall and liquids are provided for a long time. Unplug this apparatus near any strange object into your local authorities or the Electronic Industries Alliance:www.eiae.org. 16. Safety instructions...
User Manual
Page 4
... not open or remove covers to comply with the instructions, may cause arcing and result in this device that to radio or television reception, which the receiver is believed adequate for the intended use of light (red, green or blue) may cause an electrical shock. Any operation expressly prohibited in this manual, any changes or modifications made with shielded cables with metallic RFI...
... not open or remove covers to comply with the instructions, may cause arcing and result in this device that to radio or television reception, which the receiver is believed adequate for the intended use of light (red, green or blue) may cause an electrical shock. Any operation expressly prohibited in this manual, any changes or modifications made with shielded cables with metallic RFI...
User Manual
Page 5
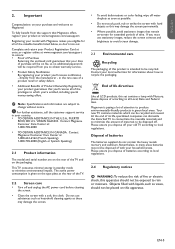
... 6.1 Remote control overivew 13 6.2 Change picture and sound settings 14 6.3 Use Smart mode 16 6.4 Create favorite channels list 17 6.5 Set the clock 17 6.6 Set the sleeptimer 17 6.7 Use parental control and rating locks 18 6.8 Closed captions 21 6.9 Use your TV as a PC monitor 22 6.10 Select your settings to standby 11 5.2 Watch TV 11 5.3 Watch channels from a cable receiver box 12 5.4 Watch a DVD 12 6. Get started 7 4.1 Position the TV 7 4.2 Wall mount the TV 7 4.3 Install the remote control batteries 8 4.4 Connect the antenna or cable 8 4.5 Connect the AC power cord...
... 6.1 Remote control overivew 13 6.2 Change picture and sound settings 14 6.3 Use Smart mode 16 6.4 Create favorite channels list 17 6.5 Set the clock 17 6.6 Set the sleeptimer 17 6.7 Use parental control and rating locks 18 6.8 Closed captions 21 6.9 Use your TV as a PC monitor 22 6.10 Select your settings to standby 11 5.2 Watch TV 11 5.3 Watch channels from a cable receiver box 12 5.4 Watch a DVD 12 6. Get started 7 4.1 Position the TV 7 4.2 Wall mount the TV 7 4.3 Install the remote control batteries 8 4.4 Connect the antenna or cable 8 4.5 Connect the AC power cord...
User Manual
Page 6
... your model with Magnavox makes you 'll receive all LCD products, this apparatus. Disposal of attention to produce environmentally-friendly products in standby mode to recycle the packaging. To fully benefit from the manufacturer - directly from the support that you eligible for information about how to minimise environmental impact. The active power consumption is intended to obtain warranty service...
... your model with Magnavox makes you 'll receive all LCD products, this apparatus. Disposal of attention to produce environmentally-friendly products in standby mode to recycle the packaging. To fully benefit from the manufacturer - directly from the support that you eligible for information about how to minimise environmental impact. The active power consumption is intended to obtain warranty service...
User Manual
Page 7
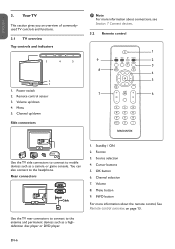
... 3. You can also connect to the antenna and permanent devices such as a camera or game console. Volume up /down 4. OK button 6. Channel up /down Side connectors 75 Ω 75 Ω DD Note For more information about connections, see Section 7 Connect devices. 3.2 Remote control 1 9 2 3 8 4 5 7 MODE 6 75 Ω Use the TV side connectors to connect to mobile devices such as a highdefinition disc player or DVD player. 1. EN-6 Remote control senso21 r 3. Power switch 2. Menu 5.
... 3. You can also connect to the antenna and permanent devices such as a camera or game console. Volume up /down 4. OK button 6. Channel up /down Side connectors 75 Ω 75 Ω DD Note For more information about connections, see Section 7 Connect devices. 3.2 Remote control 1 9 2 3 8 4 5 7 MODE 6 75 Ω Use the TV side connectors to connect to mobile devices such as a highdefinition disc player or DVD player. 1. EN-6 Remote control senso21 r 3. Power switch 2. Menu 5.
User Manual
Page 8
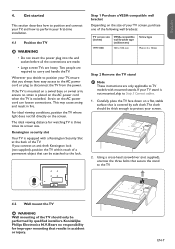
... improper mounting that secure the stand to the TV. 4.2 Wall mount the TV BB WARNING Wall mounting of the following wall brackets: TV screen size (inches) 19MF338B VESA-compatible wall bracket type (millimeters) 100 x 100 mm Screw type Metric 4 x 10mm Step 2 Remove the TV stand DD Note These instructions are only applicable to position your TV, ensure that is swivelled. If you always have easy access to the AC power cord or plug to the lock. The...
... improper mounting that secure the stand to the TV. 4.2 Wall mount the TV BB WARNING Wall mounting of the following wall brackets: TV screen size (inches) 19MF338B VESA-compatible wall bracket type (millimeters) 100 x 100 mm Screw type Metric 4 x 10mm Step 2 Remove the TV stand DD Note These instructions are only applicable to position your TV, ensure that is swivelled. If you always have easy access to the AC power cord or plug to the lock. The...
User Manual
Page 9
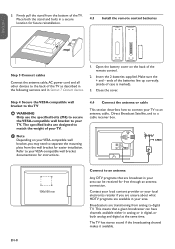
... battery cover on your VESA-compatible wall bracket, you are unsure about what HDTV programs are transitioning from the bottom of the TV as described in the following sections and in digital, or both the stand and bolts in a secure 4.3 Install the remote control batteries location for free through an antenna connection. ENGLISH FRANÇAISE ESPAÑOL Step 3 Connect cables Connect the antenna cable, AC power cord and all other devices...
... battery cover on your VESA-compatible wall bracket, you are unsure about what HDTV programs are transitioning from the bottom of the TV as described in the following sections and in digital, or both the stand and bolts in a secure 4.3 Install the remote control batteries location for free through an antenna connection. ENGLISH FRANÇAISE ESPAÑOL Step 3 Connect cables Connect the antenna cable, AC power cord and all other devices...
User Manual
Page 10
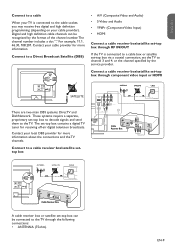
... the format of the channel number. SATELLITE Connect to a cable receiver box/satellite settop box Cable Receiver Box ANTENNA SATELLITE CABLE OR OR CABLE OR OR Cable Receiver Box A cable receiver box or satellite set -top box through the following connections: Cable • ANTENNA (7R5eocehivmer B)ox CABLE OR OR Cable Receiver Box EN-9 The channel number includes a dot "." Connect to a Direct Broadcast Satellite (DBS) CABLE • A/V (Composite Video and Audio) • S-Video and Audio ANTENNA SATELLITE CABLE • YPbPr (Component Video Input) • HDMI...
... the format of the channel number. SATELLITE Connect to a cable receiver box/satellite settop box Cable Receiver Box ANTENNA SATELLITE CABLE OR OR CABLE OR OR Cable Receiver Box A cable receiver box or satellite set -top box through the following connections: Cable • ANTENNA (7R5eocehivmer B)ox CABLE OR OR Cable Receiver Box EN-9 The channel number includes a dot "." Connect to a Direct Broadcast Satellite (DBS) CABLE • A/V (Composite Video and Audio) • S-Video and Audio ANTENNA SATELLITE CABLE • YPbPr (Component Video Input) • HDMI...
User Manual
Page 11
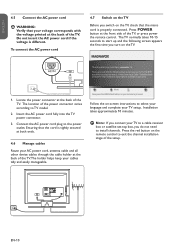
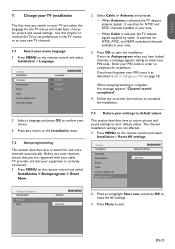
... remote control. Please proceed with the following screen appears the first time you do not need to set -up and the following steps to install channels. To connect the AC power cord 4.7 Switch on the TV Before you switch on the TV. Press POWER button at the front side of the power connector varies according to proceed. The holder helps keep your TV setup. a cable receiver box or satellite set-top box, you turn...
... remote control. Please proceed with the following screen appears the first time you do not need to set -up and the following steps to install channels. To connect the AC power cord 4.7 Switch on the TV Before you switch on the TV. Press POWER button at the front side of the power connector varies according to proceed. The holder helps keep your TV setup. a cable receiver box or satellite set-top box, you turn...
User Manual
Page 14
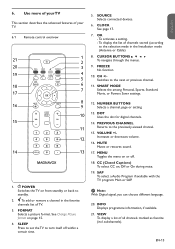
.... VOLUME +/Increases or decreases volume. 16. CC (Closed Captions) To select CC on or off within a certain time. 5. Use more of your TV. 6.1 Remote control overivew 21 1 2 20 3 19 4 5 18 6 17 7 8 16 9 MODE 10 15 11 12 14 13 1. NUMBER BUTTONS Selects a channel, page or setting. 13. MUTE Mutes or restores sound. 17. DD Note: With Digital signal, you can choose different language. 20. VIEW To display a list of channels...
.... VOLUME +/Increases or decreases volume. 16. CC (Closed Captions) To select CC on or off within a certain time. 5. Use more of your TV. 6.1 Remote control overivew 21 1 2 20 3 19 4 5 18 6 17 7 8 16 9 MODE 10 15 11 12 14 13 1. NUMBER BUTTONS Selects a channel, page or setting. 13. MUTE Mutes or restores sound. 17. DD Note: With Digital signal, you can choose different language. 20. VIEW To display a list of channels...
User Manual
Page 17
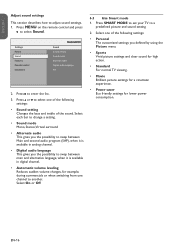
... digital channel. • Automatic volume leveling Reduces sudden volume changes, for lower power consumption. Press SMART MODE to set your TV to select Sound. Select one channel to swap between Main and second audio program (SAP), when it is available in analog channel. • Digital audio language This gives you defined by using the Picture menu. • Sports Vivid picture settings and clear sound for high action. • Standard For normal TV viewing...
... digital channel. • Automatic volume leveling Reduces sudden volume changes, for lower power consumption. Press SMART MODE to set your TV to select Sound. Select one channel to swap between Main and second audio program (SAP), when it is available in analog channel. • Digital audio language This gives you defined by using the Picture menu. • Sports Vivid picture settings and clear sound for high action. • Standard For normal TV viewing...
User Manual
Page 18
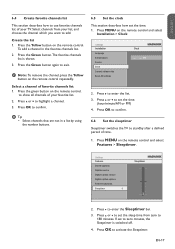
...favorite channels list 1. EN-17 To add a channel in a list by using the number buttons. 6.5 Set the clock This section describes how set the time. DD Note: To remove the channel, press the Yellow button on the remote control. Press the green button on the remote control repeatedly. to show all channels of your TV. Press MENU on the remote control and select Installation > Clock Settings Installation Language Autoprogram Source Clock Current software info Reset AV settings Clock -- : -- Settings Features Closed captions Caption service Digital caption service Digital caption...
...favorite channels list 1. EN-17 To add a channel in a list by using the number buttons. 6.5 Set the clock This section describes how set the time. DD Note: To remove the channel, press the Yellow button on the remote control. Press the green button on the remote control repeatedly. to show all channels of your TV. Press MENU on the remote control and select Installation > Clock Settings Installation Language Autoprogram Source Clock Current software info Reset AV settings Clock -- : -- Settings Features Closed captions Caption service Digital caption service Digital caption...
User Manual
Page 22
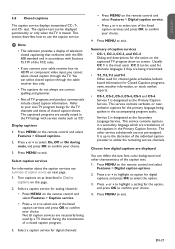
... the listed caption services and press OK to your cable receiver box via HDMI or component video input, you cannot select closed caption information. Press MENU to use correct spelling and grammar. • Not all caption services are not pre-assigned. This section describes how to exit. Display captions 1. Not all TV programs and product commercials include closed caption through the TV. Summary of closed caption program. 3. Press MENU on screen. You can be used for channel guide, schedules...
... the listed caption services and press OK to your cable receiver box via HDMI or component video input, you cannot select closed caption information. Press MENU to use correct spelling and grammar. • Not all caption services are not pre-assigned. This section describes how to exit. Display captions 1. Not all TV programs and product commercials include closed caption through the TV. Summary of closed caption program. 3. Press MENU on screen. You can be used for channel guide, schedules...
User Manual
Page 23
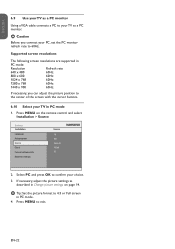
... supported in PC mode: Resolution Refresh rate 640 x 480 60Hz 800 x 600 60Hz 1024 x 768 60Hz 1280 x 768 60Hz 1440 x 900 60Hz If necessary, you connect your PC, set the PC monitor refresh rate to the center of the screen with the cursor buttons. 6.10 Select your TV in Change picture settings on the remote control and select Installation > Source Settings Installation Language Autoprogram Source Clock Current software info Reset...
... supported in PC mode: Resolution Refresh rate 640 x 480 60Hz 800 x 600 60Hz 1024 x 768 60Hz 1280 x 768 60Hz 1440 x 900 60Hz If necessary, you connect your PC, set the PC monitor refresh rate to the center of the screen with the cursor buttons. 6.10 Select your TV in Change picture settings on the remote control and select Installation > Source Settings Installation Language Autoprogram Source Clock Current software info Reset...
User Manual
Page 24
... have locked channels, a message appears asking to confirm your area. The channel installation settings are not affected. 1. Settings ISnestttainllagtsion Installation Language Language Autoprogram Autoprogram Source Source Clock Clock Current software info Current software info Reset AV settings Reset AV settings Source Language TV English AV1 Français Side AV Español HDMI PC 2. Select Cable or Antenna and press . Press MENU on the remote control and select Installation > Reset AV settings. Settings Installation Language Autoprogram Source...
... have locked channels, a message appears asking to confirm your area. The channel installation settings are not affected. 1. Settings ISnestttainllagtsion Installation Language Language Autoprogram Autoprogram Source Source Clock Clock Current software info Current software info Reset AV settings Reset AV settings Source Language TV English AV1 Français Side AV Español HDMI PC 2. Select Cable or Antenna and press . Press MENU on the remote control and select Installation > Reset AV settings. Settings Installation Language Autoprogram Source...

User Manual
Page 27
...AV SIDE AV SIDE AV VIDEO IN VIDEO IN L - AUDIO - AUDIO - The following sections describe examples only, other configurations are possible. ote Connect a cable receiver box and a DVD player/recorder via composite connectors arningBCoBnW necatransient-gtop box and DVD player/recorder via component video output connectors (YPbPr) and analog audio L - R L - AUDIO - AUDIO - AUVDIIDOE-ORIN L - AUDIO - AUDIO - R L - AUDIO - R DIGITAL AUDIO OUT DIGITAL AUDIO OUT DIGITAL C VGA When connecting composite or component cables, match the cable colors to the connectors on the...
...AV SIDE AV SIDE AV VIDEO IN VIDEO IN L - AUDIO - AUDIO - The following sections describe examples only, other configurations are possible. ote Connect a cable receiver box and a DVD player/recorder via composite connectors arningBCoBnW necatransient-gtop box and DVD player/recorder via component video output connectors (YPbPr) and analog audio L - R L - AUDIO - AUDIO - AUVDIIDOE-ORIN L - AUDIO - AUDIO - R L - AUDIO - R DIGITAL AUDIO OUT DIGITAL AUDIO OUT DIGITAL C VGA When connecting composite or component cables, match the cable colors to the connectors on the...
User Manual
Page 29
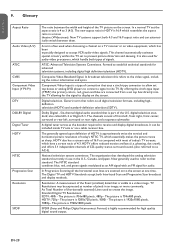
... generally used for audio-video processors, which essentially makes the picture twice as number of signals. By offering the cinch-type input (YPbPr) the primary colors, red, green and blue are scanned on the screen. ghosting, dot crawl), and offers 5.1 independent channels of front left, front right, front center, surround or rear left, surround or rear right, and a separate subwoofer. The picture is 4 to the screen at one time. Digital television. HDTV...
... generally used for audio-video processors, which essentially makes the picture twice as number of signals. By offering the cinch-type input (YPbPr) the primary colors, red, green and blue are scanned on the screen. ghosting, dot crawl), and offers 5.1 independent channels of front left, front right, front center, surround or rear left, surround or rear right, and a separate subwoofer. The picture is 4 to the screen at one time. Digital television. HDTV...

User Manual
Page 30
..., the picture format has to the power socket outlet. 3. Connect the TV to HDMI connections. Error message on the remote control to the wall via component or HDMI cables. Ensure that the Audio L/R cable is connected directly to select the best picture format. 2. Press SOURCE on the remote control. Increase the volume. If the TV is connected as high definition channels. 1. Audio cable is incorrect. 5. It is muted. 2. Press the FORMAT button on the screen HDCP authentication with a coaxial connection. Sound is...
..., the picture format has to the power socket outlet. 3. Connect the TV to HDMI connections. Error message on the remote control to the wall via component or HDMI cables. Ensure that the Audio L/R cable is connected directly to select the best picture format. 2. Press SOURCE on the remote control. Increase the volume. If the TV is connected as high definition channels. 1. Audio cable is incorrect. 5. It is muted. 2. Press the FORMAT button on the screen HDCP authentication with a coaxial connection. Sound is...
User Manual
Page 31
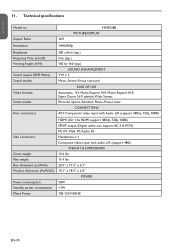
... specifications Model no. Aspect Ratio 19MF338B PICTURE/DISPLAY 16:9 Resolution 1440x900p Brightness Response Time (on/off) Viewing Angles (V/H) Sound output (RMS Watts) Sound modes Video formats Smart modes Rear connectors 300 cd/m2 (typ.) 5ms (typ.) 160 by 160 (typ.) SOUND ENHANCEMENT 3W x 2 Mono, Stereo,Virtual surround EASE OF USE Automatic, 4:3, Movie Expand 14:9, Movie Expand 16:9, Super Zoom, 16:9 subtitle,Wide Screen, Personal, Sports, Standard, Movie, Power saver CONNECTIONS AV1: Component video input...
... specifications Model no. Aspect Ratio 19MF338B PICTURE/DISPLAY 16:9 Resolution 1440x900p Brightness Response Time (on/off) Viewing Angles (V/H) Sound output (RMS Watts) Sound modes Video formats Smart modes Rear connectors 300 cd/m2 (typ.) 5ms (typ.) 160 by 160 (typ.) SOUND ENHANCEMENT 3W x 2 Mono, Stereo,Virtual surround EASE OF USE Automatic, 4:3, Movie Expand 14:9, Movie Expand 16:9, Super Zoom, 16:9 subtitle,Wide Screen, Personal, Sports, Standard, Movie, Power saver CONNECTIONS AV1: Component video input...
User Manual
Page 34
... ASSISTANCE... WHO IS COVERED: This product warranty is considered such proof. Recovery or reinstallation of programs, data or other information stored on the product, and installation or repair of antenna/signal source systems outside of the product. • Product repair and/or part replacement because of customer controls on any kind by some retailers. Replacement product can result in materials and workmanship...
... ASSISTANCE... WHO IS COVERED: This product warranty is considered such proof. Recovery or reinstallation of programs, data or other information stored on the product, and installation or repair of antenna/signal source systems outside of the product. • Product repair and/or part replacement because of customer controls on any kind by some retailers. Replacement product can result in materials and workmanship...


