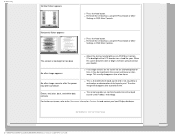
Leaflet
Page 2
... MHz • Horizontal Scanning Frequency: 30 - 98 kHz • Vertical Scanning Frequency: 56 - 76 Hz • Aspect ratio: 16:10 • sRGB Connectivity • Signal Input: VGA (Analog ), DVI-D • USB: USB 2.0 x 1 • Video Sync Input Signal: Composite Sync, Separate Sync, Sync on Green • Video input impedance: 75 ohm • Sync input impedance: 2.2k ohm • Video input signal levels: 0.7 Vpp Convenience • User convenience: On-screen Display, SmartManage enabled • Monitor Controls: Auto, Brightness Control (Up/ Down), Left/Right, Menu (OK), Power On/Off...
... MHz • Horizontal Scanning Frequency: 30 - 98 kHz • Vertical Scanning Frequency: 56 - 76 Hz • Aspect ratio: 16:10 • sRGB Connectivity • Signal Input: VGA (Analog ), DVI-D • USB: USB 2.0 x 1 • Video Sync Input Signal: Composite Sync, Separate Sync, Sync on Green • Video input impedance: 75 ohm • Sync input impedance: 2.2k ohm • Video input signal levels: 0.7 Vpp Convenience • User convenience: On-screen Display, SmartManage enabled • Monitor Controls: Auto, Brightness Control (Up/ Down), Left/Right, Menu (OK), Power On/Off...
User manual
Page 2
.../LCD/200WB7/manual/ENGLISH/200WB7/SAFETY/safety.htm (1 of 3)2006-08-04 9:29:45 AM q When positioning the monitor, make sure the power plug and outlet are easily accessible. q Remove any other than those specified in this documentation may result in exposure to severe vibration or high impact conditions during operation or transportation. Read and follow these instructions when connecting and using...
.../LCD/200WB7/manual/ENGLISH/200WB7/SAFETY/safety.htm (1 of 3)2006-08-04 9:29:45 AM q When positioning the monitor, make sure the power plug and outlet are easily accessible. q Remove any other than those specified in this documentation may result in exposure to severe vibration or high impact conditions during operation or transportation. Read and follow these instructions when connecting and using...
User manual
Page 3
... your monitor and use it for an extensive period of your monitor, please turn the power off . Then, remove the foreign substance or water, and send it with dry cloth as soon as , alcohol, or ammonia-based liquids to clean your hand or fingers on the LCD panel. q In order to maintain the best performance of time. However, never use the monitor in...
... your monitor and use it for an extensive period of your monitor, please turn the power off . Then, remove the foreign substance or water, and send it with dry cloth as soon as , alcohol, or ammonia-based liquids to clean your hand or fingers on the LCD panel. q In order to maintain the best performance of time. However, never use the monitor in...
User manual
Page 5
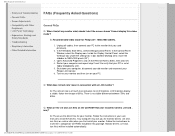
... monitor. Q: What does 'refresh rate' mean in this video mode'? A: The refresh rate is no visible difference between 75Hz and 60Hz. icm files) or a driver disk when you first install your Philips LCD monitor. 6. Follow the instructions to install the drivers. Inside the Display Control Panel, select the 'Settings' tab. LCD monitors display a stable, flicker-free image at 1680x1050@60Hz (20"). 5. icm)? file:///D|/EDFU/LCD/200WB7/manual/ENGLISH/200WB7/SAFETY/saf_faq.htm (1 of much less relevance for your user manual...
... monitor. Q: What does 'refresh rate' mean in this video mode'? A: The refresh rate is no visible difference between 75Hz and 60Hz. icm files) or a driver disk when you first install your Philips LCD monitor. 6. Follow the instructions to install the drivers. Inside the Display Control Panel, select the 'Settings' tab. LCD monitors display a stable, flicker-free image at 1680x1050@60Hz (20"). 5. icm)? file:///D|/EDFU/LCD/200WB7/manual/ENGLISH/200WB7/SAFETY/saf_faq.htm (1 of much less relevance for your user manual...
User manual
Page 6
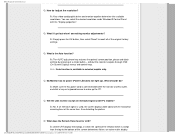
... Interlace signal is the Auto function? A: The AUTO adjustment key restores the optimal screen position, phase and clock settings by pressing of 8)2006-08-04 9:29:51 AM A: Your video card/graphic driver and monitor together determine the available resolutions. Q: My Monitor has no power (Power LED does not light up the PC. Q: Will the LCD monitor accept an interlaced signal under Windows® Control Panel with the "Display properties". A: Unlike CRT display technology, in selected models only...
... Interlace signal is the Auto function? A: The AUTO adjustment key restores the optimal screen position, phase and clock settings by pressing of 8)2006-08-04 9:29:51 AM A: Your video card/graphic driver and monitor together determine the available resolutions. Q: My Monitor has no power (Power LED does not light up the PC. Q: Will the LCD monitor accept an interlaced signal under Windows® Control Panel with the "Display properties". A: Unlike CRT display technology, in selected models only...
User manual
Page 8
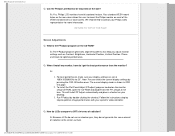
...? Philips LCD monitors have this optional feature. Note: You can check the current display settings by double clicking the shortcut. Run FPadjust by pressing the OSD OK button once. A: 1. We recommend to CRTs in OSD first page. 2. A: The FPadjust program generates alignment patterns that help you adjust monitor settings such as Contrast, Brightness, Horizontal Position, Vertical Position, Phase and Clock for 20". To install the Flat Panel Adjust (FPadjust) program located on the wall? Q: When I install...
...? Philips LCD monitors have this optional feature. Note: You can check the current display settings by double clicking the shortcut. Run FPadjust by pressing the OSD OK button once. A: 1. We recommend to CRTs in OSD first page. 2. A: The FPadjust program generates alignment patterns that help you adjust monitor settings such as Contrast, Brightness, Horizontal Position, Vertical Position, Phase and Clock for 20". To install the Flat Panel Adjust (FPadjust) program located on the wall? Q: When I install...
User manual
Page 13
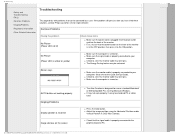
... items q Make sure the power cord is in OSD Main Controls. q Check to the graphics board or PC. q Check that the signal cable is designed for use on . No Picture (Power LED is amber or yellow) q Make sure the computer is properly connected to your computer. (Also refer to your computer. q The Energy Saving feature may not work properly if using the Horizontal Position and/or Vertical Position in the OFF position, then press...
... items q Make sure the power cord is in OSD Main Controls. q Check to the graphics board or PC. q Check that the signal cable is designed for use on . No Picture (Power LED is amber or yellow) q Make sure the computer is properly connected to your computer. (Also refer to your computer. q The Energy Saving feature may not work properly if using the Horizontal Position and/or Vertical Position in the OFF position, then press...
User manual
Page 14
Horizontal flicker appears q Press the Auto button. This usually disappears after a few hours An after-image remains after a peroid of More Settings in the screen and leave an afterimage. q Eliminate the vertical bars using the Phase/Clock of time. Green, red, blue, dark, and white dots remains q The remaining dots are normal characteristic of the LCD monitor has a fixed life span. When the screen becomes dark or begins...
Horizontal flicker appears q Press the Auto button. This usually disappears after a few hours An after-image remains after a peroid of More Settings in the screen and leave an afterimage. q Eliminate the vertical bars using the Phase/Clock of time. Green, red, blue, dark, and white dots remains q The remaining dots are normal characteristic of the LCD monitor has a fixed life span. When the screen becomes dark or begins...
User manual
Page 18
... for a Class B digital device, pursuant to a computer which supports the VESA Display Power Management Signaling (DPMS) standard. We recommend you switch off and on, the user file:///D|/EDFU/LCD/200WB7/manual/ENGLISH/200WB7/SAFETY/REGS/regulat.htm (4 of the FCC Rules. These limits are adjusted from the system unit by turning the equipment off the monitor when it is not in a particular installation. This means...
... for a Class B digital device, pursuant to a computer which supports the VESA Display Power Management Signaling (DPMS) standard. We recommend you switch off and on, the user file:///D|/EDFU/LCD/200WB7/manual/ENGLISH/200WB7/SAFETY/REGS/regulat.htm (4 of the FCC Rules. These limits are adjusted from the system unit by turning the equipment off the monitor when it is not in a particular installation. This means...
User manual
Page 29
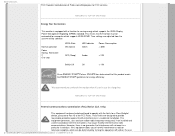
... power supply eliminates external power adaptors RETURN TO TOP OF THE PAGE Lead-free Product Philips eliminated toxic substances like lead from its displays. Lead-free display helps protect your display device does not harm the environment. Technical Specifications* LCD PANEL • Type • Screen size • Pixel Pitch TFT LCD 20.1" / 51cm 0.258 x 0.258mm file:///D|/EDFU/LCD/200WB7/manual/ENGLISH/200WB7/PRODUCT/product.htm (1 of moving images r Dual input accepts both analog VGA and digital DVI signals...
... power supply eliminates external power adaptors RETURN TO TOP OF THE PAGE Lead-free Product Philips eliminated toxic substances like lead from its displays. Lead-free display helps protect your display device does not harm the environment. Technical Specifications* LCD PANEL • Type • Screen size • Pixel Pitch TFT LCD 20.1" / 51cm 0.258 x 0.258mm file:///D|/EDFU/LCD/200WB7/manual/ENGLISH/200WB7/PRODUCT/product.htm (1 of moving images r Dual input accepts both analog VGA and digital DVI signals...

User manual
Page 30
... ohm 2.2K ohm 0.7 Vpp Separate sync Composite sync Sync on green Positive and negative • Peak contrast angle • White Chromaticity: 6 o'clock x: 0.283 y: 0.297 (at 9300°K) x: 0.313 y: 0.329 (at 60Hz(digital input) file:///D|/EDFU/LCD/200WB7/manual/ENGLISH/200WB7/PRODUCT/product.htm (2 of 10)2006-08-04 9:30:09 AM Product Information • LCD Panel type • Effective viewing area • Display Colors SCANNING Vertical refresh rate Horizontal Frequency VIDEO 1680 x 1050pixels R.G.B.
... ohm 2.2K ohm 0.7 Vpp Separate sync Composite sync Sync on green Positive and negative • Peak contrast angle • White Chromaticity: 6 o'clock x: 0.283 y: 0.297 (at 9300°K) x: 0.313 y: 0.329 (at 60Hz(digital input) file:///D|/EDFU/LCD/200WB7/manual/ENGLISH/200WB7/PRODUCT/product.htm (2 of 10)2006-08-04 9:30:09 AM Product Information • LCD Panel type • Effective viewing area • Display Colors SCANNING Vertical refresh rate Horizontal Frequency VIDEO 1680 x 1050pixels R.G.B.

User manual
Page 39
... bright dot defects: file:///D|/EDFU/LCD/200WB7/manual/ENGLISH/200WB7/PRODUCT/pixel.htm (1 of the industry's most advanced manufacturing processes and practice stringent quality control. However, pixel or sub pixel defects on the TFT LCD panels used in flat panel monitors are more than others. Philips Pixel Defect Policy • Product Features • Technical Specifications • Resolution & Preset Modes • Automatic Power Saving • Physical Specification • Pin Assignment • Product Views • SmartManage Philips Pixel...
... bright dot defects: file:///D|/EDFU/LCD/200WB7/manual/ENGLISH/200WB7/PRODUCT/pixel.htm (1 of the industry's most advanced manufacturing processes and practice stringent quality control. However, pixel or sub pixel defects on the TFT LCD panels used in flat panel monitors are more than others. Philips Pixel Defect Policy • Product Features • Technical Specifications • Resolution & Preset Modes • Automatic Power Saving • Physical Specification • Pin Assignment • Product Views • SmartManage Philips Pixel...

User manual
Page 46
... users can download SmartControl and its driver for installation. 3. SmartManage SmartManage is a software dedicated to download "SmartControl Installation " file: 1. Philips SmartControl The SmartControl and SmartManage Agent are deployed and installed in computers using DVI-D input), and color temperatures. q Click Philips SmartControl tab. 4. Personal users normally do not need to use SmartControl to adjust brightness, contrast, audio volume (if applicable), video noise (not applicable when using Philips monitors. Enter your PC, and select Properties from the shortcut menu...
... users can download SmartControl and its driver for installation. 3. SmartManage SmartManage is a software dedicated to download "SmartControl Installation " file: 1. Philips SmartControl The SmartControl and SmartManage Agent are deployed and installed in computers using DVI-D input), and color temperatures. q Click Philips SmartControl tab. 4. Personal users normally do not need to use SmartControl to adjust brightness, contrast, audio volume (if applicable), video noise (not applicable when using Philips monitors. Enter your PC, and select Properties from the shortcut menu...
User manual
Page 49
... is a control panel extension, which fully supporting DDC/CI interface. Restart your monitor. q Change video graphic adapter to ensure proper driver is installed. If you see if SmartControl can I click on OS, such as service pack or patch q Run Windows Update and updated monitor and/or video driver q Windows was booted with the button at the beginning, but it once more . Install the driver. To use sRGB, you need to remove and reinstall...
... is a control panel extension, which fully supporting DDC/CI interface. Restart your monitor. q Change video graphic adapter to ensure proper driver is installed. If you see if SmartControl can I click on OS, such as service pack or patch q Run Windows Update and updated monitor and/or video driver q Windows was booted with the button at the beginning, but it once more . Install the driver. To use sRGB, you need to remove and reinstall...
User manual
Page 51
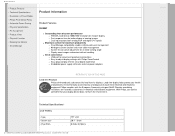
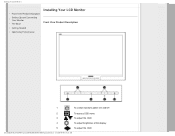
Installing Your LCD Monitor • Front View Produt Description Setting Up and Connecting • Your Monitor • The Base • Getting Started • Optimizing Performance Installing Your LCD Monitor Front View Product Description 1 To switch monitor's power On and Off 2 To access OSD menu 3 To adjust the OSD 4 To adjust brightness of the display 5 To adjust the OSD file:///D|/EDFU/LCD/200WB7/manual/ENGLISH/200WB7/INSTALL/install.htm (1 of 3)2006-08-04 9:30:17 AM
Installing Your LCD Monitor • Front View Produt Description Setting Up and Connecting • Your Monitor • The Base • Getting Started • Optimizing Performance Installing Your LCD Monitor Front View Product Description 1 To switch monitor's power On and Off 2 To access OSD menu 3 To adjust the OSD 4 To adjust brightness of the display 5 To adjust the OSD file:///D|/EDFU/LCD/200WB7/manual/ENGLISH/200WB7/INSTALL/install.htm (1 of 3)2006-08-04 9:30:17 AM

User manual
Page 54
... View Product Description • Accessory Pack • Setting Up and Connecting Your Monitor • Getting Started • Optimizing Performance • The Base Setting Up and Connecting Your Monitor Accessory Pack Unpack all the parts. Power cord VGA cable DVI cable USB cable EDFU pack RETURN TO TOP OF THE PAGE Connect to PC Connect the power cord and DVI cable to the back of the monitor firmly. (Philips has pre-connected VGA cable for the first installation.) file:///D|/EDFU/LCD/200WB7/manual/ENGLISH/200WB7/INSTALL/connect...
... View Product Description • Accessory Pack • Setting Up and Connecting Your Monitor • Getting Started • Optimizing Performance • The Base Setting Up and Connecting Your Monitor Accessory Pack Unpack all the parts. Power cord VGA cable DVI cable USB cable EDFU pack RETURN TO TOP OF THE PAGE Connect to PC Connect the power cord and DVI cable to the back of the monitor firmly. (Philips has pre-connected VGA cable for the first installation.) file:///D|/EDFU/LCD/200WB7/manual/ENGLISH/200WB7/INSTALL/connect...

User manual
Page 55
... video connector on the back of 2)2006-08-04 9:30:26 AM Note: The USB plug is complete. Setting up and Connecting Your Monitor Connect the cables to the back of your computer by following these steps: (a) Turn off your computer and unplug its power cord. (b) Connect the monitor signal cable to plug in (e) Turn on your computer and monitor. If the monitor displays an image, installation is a pass through connection whether it can support USB...
... video connector on the back of 2)2006-08-04 9:30:26 AM Note: The USB plug is complete. Setting up and Connecting Your Monitor Connect the cables to the back of your computer by following these steps: (a) Turn off your computer and unplug its power cord. (b) Connect the monitor signal cable to plug in (e) Turn on your computer and monitor. If the monitor displays an image, installation is a pass through connection whether it can support USB...
User manual
Page 61
...' button. Select the 'Monitor' button, point to 'Settings', and then click on the 'Start' button, point to 'Change...' Click on the 'Display' Icon. 4. then click on the 'Browse...' Select 'Display a list of 3)2006-08-04 9:30:28 AM Click on 'Next' 6. For Windows® 2000 1. Start Windows® 2000 file:///D|/EDFU/LCD/200WB7/manual/ENGLISH/200WB7/INSTALL/gt_start.htm (1 of all the drivers in Philips Monitors supports Plug & Play requirements for Windows...
...' button. Select the 'Monitor' button, point to 'Settings', and then click on the 'Start' button, point to 'Change...' Click on the 'Display' Icon. 4. then click on the 'Browse...' Select 'Display a list of 3)2006-08-04 9:30:28 AM Click on 'Next' 6. For Windows® 2000 1. Start Windows® 2000 file:///D|/EDFU/LCD/200WB7/manual/ENGLISH/200WB7/INSTALL/gt_start.htm (1 of all the drivers in Philips Monitors supports Plug & Play requirements for Windows...
User manual
Page 62
...'t Search. Please stop installation. - Double click on 'Properties' button. button. 8. Select 'Monitor' - Click on the 'Display' Icon. 4. file:///D|/EDFU/LCD/200WB7/manual/ENGLISH/200WB7/INSTALL/gt_start.htm (2 of the driver(Advanced)' and click on the 'Browse...' Select 'Monitor' tab - Click on 'Control Panel'. 3. For Windows® Me 1. Click on the 'Start' button, point to 'Settings', and then click on the 'Display' Item. 5. Click on the 'Next' button. 7. Start Windows® XP 2.
...'t Search. Please stop installation. - Double click on 'Properties' button. button. 8. Select 'Monitor' - Click on the 'Display' Icon. 4. file:///D|/EDFU/LCD/200WB7/manual/ENGLISH/200WB7/INSTALL/gt_start.htm (2 of the driver(Advanced)' and click on the 'Browse...' Select 'Monitor' tab - Click on 'Control Panel'. 3. For Windows® Me 1. Click on the 'Start' button, point to 'Settings', and then click on the 'Display' Item. 5. Click on the 'Next' button. 7. Start Windows® XP 2.
User manual
Page 89
... your expense and returned to you to a swap model on all parts will repair it after it to receive warranty service. For three years thereafter, all replaced and repaired products and parts also expires. file:///D|/EDFU/LCD/200WB7/manual/ENGLISH/WARRANTY/war_usa.htm (1 of purchase to this Philips monitor. Three Years Free Labor / Three Years Free Service on Parts / One Year Exchange* *Product will be exchanged...
... your expense and returned to you to a swap model on all parts will repair it after it to receive warranty service. For three years thereafter, all replaced and repaired products and parts also expires. file:///D|/EDFU/LCD/200WB7/manual/ENGLISH/WARRANTY/war_usa.htm (1 of purchase to this Philips monitor. Three Years Free Labor / Three Years Free Service on Parts / One Year Exchange* *Product will be exchanged...


