User Guide
Page 1
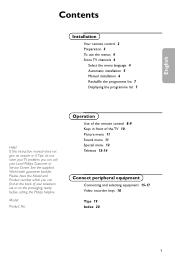
... instruction manual does not give an answer or if 'Tips' do not solve your TV problem, you can call your television set or on the packaging, ready, before calling the Philips helpline. See the supplied World-wide guarantee booklet. English Contents Installation Your remote control 2 Preparation 3 To use the menus 4 Store TV channels 4 Select the menu language 4 Automatic installation 5 Manual installation 6 Reshuffle the programme list 7 Displaying the programme list 7 Help...
... instruction manual does not give an answer or if 'Tips' do not solve your TV problem, you can call your television set or on the packaging, ready, before calling the Philips helpline. See the supplied World-wide guarantee booklet. English Contents Installation Your remote control 2 Preparation 3 To use the menus 4 Store TV channels 4 Select the menu language 4 Automatic installation 5 Manual installation 6 Reshuffle the programme list 7 Displaying the programme list 7 Help...
User Guide
Page 2
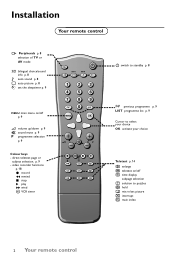
direct teletext page or subject selection, p. 9 - Installation Your remote control w Peripherals p. 8 selection of TV or AV mode X bilingual choice/sound info p. 8 M auto sound p. 8 a auto picture p. 8 D set the sleeptimer p. 9 MENU main menu on /off p. 9 V volume up/down p. 9 ¬ sound mute p. 9 P programme selection p. 9 Colour keys - video recorder functions p. 18 ® record Ò rewind ‡ stop π play † wind C VCR timer w B AUTO AUTO Y-Z a M D 1 23 4 56 7 89 0 0 LIST MENU OK V ¬ P ® Ò‡ π...
direct teletext page or subject selection, p. 9 - Installation Your remote control w Peripherals p. 8 selection of TV or AV mode X bilingual choice/sound info p. 8 M auto sound p. 8 a auto picture p. 8 D set the sleeptimer p. 9 MENU main menu on /off p. 9 V volume up/down p. 9 ¬ sound mute p. 9 P programme selection p. 9 Colour keys - video recorder functions p. 18 ® record Ò rewind ‡ stop π play † wind C VCR timer w B AUTO AUTO Y-Z a M D 1 23 4 56 7 89 0 0 LIST MENU OK V ¬ P ® Ò‡ π...
User Guide
Page 3
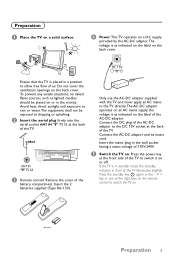
...DC 15V _ + Ensure that the TV is in standby mode, the standby indicator in the wall socket having a mains voltage of 110V-240V. ( Switch the TV on: Press the power key at the back of the TV. Insert the 2 batteries supplied (Type R6-1.5V). CABLE . Connect the DC plug of the AC-DC adaptor to the DC 15V socket... Place the TV on a solid surface. ' Power:This TV operates on a DC supply provided by the AC-DC adaptor.The voltage is as indicated on the label of the AC-DC adaptor. Only use the AC-DC adaptor supplied with the TV and never apply an AC mains to allow free flow of air.
...DC 15V _ + Ensure that the TV is in standby mode, the standby indicator in the wall socket having a mains voltage of 110V-240V. ( Switch the TV on: Press the power key at the back of the TV. Insert the 2 batteries supplied (Type R6-1.5V). CABLE . Connect the DC plug of the AC-DC adaptor to the DC 15V socket... Place the TV on a solid surface. ' Power:This TV operates on a DC supply provided by the AC-DC adaptor.The voltage is as indicated on the label of the AC-DC adaptor. Only use the AC-DC adaptor supplied with the TV and never apply an AC mains to allow free flow of air.
User Guide
Page 4
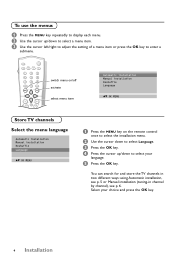
... 0 0 LIST MENU OK switch menu on/off activate V ¬ P select menu item ® Ò‡ π C Store TV channels Automaptriocgraimnmsetallation Manual installation Reshuffle Language oœ OK MENU Select the menu language Automatic installation Manual installation Reshuffle Language oœ OK MENU & Press the MENU key on the remote control once to select the installation menu. é Use the cursor down to select a menu item. " Use the cursor left/right to adjust the setting of a menu item...
... 0 0 LIST MENU OK switch menu on/off activate V ¬ P select menu item ® Ò‡ π C Store TV channels Automaptriocgraimnmsetallation Manual installation Reshuffle Language oœ OK MENU Select the menu language Automatic installation Manual installation Reshuffle Language oœ OK MENU & Press the MENU key on the remote control once to select the installation menu. é Use the cursor down to select a menu item. " Use the cursor left/right to adjust the setting of a menu item...
User Guide
Page 5
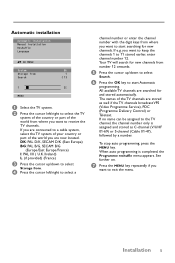
... channels broadcast VPS (Video Programme Service), PDC (Programme Delivery Control) or Teletext. Automatic installation Automaptriocgrianmsmteallation Manual installation Reshuffle Language oœ OK MENU System Storage from Search 1 ‡ MENU BG 1 C 15 2% & Select the TV system. é Press the cursor left /right to select a channel number or enter the channel number with the digit keys from where you want to receive the TV channels. If you are connected to a cable...
... channels broadcast VPS (Video Programme Service), PDC (Programme Delivery Control) or Teletext. Automatic installation Automaptriocgrianmsmteallation Manual installation Reshuffle Language oœ OK MENU System Storage from Search 1 ‡ MENU BG 1 C 15 2% & Select the TV system. é Press the cursor left /right to select a channel number or enter the channel number with the digit keys from where you want to receive the TV channels. If you are connected to a cable...
User Guide
Page 6
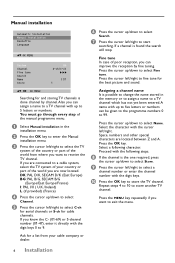
... change the name stored in the installation menu. é Press the OK key to exit the menu. If you can assign a name to a TV channel with the digit keys. 0 Press the OK key to select the TV system of the country or part of poor reception, you are located between Z and A. If you know the C- (01-69) or S-channel number...
... change the name stored in the installation menu. é Press the OK key to exit the menu. If you can assign a name to a TV channel with the digit keys. 0 Press the OK key to select the TV system of the country or part of poor reception, you are located between Z and A. If you know the C- (01-69) or S-channel number...
User Guide
Page 7
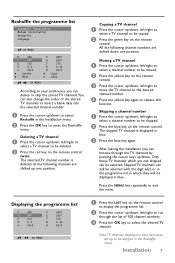
... to select a TV channel to be deleted. é Press the red key on the remote control to display the programme list. é Press the cursor up /down, left /right to move the TV channel to the desired channel number. ' Press the yellow key again to release this function. Reshuffle the programme list Automaptriocgrianmsmteallation Manual installation Reshuffle Language oœ OK MENU 0 ARD 5 1 ZDF 6 2 C12...
... to select a TV channel to be deleted. é Press the red key on the remote control to display the programme list. é Press the cursor up /down, left /right to move the TV channel to the desired channel number. ' Press the yellow key again to release this function. Reshuffle the programme list Automaptriocgrianmsmteallation Manual installation Reshuffle Language oœ OK MENU 0 ARD 5 1 ZDF 6 2 C12...
User Guide
Page 8
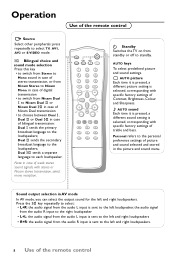
... or S-VIDEO mode. AUTO keys To select predefined picture and sound settings. X Bilingual choice and sound mode selection Press this key • to switch from Stereo to Mono sound in case of stereo transmission, or from Nicam Stereo to Nicam Mono, in AV mode In AV mode, you can select the output sound for the left and right loudspeakers • R+R: the audio signal from the audio R input is...
... or S-VIDEO mode. AUTO keys To select predefined picture and sound settings. X Bilingual choice and sound mode selection Press this key • to switch from Stereo to Mono sound in case of stereo transmission, or from Nicam Stereo to Nicam Mono, in AV mode In AV mode, you can select the output sound for the left and right loudspeakers • R+R: the audio signal from the audio R input is...
User Guide
Page 9
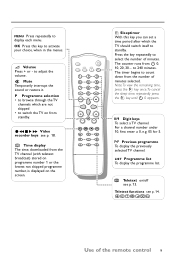
... adjust the volume. ¬ Mute Temporarily interrupt the sound or restore it. Video recorder keys see p. 13. w B AUTO AUTO Y-Z a M D 1 23 456 789 0 0 LIST MENU OK V ¬ P ® Ò‡ π C † h b U f g c e k D Sleeptimer With this key to switch the TV on the screen. LIST Programme list To display the programme list. Press the key repeatedly to count down from the number of minutes. to display each menu. The timer...
... adjust the volume. ¬ Mute Temporarily interrupt the sound or restore it. Video recorder keys see p. 13. w B AUTO AUTO Y-Z a M D 1 23 456 789 0 0 LIST MENU OK V ¬ P ® Ò‡ π C † h b U f g c e k D Sleeptimer With this key to switch the TV on the screen. LIST Programme list To display the programme list. Press the key repeatedly to count down from the number of minutes. to display each menu. The timer...
User Guide
Page 10
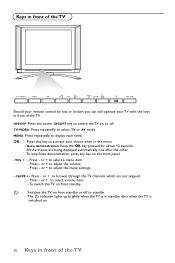
or + to adjust the menu settings. - Auto demonstration: Keep the OK key pressed for about 10 seconds. Press - Press - Press - To switch the TV on from standby or off TV/VIDEO: Press repeatedly to select TV or AV mode MENU: Press repeatedly to activate your TV with the ...operate your choice when in the menu - VOL + : - CH/PR +:- or + to adjust the volume; - or + to standby. B: Switches the TV on . 10 Keys in front of the TV. Press this key to display each menu OK: - ON/OFF: Press the power ON/OFF key to switch the TV on the front panel. - To stop Auto...
or + to adjust the menu settings. - Auto demonstration: Keep the OK key pressed for about 10 seconds. Press - Press - Press - To switch the TV on from standby or off TV/VIDEO: Press repeatedly to select TV or AV mode MENU: Press repeatedly to activate your TV with the ...operate your choice when in the menu - VOL + : - CH/PR +:- or + to adjust the volume; - or + to standby. B: Switches the TV on . 10 Keys in front of the TV. Press this key to display each menu OK: - ON/OFF: Press the power ON/OFF key to switch the TV on the front panel. - To stop Auto...
User Guide
Page 11
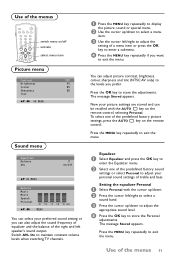
... your picture settings are stored and can also adjust the sound frequency of equalizer and the balance of the right and left speaker's sound output. " Use the cursor left /right to adjust the setting of the menus 11 The message Stored appears. Switch AVL On to maintain constant volume levels when switching TV channels. & Press the MENU key repeatedly to display the picture, sound or special menu. é Use the...
... your picture settings are stored and can also adjust the sound frequency of equalizer and the balance of the right and left speaker's sound output. " Use the cursor left /right to adjust the setting of the menus 11 The message Stored appears. Switch AVL On to maintain constant volume levels when switching TV channels. & Press the MENU key repeatedly to display the picture, sound or special menu. é Use the...

User Guide
Page 12
... equipment, p. 15) • AV2 for a VCR connected to the AV2 connector of the TV. • S-VIDEO for a period of the TV cannot be switched on and operated with the source key on watching in TV mode, press the cursor up /down , + P - Auto off If Auto off is switched On, the TV automatically switches to standby if for a S-Video VCR connected to exit the menu.
... equipment, p. 15) • AV2 for a VCR connected to the AV2 connector of the TV. • S-VIDEO for a period of the TV cannot be switched on and operated with the source key on watching in TV mode, press the cursor up /down , + P - Auto off If Auto off is switched On, the TV automatically switches to standby if for a S-Video VCR connected to exit the menu.
User Guide
Page 13
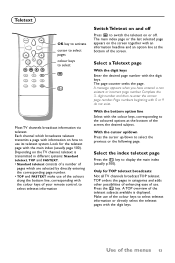
... of your remote control, to use . Each channel which are selected by directly entering the corresponding page number. • TOP and FASTEXT make use of the colour keys to select b k Most TV channels broadcast information via teletext. Complete the 3- The main index page or the last selected page appears on the TV channel, teletext is displayed. Teletext 789 0 0 LIST MENU OK...
... of your remote control, to use . Each channel which are selected by directly entering the corresponding page number. • TOP and FASTEXT make use of the colour keys to select b k Most TV channels broadcast information via teletext. Complete the 3- The main index page or the last selected page appears on the TV channel, teletext is displayed. Teletext 789 0 0 LIST MENU OK...

User Guide
Page 14
... teletext mode. Teletext reappears. 14 Teletext Hold Press g to display the teletext pages superimposed on your screen. Press the red or green key to riddles and puzzles. Reveal Press f to reveal/conceal the hidden information, such as solutions to select the previous or following subpage, or change the subpage with the digit keys. The g icon is displayed at...
... teletext mode. Teletext reappears. 14 Teletext Hold Press g to display the teletext pages superimposed on your screen. Press the red or green key to riddles and puzzles. Reveal Press f to reveal/conceal the hidden information, such as solutions to select the previous or following subpage, or change the subpage with the digit keys. The g icon is displayed at...

User Guide
Page 15
... following connection diagrams show you how to damage the screen. Lay the LCD TV with an aerial cable only. & Connect the aerial cables 1, 2 and the eurocable 3 as you have stored the test signal. Please take your VCR after you searched for and stored TV channels. " Select the programme number under a programme number. • Replace the aerial cable in the aerial socket x of video and audio...
... following connection diagrams show you how to damage the screen. Lay the LCD TV with an aerial cable only. & Connect the aerial cables 1, 2 and the eurocable 3 as you have stored the test signal. Please take your VCR after you searched for and stored TV channels. " Select the programme number under a programme number. • Replace the aerial cable in the aerial socket x of video and audio...
User Guide
Page 16
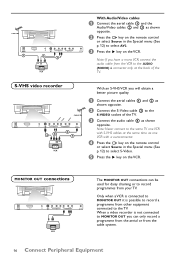
... the remote control or select Source in the Special menu (See w 1 L VIDEO (MONO) L AUDIO R VIDEO S-VIDEO L AUDIO R AV2 MONITOR OUT p. 12) to record a programme from your TV. When a video recorder is possible to select AV2. " ANT IN x75 Ω Press the π key on the VCR. 2 3 VCR Note: If you will obtain a better picture quality. & Connect the aerial cables 1 and 2 as shown opposite. " Connect the audio cable...
... the remote control or select Source in the Special menu (See w 1 L VIDEO (MONO) L AUDIO R VIDEO S-VIDEO L AUDIO R AV2 MONITOR OUT p. 12) to record a programme from your TV. When a video recorder is possible to select AV2. " ANT IN x75 Ω Press the π key on the VCR. 2 3 VCR Note: If you will obtain a better picture quality. & Connect the aerial cables 1 and 2 as shown opposite. " Connect the audio cable...
User Guide
Page 17
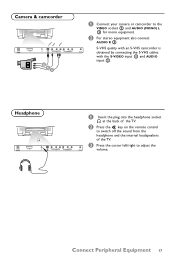
... 15V _ + w 1 L L VIDEO (MONO) L AUDIO R VIDEO S-VIDEO L AUDIO R AV2 MONITOR OUT & Insert the plug into the headphone socket L at the back of the TV. S-VHS quality with an S-VHS camcorder is ANT IN x75 Ω obtained by connecting the S-VHS cables with the S-VIDEO input 1 and AUDIO input 3. Camera & camcorder S•VIDEO VIDEO AUDIO DC 15V _ + w 1 L VIDEO (MONO) L AUDIO R VIDEO S-VIDEO L AUDIO R AV2 MONITOR OUT 1 2 3 & Connect your camera or camcorder to switch off the sound from...
... 15V _ + w 1 L L VIDEO (MONO) L AUDIO R VIDEO S-VIDEO L AUDIO R AV2 MONITOR OUT & Insert the plug into the headphone socket L at the back of the TV. S-VHS quality with an S-VHS camcorder is ANT IN x75 Ω obtained by connecting the S-VHS cables with the S-VIDEO input 1 and AUDIO input 3. Camera & camcorder S•VIDEO VIDEO AUDIO DC 15V _ + w 1 L VIDEO (MONO) L AUDIO R VIDEO S-VIDEO L AUDIO R AV2 MONITOR OUT 1 2 3 & Connect your camera or camcorder to switch off the sound from...

User Guide
Page 18
...the video equipment from our range of products can be operated with the remote control of the remote control pressed and simultaneously press: ® for record Ò for rewind ‡ for stop π for play † for fast forward C for sequential programme selection from the VCR tuner 0 to 9 to select a programme number from... your TV. Keep the VCR key on the left side of your VCR tuner B to switch the VCR to standby 18 Video recorder keys P + for VCR timer...
...the video equipment from our range of products can be operated with the remote control of the remote control pressed and simultaneously press: ® for record Ò for rewind ‡ for stop π for play † for fast forward C for sequential programme selection from the VCR tuner 0 to 9 to select a programme number from... your TV. Keep the VCR key on the left side of your VCR tuner B to switch the VCR to standby 18 Video recorder keys P + for VCR timer...
User Guide
Page 19
... the cables connected properly? (The aerial cable to the TV or VCR, the VGA cables to the TV, the power cable.) • Is your TV or house aerial located too close to the TV, keep away your household waste. Press the AUTO M or a key to restore the predefined factory settings.Try another channel, perhaps the received signal is too weak • Sometimes poor picture quality...
... the cables connected properly? (The aerial cable to the TV or VCR, the VGA cables to the TV, the power cable.) • Is your TV or house aerial located too close to the TV, keep away your household waste. Press the AUTO M or a key to restore the predefined factory settings.Try another channel, perhaps the received signal is too weak • Sometimes poor picture quality...
User Guide
Page 20
..., 17 C-channels, 6 child lock, 12 colour, 11 e equalizer, 11 eurocable, 15 f factory settings, 8 fine tune, 6 h headphone, 17 l language, 4 m manual installation, 6 menu language, 4 mono, 8 mute, 9 n name, 6 nicam, 8 p programme list, 7 s S-channels, 6 search, 5 search for tv channels, 5 sharpness, 11 sleeptimer, 9 source, 12 sound adjustments, 11 stereo, 8 store TV channels, 4 S-VHS, 16 s-video, 16 switch TV on, 3 system, 5 t teletext, 13 tint, 11 treble, 11 v video recorder, 15 volume, 9 20 Index Contents 1 Installation 2 Operation 8 Connect Peripheral...
..., 17 C-channels, 6 child lock, 12 colour, 11 e equalizer, 11 eurocable, 15 f factory settings, 8 fine tune, 6 h headphone, 17 l language, 4 m manual installation, 6 menu language, 4 mono, 8 mute, 9 n name, 6 nicam, 8 p programme list, 7 s S-channels, 6 search, 5 search for tv channels, 5 sharpness, 11 sleeptimer, 9 source, 12 sound adjustments, 11 stereo, 8 store TV channels, 4 S-VHS, 16 s-video, 16 switch TV on, 3 system, 5 t teletext, 13 tint, 11 treble, 11 v video recorder, 15 volume, 9 20 Index Contents 1 Installation 2 Operation 8 Connect Peripheral...


