
User manual
Page 2
Setting up the monitor 2.1 Installation 4 2.2 Operating the monitor 5 2.3 Remove Base Stand and Base 8 3. Product information 3.1 SmartImage 10 3.2 SmartContrast 11 3.3 SmartSaturate 12 3.4 SmartSharpness 12 3.5 Philips SmartControl Premium 13 3.6 Philips' Flat Panel Monitors Pixel Defect Policy 21 4 Technical Specifications 4.1 Resolution & Preset Modes 26 4.2 Automatic PowerSaving 26 5 Regulatory Information 27 6 Customer care and warranty 33 7 Troubleshooting & FAQs 7.1 Troubleshooting 45 7.2 SmartControl Premium FAQs 47 7.3 General FAQs 49 Important 1.1 Safety ...
Setting up the monitor 2.1 Installation 4 2.2 Operating the monitor 5 2.3 Remove Base Stand and Base 8 3. Product information 3.1 SmartImage 10 3.2 SmartContrast 11 3.3 SmartSaturate 12 3.4 SmartSharpness 12 3.5 Philips SmartControl Premium 13 3.6 Philips' Flat Panel Monitors Pixel Defect Policy 21 4 Technical Specifications 4.1 Resolution & Preset Modes 26 4.2 Automatic PowerSaving 26 5 Regulatory Information 27 6 Customer care and warranty 33 7 Troubleshooting & FAQs 7.1 Troubleshooting 45 7.2 SmartControl Premium FAQs 47 7.3 General FAQs 49 Important 1.1 Safety ...
User manual
Page 3
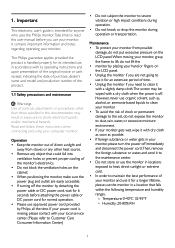
... and maintenance Warnings Use of controls, adjustments or procedures other heat source. • Remove any other than those specified in this user manual before attaching the power cable or DC power cord for normal operation. • Please use , in accordance with its intended use approved power cord provided by placing your hand or fingers on the cabinet. • When positioning the monitor, make sure the power plug and outlet are...
... and maintenance Warnings Use of controls, adjustments or procedures other heat source. • Remove any other than those specified in this user manual before attaching the power cable or DC power cord for normal operation. • Please use , in accordance with its intended use approved power cord provided by placing your hand or fingers on the cabinet. • When positioning the monitor, make sure the power plug and outlet are...
User manual
Page 6
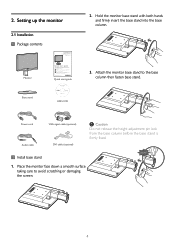
... the base column. 3. Place the monitor face down a smooth surface taking care to the base column then fasten base stand. Attach the monitor base stand to avoid scratching or damaging the screen. 4 Power cord Audio cable VGA signal cable (optional) DVI cable (optional) Caution Do not release the height adjustment pin lock from Koninklijke Philips Electronics N.V. Version M2225B 5B.0V601.001 © 2010 Koninklijke Philips Electronics, N.V.All Base stand rights reserved. Unauthorized duplication is firmly fixed. 2.
... the base column. 3. Place the monitor face down a smooth surface taking care to the base column then fasten base stand. Attach the monitor base stand to avoid scratching or damaging the screen. 4 Power cord Audio cable VGA signal cable (optional) DVI cable (optional) Caution Do not release the height adjustment pin lock from Koninklijke Philips Electronics N.V. Version M2225B 5B.0V601.001 © 2010 Koninklijke Philips Electronics, N.V.All Base stand rights reserved. Unauthorized duplication is firmly fixed. 2.

User manual
Page 7
Turn off . :To adjust the OSD menu. :To adjust volume of brightness level by one touch. :To switch monitor's power on your computer with a USB cable.The USB downstream port is now ready for selecting model) VGA input USB upstream and downstream Audio input Zero power Switch Connect to PC 1. Connect the USB upstream port on the monitor and the USB port on and off your computer and monitor. If the monitor displays an image, installation is complete. 5 8 76 4 32 1 :To access OSD menu. : Return to previous OSD level...
Turn off . :To adjust the OSD menu. :To adjust volume of brightness level by one touch. :To switch monitor's power on your computer with a USB cable.The USB downstream port is now ready for selecting model) VGA input USB upstream and downstream Audio input Zero power Switch Connect to PC 1. Connect the USB upstream port on the monitor and the USB port on and off your computer and monitor. If the monitor displays an image, installation is complete. 5 8 76 4 32 1 :To access OSD menu. : Return to previous OSD level...
User manual
Page 8
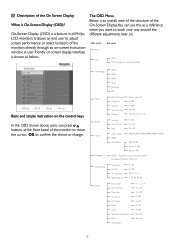
...ês Horizontal Vertical Transparency OSD Time out 0~100 0~100 Off, 1, 2, 3, 4 5, 10, 20, 30, 60 Power LED Pixel Orbiting Over Scan H. Description of the monitors directly through an on-screen instruction window. On-Screen Display (OSD) is On-Screen Display (OSD)? SmartImage Picture Audio Color Language OSD Setting Setup Office Photo Movie Game Economy Off Picture Format Brightness Contrast SmartContrast Gamma Wide screen,4:3 0~100 0~100 On, Off 1.8, 2.0, 2.2, 2.4, 2.6 Volume Stand Alone Mute 0~100 On, Off On, Off Color Temp. A user friendly on screen display interface is...
...ês Horizontal Vertical Transparency OSD Time out 0~100 0~100 Off, 1, 2, 3, 4 5, 10, 20, 30, 60 Power LED Pixel Orbiting Over Scan H. Description of the monitors directly through an on-screen instruction window. On-Screen Display (OSD) is On-Screen Display (OSD)? SmartImage Picture Audio Color Language OSD Setting Setup Office Photo Movie Game Economy Off Picture Format Brightness Contrast SmartContrast Gamma Wide screen,4:3 0~100 0~100 On, Off 1.8, 2.0, 2.2, 2.4, 2.6 Volume Stand Alone Mute 0~100 On, Off On, Off Color Temp. A user friendly on screen display interface is...
User manual
Page 13
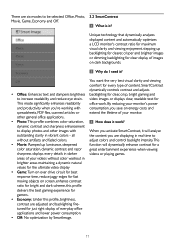
... your videos without artifacts and faded colors. adjust colors and control backlight intensity.This • Movie: Ramped up backlighting for clearer, crisper and brighter images or dimming backlighting for clear display of images on screen, enhance contrast ratio for bright and dark scheme, this profile delivers the best gaming experience for just right display of your monitor's power and productivity when you're working with When you are adjusted and backlighting...
... your videos without artifacts and faded colors. adjust colors and control backlight intensity.This • Movie: Ramped up backlighting for clearer, crisper and brighter images or dimming backlighting for clear display of images on screen, enhance contrast ratio for bright and dark scheme, this profile delivers the best gaming experience for just right display of your monitor's power and productivity when you're working with When you are adjusted and backlighting...
User manual
Page 19
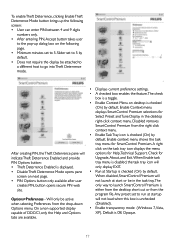
... screen: • User can enter PIN between 4 and 9 digits numbers only. • After entering PIN, Accept button takes user to the pop-up dialog box on the following page. • Minimum minutes set to 5 by default. • Does not require the display be attached to a different host to go into Theft Deterrence mode. Enable context menu shows the task tray menu for Help...
... screen: • User can enter PIN between 4 and 9 digits numbers only. • After entering PIN, Accept button takes user to the pop-up dialog box on the following page. • Minimum minutes set to 5 by default. • Does not require the display be attached to a different host to go into Theft Deterrence mode. Enable context menu shows the task tray menu for Help...

User manual
Page 25
4 Technical Specifications Picture/Display LCD panel type Backlight Panel size Aspect ratio Pixel Pitch Brightness Smar tContrast Contrast ratio (typical) Response time (typical) Optimum Resolution Viewing angle Picture Enhancement Display colors Vertical refresh rate Horizontal Frequency sRGB Connectivity Signal input USB Input Signal Audio In/Out Convenience Build-in Audio User Convenience OSD Languages Other convenience Plug & Play Compatibility Stand Tilt Swivel Height adjustment TFT-LCD CCFL (220B2), LED (220BL2) 22'' W (55.9 cm) 16:10 0.282 x 0.282 mm 250 cd/m² 500,000:1 (220B2); ...
4 Technical Specifications Picture/Display LCD panel type Backlight Panel size Aspect ratio Pixel Pitch Brightness Smar tContrast Contrast ratio (typical) Response time (typical) Optimum Resolution Viewing angle Picture Enhancement Display colors Vertical refresh rate Horizontal Frequency sRGB Connectivity Signal input USB Input Signal Audio In/Out Convenience Build-in Audio User Convenience OSD Languages Other convenience Plug & Play Compatibility Stand Tilt Swivel Height adjustment TFT-LCD CCFL (220B2), LED (220BL2) 22'' W (55.9 cm) 16:10 0.282 x 0.282 mm 250 cd/m² 500,000:1 (220B2); ...
User manual
Page 28
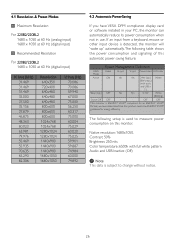
... efficiency. 4.1 Resolution & Preset Modes Maximum Resolution For 220B2/220BL2 1680 x 1050 at 60 Hz (analog input) 1680 x 1050 at 60 Hz (digital input) Recommended Resolution For 220B2/220BL2 1680 x 1050 at 60 Hz (digital input) H. As an ENERGY STAR® Partner, we have VESA DPM compliance display card or software installed in your PC, the monitor can automatically reduce its power consumption when not in use. Native resolution: 1680x1050. freq...
... efficiency. 4.1 Resolution & Preset Modes Maximum Resolution For 220B2/220BL2 1680 x 1050 at 60 Hz (analog input) 1680 x 1050 at 60 Hz (digital input) Recommended Resolution For 220B2/220BL2 1680 x 1050 at 60 Hz (digital input) H. As an ENERGY STAR® Partner, we have VESA DPM compliance display card or software installed in your PC, the monitor can automatically reduce its power consumption when not in use. Native resolution: 1680x1050. freq...

User manual
Page 36
... neglect; • Reception problems caused by signal conditions or cable or antenna systems outside the unit; • Defects caused by unauthorized service organizations or persons; • Damage is excluded? The Philips F1rst Choice Warranty may be required) • PC environment Processor: o CUP and Graphic card name and driver version o Operating system o Application being used in a specific country. • Note...
... neglect; • Reception problems caused by signal conditions or cable or antenna systems outside the unit; • Defects caused by unauthorized service organizations or persons; • Damage is excluded? The Philips F1rst Choice Warranty may be required) • PC environment Processor: o CUP and Graphic card name and driver version o Operating system o Application being used in a specific country. • Note...
User manual
Page 38
... www.philips.com/support website for additional suppor t. For 3 years thereafter, your monitor will be serviced in case of purchase. Therefore always check whether a product can be used in a specific country. The Philips guarantee may not apply if: • the documents have been executed by unauthorized service organizations or persons; • damage is handled properly for its operating instructions and...
... www.philips.com/support website for additional suppor t. For 3 years thereafter, your monitor will be serviced in case of purchase. Therefore always check whether a product can be used in a specific country. The Philips guarantee may not apply if: • the documents have been executed by unauthorized service organizations or persons; • damage is handled properly for its operating instructions and...
User manual
Page 43
Should you encounter any problems with your monitor within the second or third year of purchase, we will repair it after service hours until 20:00) Fax: 972-3-6458759 E-mail: [email protected] Service hours: Sun.~Thurs. 08:00 - 18:00 Your Philips F1rst Choice Warranty(USA) Thank you to a swap model on Parts / One Year Exchange* *Product...
Should you encounter any problems with your monitor within the second or third year of purchase, we will repair it after service hours until 20:00) Fax: 972-3-6458759 E-mail: [email protected] Service hours: Sun.~Thurs. 08:00 - 18:00 Your Philips F1rst Choice Warranty(USA) Thank you to a swap model on Parts / One Year Exchange* *Product...

User manual
Page 47
... by a user. Imaging Problems Image is not centered • Adjust the image position using the "Auto" function in OSD Main Controls. • Adjust the image position using the Phase/ Clock of Setup in OSD Main Controls. Image vibrates on the connect side. It is valid only in VGA-Analog mode. No Picture (Power LED is white blinking) • Make sure the computer is turned on. • Make sure the signal cable is properly connected to your computer. (Also refer to the Quick Set-Up Guide). • Check to...
... by a user. Imaging Problems Image is not centered • Adjust the image position using the "Auto" function in OSD Main Controls. • Adjust the image position using the Phase/ Clock of Setup in OSD Main Controls. Image vibrates on the connect side. It is valid only in VGA-Analog mode. No Picture (Power LED is white blinking) • Make sure the computer is turned on. • Make sure the signal cable is properly connected to your computer. (Also refer to the Quick Set-Up Guide). • Check to...

User manual
Page 48
...'s display resolution to the same mode as "after-imaging " or "ghost imaging", on your screen. Audio problem No sound • Check if audio cable is connected to PC and monitor correctly. • Ensure audio is connected to adjust the volume. The "power on" light is too strong and is valid only in VGA mode. Press OSD "Menu", select "Audio" then "Mute". Check it on On- Screen Display. Image appears blurred, indistinct or too dark • Adjust the contrast and brightness on "Off " position...
...'s display resolution to the same mode as "after-imaging " or "ghost imaging", on your screen. Audio problem No sound • Check if audio cable is connected to PC and monitor correctly. • Ensure audio is connected to adjust the volume. The "power on" light is too strong and is valid only in VGA mode. Press OSD "Menu", select "Audio" then "Mute". Check it on On- Screen Display. Image appears blurred, indistinct or too dark • Adjust the contrast and brightness on "Off " position...
User manual
Page 49
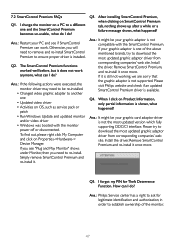
... monitor driver may need to a different one of the monitor. 47 Ans.: Philips Service center has a right to ask for Theft Deterrence Function. Q4. If your PC and see "Plug and Play Monitor" shows under Monitor, then you will need to remove and re-install SmartControl Premium to ensure proper driver is available. Otherwise, you need to be re-installed. • Changed video graphic adapter to download the most updated...
... monitor driver may need to a different one of the monitor. 47 Ans.: Philips Service center has a right to ask for Theft Deterrence Function. Q4. If your PC and see "Plug and Play Monitor" shows under Monitor, then you will need to remove and re-install SmartControl Premium to ensure proper driver is available. Otherwise, you need to be re-installed. • Changed video graphic adapter to download the most updated...

User manual
Page 51
... on your monitor. Ans.: Simply press the OK button, then select 'Reset' to recall all cables, then connect your monitor and then turn on the CD-ROM? Ans.: Recommended refresh rate in this video mode'? Q4: How do if the screen shows 'Cannot display this package. Inside the Display Control Panel, select the 'Settings' tab. Q5: What if I get lost when I adjust the resolution? When handling the monitor, make sure that...
... on your monitor. Ans.: Simply press the OK button, then select 'Reset' to recall all cables, then connect your monitor and then turn on the CD-ROM? Ans.: Recommended refresh rate in this video mode'? Q4: How do if the screen shows 'Cannot display this package. Inside the Display Control Panel, select the 'Settings' tab. Q5: What if I get lost when I adjust the resolution? When handling the monitor, make sure that...
User manual
Page 52
...:What kind of light radiated by adjusting red, green blue color. Play? Ans.: Yes. Four standard VESA mount holes on the rear cover allows the user to mount the Philips monitor on the wall? TN panels have this is white, at 6504K. User Define; Q7: How should I connect my LCD monitor to any PC, workstation or Mac? Color Temperature;The six settings are Plug-and-Play compatible with a red-white color tone, while a 11500K temperature yields 'cool, blue-white toning." 2.
...:What kind of light radiated by adjusting red, green blue color. Play? Ans.: Yes. Four standard VESA mount holes on the rear cover allows the user to mount the Philips monitor on the wall? TN panels have this is white, at 6504K. User Define; Q7: How should I connect my LCD monitor to any PC, workstation or Mac? Color Temperature;The six settings are Plug-and-Play compatible with a red-white color tone, while a 11500K temperature yields 'cool, blue-white toning." 2.
Leaflet
Page 1
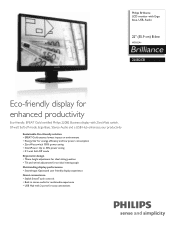
... power consumption • ZeroWatt switch 100% power saving • SmartPower: Up to 50% power saving • 0.1 watt Soft-Off mode Ergonomic design • 70mm height adjustment for ideal sitting position • Tilt and swivel adjustment for an ideal viewing angle Outstanding display performance • SmartImage: Optimized user friendly display experience Great convenience • Stylish SmartTouch controls • Built in stereo audio for multimedia experience • USB Hub with 2 ports for easy connections
... power consumption • ZeroWatt switch 100% power saving • SmartPower: Up to 50% power saving • 0.1 watt Soft-Off mode Ergonomic design • 70mm height adjustment for ideal sitting position • Tilt and swivel adjustment for an ideal viewing angle Outstanding display performance • SmartImage: Optimized user friendly display experience Great convenience • Stylish SmartTouch controls • Built in stereo audio for multimedia experience • USB Hub with 2 ports for easy connections
Leaflet
Page 2
... criteria supported by the system to the computer. The Economy mode option offers you optimized display performance. SmartTouch controls SmartTouch controls are certified for maximum viewing comfort and efficiency Screen tilt and swivel Screen tilt and swivel is valid only where Philips registers the product. Built-in use of images and videos for registration status in use . Energy Star certification ensures that replace protruding buttons. New Philips monitors are intelligent, touch...
... criteria supported by the system to the computer. The Economy mode option offers you optimized display performance. SmartTouch controls SmartTouch controls are certified for maximum viewing comfort and efficiency Screen tilt and swivel Screen tilt and swivel is valid only where Philips registers the product. Built-in use of images and videos for registration status in use . Energy Star certification ensures that replace protruding buttons. New Philips monitors are intelligent, touch...

Leaflet
Page 3
...; Pixel pitch: 0.282 x 0.282 mm • Viewing angle: 176º (H) / 170º (V), @ C/R > 5 • Picture enhancement: SmartImage • Display colors: 16.7 M • Scanning Frequency: 30 -83 kHz (H) / 56 -75 Hz (V) • sRGB Connectivity • Signal Input: VGA (Analog ), DVI-D (digital, HDCP) • USB: USB 2.0 x 2 • Sync Input: Separate Sync, Sync on Green • Audio In/Out: Stereo Audio Convenience • Built-in inch (WxHxD): 18.43 x 22.44 x 6.89 inch Weight • Product with stand (kg...
...; Pixel pitch: 0.282 x 0.282 mm • Viewing angle: 176º (H) / 170º (V), @ C/R > 5 • Picture enhancement: SmartImage • Display colors: 16.7 M • Scanning Frequency: 30 -83 kHz (H) / 56 -75 Hz (V) • sRGB Connectivity • Signal Input: VGA (Analog ), DVI-D (digital, HDCP) • USB: USB 2.0 x 2 • Sync Input: Separate Sync, Sync on Green • Audio In/Out: Stereo Audio Convenience • Built-in inch (WxHxD): 18.43 x 22.44 x 6.89 inch Weight • Product with stand (kg...


