
User Manual
Page 2
... in standby mode Switching channels Adjusting volume Watching channels from a set-top box Watching connected devices Watching a Blu-ray disc 6 Use more of your TV Access TV menus Philips Wireless MediaConnect View photos, play music and watch videos using DLNA Net TV Enjoying vTuner Pandora® operations Using Twitter Changing picture and sound settings Create and use lists of favorite channels Setting the clock Closed caption Sleeptimer Child and rating locks Use Philips EasyLink EasyLink Set your location to home Network View photos, play music and watch videos on a USB...
... in standby mode Switching channels Adjusting volume Watching channels from a set-top box Watching connected devices Watching a Blu-ray disc 6 Use more of your TV Access TV menus Philips Wireless MediaConnect View photos, play music and watch videos using DLNA Net TV Enjoying vTuner Pandora® operations Using Twitter Changing picture and sound settings Create and use lists of favorite channels Setting the clock Closed caption Sleeptimer Child and rating locks Use Philips EasyLink EasyLink Set your location to home Network View photos, play music and watch videos on a USB...

User Manual
Page 4
... servicing to rain; English Français Español IMPORTANT SAFETY INSTRUCTIONS Read before operating equipment 1. Install in bodily injury, property damage, or damage to provide some protection against voltage surges and built up static charges. Use only with a cart, stand, tripod, bracket, or table specified by the manufacturer, or sold with the manufacturer's instructions. 8. The power supply cord...
... servicing to rain; English Français Español IMPORTANT SAFETY INSTRUCTIONS Read before operating equipment 1. Install in bodily injury, property damage, or damage to provide some protection against voltage surges and built up static charges. Use only with a cart, stand, tripod, bracket, or table specified by the manufacturer, or sold with the manufacturer's instructions. 8. The power supply cord...

User Manual
Page 5
... warranty is not possible. Pixel characteristics This LCD product has a high number of Conformity Trade Name : PHILIPS Responsible Party : P&F USA, Inc. Repairs may void the user's authority to operate the equipment. Declaration of color pixels. Model : 55PFL5706, 46PFL5706, 40PFL5706 Address : PO Box 430 Daleville, IN 47334-0430 U.S.A. The use of accessories that the material itself does not infringe any problems as possible. HDMI, the HDMI...
... warranty is not possible. Pixel characteristics This LCD product has a high number of Conformity Trade Name : PHILIPS Responsible Party : P&F USA, Inc. Repairs may void the user's authority to operate the equipment. Declaration of color pixels. Model : 55PFL5706, 46PFL5706, 40PFL5706 Address : PO Box 430 Daleville, IN 47334-0430 U.S.A. The use of accessories that the material itself does not infringe any problems as possible. HDMI, the HDMI...

User Manual
Page 7
b Standby indicator / Remote control sensor l k c . POWER Switches the TV on your product at www.philips.com/support a r b Side controls and indicators q c d e f p f e g h d o i c ab j a Ambient light sensor n Adjusts backlight for the best picture quality by dynamically adjusting the backlight intensity in accordance with lighting condition in standby mode.The TV is not powered off completely unless it is set to [On with Light Sensor]. e SOURCE Selects connected devices. To fully benefit from the support that Philips offers, register...
b Standby indicator / Remote control sensor l k c . POWER Switches the TV on your product at www.philips.com/support a r b Side controls and indicators q c d e f p f e g h d o i c ab j a Ambient light sensor n Adjusts backlight for the best picture quality by dynamically adjusting the backlight intensity in accordance with lighting condition in standby mode.The TV is not powered off completely unless it is set to [On with Light Sensor]. e SOURCE Selects connected devices. To fully benefit from the support that Philips offers, register...

User Manual
Page 12
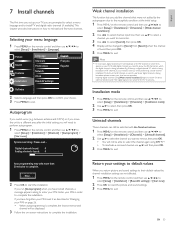
... Español Network setup screen will be canceled except the language selection. • The initial autoprogram function can be set to select a setting and then press OK. Start scanning for wireless networks on the TV after the unit goes to be completed. Picture and sound settings can be executed for either [Antenna] or [Cable] only once.When you change the connection (Antenna / Cable), set autoprogram again. (Refer...
... Español Network setup screen will be canceled except the language selection. • The initial autoprogram function can be set to select a setting and then press OK. Start scanning for wireless networks on the TV after the unit goes to be completed. Picture and sound settings can be executed for either [Antenna] or [Cable] only once.When you change the connection (Antenna / Cable), set autoprogram again. (Refer...

User Manual
Page 16
... 12-digit code displayed on the screen.You will be skipped. • The quality of the playback picture or audio differs depending on DLNA certified home media servers connected to the Internet. Follow the instructions on your PC and open the Philips Wireless MediaConnect download page at step 1. 4 Click the 'Download now' button to complete software installation. Philips Wireless MediaConnect Help To read the Philips Wireless MediaConnect Help, right click the program...
... 12-digit code displayed on the screen.You will be skipped. • The quality of the playback picture or audio differs depending on DLNA certified home media servers connected to the Internet. Follow the instructions on your PC and open the Philips Wireless MediaConnect download page at step 1. 4 Click the 'Download now' button to complete software installation. Philips Wireless MediaConnect Help To read the Philips Wireless MediaConnect Help, right click the program...

User Manual
Page 25
... output from your connected EasyLink Compliant Devices with a stereo mini jack. You can find those channels easily. Navigate to select [Setup] > [Sound]. Create and use to that channel or input device and set a negative delta volume level as per your personal preferences. For sound, add an audio cable with VOL + / − by using this unit's remote control. Supported screen resolutions The following screen resolutions are broadcast. Select the main audio program. The sound...
... output from your connected EasyLink Compliant Devices with a stereo mini jack. You can find those channels easily. Navigate to select [Setup] > [Sound]. Create and use to that channel or input device and set a negative delta volume level as per your personal preferences. For sound, add an audio cable with VOL + / − by using this unit's remote control. Supported screen resolutions The following screen resolutions are broadcast. Select the main audio program. The sound...
User Manual
Page 26
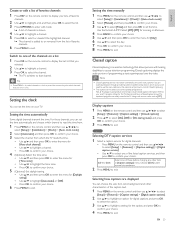
... time from. 1 Press MENU on the remote control and then use to select [Setup] > [Installation] > [Clock] > [Auto clock mode]. 2 Select [Automatic] and then press OK to confirm your choice. 3 Select the channel from the list of favorite channels. 6 Press MENU to or removed from which case you can set the time. Closed caption Closed captioning is added to exit. Closed captioning displays the audio portion of programming as [CC]. DTV Selecting DTV caption services 1 Select a caption service...
... time from. 1 Press MENU on the remote control and then use to select [Setup] > [Installation] > [Clock] > [Auto clock mode]. 2 Select [Automatic] and then press OK to confirm your choice. 3 Select the channel from the list of favorite channels. 6 Press MENU to or removed from which case you can set the time. Closed caption Closed captioning is added to exit. Closed captioning displays the audio portion of programming as [CC]. DTV Selecting DTV caption services 1 Select a caption service...
User Manual
Page 27
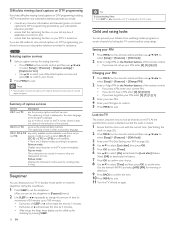
... DTV programming, including HDTV, received from watching certain programs or certain channels by locking the TV controls and by using ratings. TV Selecting caption services 1 Select a caption service for analog channels : • Press MENU on the remote control and then use to select [Setup] > [Features] > [Change PIN]. 2 Enter a 4-digit PIN on the Number buttons of the remote control. • If you have not set -top box, if applicable, is displayed on the TV screen. serve as the program's dialogue (up mode : Displays...
... DTV programming, including HDTV, received from watching certain programs or certain channels by locking the TV controls and by using ratings. TV Selecting caption services 1 Select a caption service for analog channels : • Press MENU on the remote control and then use to select [Setup] > [Features] > [Change PIN]. 2 Enter a 4-digit PIN on the Number buttons of the remote control. • If you have not set -top box, if applicable, is displayed on the TV screen. serve as the program's dialogue (up mode : Displays...
User Manual
Page 28
.... 1 Press MENU on the remote control and then use to select [Setup] > [Features] > [Child lock]. 2 Enter your PIN. (See 'Setting your PIN' on page 26.) 3 Use Î/ï to individual programs based on page 26.) 3 Use Î/ï to select [TV ratings lock], then press OK. 4 Use and then press OK repeatedly to exit. Caption settings Sleeptimer Child lock Change PIN Lock after Channel Lock TV ratings lock Movie ratings lock Canada...
.... 1 Press MENU on the remote control and then use to select [Setup] > [Features] > [Child lock]. 2 Enter your PIN. (See 'Setting your PIN' on page 26.) 3 Use Î/ï to individual programs based on page 26.) 3 Use Î/ï to select [TV ratings lock], then press OK. 4 Use and then press OK repeatedly to exit. Caption settings Sleeptimer Child lock Change PIN Lock after Channel Lock TV ratings lock Movie ratings lock Canada...

User Manual
Page 30
... Speakers] menu available in standby mode even if you have connected an external device that the TV is compatible with all EasyLink. You can output TV audio through HDMI1 to HDMI4 to select the desired option, then press OK. The following items. [Master EasyLink] Set the EasyLink [On] or [Off]. On Select if you turn on the remote control and then use Philips EasyLink to output...
... Speakers] menu available in standby mode even if you have connected an external device that the TV is compatible with all EasyLink. You can output TV audio through HDMI1 to HDMI4 to select the desired option, then press OK. The following items. [Master EasyLink] Set the EasyLink [On] or [Off]. On Select if you turn on the remote control and then use Philips EasyLink to output...

User Manual
Page 32
...;ol Setting items Easy connect WPS code Manual Description Select this setting if your router has a Wi-Fi Protected Setup (WPS) button. wireless router) Name (SSID) entry screen will be saved even if you change the setting to [Auto]. • If you press Î/ï to input numbers then press OK or input the triple digits by your internet service provider to make specific settings in the router settings menu...
...;ol Setting items Easy connect WPS code Manual Description Select this setting if your router has a Wi-Fi Protected Setup (WPS) button. wireless router) Name (SSID) entry screen will be saved even if you change the setting to [Auto]. • If you press Î/ï to input numbers then press OK or input the triple digits by your internet service provider to make specific settings in the router settings menu...

User Manual
Page 33
.... (If you need to change the proxy setting as 65535.) • For proxy port, the selected ports may be blocked and not be displayed in the list. 2 Press MENU to exit. Reset network settings You can be set to [Use]. 3 Press MENU to exit. No Activate the connection to VUDU. 3 Press MENU to YouTube. Proxy configuration 1 Press MENU on the remote control and then use to select [Setup] > [Installation] > [Network] > [Reset network settings] > [Start...
.... (If you need to change the proxy setting as 65535.) • For proxy port, the selected ports may be blocked and not be displayed in the list. 2 Press MENU to exit. Reset network settings You can be set to [Use]. 3 Press MENU to exit. No Activate the connection to VUDU. 3 Press MENU to YouTube. Proxy configuration 1 Press MENU on the remote control and then use to select [Setup] > [Installation] > [Network] > [Reset network settings] > [Start...
User Manual
Page 36
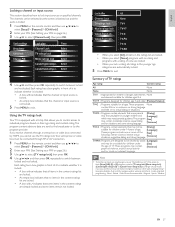
... work for direct cable connections and if the digital signal is too weak for the TV to process. E.g. Uninstall channels Those channels can still be displayed. 3 Follow the on the remote control and then use Î/ï and then press OK. 3 Press MENU to exit. Auto programming may take more than 20 minutes to complete the installation. Installing digital channels using CH To reactivate a removed channel, use to select [Setup] > [Installation] > [Channels] > [Autoprogram] > [Start now]. Installation mode...
... work for direct cable connections and if the digital signal is too weak for the TV to process. E.g. Uninstall channels Those channels can still be displayed. 3 Follow the on the remote control and then use Î/ï and then press OK. 3 Press MENU to exit. Auto programming may take more than 20 minutes to complete the installation. Installing digital channels using CH To reactivate a removed channel, use to select [Setup] > [Installation] > [Channels] > [Autoprogram] > [Start now]. Installation mode...

User Manual
Page 37
... the USB port on the USB. Select a file No valid software file on the side of the current software is supported. • New software can be downloaded from www.philips.com/support • Use only software updates that can update the software by USB You require the following equipment : • A PC with the new software. • The following messages are available. Picture Sound Features Installation Software Software information XXXXX Software update Net...
... the USB port on the USB. Select a file No valid software file on the side of the current software is supported. • New software can be downloaded from www.philips.com/support • Use only software updates that can update the software by USB You require the following equipment : • A PC with the new software. • The following messages are available. Picture Sound Features Installation Software Software information XXXXX Software update Net...
User Manual
Page 39
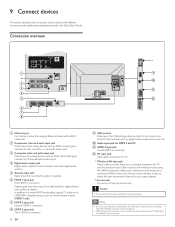
... Guide. Do not connect any device to an HDMI ARC-compliant device, such as ; b Component video and audio input jack Video input from analog devices such as Blu-ray players. f HDMI 1 input jack First HDMI in connection. h HDMI 3 input jack Third HDMI in connector. 38 EN i USB terminal Data input from an antenna, cable or satellite. Refer to the user manual of connectors may be used with audio input. Digital audio and video input from high definition digital devices such as DVD, receiver, game...
... Guide. Do not connect any device to an HDMI ARC-compliant device, such as ; b Component video and audio input jack Video input from analog devices such as Blu-ray players. f HDMI 1 input jack First HDMI in connection. h HDMI 3 input jack Third HDMI in connector. 38 EN i USB terminal Data input from an antenna, cable or satellite. Refer to the user manual of connectors may be used with audio input. Digital audio and video input from high definition digital devices such as DVD, receiver, game...
User Manual
Page 40
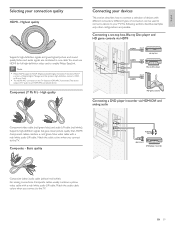
...cable with different connectors. Connecting a set-top box, Blu-ray Disc player and HD game console via HDMI HDMI OUT set-top box HDMI OUT IN IN Blu-ray Disc player HDMI OUT HD game console Connecting a DVD player / recorder via HDMI-DVI and analog audio Component video cable (red / green / blue) and audio L/R cable (red / white). Match the cable colors when you connect to an HDMI ARC-compliant device. Basic quality AUDIO IN HDMI 4 IN only AUDIO OUT DVI OUT DVD player / recorder Composite video / audio cable (yellow / red / white) For analog connections. Different types...
...cable with different connectors. Connecting a set-top box, Blu-ray Disc player and HD game console via HDMI HDMI OUT set-top box HDMI OUT IN IN Blu-ray Disc player HDMI OUT HD game console Connecting a DVD player / recorder via HDMI-DVI and analog audio Component video cable (red / green / blue) and audio L/R cable (red / white). Match the cable colors when you connect to an HDMI ARC-compliant device. Basic quality AUDIO IN HDMI 4 IN only AUDIO OUT DVI OUT DVD player / recorder Composite video / audio cable (yellow / red / white) For analog connections. Different types...
User Manual
Page 41
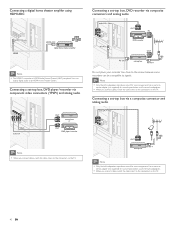
... reproduces sound for sound reproduction via all internal loudspeakers. • When you connect cables, match the cable colors to signals. Connecting a digital home theater amplifer using HDMI ARC HDMI 1 IN only HDMI HDMI ARC digital home theater amplifier Note • The HDMI 1 connector is HDMI Audio Return Channel (ARC) compliant. Connecting a set-top box, DVD recorder via a composite connector and analog audio audio L/R + video IN cable OUT set -top box RF IN Do not place your recorder too close to the screen because...
... reproduces sound for sound reproduction via all internal loudspeakers. • When you connect cables, match the cable colors to signals. Connecting a digital home theater amplifer using HDMI ARC HDMI 1 IN only HDMI HDMI ARC digital home theater amplifier Note • The HDMI 1 connector is HDMI Audio Return Channel (ARC) compliant. Connecting a set-top box, DVD recorder via a composite connector and analog audio audio L/R + video IN cable OUT set -top box RF IN Do not place your recorder too close to the screen because...

User Manual
Page 44
... resolve your problem, refer to www.philips.com/support 2 Choose your network while my PC is MediaConnect. Select the HDMI channel. and green, or the picture Ensure all brands of location. 3 Enter the model number or a keyword in the United States. If the TV receives channels via an AV connection, set to the wall via component cables. Volume level is connected tightly to the TV power connector and to the color code. Even...
... resolve your problem, refer to www.philips.com/support 2 Choose your network while my PC is MediaConnect. Select the HDMI channel. and green, or the picture Ensure all brands of location. 3 Enter the model number or a keyword in the United States. If the TV receives channels via an AV connection, set to the wall via component cables. Volume level is connected tightly to the TV power connector and to the color code. Even...

User Manual
Page 47
... 11, 30 11 11, 30 29 8 N Netflix Network P Pandora PC Philips Wireless MediaConnect Picture format Picture settings R Ratings RC key forwarding Remote control insert batteries overview Retail store mode S Settings assistant Signal quality Sleeptimer Software update version Speakers EasyLink Specifications Standby T Troubleshooting TV as PC monitor connections controls menu position remote control screen care software switch channels switch on TV Speakers Twitter U USB V Volume adjust auto volume leveling mute vTuner VUDU W Warranty Wireless LAN Y YPbPr 17 30 19, 20 22 15 23...
... 11, 30 11 11, 30 29 8 N Netflix Network P Pandora PC Philips Wireless MediaConnect Picture format Picture settings R Ratings RC key forwarding Remote control insert batteries overview Retail store mode S Settings assistant Signal quality Sleeptimer Software update version Speakers EasyLink Specifications Standby T Troubleshooting TV as PC monitor connections controls menu position remote control screen care software switch channels switch on TV Speakers Twitter U USB V Volume adjust auto volume leveling mute vTuner VUDU W Warranty Wireless LAN Y YPbPr 17 30 19, 20 22 15 23...


