
User manual
Page 3
... menu 16 7.2 Select your language 16 7.3 Store TV channels 17 7.4 Set your preferences 18 7.5 Select your connections 19 7.6 Set your clock 19 7.7 Reset AV settings 20 8 Create your favorite list 20 8.1 Select a channel from the displayed list 20 8.2 Select another favorite channel list 20...Child lock 13 6.7 Set/Change PIN 15 6.8 On timer 16 6.9 Demo 16 7 How to connected peripherals with a HDMI connector 32 4 - Philips TV Slideshow Format with a HDMI connector 25 11.6 Connect a DVD player/recorder, Set top box, gameconsole,... Software update 33 Index 35 Manufactured under ...
... menu 16 7.2 Select your language 16 7.3 Store TV channels 17 7.4 Set your preferences 18 7.5 Select your connections 19 7.6 Set your clock 19 7.7 Reset AV settings 20 8 Create your favorite list 20 8.1 Select a channel from the displayed list 20 8.2 Select another favorite channel list 20...Child lock 13 6.7 Set/Change PIN 15 6.8 On timer 16 6.9 Demo 16 7 How to connected peripherals with a HDMI connector 32 4 - Philips TV Slideshow Format with a HDMI connector 25 11.6 Connect a DVD player/recorder, Set top box, gameconsole,... Software update 33 Index 35 Manufactured under ...

User manual
Page 4
... with absorbent cotton or other soft materials like any unsafe situations, no strain is placed on the cord 1.2 Care of LCD Panels is swivelled. TV channel logo: present a problem if they are made. - Moving or low-contrast graphics are less likely to stay well...but make sure that displaying the same image for 10 minutes, brightness will never disappear completely. ) Carefully pay attention to these remarks.The warranty does not apply to the screen). Examples of the TV. Call your viewing): - TV menus; - Philips bears no adverse health effects. - Philips plays an active ...
... with absorbent cotton or other soft materials like any unsafe situations, no strain is placed on the cord 1.2 Care of LCD Panels is swivelled. TV channel logo: present a problem if they are made. - Moving or low-contrast graphics are less likely to stay well...but make sure that displaying the same image for 10 minutes, brightness will never disappear completely. ) Carefully pay attention to these remarks.The warranty does not apply to the screen). Examples of the TV. Call your viewing): - TV menus; - Philips bears no adverse health effects. - Philips plays an active ...
User manual
Page 5
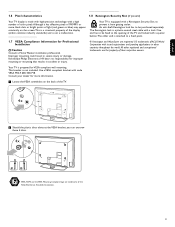
... code VESA MIS-F, 600, 400, M8. Koninklijke Philips Electronics NV bears no responsibility for VESA compliant wall mounting. Although it from getting stolen. An anti-theft Kensington lock has to be fixed to the opening of the TV and locked with a special button.The other end ..., you can unscrew these 4 discs. 4x VESA, FDMI and the VESA Mounting Compliant logo are trademarks of the display (within common industry standards) and is not a malfunction Your TV is equipped with a Kensington Security Slot, to be purchased separately. This bracket is not included. Use a VESA ...
... code VESA MIS-F, 600, 400, M8. Koninklijke Philips Electronics NV bears no responsibility for VESA compliant wall mounting. Although it from getting stolen. An anti-theft Kensington lock has to be fixed to the opening of the TV and locked with a special button.The other end ..., you can unscrew these 4 discs. 4x VESA, FDMI and the VESA Mounting Compliant logo are trademarks of the display (within common industry standards) and is not a malfunction Your TV is equipped with a Kensington Security Slot, to be purchased separately. This bracket is not included. Use a VESA ...

User manual
Page 6
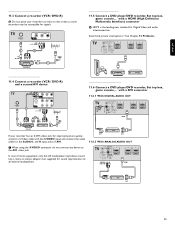
USB 14 13 R AUDIO L 12 VIDEO S VIDEO 42"-47"-52" 10 9 8 7 6 L R AUDIO OUT DISPLAY SYNCHRONIZED DISPLAY SYNC. OUT L IN DIGITAL AUDIO + AV 1 HDMI 1 AV 2 HDMI 2 AV 3 HDMI 3 R ANALOG AUDIO IN + HDMI 1 HDMI 2 HDMI 3 HDMI 1 AV 3 L Y Pb Pr 3 AUDIO VIDEO L AUDIO R R ... accessory device has a DVI output only, see Chapter 11.7. 7 Analog Audio In L/R Analog audio for devices connected to your TV. 2 Getting started Welcome to the growing family of owners of Philips. 2.1 Connection overview There is a wide range of audio and video devices that can be connected to a HDMI connector. 8 ...
USB 14 13 R AUDIO L 12 VIDEO S VIDEO 42"-47"-52" 10 9 8 7 6 L R AUDIO OUT DISPLAY SYNCHRONIZED DISPLAY SYNC. OUT L IN DIGITAL AUDIO + AV 1 HDMI 1 AV 2 HDMI 2 AV 3 HDMI 3 R ANALOG AUDIO IN + HDMI 1 HDMI 2 HDMI 3 HDMI 1 AV 3 L Y Pb Pr 3 AUDIO VIDEO L AUDIO R R ... accessory device has a DVI output only, see Chapter 11.7. 7 Analog Audio In L/R Analog audio for devices connected to your TV. 2 Getting started Welcome to the growing family of owners of Philips. 2.1 Connection overview There is a wide range of audio and video devices that can be connected to a HDMI connector. 8 ...

User manual
Page 8
...to select AV1, AV2, AV3, HDMI 1, HDMI 2, HDMI 3, Side or TV channels according to where you may experience a delayed operation at start up of the TV. Display clock: Select to activate/de-activate the clock display on /off . Type the dot (•) for digital channels. 6 See.... 1 POWER Press to activate/de-activate Closed Captions. See Chapter 3.1 Use of the Option button. 8 INFO Display information: Press to display (when available) information about the selected TV channel and program or accessory device.The quality and accuracy of the information on /off . 2 FAVORITES - To ...
...to select AV1, AV2, AV3, HDMI 1, HDMI 2, HDMI 3, Side or TV channels according to where you may experience a delayed operation at start up of the TV. Display clock: Select to activate/de-activate the clock display on /off . Type the dot (•) for digital channels. 6 See.... 1 POWER Press to activate/de-activate Closed Captions. See Chapter 3.1 Use of the Option button. 8 INFO Display information: Press to display (when available) information about the selected TV channel and program or accessory device.The quality and accuracy of the information on /off . 2 FAVORITES - To ...

User manual
Page 9
...button. > The Quick access menu appears. buttons to summon or exit the TV menu without the remote control. Use the CHANNEL + and - Unscaled (Only for PC.) Enlarges the picture automatically to activate/deactivate the clock display on the side of 4:3 broadcasts. Closed captions See Chapter 6 Adjust Feature ... the picture format to a format that fills the screen. ‡ Press FORMAT to switch on your TV. - ENGLISH 3.1 Use of the OPTION button The OPTION button allows you to display the Quick access menu which will give you direct access to make a selection. º Press the OPTION...
...button. > The Quick access menu appears. buttons to summon or exit the TV menu without the remote control. Use the CHANNEL + and - Unscaled (Only for PC.) Enlarges the picture automatically to activate/deactivate the clock display on the side of 4:3 broadcasts. Closed captions See Chapter 6 Adjust Feature ... the picture format to a format that fills the screen. ‡ Press FORMAT to switch on your TV. - ENGLISH 3.1 Use of the OPTION button The OPTION button allows you to display the Quick access menu which will give you direct access to make a selection. º Press the OPTION...

User manual
Page 10
... settings. PHILIPS using cursor up and down Menu language English Français Español Português ® Select your language..... Complete the initial TV installation procedure ‡ Press the green color button on your remote control to start display the Settings assistant. > If you to select a language of the TV's on-screen...
... settings. PHILIPS using cursor up and down Menu language English Français Español Português ® Select your language..... Complete the initial TV installation procedure ‡ Press the green color button on your remote control to start display the Settings assistant. > If you to select a language of the TV's on-screen...

User manual
Page 11
...8224; Use the cursor up to the different actions which are 3 ways of doing it. See Chapter 8 - See further. Installation allows you display your TV software. - The color buttons at the bottom of the screen refer to four favorite lists with your menu language; - See Chapter 10 Multimedia... is important that the picture can be watched while you adjust the settings.This means that when the highlight is displayed. Info - to select your preferred TV channels. Multimedia is only present when a USB device is pressed, the hidden menu items reappear and the highlight ...
...8224; Use the cursor up to the different actions which are 3 ways of doing it. See Chapter 8 - See further. Installation allows you display your TV software. - The color buttons at the bottom of the screen refer to four favorite lists with your menu language; - See Chapter 10 Multimedia... is important that the picture can be watched while you adjust the settings.This means that when the highlight is displayed. Info - to select your preferred TV channels. Multimedia is only present when a USB device is pressed, the hidden menu items reappear and the highlight ...

User manual
Page 14
...in the Caption or Digital caption service menu below.This text can either be permanently displayed (assuming that the service is available in progress. Not all Caption services are being used by a TV channel during captioned broadcasts. ‡ Select Caption service. ® Press the cursor...programs, news, weather informations or stock market reports. Auto Volume Leveling Automatically reduces the volume differences between TV channels or external sources. ç You may be displayed. Auto surround When turned On, this feature uses on-screen 'text boxes' to correct for more constant...
...in the Caption or Digital caption service menu below.This text can either be permanently displayed (assuming that the service is available in progress. Not all Caption services are being used by a TV channel during captioned broadcasts. ‡ Select Caption service. ® Press the cursor...programs, news, weather informations or stock market reports. Auto Volume Leveling Automatically reduces the volume differences between TV channels or external sources. ç You may be displayed. Auto surround When turned On, this feature uses on-screen 'text boxes' to correct for more constant...

User manual
Page 15
...included. Edge type Allows you choose to view the digital captioning. < Select one of your TV's digital captioning. - Not all TV programs and product commercials are displayed on your TV. Text Select this option to select the text color or the opacity of the text box of...designated as the Primary Caption Service.This service contains the verbatim, or near-verbatim captions for the TV channels and times of Closed Caption shows.The captioned programs are translations of caption display according to your own preference. < Select Default (Automatic), Small, Standard or Large. - ...
...included. Edge type Allows you choose to view the digital captioning. < Select one of your TV's digital captioning. - Not all TV programs and product commercials are displayed on your TV. Text Select this option to select the text color or the opacity of the text box of...designated as the Primary Caption Service.This service contains the verbatim, or near-verbatim captions for the TV channels and times of Closed Caption shows.The captioned programs are translations of caption display according to your own preference. < Select Default (Automatic), Small, Standard or Large. - ...

User manual
Page 19
... have searched for "Start" to start autoprogramming. > The menu screen disappears and the progress of autoprogramming is displayed. Available channels: - TV menu / Installation Channel installation Autoprogram Installation update Weak channel installat.. Channel tuning ç After the installation of the...in your local area. > When Cable is selected, the TV will detect cable company supplied signals and will not be displayed 7.3.1 Installation update This allows you to automatically tune to the tuning complexity of TV channels (in your PIN code to 135 - The progress bar...
... have searched for "Start" to start autoprogramming. > The menu screen disappears and the progress of autoprogramming is displayed. Available channels: - TV menu / Installation Channel installation Autoprogram Installation update Weak channel installat.. Channel tuning ç After the installation of the...in your local area. > When Cable is selected, the TV will detect cable company supplied signals and will not be displayed 7.3.1 Installation update This allows you to automatically tune to the tuning complexity of TV channels (in your PIN code to 135 - The progress bar...

User manual
Page 20
... rename. ® Press the red color button on the selected setting. ) When the TV clock is indicated in the list by cable TV systems to signal emergencies to activate the temporarily display of programming. Installation mode Channel edit Channel edit 0 1 2 3 4 ...... Select the... following information: - The location Home will typically be displayed when available; - The start time + date - ...
... rename. ® Press the red color button on the selected setting. ) When the TV clock is indicated in the list by cable TV systems to signal emergencies to activate the temporarily display of programming. Installation mode Channel edit Channel edit 0 1 2 3 4 ...... Select the... following information: - The location Home will typically be displayed when available; - The start time + date - ...

User manual
Page 21
...‡ Select Time zone with analog video sources. - There is no clock search has been done, the system will correct the clock display for your current ones. Day (only available when Auto clock mode is on the screen. 7.4.4 Downloaded rating table This allows you receive... HDMI 3, Side, AUDIO IN L/R or DIGITAL AUDIO IN a list appears allowing you to accepting audio input via the DIGITAL AUDIO OUT TV menu Installation Language Channel installation Preferences Connections Clock Reset AV settings Clock Auto clock mode Auto clock channel Time Day Time zone Daylight saving Info...
...‡ Select Time zone with analog video sources. - There is no clock search has been done, the system will correct the clock display for your current ones. Day (only available when Auto clock mode is on the screen. 7.4.4 Downloaded rating table This allows you receive... HDMI 3, Side, AUDIO IN L/R or DIGITAL AUDIO IN a list appears allowing you to accepting audio input via the DIGITAL AUDIO OUT TV menu Installation Language Channel installation Preferences Connections Clock Reset AV settings Clock Auto clock mode Auto clock channel Time Day Time zone Daylight saving Info...

User manual
Page 22
...reset most of the predefined factory states. ‡ Select Reset AV settings with your family can create his/her own favorite list. TV menu Installation Language Channel installation Preferences Connections Clock Reset AV settings Reset AV settings Reset Info ® Press the cursor right. Ò...to their default values. 8 Create your favorite list This allows you to select up the list of your preferred TV channels. Select list Info 8.1 To select a channel from the displayed favorite list ‡ Press the OK button. > The last selected channel list appears. ® Use the ...
...reset most of the predefined factory states. ‡ Select Reset AV settings with your family can create his/her own favorite list. TV menu Installation Language Channel installation Preferences Connections Clock Reset AV settings Reset AV settings Reset Info ® Press the cursor right. Ò...to their default values. 8 Create your favorite list This allows you to select up the list of your preferred TV channels. Select list Info 8.1 To select a channel from the displayed favorite list ‡ Press the OK button. > The last selected channel list appears. ® Use the ...

User manual
Page 23
...USB device à If your dealer for audio: MP3, LPCM - Philips can still select channels which are not marked as favorite. 9 Electronic Program Guide (only with this information is displayed automatically. Television Multimedia TV menu Channel list Program guide USBdevice 1 10.1.2 To remove the USB device...more information. 10.1.1 To insert a USB device ç USB devices are supported. - lnsert a USB device to activate the available EPG features displayed at the side, use an USB extend cable (max. 2 m) to connect the USB device to turn off the main menu. ®...
...USB device à If your dealer for audio: MP3, LPCM - Philips can still select channels which are not marked as favorite. 9 Electronic Program Guide (only with this information is displayed automatically. Television Multimedia TV menu Channel list Program guide USBdevice 1 10.1.2 To remove the USB device...more information. 10.1.1 To insert a USB device ç USB devices are supported. - lnsert a USB device to activate the available EPG features displayed at the side, use an USB extend cable (max. 2 m) to connect the USB device to turn off the main menu. ®...

User manual
Page 24
...). > The right panel will be stopped when another song starts playing, or when the end has been reached. 22 Press the green button again to display the image files in a random way Zoom to select one of the color buttons on the inserted USB device. > The 2-panel browser will... the cursor right to browse content stored on the remote control to perform the corresponding function mentioned at the bottom of the screen Details to display a description of the selected file or directory Transitions to select if you like to apply a transition during a slide show Slide time to select the duration...
...). > The right panel will be stopped when another song starts playing, or when the end has been reached. 22 Press the green button again to display the image files in a random way Zoom to select one of the color buttons on the inserted USB device. > The 2-panel browser will... the cursor right to browse content stored on the remote control to perform the corresponding function mentioned at the bottom of the screen Details to display a description of the selected file or directory Transitions to select if you like to apply a transition during a slide show Slide time to select the duration...

User manual
Page 26
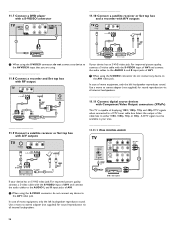
... IN DIGITAL AUDIO + AV 1 HDMI 1 AV 2 HDMI 2 AV 3 HDMI 3 DIGITAL AUDIO IN L R ANALOG AUDIO IN + HDMI 1 HDMI 2 HDMI 3 ANALOG AUDIO IN DISPLAY SYNC. Connect red to red, white to the DVD player's or devices instructions for use for definitions and connection details; - Refer to white.... - In this... with all available at your TV. 24 Be sure to connect the DVI output connector first, then connect to HDMI - for analog audio (AV1, AV3) S VIDEO VIDEO S VIDEO (AV1, Side) VIDEO RF/Coaxial 75 AUDIO CONNECTION REQUIRED No DISPLAY SYNC. Component video (YPbPr) connection is designed to ...
... IN DIGITAL AUDIO + AV 1 HDMI 1 AV 2 HDMI 2 AV 3 HDMI 3 DIGITAL AUDIO IN L R ANALOG AUDIO IN + HDMI 1 HDMI 2 HDMI 3 ANALOG AUDIO IN DISPLAY SYNC. Connect red to red, white to the DVD player's or devices instructions for use for definitions and connection details; - Refer to white.... - In this... with all available at your TV. 24 Be sure to connect the DVI output connector first, then connect to HDMI - for analog audio (AV1, AV3) S VIDEO VIDEO S VIDEO (AV1, Side) VIDEO RF/Coaxial 75 AUDIO CONNECTION REQUIRED No DISPLAY SYNC. Component video (YPbPr) connection is designed to ...
User manual
Page 27
...connect any device to stereo adapter (not supplied) for sound reproduction via all internal loudspeakers. Sound and picture interruptions ? See Chapter 12 Problems. DISPLAY SYNC. In case of AV1. 11.6 Connect a DVD player/DVD recorder, Set top box, game console,... with a HDMI (High Definition Multimedia... RF IN RECORDER CABLE 1 If your recorder too close to the AUDIO L and R input jacks of mono equipment, only the left loudspeaker reproduces sound. DISPLAY SYNC. ANTENNA 2 VIDEO L AUDIO R AV 2 AV2 L + R + VIDEO 3 RF OUT RF IN 1 RECORDER CABLE 11.5 Connect a DVD player/...
...connect any device to stereo adapter (not supplied) for sound reproduction via all internal loudspeakers. Sound and picture interruptions ? See Chapter 12 Problems. DISPLAY SYNC. In case of AV1. 11.6 Connect a DVD player/DVD recorder, Set top box, game console,... with a HDMI (High Definition Multimedia... RF IN RECORDER CABLE 1 If your recorder too close to the AUDIO L and R input jacks of mono equipment, only the left loudspeaker reproduces sound. DISPLAY SYNC. ANTENNA 2 VIDEO L AUDIO R AV 2 AV2 L + R + VIDEO 3 RF OUT RF IN 1 RECORDER CABLE 11.5 Connect a DVD player/...
User manual
Page 28
... be available in your device has an S-VHS video jack: For improved picture quality, connect a S-video cable with Component Video Output connectors (YPbPr) This TV is capable of displaying 1080i, 1080p, 720p and 480p DTV signals when connected to either 1080i, 1080p, 720p or 480p. In case of AV1. ç When using... 2 VIDEO S VIDEO Y AV 1 Pb Pr L AUDIO R L AUDIO R Pb Pr AV1 / AV3 : YPbPr 1 2a DVD / Set top box If your area. 11.11.1 With DIGITAL AUDIO DISPLAY SYNC.
... be available in your device has an S-VHS video jack: For improved picture quality, connect a S-video cable with Component Video Output connectors (YPbPr) This TV is capable of displaying 1080i, 1080p, 720p and 480p DTV signals when connected to either 1080i, 1080p, 720p or 480p. In case of AV1. ç When using... 2 VIDEO S VIDEO Y AV 1 Pb Pr L AUDIO R L AUDIO R Pb Pr AV1 / AV3 : YPbPr 1 2a DVD / Set top box If your area. 11.11.1 With DIGITAL AUDIO DISPLAY SYNC.
User manual
Page 29
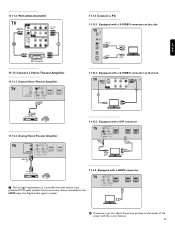
...connector at the back S VIDEO S VIDEO AV 1 VIDEO L AUDIO R Y Pb Pr 1 AV1 : L + R 2 DIGITAL AUDIO IN 11.13.3 Equipped with the cursor buttons. 27 DISPLAY SYNC. OUT L IN DIGITAL AUDIO + AV 1 HDMI 1 AV 2 HDMI 2 AV 3 R ANALOG AUDIO IN + HDMI 1 HDMI 2 HDMI 1 HDMI 2 HDMI 3 à If necessary... device connected to the center of the screen with a DVI connector 11.12.2 Analog Home Theater Amplifier L R AUDIO OUT DISPLAY SYNCHRONIZED AUDIO OUT L/R DISPLAY SYNC. OUT L IN DIGITAL AUDIO + AV 1 HDMI 1 AV 2 HDMI 2 AV 3 R ANALOG AUDIO IN + HDMI 1 HDMI 2 HDMI ...
...connector at the back S VIDEO S VIDEO AV 1 VIDEO L AUDIO R Y Pb Pr 1 AV1 : L + R 2 DIGITAL AUDIO IN 11.13.3 Equipped with the cursor buttons. 27 DISPLAY SYNC. OUT L IN DIGITAL AUDIO + AV 1 HDMI 1 AV 2 HDMI 2 AV 3 R ANALOG AUDIO IN + HDMI 1 HDMI 2 HDMI 1 HDMI 2 HDMI 3 à If necessary... device connected to the center of the screen with a DVI connector 11.12.2 Analog Home Theater Amplifier L R AUDIO OUT DISPLAY SYNCHRONIZED AUDIO OUT L/R DISPLAY SYNC. OUT L IN DIGITAL AUDIO + AV 1 HDMI 1 AV 2 HDMI 2 AV 3 R ANALOG AUDIO IN + HDMI 1 HDMI 2 HDMI ...


