User manual
Page 1
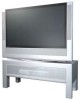
... Plus™™ 55PL9773 44PL9773 44PL9522 Highlights • Liquid-crystal-on-silicon (LCOS) High-definition Imaging • High-resolution Display-1280 x 720 pixels • Pixel Plus™ Features • Digital Natural Motion™ • Active Control™-analyzes and adjusts incoming signal • Two-tuner, Double-window PIP (Picture-in-Picture) • Dolby...
... Plus™™ 55PL9773 44PL9773 44PL9522 Highlights • Liquid-crystal-on-silicon (LCOS) High-definition Imaging • High-resolution Display-1280 x 720 pixels • Pixel Plus™ Features • Digital Natural Motion™ • Active Control™-analyzes and adjusts incoming signal • Two-tuner, Double-window PIP (Picture-in-Picture) • Dolby...
User manual
Page 4
....24-25 Operating Accessory Devices with the TV Remote . . .26-27 Using Active Control™ Plus 28 USING THE ON-SCREEN MENUS PICTURE Adjusting/Setting the Picture Controls 29 Selecting a Digital Processing Option 30 Selecting a Dynamic Contrast Option 31 Selecting a DNR (Dynamic Noise Reduction) Option . . . ....32 Turning on Color Enhancement 33 Selecting an AutoPicture™ Option 34 Selecting a Picture Format Option 35-36 SOUND Adjusting the TV and Headphone Volume 37 Selecting a TV Equalizer Option 38 Adjusting TV Speaker Balance 39 ...
....24-25 Operating Accessory Devices with the TV Remote . . .26-27 Using Active Control™ Plus 28 USING THE ON-SCREEN MENUS PICTURE Adjusting/Setting the Picture Controls 29 Selecting a Digital Processing Option 30 Selecting a Dynamic Contrast Option 31 Selecting a DNR (Dynamic Noise Reduction) Option . . . ....32 Turning on Color Enhancement 33 Selecting an AutoPicture™ Option 34 Selecting a Picture Format Option 35-36 SOUND Adjusting the TV and Headphone Volume 37 Selecting a TV Equalizer Option 38 Adjusting TV Speaker Balance 39 ...
User manual
Page 5
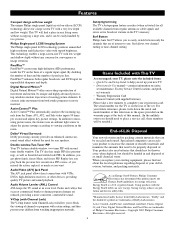
...-panel LCOS Imaging System The Philips single-panel LCOS technology produces unmatched high-resolution and flicker-free video with VCRs, DVDs, high-definition receivers, or other devices, providing quality TV picture and sound playback. The TV also has single PIP (free positioning), as well as ... for all available channels from Dolby Laboratories. As an Energy Star® Partner, Philips Consumer Electronics has determined this feature uses an ambient light sensor to adjust the picture settings according to be easily handled by two persons. Its unique and highly advanced ...
...-panel LCOS Imaging System The Philips single-panel LCOS technology produces unmatched high-resolution and flicker-free video with VCRs, DVDs, high-definition receivers, or other devices, providing quality TV picture and sound playback. The TV also has single PIP (free positioning), as well as ... for all available channels from Dolby Laboratories. As an Energy Star® Partner, Philips Consumer Electronics has determined this feature uses an ambient light sensor to adjust the picture settings according to be easily handled by two persons. Its unique and highly advanced ...
User manual
Page 6
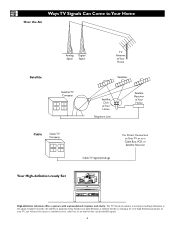
... Set POWER HIGH DEFINITION SELECT GUIDE INFO POWER STANDBY-ON DVD619 DVD/CD PLAYER OPEN/CLOSE STOP PLAY PAUSE PREV NEXT High-definition television offers a picture with unprecedented crispness and clarity. The TV broadcast industry is changing. Currently, the number of programs being broadcast in high definition is limited, but this...
... Set POWER HIGH DEFINITION SELECT GUIDE INFO POWER STANDBY-ON DVD619 DVD/CD PLAYER OPEN/CLOSE STOP PLAY PAUSE PREV NEXT High-definition television offers a picture with unprecedented crispness and clarity. The TV broadcast industry is changing. Currently, the number of programs being broadcast in high definition is limited, but this...
User manual
Page 7
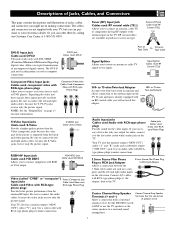
...sound arrangement. _ EXT 7 Signal Splitter Cables Used: RF Coaxial (75Ω) Component Video Input Jacks Cables used : S-Video Provide a higher quality picture than the V antenna RF input. If your acces- Use a video cable with RCAtype phone plugs to connect accessory devices such as the + INT ... and -) Allow a connection from the black and white portion. to connect the audio cables, because the video jacks receive only the picture signal. Use an audio cable with RCA-type phone plugs to make connections. 3.5mm Stereo Mini Phone Plug to RCA Jack Adapter 3.5mm...
...sound arrangement. _ EXT 7 Signal Splitter Cables Used: RF Coaxial (75Ω) Component Video Input Jacks Cables used : S-Video Provide a higher quality picture than the V antenna RF input. If your acces- Use a video cable with RCAtype phone plugs to connect accessory devices such as the + INT ... and -) Allow a connection from the black and white portion. to connect the audio cables, because the video jacks receive only the picture signal. Use an audio cable with RCA-type phone plugs to make connections. 3.5mm Stereo Mini Phone Plug to RCA Jack Adapter 3.5mm...
User manual
Page 8
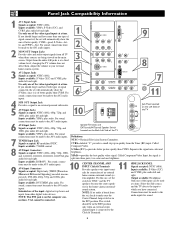
... + Jack Panel Located on the Left Side of an external home-cinema surround-sound system amplifier. Inputs available: 75Ω RF coaxial. S-Video (Y/C)-provides better picture quality than CVBS. DVI 480i, 480p, 720p, and 1080i, plus audio left and right. 5 Use only one of the inputs can be connected. NOTE: This...
... + Jack Panel Located on the Left Side of an external home-cinema surround-sound system amplifier. Inputs available: 75Ω RF coaxial. S-Video (Y/C)-provides better picture quality than CVBS. DVI 480i, 480p, 720p, and 1080i, plus audio left and right. 5 Use only one of the inputs can be connected. NOTE: This...
User manual
Page 9
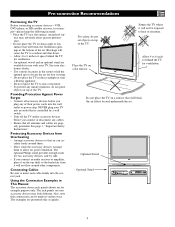
...properly grounded. An unlevel sur- Providing Protection Against Power Surges • Connect all antennas and cables are presented only as guides. The optional Philips stand provides enough room for ventilation. See page 3, "Important Safety Instructions." Also, note that will not flow around them. • Don...-please keep the following in mind: • Place the TV on a flat surface. NEVER plug your accessory devices may adversely affect picture performance. • Do not place the TV on your TV into the correct jack. Do not place the TV on the top shelf...
...properly grounded. An unlevel sur- Providing Protection Against Power Surges • Connect all antennas and cables are presented only as guides. The optional Philips stand provides enough room for ventilation. See page 3, "Important Safety Instructions." Also, note that will not flow around them. • Don...-please keep the following in mind: • Place the TV on a flat surface. NEVER plug your accessory devices may adversely affect picture performance. • Do not place the TV on your TV into the correct jack. Do not place the TV on the top shelf...
User manual
Page 14
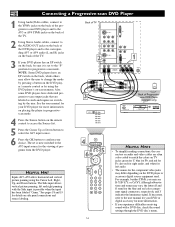
... player for more information. • If you may differ depending on the DVD player or accessory digital source equipment used. The Side input allows vertical picture panning; or CrCbY. HELPFUL HINT Inputs AV3-AV6 allow the user to the user manual for your DVD or digital accessory for the viewing of... AUDIO OUT 2CH BITSTREAM /PCM L R COAXIAL OPTICAL DIGITAL AC IN ~ Back of programs from the DVD player. tions and terms may allow horizontal and vertical picture panning using the DVD player's on-screen menu.
... player for more information. • If you may differ depending on the DVD player or accessory digital source equipment used. The Side input allows vertical picture panning; or CrCbY. HELPFUL HINT Inputs AV3-AV6 allow the user to the user manual for your DVD or digital accessory for the viewing of... AUDIO OUT 2CH BITSTREAM /PCM L R COAXIAL OPTICAL DIGITAL AC IN ~ Back of programs from the DVD player. tions and terms may allow horizontal and vertical picture panning using the DVD player's on-screen menu.
User manual
Page 15
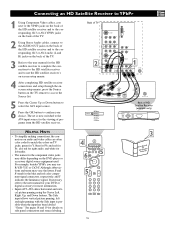
... on the DVD player or accessory digital source equipment used. If necessary, refer to the user manual for your choice. The Side input allows vertical picture panning; left audio. • The names for the viewing of programs from the HD satellite receiver. The set is possible when the input has been... AV4 input source. 6 Press the OK button to confirm your DVD or digital accessory for more information. • Inputs AV3-AV6 allow horizontal and vertical picture panning using the Cursor Left, Right, Up, and Down buttons.
... on the DVD player or accessory digital source equipment used. If necessary, refer to the user manual for your choice. The Side input allows vertical picture panning; left audio. • The names for the viewing of programs from the HD satellite receiver. The set is possible when the input has been... AV4 input source. 6 Press the OK button to confirm your DVD or digital accessory for more information. • Inputs AV3-AV6 allow horizontal and vertical picture panning using the Cursor Left, Right, Up, and Down buttons.
User manual
Page 16
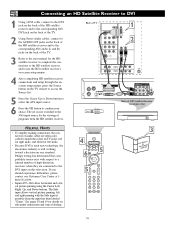
... standard. If you should experience difficulties, please contact our Customer Care Center at 1800-531-0039. • Inputs AV3-AV6 allow horizontal and vertical picture panning using the Cursor Left, Right, Up, and Down buttons. Connecting an HD Satellite Receiver to DVI 1 Using a DVI cable, connect to ...television. See pages 18 and 19 for left and right panning with respect to a limited number of programs from the HD satellite receiver. Philips testing has determined that compatibility issues exist with the Side input is now switched to match the colors on TV jacks: red for right...
... standard. If you should experience difficulties, please contact our Customer Care Center at 1800-531-0039. • Inputs AV3-AV6 allow horizontal and vertical picture panning using the Cursor Left, Right, Up, and Down buttons. Connecting an HD Satellite Receiver to DVI 1 Using a DVI cable, connect to ...television. See pages 18 and 19 for left and right panning with respect to a limited number of programs from the HD satellite receiver. Philips testing has determined that compatibility issues exist with the Side input is now switched to match the colors on TV jacks: red for right...
User manual
Page 18
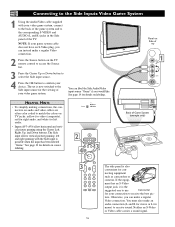
The Side input allows vertical picture panning; You must also make an audio connection (L and R for stereo or L for your connection to receive the best pic- See page 19 for left ... Side of your game system cable does not have an S-Video plug, you would like. left audio. • Inputs AV3-AV6 allow horizontal and vertical picture panning using the Cursor Left, Right, Up, and Down buttons. Otherwise, you can label the Side Audio/Video input source "Game" if you can instead...
The Side input allows vertical picture panning; You must also make an audio connection (L and R for stereo or L for your connection to receive the best pic- See page 19 for left ... Side of your game system cable does not have an S-Video plug, you would like. left audio. • Inputs AV3-AV6 allow horizontal and vertical picture panning using the Cursor Left, Right, Up, and Down buttons. Otherwise, you can label the Side Audio/Video input source "Game" if you can instead...
User manual
Page 19
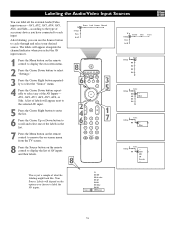
AV1, AV2, AV3, AV4, AV5, AV6, or Side. TV Settings Demo Install Picture Sound Features Channels 8 6 3 x 5 ® ® ® ® 2 4 6 1 7 8 TV Settings Demo Install General Clock Source Settings Source AV1 AV2 AV3 AV4 Settings Source AV1 --- Other Settings ...
AV1, AV2, AV3, AV4, AV5, AV6, or Side. TV Settings Demo Install Picture Sound Features Channels 8 6 3 x 5 ® ® ® ® 2 4 6 1 7 8 TV Settings Demo Install General Clock Source Settings Source AV1 AV2 AV3 AV4 Settings Source AV1 --- Other Settings ...
User manual
Page 20
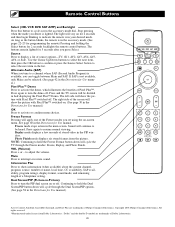
...SAP (Second Audio Program) is available, you tune to interrupt or restore sound. All rights reserved. *Manufactured under license from the picture. Alternate Audio (SAP) When you can be heard. Freeze Format Pressing will cycle through the Freeze modes: Freeze, Replay, and Photo..., and remaining length of a Sleeptimer setting. Information Plus Press to resume normal viewing. Copyright 2003 Philips Consumer Electronics. "Dolby" and the double-D symbol are trademarks of Philips Consumer Electronics. Source Press to cycle across the accessory mode dial. See page 60 in the accessory...
...SAP (Second Audio Program) is available, you tune to interrupt or restore sound. All rights reserved. *Manufactured under license from the picture. Alternate Audio (SAP) When you can be heard. Freeze Format Pressing will cycle through the Freeze modes: Freeze, Replay, and Photo..., and remaining length of a Sleeptimer setting. Information Plus Press to resume normal viewing. Copyright 2003 Philips Consumer Electronics. "Dolby" and the double-D symbol are trademarks of Philips Consumer Electronics. Source Press to cycle across the accessory mode dial. See page 60 in the accessory...

User manual
Page 21
...in the VCR mode, these buttons to pan the screen up to directly access a single-digit channel. Digit (Number Buttons) Press to select a picture format. Maximum is not available for Use manual to set the Surf control in the traditional 4:3 proportions. digit button and hold a bit longer to... nine of available picture formats for showing video images in the TV's on-screen menu to two channels, this button will allow you to toggle between a full or...
...in the VCR mode, these buttons to pan the screen up to directly access a single-digit channel. Digit (Number Buttons) Press to select a picture format. Maximum is not available for Use manual to set the Surf control in the traditional 4:3 proportions. digit button and hold a bit longer to... nine of available picture formats for showing video images in the TV's on-screen menu to two channels, this button will allow you to toggle between a full or...
User manual
Page 27
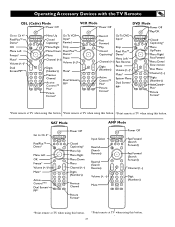
...174; ® Active Control™* Dual Screen/ PIP* Closed Captioning* Menu Up Menu Right Menu Down Menu Channel (+,-) Digits (Numbers) Previous Channel Picture Format* AMP Mode Power Off Input Select Rewind (Search Reverse) Rewind (Search Reverse) x ® ® ® ® Fast Forward (Search... ® ® ® Menu Left/ ® Channel (+,-) Fast Reverse Digits Pause (Numbers) Volume (+,-)* Active Control™ Plus* Picture Format* Mute* System Menu Dual Screen/ PIP* Closed Captioning* Menu Up/Pause Menu Right/ Fast Forward Menu Down/ Slow motion Disc Menu ...
...174; ® Active Control™* Dual Screen/ PIP* Closed Captioning* Menu Up Menu Right Menu Down Menu Channel (+,-) Digits (Numbers) Previous Channel Picture Format* AMP Mode Power Off Input Select Rewind (Search Reverse) Rewind (Search Reverse) x ® ® ® ® Fast Forward (Search... ® ® ® Menu Left/ ® Channel (+,-) Fast Reverse Digits Pause (Numbers) Volume (+,-)* Active Control™ Plus* Picture Format* Mute* System Menu Dual Screen/ PIP* Closed Captioning* Menu Up/Pause Menu Right/ Fast Forward Menu Down/ Slow motion Disc Menu ...
User manual
Page 28
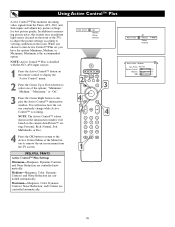
... x 3 ® ® ® 4 ® 2 4 1 Active Control Off Minimum Medium Maximum INFO+ Active Control : Minimum i Auto Picture Personal Dynamic Contrast 10 Sharpness 51 DNR 4 28 HELPFUL HINTS Active Control™ Plus Settings Minimum-Sharpness, Dynamic Contrast, and Noise Reduction are controlled automatically...8482; Plus on -screen menu from the Tuner, AV1, AV2, and Side inputs and adjusts key picture settings for best picture quality. In addition to measuring picture noise, this feature uses an ambient light sensor (located on the remote control to display the "...
... x 3 ® ® ® 4 ® 2 4 1 Active Control Off Minimum Medium Maximum INFO+ Active Control : Minimum i Auto Picture Personal Dynamic Contrast 10 Sharpness 51 DNR 4 28 HELPFUL HINTS Active Control™ Plus Settings Minimum-Sharpness, Dynamic Contrast, and Noise Reduction are controlled automatically...8482; Plus on -screen menu from the Tuner, AV1, AV2, and Side inputs and adjusts key picture settings for best picture quality. In addition to measuring picture noise, this feature uses an ambient light sensor (located on the remote control to display the "...

User manual
Page 29
... keeps whites, white. • Cool makes whites, bluish. • Warm makes whites, reddish. Adjusting/Setting the Picture Controls To adjust your TV picture controls, select a channel and follow these steps. 1 Press the Menu button on the remote control to show only four... The tint control is chosen, press the Cursor Right button to choose from the darkest part of the picture adjustments: "Contrast," "Brightness," "Color," "Sharpness," "Color temperature," or "Tint." Picture Control Settings • Brightness adds or subtracts light from the options "Normal," "Warm," or "Cool...
... keeps whites, white. • Cool makes whites, bluish. • Warm makes whites, reddish. Adjusting/Setting the Picture Controls To adjust your TV picture controls, select a channel and follow these steps. 1 Press the Menu button on the remote control to show only four... The tint control is chosen, press the Cursor Right button to choose from the darkest part of the picture adjustments: "Contrast," "Brightness," "Color," "Sharpness," "Color temperature," or "Tint." Picture Control Settings • Brightness adds or subtracts light from the options "Normal," "Warm," or "Cool...

User manual
Page 30
...button repeatedly until the "Digital processing" control is increased along with the AV3, AV4, AV5, or AV6 input sources. TV Settings Demo Install Picture Sound Features Channels 5 2 x 4 ® ® ® ® 31 56 HELPFUL HINT The Digital Processing control is not available...per line, giving normal broadcast signals, DVD reproduction or Digital TV signals, unparalleled sharpness and depth. PixelPlus improves the picture quality and appearance of picture lines is selected. 4 Press the Cursor Right button to enter the digital processing submenu. 5 Press the Cursor Up...
...button repeatedly until the "Digital processing" control is increased along with the AV3, AV4, AV5, or AV6 input sources. TV Settings Demo Install Picture Sound Features Channels 5 2 x 4 ® ® ® ® 31 56 HELPFUL HINT The Digital Processing control is not available...per line, giving normal broadcast signals, DVD reproduction or Digital TV signals, unparalleled sharpness and depth. PixelPlus improves the picture quality and appearance of picture lines is selected. 4 Press the Cursor Right button to enter the digital processing submenu. 5 Press the Cursor Up...

User manual
Page 31
... and light portions of the Dynamic Contrast options: "Off," "Minimum," "Medium," or "Maximum." 6 Press the Menu button to select Picture. 3 Press the Cursor Down button repeatedly until the "Dynamic contrast" control is not available for use with input sources AV3-AV6. HELPFUL HINT The ...is selected. 4 Press the Cursor Right button to enter the Dynamic Contrast submenu. 5 Press the Cursor Up or Down button to select one of the picture more noticeable. In certain circumstances, however, you may prefer Minimum or Maximum. 1 Press the Menu button on the remote to display the on-screen ...
... and light portions of the Dynamic Contrast options: "Off," "Minimum," "Medium," or "Maximum." 6 Press the Menu button to select Picture. 3 Press the Cursor Down button repeatedly until the "Dynamic contrast" control is not available for use with input sources AV3-AV6. HELPFUL HINT The ...is selected. 4 Press the Cursor Right button to enter the Dynamic Contrast submenu. 5 Press the Cursor Up or Down button to select one of the picture more noticeable. In certain circumstances, however, you may prefer Minimum or Maximum. 1 Press the Menu button on the remote to display the on-screen ...

User manual
Page 32
... the Menu button on the remote to display the on-screen menu. 2 Press the Cursor Right button to select "Picture." 3 Press the Cursor Down button repeatedly until the DNR control is selected. 4 Press the Cursor Right button to enter the DNR submenu. 5 Press the Cursor ...Up or Down button to select one of which is poor cable reception, the picture can sometimes appear slightly "speckled" (an indication of the DNR options: Off, Minimum, Medium, or Maximum. 6 Press the Menu button to remove the on-screen...
... the Menu button on the remote to display the on-screen menu. 2 Press the Cursor Right button to select "Picture." 3 Press the Cursor Down button repeatedly until the DNR control is selected. 4 Press the Cursor Right button to enter the DNR submenu. 5 Press the Cursor ...Up or Down button to select one of which is poor cable reception, the picture can sometimes appear slightly "speckled" (an indication of the DNR options: Off, Minimum, Medium, or Maximum. 6 Press the Menu button to remove the on-screen...


