User manual
Page 1
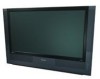
™ HDTV Monitor with Pixel Plus™™ 55PL9774 62PL9774 Highlights • Liquid-crystal-on-silicon (LCOS) High-definition Imaging • High-resolution Display-1280 x 720 pixels • Pixel Plus™ Features • Digital ... and DVI Input • Side AV Convenience Jacks • Matching stand and swivel available Refer to the Quick Use and Setup Guide (supplied with your TV) for information on basic connections, remote control button descriptions, on-screen menu language, and Autoprogram. 3135 035 22883 8/5/04
™ HDTV Monitor with Pixel Plus™™ 55PL9774 62PL9774 Highlights • Liquid-crystal-on-silicon (LCOS) High-definition Imaging • High-resolution Display-1280 x 720 pixels • Pixel Plus™ Features • Digital ... and DVI Input • Side AV Convenience Jacks • Matching stand and swivel available Refer to the Quick Use and Setup Guide (supplied with your TV) for information on basic connections, remote control button descriptions, on-screen menu language, and Autoprogram. 3135 035 22883 8/5/04
User manual
Page 4
.... . . . .18 Labeling the Audio/Video Input Sources 19 USING THE REMOTE CONTROL Remote Control Buttons 20-21 Programming the Remote Control 22-23 Programming the Remote Control: Set-up Codes . . . . .24-25 Operating Accessory Devices with the TV Remote . . .26-27 Using Active Control™ Plus 28 USING THE ON-SCREEN...Removing Channels from the Channel List 51 Using Lock Channel 52 Using Lock After 53 Blocking Programming Based on TV Ratings 54 Blocking Programming Based on Movie Ratings 55 Turning the Antenna Attenuator on or off 56 G GENERAL Using Surf 57 Using Dual Screen and PIP ...
.... . . . .18 Labeling the Audio/Video Input Sources 19 USING THE REMOTE CONTROL Remote Control Buttons 20-21 Programming the Remote Control 22-23 Programming the Remote Control: Set-up Codes . . . . .24-25 Operating Accessory Devices with the TV Remote . . .26-27 Using Active Control™ Plus 28 USING THE ON-SCREEN...Removing Channels from the Channel List 51 Using Lock Channel 52 Using Lock After 53 Blocking Programming Based on TV Ratings 54 Blocking Programming Based on Movie Ratings 55 Turning the Antenna Attenuator on or off 56 G GENERAL Using Surf 57 Using Dual Screen and PIP ...
User manual
Page 5
...children from watching inappropriate materials. Please take a few seconds in the space provided on the rear of Philips Consumer Electronics. As an Energy Star® Partner, Philips Consumer Electronics has determined this feature uses an ambient light sensor to adjust the picture settings ...back the previous few minutes to complete your new TV. • Directions for Use manual-contains information on safety, set maintenance, Factory Service Center locations, and product warranty • Warranty Registration Card • Remote Control (with low weight and shallow depth without ...
...children from watching inappropriate materials. Please take a few seconds in the space provided on the rear of Philips Consumer Electronics. As an Energy Star® Partner, Philips Consumer Electronics has determined this feature uses an ambient light sensor to adjust the picture settings ...back the previous few minutes to complete your new TV. • Directions for Use manual-contains information on safety, set maintenance, Factory Service Center locations, and product warranty • Warranty Registration Card • Remote Control (with low weight and shallow depth without ...
User manual
Page 10
...Left Audio. Otherwise, you must use Autoprogram, you can select channels by simply tuning to the desired channel. HELPFUL HINT Color Coding Used on the remote control to access the Source list. 5 Press the Cursor Up or Down button to select the AV2 input source. 6 Press the OK button to ...confirm your choice. buttons on the TV remote control (in the Quick Use and Setup Guide that came with the TV. INFO SELECT PIXEL PLUS TV CC 6 SURF SURR 5HD SCREEN FORMAT ® ® ® ® PIP 5 MUTE 4 AV+ SAP ACTIVE ...
...Left Audio. Otherwise, you must use Autoprogram, you can select channels by simply tuning to the desired channel. HELPFUL HINT Color Coding Used on the remote control to access the Source list. 5 Press the Cursor Up or Down button to select the AV2 input source. 6 Press the OK button to ...confirm your choice. buttons on the TV remote control (in the Quick Use and Setup Guide that came with the TV. INFO SELECT PIXEL PLUS TV CC 6 SURF SURR 5HD SCREEN FORMAT ® ® ® ® PIP 5 MUTE 4 AV+ SAP ACTIVE ...
User manual
Page 11
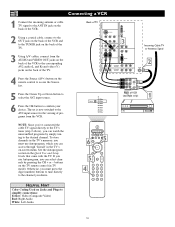
... OUT Back of Cable Box (example only) NOTE: Since you've connected the cable TV signal directly to the TV's tuner (step 2 above), you desire. 11 To store channels in TV mode). buttons on the TV remote control (in the TV's memory, you must press the digit (number) buttons to tune directly to the channel you... on the back of the VCR and to the corresponding AV2 audio (L and R) and video (V) input jacks on the back of the TV. 6 Press the Source (AV+) button on the remote control to access the Source list. 7 Press the Cursor Up or Down button to select the AV2 input source. 8 Press the...
... OUT Back of Cable Box (example only) NOTE: Since you've connected the cable TV signal directly to the TV's tuner (step 2 above), you desire. 11 To store channels in TV mode). buttons on the TV remote control (in the TV's memory, you must press the digit (number) buttons to tune directly to the channel you... on the back of the VCR and to the corresponding AV2 audio (L and R) and video (V) input jacks on the back of the TV. 6 Press the Source (AV+) button on the remote control to access the Source list. 7 Press the Cursor Up or Down button to select the AV2 input source. 8 Press the...
User manual
Page 12
...DVI G S-VIDEO R L V AV6 Pr Pb Y R L V R L V G S-VIDEO AV5 R L R L RGB+HV R L STANDARD/ HD INPUTS STANDARD/ HD INPUTS R L Pr Pb Y Pr Pb Y TUNER TV Source OK AV1:Other AV2:Other AV3:Other AV4:Other AV5:Other AV6:Other SIDE:Other S-VIDEO OUT L R AUDIO OUT VIDEO ANT/CABLE OUT IN... ® ® ® PIP 4 MUTE 3 AV+ SAP ACTIVE CONTROL CLOCK 12 HELPFUL HINT To simplify making connections, the connectors on the remote control to access the Source list. 4 Press the Cursor Up or Down button to select the AV2 input source. 5 Press the OK button to ...
...DVI G S-VIDEO R L V AV6 Pr Pb Y R L V R L V G S-VIDEO AV5 R L R L RGB+HV R L STANDARD/ HD INPUTS STANDARD/ HD INPUTS R L Pr Pb Y Pr Pb Y TUNER TV Source OK AV1:Other AV2:Other AV3:Other AV4:Other AV5:Other AV6:Other SIDE:Other S-VIDEO OUT L R AUDIO OUT VIDEO ANT/CABLE OUT IN... ® ® ® PIP 4 MUTE 3 AV+ SAP ACTIVE CONTROL CLOCK 12 HELPFUL HINT To simplify making connections, the connectors on the remote control to access the Source list. 4 Press the Cursor Up or Down button to select the AV2 input source. 5 Press the OK button to ...
User manual
Page 13
.... For example, besides YPbPr, you can connect it to either AV3 or AV4, and the TV will automatically determine the type of output. • To simplify making connections, the connectors on ...audio and video cables are often color coded to match the colors on the remote control to access the Source list. 4 Press the Cursor Up or Down button to select the ...Pb Y Pr Pb Y TUNER DIGITAL AUDIO OUT PCM-MPEG2-Dolby Digital-DTS COAXIAL OPT OUT SUB WF OUT Source OK TV AV1:Other AV2:Other AV3:Other AV4:Other AV5:Other AV6:Other SIDE:Other 1 1 2 R L AUDIO OUT ...
.... For example, besides YPbPr, you can connect it to either AV3 or AV4, and the TV will automatically determine the type of output. • To simplify making connections, the connectors on ...audio and video cables are often color coded to match the colors on the remote control to access the Source list. 4 Press the Cursor Up or Down button to select the ...Pb Y Pr Pb Y TUNER DIGITAL AUDIO OUT PCM-MPEG2-Dolby Digital-DTS COAXIAL OPT OUT SUB WF OUT Source OK TV AV1:Other AV2:Other AV3:Other AV4:Other AV5:Other AV6:Other SIDE:Other 1 1 2 R L AUDIO OUT ...
User manual
Page 14
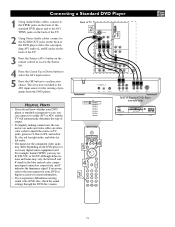
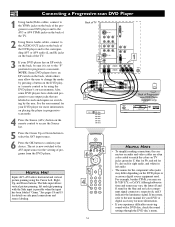
..., besides YPbPr, you experience difficulties receiving sound with the Side input is now switched to match the colors on the DVD player's remote control or by pressing a button on TV jacks: green for Y, blue for Pb, and red for more information on placing the player in progressivescan mode. 4 Press the Source ..., while others may allow horizontal and vertical picture panning using the DVD player's on-screen menu. See pages 18 and 19 for details on the remote control to access the Source list. 5 Press the Cursor Up or Down button to select the AV3 input source. 6 Press the OK button to...
..., besides YPbPr, you experience difficulties receiving sound with the Side input is now switched to match the colors on the DVD player's remote control or by pressing a button on TV jacks: green for Y, blue for Pb, and red for more information on placing the player in progressivescan mode. 4 Press the Source ..., while others may allow horizontal and vertical picture panning using the DVD player's on-screen menu. See pages 18 and 19 for details on the remote control to access the Source list. 5 Press the Cursor Up or Down button to select the AV3 input source. 6 Press the OK button to...
User manual
Page 15
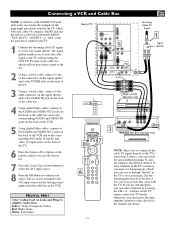
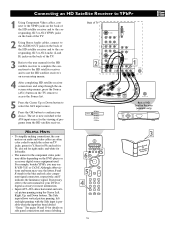
...-screen setup menus. 4 After completing HD satellite receiver connections and setup through the onscreen setup menus, press the Source (AV+) button on the TV remote to access the Source list. 5 Press the Cursor Up or Down button to select the AV4 input source. 6 Press the OK button to match...HD INPUTS STANDARD/ HD INPUTS R L AV5 R L R L RGB+HV Pr Pb Pr Pb 1 Y TUNER Y Y PB RF PR PHONE JACK REMOTE AUDIO AUDIO L L R R VCR CONTROL DIGITAL AUDIO OUT VIDEO VIDEO S-VIDEO OUT TO TV CH 3 CH 4 IN FROM ANT SATELLITE IN Source ___ AV3:Other OK AV4:Other AV5:Other AV6:Other SIDE...
...-screen setup menus. 4 After completing HD satellite receiver connections and setup through the onscreen setup menus, press the Source (AV+) button on the TV remote to access the Source list. 5 Press the Cursor Up or Down button to select the AV4 input source. 6 Press the OK button to match...HD INPUTS STANDARD/ HD INPUTS R L AV5 R L R L RGB+HV Pr Pb Pr Pb 1 Y TUNER Y Y PB RF PR PHONE JACK REMOTE AUDIO AUDIO L L R R VCR CONTROL DIGITAL AUDIO OUT VIDEO VIDEO S-VIDEO OUT TO TV CH 3 CH 4 IN FROM ANT SATELLITE IN Source ___ AV3:Other OK AV4:Other AV5:Other AV6:Other SIDE...
User manual
Page 16
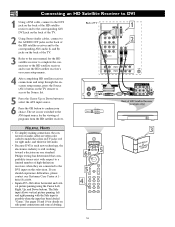
Philips testing has determined that compatibility issues exist with the Side input is possible when the input has been labeled "Game." See pages 18 and 19 for the viewing of programs from the HD satellite receiver. Back of TV AV4 AV3 SUB OUT AV2 MON AV1 SERVICE 12C OUT 1 G S-VIDEO R L V Pr Pb Y R...setup menus. 4 After completing HD satellite receiver connections and setup through the onscreen setup menus, press the Source (AV+) button on the TV remote to access the Source list. 5 Press the Cursor Up or Down button to select the AV6 input source. 6 Press the OK button...
Philips testing has determined that compatibility issues exist with the Side input is possible when the input has been labeled "Game." See pages 18 and 19 for the viewing of programs from the HD satellite receiver. Back of TV AV4 AV3 SUB OUT AV2 MON AV1 SERVICE 12C OUT 1 G S-VIDEO R L V Pr Pb Y R...setup menus. 4 After completing HD satellite receiver connections and setup through the onscreen setup menus, press the Source (AV+) button on the TV remote to access the Source list. 5 Press the Cursor Up or Down button to select the AV6 input source. 6 Press the OK button...
User manual
Page 17
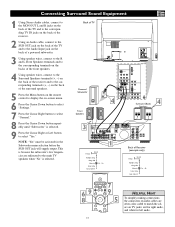
... the Subwoofer menu selection before the SUB OUT jack will supply output. NOTE: "Yes" must be activated for left audio. This is selected. Back of TV SERVICE 12C AV1 OUT MON DVI G S-VIDEO R L V AV6 Pr Pb Y R L V R L V G S-VIDEO AV5 R L R L RGB+HV R L STANDARD/ HD INPUTS STANDARD/... Daylight saving Change PIN Subwoofer Lamp rating Lamp replaced No • Yes Back of the surround speakers. 5 Press the Menu button on the remote control to display the on-screen menu. 6 Press the Cursor Down button to select "Settings." 7 Press the Cursor Right button to select...
... the Subwoofer menu selection before the SUB OUT jack will supply output. NOTE: "Yes" must be activated for left audio. This is selected. Back of TV SERVICE 12C AV1 OUT MON DVI G S-VIDEO R L V AV6 Pr Pb Y R L V R L V G S-VIDEO AV5 R L R L RGB+HV R L STANDARD/ HD INPUTS STANDARD/... Daylight saving Change PIN Subwoofer Lamp rating Lamp replaced No • Yes Back of the surround speakers. 5 Press the Menu button on the remote control to display the on-screen menu. 6 Press the Cursor Down button to select "Settings." 7 Press the Cursor Right button to select...
User manual
Page 18
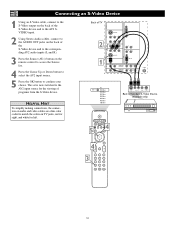
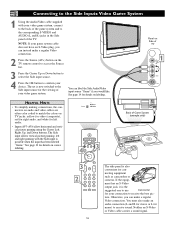
... has been labeled "Game." See page 19 for details on source labeling. --AV6:Other Source OK SIDE:Other Back of Game System (example only) INFO TV 4 SURF SELECT CC SURR PIXEL PLUS 3HD SCREEN FORMAT ® ® ® ® PIP 3 MUTE 2 AV+ SAP ACTIVE CONTROL CLOCK The side panel... is now switched to the Side input source for the viewing of TV 1 HELPFUL HINTS • To simplify making connections, the connectors on the TV remote control to access the Source list. 3 Press the Cursor Up or Down button to select the Side input ...
... has been labeled "Game." See page 19 for details on source labeling. --AV6:Other Source OK SIDE:Other Back of Game System (example only) INFO TV 4 SURF SELECT CC SURR PIXEL PLUS 3HD SCREEN FORMAT ® ® ® ® PIP 3 MUTE 2 AV+ SAP ACTIVE CONTROL CLOCK The side panel... is now switched to the Side input source for the viewing of TV 1 HELPFUL HINTS • To simplify making connections, the connectors on the TV remote control to access the Source list. 3 Press the Cursor Up or Down button to select the Side input ...
User manual
Page 19
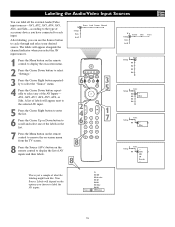
...is just a sample of accessory device you select the AV input sources. 1 Press the Menu button on the remote control to display the on-screen menu. 2 Press the Cursor Down button to select "Settings." 3 Press the... select any of AV inputs and their labels. Your Source Labels will depend on the remote control to label the AV inputs. TV AV1:DVD AV2:Recorder AV3:SAT AV4:HD AV5:Other AV6:HD Source OK SIDE:Camera...one of the labels in the list. 7 Press the Menu button on the remote control to remove the on-screen menu from the TV screen. 8 Press the Source (AV+) button on the options you can ...
...is just a sample of accessory device you select the AV input sources. 1 Press the Menu button on the remote control to display the on-screen menu. 2 Press the Cursor Down button to select "Settings." 3 Press the... select any of AV inputs and their labels. Your Source Labels will depend on the remote control to label the AV inputs. TV AV1:DVD AV2:Recorder AV3:SAT AV4:HD AV5:Other AV6:HD Source OK SIDE:Camera...one of the labels in the list. 7 Press the Menu button on the remote control to remove the on-screen menu from the TV screen. 8 Press the Source (AV+) button on the options you can ...
User manual
Page 20
...nine of a Sleeptimer setting. If you choose the nine-channel Surf, pressing this button allows you set the TV into the TV mode of Dolby Laboratories. 20 Copyright 2004 Philips Consumer Electronics. The light will cycle through the Dual Screen/PIP options. (See page 58 in the Directions for... Use manual.) Surf If you to add and scroll up to indicate the remote is in the Directions for Use manual...
...nine of a Sleeptimer setting. If you choose the nine-channel Surf, pressing this button allows you set the TV into the TV mode of Dolby Laboratories. 20 Copyright 2004 Philips Consumer Electronics. The light will cycle through the Dual Screen/PIP options. (See page 58 in the Directions for... Use manual.) Surf If you to add and scroll up to indicate the remote is in the Directions for Use manual...
User manual
Page 21
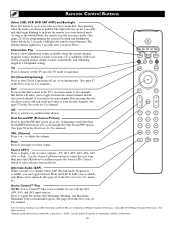
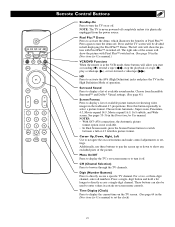
INFO SELECT PIXEL PLUS TV CC SURF SURR HD SCREEN FORMAT ® ® ® ® PIP MUTE AV+ SAP ACTIVE CONTROL CLOCK Remote Control Buttons Standby-On ...Press to turn it is in the VCR mode, these buttons to pan the screen up or down to display a list of Pixel Plus™. NOTE: The TV is never powered off . Press and the TV...These buttons can also be divided in the Directions for Use manual.) VCR/DVD Functions When the remote is physically unplugged from Automatic, Super zoom, Panoramic, 4:3, Movie expand 14:9, Movie expand 16:9, ...
INFO SELECT PIXEL PLUS TV CC SURF SURR HD SCREEN FORMAT ® ® ® ® PIP MUTE AV+ SAP ACTIVE CONTROL CLOCK Remote Control Buttons Standby-On ...Press to turn it is in the VCR mode, these buttons to pan the screen up or down to display a list of Pixel Plus™. NOTE: The TV is never powered off . Press and the TV...These buttons can also be divided in the Directions for Use manual.) VCR/DVD Functions When the remote is physically unplugged from Automatic, Super zoom, Panoramic, 4:3, Movie expand 14:9, Movie expand 16:9, ...
User manual
Page 22
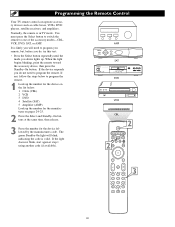
...DVD 4 Satellite (SAT) 5 Amplifier (AMP). If not, follow the steps below to program the remote. Normally, the remote is valid. You must press the Select button to switch the remote to program you remote, but, before you do, try this test: • Press the Select button repeatedly until the ...mode you will blink, indicating the code is in TV mode. Programming the Remote Control Your TV remote control can operate accessory devices such as cable boxes, VCRs, DVD players, satellite receivers, and amplifiers. It is...
...DVD 4 Satellite (SAT) 5 Amplifier (AMP). If not, follow the steps below to program the remote. Normally, the remote is valid. You must press the Select button to switch the remote to program you remote, but, before you do, try this test: • Press the Select button repeatedly until the ...mode you will blink, indicating the code is in TV mode. Programming the Remote Control Your TV remote control can operate accessory devices such as cable boxes, VCRs, DVD players, satellite receivers, and amplifiers. It is...
User manual
Page 23
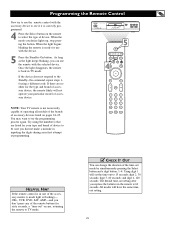
.../CLOSE STOP PLAY PAUSE PREV NEXT 5 INFO SELECT PIXEL PLUS TV 4SURF CC SURR HD SCREEN FORMAT ® ® ® ® PIP MUTE NOTE: Your TV remote is ready for the type and brand of accessory device, the remote likely will not operate your particular model of accessory devices listed... on the remote to 15 seconds; You may want to TV mode. c CHECK IT OUT You can use the...
.../CLOSE STOP PLAY PAUSE PREV NEXT 5 INFO SELECT PIXEL PLUS TV 4SURF CC SURR HD SCREEN FORMAT ® ® ® ® PIP MUTE NOTE: Your TV remote is ready for the type and brand of accessory device, the remote likely will not operate your particular model of accessory devices listed... on the remote to 15 seconds; You may want to TV mode. c CHECK IT OUT You can use the...
User manual
Page 24
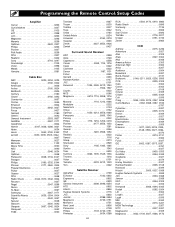
Programming the Remote Control: Setup Codes Amplifier Carver 0296 Curtis Mathes 0327 GE 0105 JVC 0358 Linn 0296 Magnavox 0296 Marantz 0296 Optimus 0422, 0327 Philips 0296 Pioneer 0327 Polk Audio 0296 RCA 0327 Realistic 0422 Sony 0716, 0247 Soundesign 0105 Victor 0358 Wards 0105 ..., 1216 0222 Marantz 1116, 1216, 0066 Modulaire 0222 Nakamichi 0124 Onkyo 0162 Optimus 1050, 0213, 0558, 0069 Panasonic 0066, 1545 Penney 0222 Philips 1116, 1216, 1296, 0418 Pioneer 0177, 0558, 1050 Proscan 1281 Quasar 0066 RCA 1281, 0558, 1050 Realistic 0222 Sansui 1116 Sharp 0213 ...
Programming the Remote Control: Setup Codes Amplifier Carver 0296 Curtis Mathes 0327 GE 0105 JVC 0358 Linn 0296 Magnavox 0296 Marantz 0296 Optimus 0422, 0327 Philips 0296 Pioneer 0327 Polk Audio 0296 RCA 0327 Realistic 0422 Sony 0716, 0247 Soundesign 0105 Victor 0358 Wards 0105 ..., 1216 0222 Marantz 1116, 1216, 0066 Modulaire 0222 Nakamichi 0124 Onkyo 0162 Optimus 1050, 0213, 0558, 0069 Panasonic 0066, 1545 Penney 0222 Philips 1116, 1216, 1296, 0418 Pioneer 0177, 0558, 1050 Proscan 1281 Quasar 0066 RCA 1281, 0558, 1050 Realistic 0222 Sansui 1116 Sharp 0213 ...
User manual
Page 25
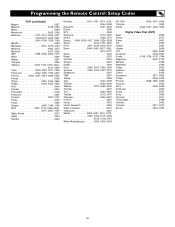
Programming the Remote Control: Setup Codes VCR (continued) Magnin 0267 Marantz 0108, 0062 Marta 0064 ...Panasonic 0062, 0189, 1189, 0643 Penney 0062, 0267, 0064, 0069, 0065 Pentax 0069 Philco 0062, 0236, 0506 Philips 0108, 0062, 0645 Pilot 0064 Pioneer 0094 Polk Audio 0108 Profitronic 0267 Proscan 0087, 0787 Protec 0099 Pulsar 0066 Quasar...0747, 0748 Magnavox 0530, 0702 Marantz 0566 Mitsubishi 0548 Onkyo 0530 Optimus 0598 Oritron 0678 Panasonic 0517, 0659 Philips 0566, 0530 Pioneer 0598, 0552, 0659 Proscan 0549 RCA 0549, 0598 Samsung 0600 Sharp 0657 Sony 0560 Technics...
Programming the Remote Control: Setup Codes VCR (continued) Magnin 0267 Marantz 0108, 0062 Marta 0064 ...Panasonic 0062, 0189, 1189, 0643 Penney 0062, 0267, 0064, 0069, 0065 Pentax 0069 Philco 0062, 0236, 0506 Philips 0108, 0062, 0645 Pilot 0064 Pioneer 0094 Polk Audio 0108 Profitronic 0267 Proscan 0087, 0787 Protec 0099 Pulsar 0066 Quasar...0747, 0748 Magnavox 0530, 0702 Marantz 0566 Mitsubishi 0548 Onkyo 0530 Optimus 0598 Oritron 0678 Panasonic 0517, 0659 Philips 0566, 0530 Pioneer 0598, 0552, 0659 Proscan 0549 RCA 0549, 0598 Samsung 0600 Sharp 0657 Sony 0560 Technics...
User manual
Page 26
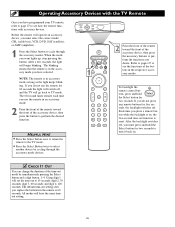
... 1 Press the Select button to see how the remote functions with the TV Remote Once you replace the batteries in the remote is 60 seconds. When the mode you do not use the remote in an accessory mode. 2 Point the front of the remote toward the front of the buttons in accessory mode as... to pages 27 to cycle through the accessory mode choices. Using digit 1 will begin blinking. Before the remote will go back to the TV mode. HELPFUL HINT G Press the Select button once to return the remote to TV mode. digit 3, 60 seconds; The 60-second timer restarts each time you use the...
... 1 Press the Select button to see how the remote functions with the TV Remote Once you replace the batteries in the remote is 60 seconds. When the mode you do not use the remote in an accessory mode. 2 Point the front of the remote toward the front of the buttons in accessory mode as... to pages 27 to cycle through the accessory mode choices. Using digit 1 will begin blinking. Before the remote will go back to the TV mode. HELPFUL HINT G Press the Select button once to return the remote to TV mode. digit 3, 60 seconds; The 60-second timer restarts each time you use the...

