User manual
Page 4
...Video Input Sources 19 USING THE REMOTE CONTROL Remote Control Buttons 20-21 Programming the Remote Control 22-23 Programming the Remote Control: Set-up Codes . . . . .24-25 Operating Accessory Devices with the TV Remote . . .26-27 Using... 52 Using Lock After 53 Blocking Programming Based on TV Ratings 54 Blocking Programming Based on Movie Ratings 55 Turning the Antenna Attenuator on or off 56 G ...Subwoofer Control 63 Setting the Clock-Auto Clock Mode 64 Setting the Clock Manually 65 Selecting a Time Zone and Setting the Daylight Savings Control 66 Using Installation Features: ...
...Video Input Sources 19 USING THE REMOTE CONTROL Remote Control Buttons 20-21 Programming the Remote Control 22-23 Programming the Remote Control: Set-up Codes . . . . .24-25 Operating Accessory Devices with the TV Remote . . .26-27 Using... 52 Using Lock After 53 Blocking Programming Based on TV Ratings 54 Blocking Programming Based on Movie Ratings 55 Turning the Antenna Attenuator on or off 56 G ...Subwoofer Control 63 Setting the Clock-Auto Clock Mode 64 Setting the Clock Manually 65 Selecting a Time Zone and Setting the Daylight Savings Control 66 Using Installation Features: ...
User manual
Page 5
...and minimize the amounts that can recycle your new TV. • Directions for a large screen TV with a very low depth and low weight. The serial number for rear speakers. Specialized companies can be properly disposed of Philips Consumer Electronics. "Dolby" and the double-D ... with low weight The unique Philips single-panel liquid-crystal-on-silicon (LCOS) technology allows for Use manual-contains information on safety, set maintenance, Factory Service Center locations, and product warranty • Warranty Registration Card • Remote Control (with supplied batteries). ...
...and minimize the amounts that can recycle your new TV. • Directions for a large screen TV with a very low depth and low weight. The serial number for rear speakers. Specialized companies can be properly disposed of Philips Consumer Electronics. "Dolby" and the double-D ... with low weight The unique Philips single-panel liquid-crystal-on-silicon (LCOS) technology allows for Use manual-contains information on safety, set maintenance, Factory Service Center locations, and product warranty • Warranty Registration Card • Remote Control (with supplied batteries). ...
User manual
Page 13
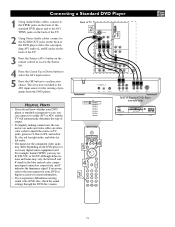
...AV3 or AV4, and the TV will automatically determine the type...and red for the viewing of programs from the DVD player. Back of TV 2 AV4 AV3 SUB OUT AV2 MON AV1 SERVICE 12C OUT G S-...-DTS COAXIAL OPT OUT SUB WF OUT Source OK TV AV1:Other AV2:Other AV3:Other AV4:Other AV5:... PLAYER OPEN/CLOSE STOP PLAY PAUSE PREV NEXT INFO TV 5 SURF SELECT CC SURR PIXEL PLUS 4HD SCREEN FORMAT... on the back of the TV. 2 Using Stereo Audio cables... jacks on the back of the TV. 3 Press the Source (AV+)... If you may differ depending on the remote control to access the Source list. 4 ...
...AV3 or AV4, and the TV will automatically determine the type...and red for the viewing of programs from the DVD player. Back of TV 2 AV4 AV3 SUB OUT AV2 MON AV1 SERVICE 12C OUT G S-...-DTS COAXIAL OPT OUT SUB WF OUT Source OK TV AV1:Other AV2:Other AV3:Other AV4:Other AV5:... PLAYER OPEN/CLOSE STOP PLAY PAUSE PREV NEXT INFO TV 5 SURF SELECT CC SURR PIXEL PLUS 4HD SCREEN FORMAT... on the back of the TV. 2 Using Stereo Audio cables... jacks on the back of the TV. 3 Press the Source (AV+)... If you may differ depending on the remote control to access the Source list. 4 ...
User manual
Page 14
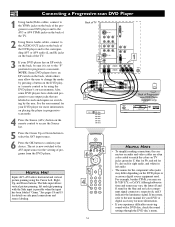
...the DVD player or accessory digital source equipment used. See the user manual for your DVD player for more information on placing the player in progressivescan mode. 4 Press the Source (AV+) button on the remote control to access the Source list. 5 Press the Cursor Up ... player has an I /P switch on the back, while others may allow horizontal and vertical picture panning using the DVD player's on-screen menu. Back of TV SERVICE 12C DVI G S-VIDEO R L V AV6 AV1 Pr Pb Y R L V OUT MON 2 AV2 R L V G S-VIDEO AV5 R L R L RGB+HV 1 SUB OUT AV3 R L STANDARD/ HD ...
...the DVD player or accessory digital source equipment used. See the user manual for your DVD player for more information on placing the player in progressivescan mode. 4 Press the Source (AV+) button on the remote control to access the Source list. 5 Press the Cursor Up ... player has an I /P switch on the back, while others may allow horizontal and vertical picture panning using the DVD player's on-screen menu. Back of TV SERVICE 12C DVI G S-VIDEO R L V AV6 AV1 Pr Pb Y R L V OUT MON 2 AV2 R L V G S-VIDEO AV5 R L R L RGB+HV 1 SUB OUT AV3 R L STANDARD/ HD ...
User manual
Page 15
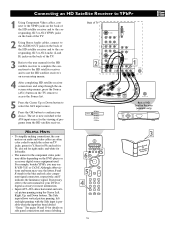
...; Inputs AV3-AV6 allow horizontal and vertical picture panning using the Cursor Left, Right, Up, and Down buttons. If necessary, refer to the user manual for your DVD or digital accessory for the HD satellite receiver to complete the connections to the HD satellite receiver and to use the HD... on-screen setup menus. 4 After completing HD satellite receiver connections and setup through the onscreen setup menus, press the Source (AV+) button on the TV remote to access the Source list. 5 Press the Cursor Up or Down button to select the AV4 input source. 6 Press the OK button to confirm your...
...; Inputs AV3-AV6 allow horizontal and vertical picture panning using the Cursor Left, Right, Up, and Down buttons. If necessary, refer to the user manual for your DVD or digital accessory for the HD satellite receiver to complete the connections to the HD satellite receiver and to use the HD... on-screen setup menus. 4 After completing HD satellite receiver connections and setup through the onscreen setup menus, press the Source (AV+) button on the TV remote to access the Source list. 5 Press the Cursor Up or Down button to select the AV4 input source. 6 Press the OK button to confirm your...
User manual
Page 16
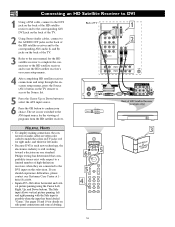
...PIP 5 MUTE 4 AV+ SAP ACTIVE CONTROL CLOCK 3 UHseDRr eSMfocaaertneivulleiatrle 16 Philips testing has determined that compatibility issues exist with the Side input is possible when the input has been labeled "Game." Back of TV AV4 AV3 SUB OUT AV2 MON AV1 SERVICE 12C OUT 1 G S-VIDEO ...manual for the HD satellite receiver to complete the connections to the HD satellite receiver and to use the HD satellite receiver's on-screen setup menus. 4 After completing HD satellite receiver connections and setup through the onscreen setup menus, press the Source (AV+) button on the TV remote...
...PIP 5 MUTE 4 AV+ SAP ACTIVE CONTROL CLOCK 3 UHseDRr eSMfocaaertneivulleiatrle 16 Philips testing has determined that compatibility issues exist with the Side input is possible when the input has been labeled "Game." Back of TV AV4 AV3 SUB OUT AV2 MON AV1 SERVICE 12C OUT 1 G S-VIDEO ...manual for the HD satellite receiver to complete the connections to the HD satellite receiver and to use the HD satellite receiver's on-screen setup menus. 4 After completing HD satellite receiver connections and setup through the onscreen setup menus, press the Source (AV+) button on the TV remote...
User manual
Page 20
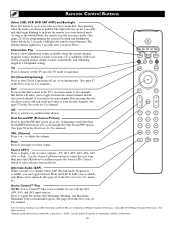
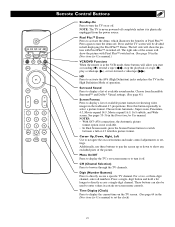
... in the list. Maximum is available, you can be selected. (See page 42 in -Picture) Press to turn Closed Captioning off . Copyright 2004 Philips Consumer Electronics. to interrupt or restore sound. Use the Cursor Up/Down buttons to select the next item, then press the OK button to confirm...-D symbol are trademarks of a Sleeptimer setting. As long as the button blinks, the remote is in the TV's on during mute. (See page 47 in the Directions for Use manual.) Surf If you to indicate the remote is lighted. Mute Press to adjust the volume. See page 57 in the Directions for...
... in the list. Maximum is available, you can be selected. (See page 42 in -Picture) Press to turn Closed Captioning off . Copyright 2004 Philips Consumer Electronics. to interrupt or restore sound. Use the Cursor Up/Down buttons to select the next item, then press the OK button to confirm...-D symbol are trademarks of a Sleeptimer setting. As long as the button blinks, the remote is in the TV's on during mute. (See page 47 in the Directions for Use manual.) Surf If you to indicate the remote is lighted. Mute Press to adjust the volume. See page 57 in the Directions for...
User manual
Page 21
...Pixel Plus™ switched off. Cursor Up, Down, Right, Left Use to display a list of the picture. NOTE: The TV is in the Directions for Use manual to switch between a full or 4:3 letterbox picture format. Surround Sound Press to navigate the on-screen menu and make control ...adjustments or settings. INFO SELECT PIXEL PLUS TV CC SURF SURR HD SCREEN FORMAT ® ® ® ® PIP MUTE AV+ SAP ACTIVE CONTROL CLOCK Remote ...
...Pixel Plus™ switched off. Cursor Up, Down, Right, Left Use to display a list of the picture. NOTE: The TV is in the Directions for Use manual to switch between a full or 4:3 letterbox picture format. Surround Sound Press to navigate the on-screen menu and make control ...adjustments or settings. INFO SELECT PIXEL PLUS TV CC SURF SURR HD SCREEN FORMAT ® ® ® ® PIP MUTE AV+ SAP ACTIVE CONTROL CLOCK Remote ...

User manual
Page 64
...1 Press the Menu button on the remote control to display the on -screen menu from a the TV signal. Auto Clock Channel 5 After following steps 1-4 above, press the Cursor Down button to select Auto Clock Channel. 6 Press the Cursor Right button to Select "Automatic" or "Manual." Select your local PBS channel by ...Mode. This is normal. 64 See page 68 for instructions. During this delay the blue LED will be set the clock manually or have the TV acquire the time from the TV screen. 8 Next Set the Time Zone and Daylight Savings Time. If you choose to set the "AutoClock Channel" by...
...1 Press the Menu button on the remote control to display the on -screen menu from a the TV signal. Auto Clock Channel 5 After following steps 1-4 above, press the Cursor Down button to select Auto Clock Channel. 6 Press the Cursor Right button to Select "Automatic" or "Manual." Select your local PBS channel by ...Mode. This is normal. 64 See page 68 for instructions. During this delay the blue LED will be set the clock manually or have the TV acquire the time from the TV screen. 8 Next Set the Time Zone and Daylight Savings Time. If you choose to set the "AutoClock Channel" by...

User manual
Page 65
... to enter the list of days. 9 Press the Cursor Up or Down buttons to select the current day. 10 Press the Menu button on the remote control to remove the on -screen menu. 2 Press the Cursor Down button to highlight "Settings." 3 Press the Cursor Right button repeatedly to select the.... 8 Press Cursor Down to select "Day". Setting the Clock Manually G If you select Manual in the Auto Clock Mode, you need to set the time manually. 1 Press the Menu button on the remote control to display the on -screen menu from the TV screen. 11 Next Set the Time Zone and Daylight Savings Time....
... to enter the list of days. 9 Press the Cursor Up or Down buttons to select the current day. 10 Press the Menu button on the remote control to remove the on -screen menu. 2 Press the Cursor Down button to highlight "Settings." 3 Press the Cursor Right button repeatedly to select the.... 8 Press Cursor Down to select "Day". Setting the Clock Manually G If you select Manual in the Auto Clock Mode, you need to set the time manually. 1 Press the Menu button on the remote control to display the on -screen menu from the TV screen. 11 Next Set the Time Zone and Daylight Savings Time....
User manual
Page 74
... you may need to reprogram the remote for use Autoprogram. (page *Q8). • If you want to try taking the batteries out, you to replace the batteries as soon as an HD satellite receiver, make sure the TV/VCR mode on the accessory equip- See the user manual for the device. (pages *Q6..., 22-28) • Make sure you have installed the batteries correctly. (page *Q6) • The batteries could be sure it is set to the option you want. (page 33) Remote-related Checks The remote control does...
... you may need to reprogram the remote for use Autoprogram. (page *Q8). • If you want to try taking the batteries out, you to replace the batteries as soon as an HD satellite receiver, make sure the TV/VCR mode on the accessory equip- See the user manual for the device. (pages *Q6..., 22-28) • Make sure you have installed the batteries correctly. (page *Q6) • The batteries could be sure it is set to the option you want. (page 33) Remote-related Checks The remote control does...
Quick start guide
Page 1
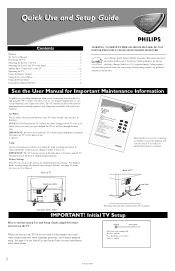
... with Pixel Plus™™ Contents Warning 1 See the User Manual 1 Positioning the TV 2 Mounting the Swivel to the TV 2 Mounting the Swivel and TV to the Stand 3 Making Basic Connections to the TV 3-5 Operating the TV 5 Using the Remote Control 6 Using the On-screen Menu 7 Using the Demo Mode...IMPORTANT! As an Energy Star® Partner, Philips Consumer Electronics has determined this Quick Use and Setup Guide for more information about safety, connecting accessory devices, and using the TV's features, the Directions for Use manual explains how to care for air flow through the...
... with Pixel Plus™™ Contents Warning 1 See the User Manual 1 Positioning the TV 2 Mounting the Swivel to the TV 2 Mounting the Swivel and TV to the Stand 3 Making Basic Connections to the TV 3-5 Operating the TV 5 Using the Remote Control 6 Using the On-screen Menu 7 Using the Demo Mode...IMPORTANT! As an Energy Star® Partner, Philips Consumer Electronics has determined this Quick Use and Setup Guide for more information about safety, connecting accessory devices, and using the TV's features, the Directions for Use manual explains how to care for air flow through the...

Quick start guide
Page 4
...the viewing of cable TV programs through your cable box), then tune the TV to the corresponding channel. See the sections on "Programming the Remote Control" and "Operating Accessory Devices with the TV Remote" in the Directions for Use manual that the RF output on a cable box-labeled "TO TV," "OUT," or ..."OUTPUT," for example-will not supply video and stereo audio to the TV, you can also watch the...
...the viewing of cable TV programs through your cable box), then tune the TV to the corresponding channel. See the sections on "Programming the Remote Control" and "Operating Accessory Devices with the TV Remote" in the Directions for Use manual that the RF output on a cable box-labeled "TO TV," "OUT," or ..."OUTPUT," for example-will not supply video and stereo audio to the TV, you can also watch the...
Quick start guide
Page 6
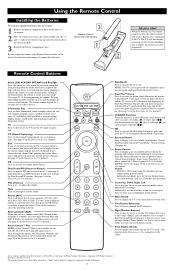
...sure to point the remote at the Remote Sensor window on the back of the remote. 2 Place the batteries (2-AA) in the Directions for Use manual. Cursor Up, Down, Right, Left Use to set the TV into the remote: 1 Remove the ...manual. Surround Sound Press to directly set the clock) Active Control, AutoSurf, Incredible Surround, and Pixel Plus are trademarks of Dolby Laboratories. 6 Choose from Dolby Laboratories. TV Press to display a list of available sound modes. Source (AV+) Press to cycle across the accessory mode dial. Copyright 2003 Philips Consumer Electronics. Remote...
...sure to point the remote at the Remote Sensor window on the back of the remote. 2 Place the batteries (2-AA) in the Directions for Use manual. Cursor Up, Down, Right, Left Use to set the TV into the remote: 1 Remove the ...manual. Surround Sound Press to directly set the clock) Active Control, AutoSurf, Incredible Surround, and Pixel Plus are trademarks of Dolby Laboratories. 6 Choose from Dolby Laboratories. TV Press to display a list of available sound modes. Source (AV+) Press to cycle across the accessory mode dial. Copyright 2003 Philips Consumer Electronics. Remote...

Quick start guide
Page 7
..., Sound, Features, or Channel controls. Refer to the Directions for Use manual for example). Dealer demo Digital options Lightsensor 3D Y/C Comb filter 7 This system allows you can change the menu language and on the remote control to show you to have only an "On" or "Off" option... the Cursor Down or Up to select a mode, then press the Cursor Right to select Dealer Demo, then press the Cursor right. TV Settings Demo Install Picture Sound Features Channels Auto demo Demo Dual screen Freeze-Replay-Photo finish Install Main Menu Picture - - - Each specific...
..., Sound, Features, or Channel controls. Refer to the Directions for Use manual for example). Dealer demo Digital options Lightsensor 3D Y/C Comb filter 7 This system allows you can change the menu language and on the remote control to show you to have only an "On" or "Off" option... the Cursor Down or Up to select a mode, then press the Cursor Right to select Dealer Demo, then press the Cursor right. TV Settings Demo Install Picture Sound Features Channels Auto demo Demo Dual screen Freeze-Replay-Photo finish Install Main Menu Picture - - - Each specific...

Quick start guide
Page 8
...Menu button to be faster if you choose the specific type of connec- The Language control enables you to select only the TV stations in the Directions for Use manual for you to set the mode based on removing channels. 8 This makes it easy for instructions on the type of ... To Autoprogram Analog channels, press the right arrow. See page 51 in your menu language with the cursor up/down to remove the on the remote control to set itself for , find and store all the available channels. Select "Antenna" for a cable company sup- Autoprogram Install mode Install Automatic...
...Menu button to be faster if you choose the specific type of connec- The Language control enables you to select only the TV stations in the Directions for Use manual for you to set the mode based on removing channels. 8 This makes it easy for instructions on the type of ... To Autoprogram Analog channels, press the right arrow. See page 51 in your menu language with the cursor up/down to remove the on the remote control to set itself for , find and store all the available channels. Select "Antenna" for a cable company sup- Autoprogram Install mode Install Automatic...


