Leaflet
Page 1
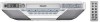
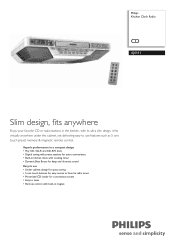
... dramatic sound Easy to use • Under cabinet design for space saving • 5 one touch buttons for easy access to favorite radio tunes • Motorized CD loader for extra convenience • Built-in magnet Superb performance in a compact design • Play CD, CD-R and CD-RW discs • Digital tuning with preset stations for convenience access • Easy to clean • Remote control...
... dramatic sound Easy to use • Under cabinet design for space saving • 5 one touch buttons for easy access to favorite radio tunes • Motorized CD loader for extra convenience • Built-in magnet Superb performance in a compact design • Play CD, CD-R and CD-RW discs • Digital tuning with preset stations for convenience access • Easy to clean • Remote control...
Leaflet
Page 2
.... Kitchen Clock Radio CD Specifications AJ6111/37 Highlights Audio playback • Playback media: CD, CD-R, CD-RW • Disc playback modes: fast forward/backward, next/ previous track search, repeat/shuffle/program Tuner/Reception/Transmission • Tuner bands: AM, FM • Station presets: 25 • Tuner enhancement: auto digital tuning Sound • Sound enhancement: Dynamic Bass Boost • Sound system: stereo • Volume control: up/down • Output power: 2 x 2 W RMS Convenience • Alarms: buzzer alarm • Backlight color...
.... Kitchen Clock Radio CD Specifications AJ6111/37 Highlights Audio playback • Playback media: CD, CD-R, CD-RW • Disc playback modes: fast forward/backward, next/ previous track search, repeat/shuffle/program Tuner/Reception/Transmission • Tuner bands: AM, FM • Station presets: 25 • Tuner enhancement: auto digital tuning Sound • Sound enhancement: Dynamic Bass Boost • Sound system: stereo • Volume control: up/down • Output power: 2 x 2 W RMS Convenience • Alarms: buzzer alarm • Backlight color...
User manual
Page 2
... obtain warrranty service. *Product Safety Notification By registering your product, you should read the enclosed literature closely to prevent operating and maintenance problems. WARNING: To reduce the risk of lightning" indicates uninsulated material within your household, please do everything in PHILIPS. Retain this apparatus. Return your Product Registration Card or register online at : www.philips.com/welcome For Customer Use Enter below...
... obtain warrranty service. *Product Safety Notification By registering your product, you should read the enclosed literature closely to prevent operating and maintenance problems. WARNING: To reduce the risk of lightning" indicates uninsulated material within your household, please do everything in PHILIPS. Retain this apparatus. Return your Product Registration Card or register online at : www.philips.com/welcome For Customer Use Enter below...
User manual
Page 4
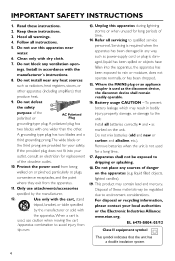
IMPORTANT SAFETY INSTRUCTIONS Clean only with dry cloth. Where the MAINS plug or an appliance coupler is used as the disconnet device, the disconnet device shall remain readily operable. 9 materials Class II equipment symbol This symbol indicates that the unit has a double insulation system 4
IMPORTANT SAFETY INSTRUCTIONS Clean only with dry cloth. Where the MAINS plug or an appliance coupler is used as the disconnet device, the disconnet device shall remain readily operable. 9 materials Class II equipment symbol This symbol indicates that the unit has a double insulation system 4
User manual
Page 6
... Mounting the set Power supply 8 Backup battery (not included) AC power Using the remote control 9 Setting the clock 9 To turn on the Daylight Saving Time (DST) mode Controls Controls on the set 10 Remote control 10 Basic Functions Switching on/ to standby mode and selecting functions 11 Adjusting volume and sound 11 Adjusting volume DBB Contents Mute 11 Display information 11 CD Discs for playback 12 Playing discs 12 Selecting and searching 12 Selecting a different track Finding a passage within a track during playback Different play modes:REPEAT, SHUFFLE ...... 12 Programming...
... Mounting the set Power supply 8 Backup battery (not included) AC power Using the remote control 9 Setting the clock 9 To turn on the Daylight Saving Time (DST) mode Controls Controls on the set 10 Remote control 10 Basic Functions Switching on/ to standby mode and selecting functions 11 Adjusting volume and sound 11 Adjusting volume DBB Contents Mute 11 Display information 11 CD Discs for playback 12 Playing discs 12 Selecting and searching 12 Selecting a different track Finding a passage within a track during playback Different play modes:REPEAT, SHUFFLE ...... 12 Programming...
User manual
Page 7
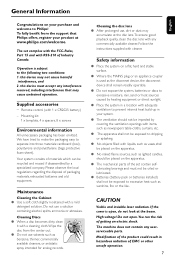
The set contain selflubricating bearings and must accept any interference received, including interference that Philips offers, register your product at www.philips.com/welcome. Remote control (with a cleaning cloth. Mounting kit: 1 x template, 4 x spacers, 8 x screws Environmental information All unnecessary packaging has been omitted. Cleaning Discs ● When a disc becomes dirty, clean it with 1 x CR2025 battery) - If the cover is subject to the following two...
The set contain selflubricating bearings and must accept any interference received, including interference that Philips offers, register your product at www.philips.com/welcome. Remote control (with a cleaning cloth. Mounting kit: 1 x template, 4 x spacers, 8 x screws Environmental information All unnecessary packaging has been omitted. Cleaning Discs ● When a disc becomes dirty, clean it with 1 x CR2025 battery) - If the cover is subject to the following two...

User manual
Page 8
... properly AC power ● Connect the AC power cord to hold the set makes mounting easier and quicker. ● You may install the unit in the AC power cord to wrap the power cord so that excess cord does not hang down. b b Use the mounting template to help safeguard the clock, timer settings and preset radio stations.To save energy, the display switches off and you also insert a 9V battery for memory back-up power supply. Power supply This set as...
... properly AC power ● Connect the AC power cord to hold the set makes mounting easier and quicker. ● You may install the unit in the AC power cord to wrap the power cord so that excess cord does not hang down. b b Use the mounting template to help safeguard the clock, timer settings and preset radio stations.To save energy, the display switches off and you also insert a 9V battery for memory back-up power supply. Power supply This set as...
User manual
Page 9
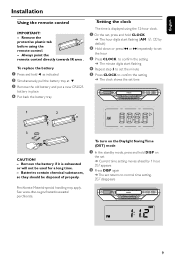
... 5 LI 3 THIUM CR 202 UM CAUTION! - Remove the battery if it is displayed using the remote control. - To turn on the Daylight Saving Time (DST) mode 1 In the standby mode, press and hold CLOCK ➜ The hour digits start flashing 4 Repeat step 3 to set the minute 5 Press CLOCK to confirm the setting ➜ The clock shows the set returns to confirm the setting ➜ The minute digits start flashing (AM 12: 00 by 1 hour. English Installation Using the remote control IMPORTANT! -
... 5 LI 3 THIUM CR 202 UM CAUTION! - Remove the battery if it is displayed using the remote control. - To turn on the Daylight Saving Time (DST) mode 1 In the standby mode, press and hold CLOCK ➜ The hour digits start flashing 4 Repeat step 3 to set the minute 5 Press CLOCK to confirm the setting ➜ The clock shows the set returns to confirm the setting ➜ The minute digits start flashing (AM 12: 00 by 1 hour. English Installation Using the remote control IMPORTANT! -
User manual
Page 10
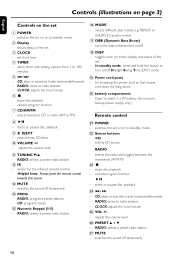
... the set on /off Daylight Saving Time (DST) mode ( Power cord posts - switches the sound off temporarily $ PROG - English Controls (illustrations on page 3) Controls on /off * DISP - Open to standby mode 2 Display - selects CD source RADIO - switches the set on or to radio stations - adjusts the volume level ! RADIO: selects a preset radio station ^ MODE - alarm timer with setting options from 1 to radio stations - TUNING 4/3 - turns the bass enhancement on or to insert 1 x 9V battery (for memory backup power supply only) Remote control ¡...
... the set on /off Daylight Saving Time (DST) mode ( Power cord posts - switches the sound off temporarily $ PROG - English Controls (illustrations on page 3) Controls on /off * DISP - Open to standby mode 2 Display - selects CD source RADIO - switches the set on or to radio stations - adjusts the volume level ! RADIO: selects a preset radio station ^ MODE - alarm timer with setting options from 1 to radio stations - TUNING 4/3 - turns the bass enhancement on or to insert 1 x 9V battery (for memory backup power supply only) Remote control ¡...
User manual
Page 11
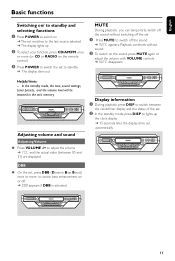
..., sound settings, tuner presets, and the volume level will be retained in the set 1 Press MUTE to switch off the sound ➜ MUTE appears. English Basic functions Switching on/ to standby and selecting functions 1 Press POWER to switch on ➜ The set switches to the last source selected ➜ The display lights up the clock display ➜ 15 seconds later, the display dims out automatically 11 Adjusting volume and sound Adjusting Volume...
..., sound settings, tuner presets, and the volume level will be retained in the set 1 Press MUTE to switch off the sound ➜ MUTE appears. English Basic functions Switching on/ to standby and selecting functions 1 Press POWER to switch on ➜ The set switches to the last source selected ➜ The display lights up the clock display ➜ 15 seconds later, the display dims out automatically 11 Adjusting volume and sound Adjusting Volume...
User manual
Page 12
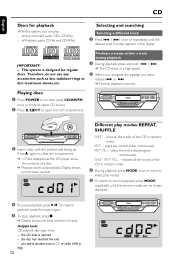
... repeatedly until the various modes are no longer displayed 4 To pause playback, pressÉÅ. plays the entire disc/program continuously SHUF REP ALL - English CD Discs for regular discs. all the tracks of tracks Helpful hints: CD playwill also stop when - plays all pre-recorded audio CDs (CDDA) - To resume playback, press the button again 5 To stop playback, pressÇ ➜ Display shows the total number...
... repeatedly until the various modes are no longer displayed 4 To pause playback, pressÉÅ. plays the entire disc/program continuously SHUF REP ALL - English CD Discs for regular discs. all the tracks of tracks Helpful hints: CD playwill also stop when - plays all pre-recorded audio CDs (CDDA) - To resume playback, press the button again 5 To stop playback, pressÇ ➜ Display shows the total number...
User manual
Page 13
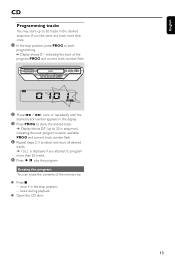
PROG and current track number flash 4 Repeat steps 2-3 to select and store all desired tracks. ➜ FULL is displayed if you like, store any track more than once. 1 In the stop position; - If you attempt to program more than 20 tracks 5 Press ÉÅ play the program Erasing the program You can erase the contents of the program. twice during playback...
PROG and current track number flash 4 Repeat steps 2-3 to select and store all desired tracks. ➜ FULL is displayed if you like, store any track more than once. 1 In the stop position; - If you attempt to program more than 20 tracks 5 Press ÉÅ play the program Erasing the program You can erase the contents of the program. twice during playback...
User manual
Page 14
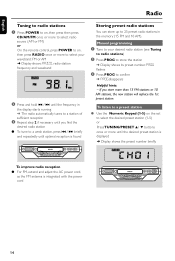
... power cord 14 Manual programming 1 Tune to your waveband: FM or AM ➜ Display shows: RADIO, radio station frequency and waveband 2 Press and hold ∞ / § until the frequency in the memory (15 FM and 10 AM). To improve radio reception ● For FM, extend and adjust the AC power cord, as the FM antenna is displayed ➜ Display shows the preset number briefly. To listen to a preset station ● Use...
... power cord 14 Manual programming 1 Tune to your waveband: FM or AM ➜ Display shows: RADIO, radio station frequency and waveband 2 Press and hold ∞ / § until the frequency in the memory (15 FM and 10 AM). To improve radio reception ● For FM, extend and adjust the AC power cord, as the FM antenna is displayed ➜ Display shows the preset number briefly. To listen to a preset station ● Use...
User manual
Page 15
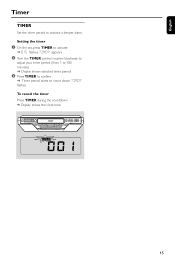
TIMER flashes To cancel the timer Press TIMER during the countdown ➜ Display shows the clock time 15 English Timer TIMER Set the timer period to count down. TIMER appears 2 Turn the TIMER control counter-/clockwise to adjust your timer period (from 1 to 180 minutes) ➜ Display shows selected timer period 3 Press TIMER to confirm ➜ Timer period starts to activate a beeper alarm. Setting the timer 1 On the set, press TIMER to activate ➜ 015 flashes.
TIMER flashes To cancel the timer Press TIMER during the countdown ➜ Display shows the clock time 15 English Timer TIMER Set the timer period to count down. TIMER appears 2 Turn the TIMER control counter-/clockwise to adjust your timer period (from 1 to 180 minutes) ➜ Display shows selected timer period 3 Press TIMER to confirm ➜ Timer period starts to activate a beeper alarm. Setting the timer 1 On the set, press TIMER to activate ➜ 015 flashes.

User manual
Page 16
...~125kHz signal-to-noise 50dB Audio distortion 1.5% Channel separation 30dB (1kHz) Tuner Frequency range AM 520~1710 kHz FM 87.5~108 MHz Number of presets 25 GENERAL Power AC120V/60Hz Power consumption Max 30W Standby 1.5W Dimension .... 300mmx67mmx230mm (W/H/D 11.8" x 2.64" x 9.05" (W/H/D) Weight 2kgs 4.4lbs Philips reserves the right to make design and specification changes for product improvement without prior notice.
...~125kHz signal-to-noise 50dB Audio distortion 1.5% Channel separation 30dB (1kHz) Tuner Frequency range AM 520~1710 kHz FM 87.5~108 MHz Number of presets 25 GENERAL Power AC120V/60Hz Power consumption Max 30W Standby 1.5W Dimension .... 300mmx67mmx230mm (W/H/D 11.8" x 2.64" x 9.05" (W/H/D) Weight 2kgs 4.4lbs Philips reserves the right to make design and specification changes for product improvement without prior notice.
User manual
Page 17
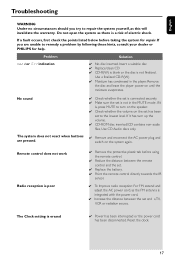
... disc ✔ Replace/clean CD ✔ CD-R(W) is blank or the disc is erased ✔ Power has been interrupted or the power cord has been disconnected. Remove the disc and leave the player power-on the system again. Remote control does not work Radio reception is poor ✔ Remove the protective plastic tab before taking the system for help. The Clock setting is not finalized. Reset the clock. 17 Use...
... disc ✔ Replace/clean CD ✔ CD-R(W) is blank or the disc is erased ✔ Power has been interrupted or the power cord has been disconnected. Remove the disc and leave the player power-on the system again. Remote control does not work Radio reception is poor ✔ Remove the protective plastic tab before taking the system for help. The Clock setting is not finalized. Reset the clock. 17 Use...
User manual
Page 18
... Philips Customer Care Center at least functionally equivalent or most comparable to you specific legal rights. This warranty gives you . Philips warrants replacement products or parts provided under this warranty. Note: Any product sold and identified as based on the product, and installation or repair of antenna/signal source systems outside of the product. • Product repair and/or part replacement because of improper installation or maintenance, connections to improper voltage supply, power line...
... Philips Customer Care Center at least functionally equivalent or most comparable to you specific legal rights. This warranty gives you . Philips warrants replacement products or parts provided under this warranty. Note: Any product sold and identified as based on the product, and installation or repair of antenna/signal source systems outside of the product. • Product repair and/or part replacement because of improper installation or maintenance, connections to improper voltage supply, power line...
User manual
Page 19
All rights reserved Printed in China PDCC-AL-0903 Box 671539, Marietta, GA. 30006-0026 Meet Philips at the Internet http://www.philips.com http://www.philips.com/welcome AJ6110 AJ6111 CLASS 1 LASER PRODUCT 2009 C Koninklijie Philips Electronics N.V. PHILIPS CONSUMER ELECTRONICS NORTH AMERICA P.O.
All rights reserved Printed in China PDCC-AL-0903 Box 671539, Marietta, GA. 30006-0026 Meet Philips at the Internet http://www.philips.com http://www.philips.com/welcome AJ6110 AJ6111 CLASS 1 LASER PRODUCT 2009 C Koninklijie Philips Electronics N.V. PHILIPS CONSUMER ELECTRONICS NORTH AMERICA P.O.
Quick start guide
Page 1
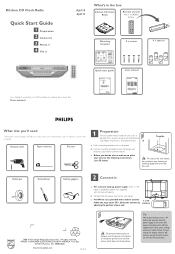
..., use the power cord posts to operate the CD/ Tuner functions. c For AM, the set is provided with a built-in antenna. PHILIPS CONSUMER ELECTRONICS NORTH AMERICA P.O. fridges, microwaves, fluorescent lamps) a Template a Find a mounting location near a wall outlet. Kitchen CD Clock Radio Quick Start Guide 1 Preparation 2 Connect it 3 Mount it 4 Use it AJ6110 AJ6111 What's in the box Kitchen CD Clock Radio Remote control with 1 x CR2025 battery POWER MUTE CD RADIO VOL PRESET Mounting template 8 x screws 4 x spacers Quick start guide User manual For detailed operation of...
..., use the power cord posts to operate the CD/ Tuner functions. c For AM, the set is provided with a built-in antenna. PHILIPS CONSUMER ELECTRONICS NORTH AMERICA P.O. fridges, microwaves, fluorescent lamps) a Template a Find a mounting location near a wall outlet. Kitchen CD Clock Radio Quick Start Guide 1 Preparation 2 Connect it 3 Mount it 4 Use it AJ6110 AJ6111 What's in the box Kitchen CD Clock Radio Remote control with 1 x CR2025 battery POWER MUTE CD RADIO VOL PRESET Mounting template 8 x screws 4 x spacers Quick start guide User manual For detailed operation of...
Quick start guide
Page 2
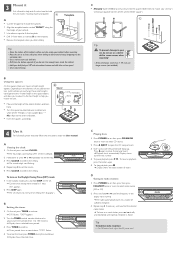
... makes mounting easier and quicker A A • Cut the template to help you mount the unit. C • Manually fasten the 8 long screws down into the ventilation slots. - C Tip To prevent damage to on the Daylight Saving Time (DST) mode 1 In the standby mode, press and hold CLOCK. ➜ The hour digits start flashing (AM 12: 00 by 1 hour. C Playing discs 1 Press POWER to your cabinet before mounting. - Clear wood shavings. hang. • Turn...
... makes mounting easier and quicker A A • Cut the template to help you mount the unit. C • Manually fasten the 8 long screws down into the ventilation slots. - C Tip To prevent damage to on the Daylight Saving Time (DST) mode 1 In the standby mode, press and hold CLOCK. ➜ The hour digits start flashing (AM 12: 00 by 1 hour. C Playing discs 1 Press POWER to your cabinet before mounting. - Clear wood shavings. hang. • Turn...


