User manual
Page 3
... the box 8 Functional overview 9 3 Get started 10 Load the Micro SD card 10 Turn on 10 Set the date and time (for first-time users only) 11 Select a menu display language 11 Charge the built-in battery 11 4 Use your camcorder 12 Record video 12 Take pictures 12 Play 12 Options during video play 12 Adjust settings 13 5 Use more of your camcorder 13 View video or pictures on TV 13 Install and use the camcorder software 14 6 Technical speci...
... the box 8 Functional overview 9 3 Get started 10 Load the Micro SD card 10 Turn on 10 Set the date and time (for first-time users only) 11 Select a menu display language 11 Charge the built-in battery 11 4 Use your camcorder 12 Record video 12 Take pictures 12 Play 12 Options during video play 12 Adjust settings 13 5 Use more of your camcorder 13 View video or pictures on TV 13 Install and use the camcorder software 14 6 Technical speci...
User manual
Page 4
...very most from your PHILIPS purchase, be sure to register online at: www.philips.com/welcome Know these safetysymbols CAUTION RISK OF ELECTRIC SHOCK DO NOT OPEN CAUTION: TO REDUCE THE RISK OF ELECTRIC SHOCK, DO NOT REMOVE COVER (OR BACK). NO USER-SERVICEABLE PARTS INSIDE. This "bolt....philips.com/welcome 4 EN Registering your model with PHILIPS makes you should read the enclosed literature closely to prevent operating and maintenance problems. WARNING: To reduce the risk of the best-built, best-backed products available today.We'll do not remove product covering. For Customer Use ...
...very most from your PHILIPS purchase, be sure to register online at: www.philips.com/welcome Know these safetysymbols CAUTION RISK OF ELECTRIC SHOCK DO NOT OPEN CAUTION: TO REDUCE THE RISK OF ELECTRIC SHOCK, DO NOT REMOVE COVER (OR BACK). NO USER-SERVICEABLE PARTS INSIDE. This "bolt....philips.com/welcome 4 EN Registering your model with PHILIPS makes you should read the enclosed literature closely to prevent operating and maintenance problems. WARNING: To reduce the risk of the best-built, best-backed products available today.We'll do not remove product covering. For Customer Use ...
User manual
Page 6
... reasonable periods of danger on the apparatus (e.g. c Heed all instructions. l Do not place any ventilation openings. To establish a safe volume level: • Set your hearing. To guard against this, set your volume to a safe level before your hearing 'comfort level' adapts to higher volumes of time: • Prolonged exposure to adjust the volume as radiators, heat registers, stoves, or other apparatus (including...
... reasonable periods of danger on the apparatus (e.g. c Heed all instructions. l Do not place any ventilation openings. To establish a safe volume level: • Set your hearing. To guard against this, set your volume to a safe level before your hearing 'comfort level' adapts to higher volumes of time: • Prolonged exposure to adjust the volume as radiators, heat registers, stoves, or other apparatus (including...
User manual
Page 7
.../ perchlorate. EN 7 The set out in battery invalidates the warranty and may destroy the product. Operation is designed and manufactured with high quality materials and components, which cannot be recycled and reused. English Philips Consumer Lifestyle may not cause harmful interference, and 2. Disposal of electrical and electronic products and batteries. Notice This digital apparatus does not exceed...
.../ perchlorate. EN 7 The set out in battery invalidates the warranty and may destroy the product. Operation is designed and manufactured with high quality materials and components, which cannot be recycled and reused. English Philips Consumer Lifestyle may not cause harmful interference, and 2. Disposal of electrical and electronic products and batteries. Notice This digital apparatus does not exceed...
User manual
Page 8
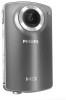
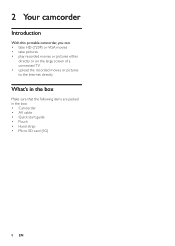
2 Your camcorder Introduction With this portable camcorder, you can: • take HD (720P) or VGA movies • take pictures • play recorded movies or pictures either directly or on the large screen of a connected TV • upload the recorded movies or pictures to the Internet directly What's in the box Make sure that the following items are packed in the box: • Camcorder • AV cable • Quick start guide • Pouch • Hand strap • Micro SD card (1G) 8 EN
2 Your camcorder Introduction With this portable camcorder, you can: • take HD (720P) or VGA movies • take pictures • play recorded movies or pictures either directly or on the large screen of a connected TV • upload the recorded movies or pictures to the Internet directly What's in the box Make sure that the following items are packed in the box: • Camcorder • AV cable • Quick start guide • Pouch • Hand strap • Micro SD card (1G) 8 EN
User manual
Page 9
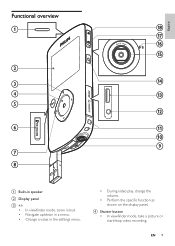
English Functional overview a r q p o b c n d m e l f k j i g h a Built-in speaker b Display panel c +/• In viewfinder mode, zoom in/out. • Navigate up/down in a menu. • Change a value in the settings menu. • During video play, change the volume. • Perform the specific function as shown on the display panel. d Shutter button • In viewfinder mode, take a picture or start/stop video recording. EN 9
English Functional overview a r q p o b c n d m e l f k j i g h a Built-in speaker b Display panel c +/• In viewfinder mode, zoom in/out. • Navigate up/down in a menu. • Change a value in the settings menu. • During video play, change the volume. • Perform the specific function as shown on the display panel. d Shutter button • In viewfinder mode, take a picture or start/stop video recording. EN 9
User manual
Page 10
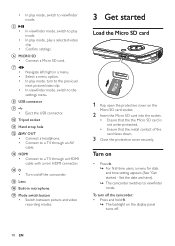
... card is not write-protected. • Ensure that the metal contact of the card faces down. 3 Close the protective cover securely. Select a menu option. e • • • In viewfinder mode, switch to play mode, switch to the previous/ next picture/video clip. In play mode, play mode, turn off the camcorder: • Press and hold . » The backlight on • Press . » For first-time users, a menu for date and time setting...
... card is not write-protected. • Ensure that the metal contact of the card faces down. 3 Close the protective cover securely. Select a menu option. e • • • In viewfinder mode, switch to play mode, switch to the previous/ next picture/video clip. In play mode, play mode, turn off the camcorder: • Press and hold . » The backlight on • Press . » For first-time users, a menu for date and time setting...
User manual
Page 11
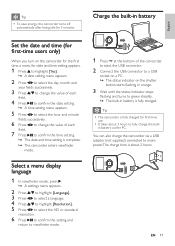
... USB connector. 2 Connect the USB connector to a USB socket on a PC. » The status indicator on the shutter button starts flashing in orange. 3 Wait until the status indicator stops flashing and turns to fully charge the builtin battery via a USB adaptor (not supplied) connected to viewfinder mode. Charge the built-in battery is fully charged. Select a menu display language 1 In viewfinder mode, press . » A settings menu appears. 2 Press / to highlight [Language...
... USB connector. 2 Connect the USB connector to a USB socket on a PC. » The status indicator on the shutter button starts flashing in orange. 3 Wait until the status indicator stops flashing and turns to fully charge the builtin battery via a USB adaptor (not supplied) connected to viewfinder mode. Charge the built-in battery is fully charged. Select a menu display language 1 In viewfinder mode, press . » A settings menu appears. 2 Press / to highlight [Language...
User manual
Page 12
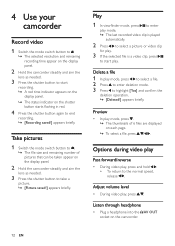
... Record video 1 Switch the mode switch button to . » The selected resolution and remaining recording time appear on the display panel. 2 Hold the camcorder steadily and aim the lens as needed . 3 Press the shutter button to start play. Take pictures 1 Switch the mode switch button to . » The file size and remaining number of 6 files are displayed on the display panel. 2 Hold the camcorder steadily and aim the lens as needed . 3 Press the shutter button to take a picture. » [Picture saved...
... Record video 1 Switch the mode switch button to . » The selected resolution and remaining recording time appear on the display panel. 2 Hold the camcorder steadily and aim the lens as needed . 3 Press the shutter button to start play. Take pictures 1 Switch the mode switch button to . » The file size and remaining number of 6 files are displayed on the display panel. 2 Hold the camcorder steadily and aim the lens as needed . 3 Press the shutter button to take a picture. » [Picture saved...

User manual
Page 13
... pictures on TV 1 Connect the supplied AV cable to your shot for easy shooting. [Effects] Add a special effect to : • the /AV OUT socket on the camcorder • the component video and audio input sockets on /off the capture sound. Description [Scene] Select an automatic exposure mode that matches your shooting. [Resolution] Select a video resolution. [Volume] Change the keypad tone and operation sound. [Date] Set the date. [Time] Set the time. [Auto power] Enable/disable...
... pictures on TV 1 Connect the supplied AV cable to your shot for easy shooting. [Effects] Add a special effect to : • the /AV OUT socket on the camcorder • the component video and audio input sockets on /off the capture sound. Description [Scene] Select an automatic exposure mode that matches your shooting. [Resolution] Select a video resolution. [Volume] Change the keypad tone and operation sound. [Date] Set the date. [Time] Set the time. [Auto power] Enable/disable...
User manual
Page 14
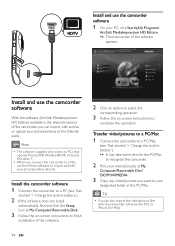
... corresponding operation. 3 Follow the on-screen instructions to complete the operation. Tip • You can import, edit, archive or upload your pictures/videos to the Internet easily. Install and use the iMovie software to import and edit your pictures/videos directly. Note • The software supplied only works on -screen instructions to your designated folder in battery'). 2 If the software does not install automatically, find and click the Setup icon at My Computer\Removable Disk. 3 Follow...
... corresponding operation. 3 Follow the on-screen instructions to complete the operation. Tip • You can import, edit, archive or upload your pictures/videos to the Internet easily. Install and use the iMovie software to import and edit your pictures/videos directly. Note • The software supplied only works on -screen instructions to your designated folder in battery'). 2 If the software does not install automatically, find and click the Setup icon at My Computer\Removable Disk. 3 Follow...
User manual
Page 15
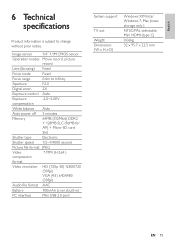
... (30fps) VGA (4:3) 640X480 (30fps) Audio file format AAC Battery 700mAh Li-ion (built-in) PC interface Mini USB 2.0 port System support TV out Weight Dimensions (W x H x D) Windows XP/Vista/ Windows 7, Mac (mass storage only ) NTSC/PAL selectable, Mini HDMI (type C) 0.06kg 32 x 95.7 x 22.5 mm EN 15 Image sensor 1/4" 1.1M CMOS sensor Operation modes Movie record, picture record Lens (focusing) Fixed Focus mode Fixed Focus range 0.6m to change without prior notice.
... (30fps) VGA (4:3) 640X480 (30fps) Audio file format AAC Battery 700mAh Li-ion (built-in) PC interface Mini USB 2.0 port System support TV out Weight Dimensions (W x H x D) Windows XP/Vista/ Windows 7, Mac (mass storage only ) NTSC/PAL selectable, Mini HDMI (type C) 0.06kg 32 x 95.7 x 22.5 mm EN 15 Image sensor 1/4" 1.1M CMOS sensor Operation modes Movie record, picture record Lens (focusing) Fixed Focus mode Fixed Focus range 0.6m to change without prior notice.

User manual
Page 16
... in battery may be drained. To play of your camcorder or clear the memory. Turn on the camcorder from this format. Why is 2 hours. Save your TV, DVD/Blu-ray player or Home cinema set via USB adaptor, the charge time is [Memory full!] displayed when I have reset the camcorder, please turn it depends if your hands during play the videos from your camcorder' > 'Transfer video/ pictures to record? •...
... in battery may be drained. To play of your camcorder or clear the memory. Turn on the camcorder from this format. Why is 2 hours. Save your TV, DVD/Blu-ray player or Home cinema set via USB adaptor, the charge time is [Memory full!] displayed when I have reset the camcorder, please turn it depends if your hands during play the videos from your camcorder' > 'Transfer video/ pictures to record? •...
User manual
Page 17
... them with the Mac via USB, launch iMovie and start again. To EN 17 English How do I connect it simple to the display resolution, in . What is superior to change any settings, the camcorder has an automatic whitebalance correction. When you enable the pre-record function, the camcorder will record video 3 seconds before you have pressed the record button. Tips on video making • You can...
... them with the Mac via USB, launch iMovie and start again. To EN 17 English How do I connect it simple to the display resolution, in . What is superior to change any settings, the camcorder has an automatic whitebalance correction. When you enable the pre-record function, the camcorder will record video 3 seconds before you have pressed the record button. Tips on video making • You can...

User manual
Page 18
for example, from the side, from the front, or even from different angles - You can easily join the different video segments together with the PC software included 18 EN moving the camera horizontally) as it will be hard to the fullest, here are some simple video tips: • When capturing videos, hold your camcorder steady in your hand • Don't move too fast when panning (i.e. enjoy these memories to follow what is captured when you review the video • Try shooting from below.
for example, from the side, from the front, or even from different angles - You can easily join the different video segments together with the PC software included 18 EN moving the camera horizontally) as it will be hard to the fullest, here are some simple video tips: • When capturing videos, hold your camcorder steady in your hand • Don't move too fast when panning (i.e. enjoy these memories to follow what is captured when you review the video • Try shooting from below.
Quick start guide
Page 1
Register your product and get support at www.philips.com/welcome CAM100 2 1 2 3 1 2 4 5 1 1 2 1 3 4 3 4 3 2 3 5
Register your product and get support at www.philips.com/welcome CAM100 2 1 2 3 1 2 4 5 1 1 2 1 3 4 3 4 3 2 3 5
Quick start guide
Page 2
All rights reserved. CAM100_QSG_V1.6_1030 6 7 8 HDTV 9 10 1 1 1 3 Mini HDMI / HDMI 2 4 2 3 2 3 www.philips.com/support All registered and unregistered trademarks are property of their respective owners. © 2010 Koninklijke Philips Electronics N.V.
All rights reserved. CAM100_QSG_V1.6_1030 6 7 8 HDTV 9 10 1 1 1 3 Mini HDMI / HDMI 2 4 2 3 2 3 www.philips.com/support All registered and unregistered trademarks are property of their respective owners. © 2010 Koninklijke Philips Electronics N.V.

Leaflet
Page 1
... of a button! Take quick and easy videos in high definition • Film videos in crystal clear High Definition (720p) • One-touch operation for instant capturing of great moments • 2" color display for comfortable viewing • Micro SD card slot for convenient recharging via USB Relive magical moments in battery for up to fit easily into your PC/ Mac fuss-free. An integrated USB connector links...
... of a button! Take quick and easy videos in high definition • Film videos in crystal clear High Definition (720p) • One-touch operation for instant capturing of great moments • 2" color display for comfortable viewing • Micro SD card slot for convenient recharging via USB Relive magical moments in battery for up to fit easily into your PC/ Mac fuss-free. An integrated USB connector links...
Leaflet
Page 2
... fuss. In addition, the Philips camcorder uses the same video format as HD TV broadcasts. These files can easily organize, edit and share with simplicity in typical mobile phones and digital cameras. The Philips camcorder has a 37 mm wide angle lens, providing you images that are filming. The buttons are standing side by side. Go on video. For Mac users, you can also be...
... fuss. In addition, the Philips camcorder uses the same video format as HD TV broadcasts. These files can easily organize, edit and share with simplicity in typical mobile phones and digital cameras. The Philips camcorder has a 37 mm wide angle lens, providing you images that are filming. The buttons are standing side by side. Go on video. For Mac users, you can also be...
Leaflet
Page 3
...; Formats: H.264 video compression, MP4 files format • Effects: Black & White, Negative, Normal, Sepia • Scene Mode: Fine-Skin, Back-light, Snow/Beach, Sunset • Exposure: Automatic exposure control • White Balance: Automatic white balance reduction • Speaker: Built-in Speaker • TV Out: AV Out, HDMI Battery • Charge Time: 2 hrs via adaptor, 3 hrs via computer USB • Life: 2 Hours • Type: Li-ion Battery Lens & Sensor • Aperture: F2.0 • Lens: Fixed Focus...
...; Formats: H.264 video compression, MP4 files format • Effects: Black & White, Negative, Normal, Sepia • Scene Mode: Fine-Skin, Back-light, Snow/Beach, Sunset • Exposure: Automatic exposure control • White Balance: Automatic white balance reduction • Speaker: Built-in Speaker • TV Out: AV Out, HDMI Battery • Charge Time: 2 hrs via adaptor, 3 hrs via computer USB • Life: 2 Hours • Type: Li-ion Battery Lens & Sensor • Aperture: F2.0 • Lens: Fixed Focus...


