

User manual
Page 2
... wide slot, and fully insert. NO USER-SERVICEABLE PARTS INSIDE. CAUTION: To prevent electric shock, match wide blade of plug to protection by one of the Philips "family," you 'll receive all the privileges of product theft or loss. Retain this is located on our uncompromising commitment to prevent operating and maintenance problems. WARNING: TO PREVENT FIRE OR SHOCK...
... wide slot, and fully insert. NO USER-SERVICEABLE PARTS INSIDE. CAUTION: To prevent electric shock, match wide blade of plug to protection by one of the Philips "family," you 'll receive all the privileges of product theft or loss. Retain this is located on our uncompromising commitment to prevent operating and maintenance problems. WARNING: TO PREVENT FIRE OR SHOCK...

User manual
Page 7
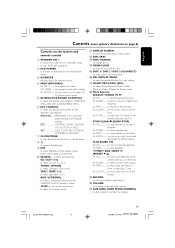
... mode 15 Easy Set 15 Switching the system on 16 Switching the system to Standby mode ........ 16 Switching the system to Eco Power Standby mode 16 Power Saving Automatic Standby 16 Dim mode 16 Volume Control 17 Interactive Sound Control 17-18 CD Operation Discs for Playback 19 Loading Discs 19 Disc Playback 20 Programming the disc tracks 20-21 Repeat 21 Shuffle 21 Radio Reception Storing Preset Radio Stations 22-23 Tuning to Preset Radio Stations 23 Contents External Sources Listening to External Sources 23 Tape Operation/Recording Tape...
... mode 15 Easy Set 15 Switching the system on 16 Switching the system to Standby mode ........ 16 Switching the system to Eco Power Standby mode 16 Power Saving Automatic Standby 16 Dim mode 16 Volume Control 17 Interactive Sound Control 17-18 CD Operation Discs for Playback 19 Loading Discs 19 Disc Playback 20 Programming the disc tracks 20-21 Repeat 21 Shuffle 21 Radio Reception Storing Preset Radio Stations 22-23 Tuning to Preset Radio Stations 23 Contents External Sources Listening to External Sources 23 Tape Operation/Recording Tape...

User manual
Page 8
... mechanical parts of your local power supply. Supplied accessories - All rights reser ved. G If the system is brought directly from a cold to prevent internal heat build-up in the system until normal playback is still consuming some power. AM loop antenna - FM wire antenna - To disconnect the system from the power supply completely, remove the AC power plug from each side. Operation is subject to Standby mode, it is possible. Batteries...
... mechanical parts of your local power supply. Supplied accessories - All rights reser ved. G If the system is brought directly from a cold to prevent internal heat build-up in the system until normal playback is still consuming some power. AM loop antenna - FM wire antenna - To disconnect the system from the power supply completely, remove the AC power plug from each side. Operation is subject to Standby mode, it is possible. Batteries...
User manual
Page 10
...: - Line Out Connection Connect this digital output when recording on any analog audio equipment for playback or recording (CD recorder, tape recorder or amplifier for example). If you can use the supplied speakers. - Subwoofer Out Connection Connect the subwoofer to both the LINE OUT and AUX/CDR IN terminals at the same time. Note: - Use a cinch cable to connect the DIGITAL OUT terminal to the digital input terminal of this manual. Remove batteries if they are...
...: - Line Out Connection Connect this digital output when recording on any analog audio equipment for playback or recording (CD recorder, tape recorder or amplifier for example). If you can use the supplied speakers. - Subwoofer Out Connection Connect the subwoofer to both the LINE OUT and AUX/CDR IN terminals at the same time. Note: - Use a cinch cable to connect the DIGITAL OUT terminal to the digital input terminal of this manual. Remove batteries if they are...

User manual
Page 11
... to audio tracks as they were recorded through the Left, Center, Right, and Surround speakers. The DOLBY PRO LOGIC sound setting allows you to switch on the system. 2 Press TEST TONE on the wall at the ideal sitting position and use the remote control to perform this operation. 1 Press CD, TUNER, TAPE or AUX to adjust the Front Left, Front Right, Center and Surround Sound levels of the room. Dolby Pro Logic Surround sound can...
... to audio tracks as they were recorded through the Left, Center, Right, and Surround speakers. The DOLBY PRO LOGIC sound setting allows you to switch on the system. 2 Press TEST TONE on the wall at the ideal sitting position and use the remote control to perform this operation. 1 Press CD, TUNER, TAPE or AUX to adjust the Front Left, Front Right, Center and Surround Sound levels of the room. Dolby Pro Logic Surround sound can...
User manual
Page 13
... a program. for TAPE to start EASY SET operation. 2 ECO POWER - to open or close the disc tray. % DISC 1 / DISC 2 / DISC 3 (CD DIRECT) - for DEMO ......... (on tape deck 2. ) VOLUME - PERSONAL 1-6, six personal preferred Spectrum Analyzer settings. to select a connected external source : CDR/DVD or AUX (auxiliary) mode. to select waveband : FM or AM. to adjust the TV volume (if the remote operates your TV). to change disc(s). $ OPEN•CLOSE - for TUNER ........ for the selected sound feature. to start playback. í PREV / SIDE / NEXT ë (PRESET...
... a program. for TAPE to start EASY SET operation. 2 ECO POWER - to open or close the disc tray. % DISC 1 / DISC 2 / DISC 3 (CD DIRECT) - for DEMO ......... (on tape deck 2. ) VOLUME - PERSONAL 1-6, six personal preferred Spectrum Analyzer settings. to select a connected external source : CDR/DVD or AUX (auxiliary) mode. to select waveband : FM or AM. to adjust the TV volume (if the remote operates your TV). to change disc(s). $ OPEN•CLOSE - for TUNER ........ for the selected sound feature. to start playback. í PREV / SIDE / NEXT ë (PRESET...

User manual
Page 14
... keys on the remote control (CD 123 or TUNER, for CD to playback all available discs and their tracks/ program in a preset radio station. ‡B - to increase or decrease the high tone. £ AUTO REVERSE - for remote control: - to adjust the BASS/TREBLE level : BASS # $ - to balance the sound level of the Front Left, Front Right, Center and Surround speakers. º CENTER +/- - TREBLE # $ - to activate, deactivate or set the sleep timer. ‹ REAR +/- - to select...
... keys on the remote control (CD 123 or TUNER, for CD to playback all available discs and their tracks/ program in a preset radio station. ‡B - to increase or decrease the high tone. £ AUTO REVERSE - for remote control: - to adjust the BASS/TREBLE level : BASS # $ - to balance the sound level of the Front Left, Front Right, Center and Surround speakers. º CENTER +/- - TREBLE # $ - to activate, deactivate or set the sleep timer. ‹ REAR +/- - to select...

User manual
Page 15
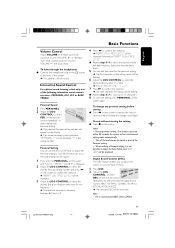
... used . ➜ The last preset radio station will begin. Note: - Before you to Standby mode. PERSONAL DS English Basic Functions STANDBY-ON MINI HIFI SYSTEM ECO POWER IR SENSOR VEC C BASS/TREBLE CD 1•2•3 FM•AM TAPE 1•2 CDR/DVD C 1C•D2 • 3 SEARCH•TUNING BTAUNNDER TAPE DEMO STOP STOP•CLEAR PLAY PAUSE L ACUDRX PRESET L PREV SIDE NEXT PROG CLOCK/ TIMER DIM AUTO REVERSE DUB (HSD) RECORD JOG CONTROL BASS...
... used . ➜ The last preset radio station will begin. Note: - Before you to Standby mode. PERSONAL DS English Basic Functions STANDBY-ON MINI HIFI SYSTEM ECO POWER IR SENSOR VEC C BASS/TREBLE CD 1•2•3 FM•AM TAPE 1•2 CDR/DVD C 1C•D2 • 3 SEARCH•TUNING BTAUNNDER TAPE DEMO STOP STOP•CLEAR PLAY PAUSE L ACUDRX PRESET L PREV SIDE NEXT PROG CLOCK/ TIMER DIM AUTO REVERSE DUB (HSD) RECORD JOG CONTROL BASS...

User manual
Page 16
... the remote control). ➜ The clock will appear on the remote control). ➜ "LOW POWER STANDBY ON" will be displayed, then the display screen will go blank. ➜ The low power STANDBY ON LED will switch to Standby mode In Demonstration mode G Press and hold B on the display when the system is in Standby mode. normal brightness with Spectrum Analyzer On DIM 3 - G Press any one of the DISC DIRECT PLAY buttons or OPEN•CLOSE...
... the remote control). ➜ The clock will appear on the remote control). ➜ "LOW POWER STANDBY ON" will be displayed, then the display screen will go blank. ➜ The low power STANDBY ON LED will switch to Standby mode In Demonstration mode G Press and hold B on the display when the system is in Standby mode. normal brightness with Spectrum Analyzer On DIM 3 - G Press any one of the DISC DIRECT PLAY buttons or OPEN•CLOSE...
User manual
Page 17
... system to adjust the Bass/Treble level, "USE JOG" will be displayed. "X" is pressed within 90 seconds, the system will be encircled. To listen through the headphones G Connect the headphones plug to select the desired Spectrum Analyzer band level for editing will be flashing. Interactive Sound Control For optimal sound listening, select only one of the system. ➜ The speakers will exit the Personal setting mode...
... system to adjust the Bass/Treble level, "USE JOG" will be displayed. "X" is pressed within 90 seconds, the system will be encircled. To listen through the headphones G Connect the headphones plug to select the desired Spectrum Analyzer band level for editing will be flashing. Interactive Sound Control For optimal sound listening, select only one of the system. ➜ The speakers will exit the Personal setting mode...

User manual
Page 18
... discs or tapes might be displayed. If this occurs, deactivate wOOx or reduce the volume. "X" denotes the sound level. Automatic DSC-wOOx / VEC-wOOx selection The best wOOx setting is switched off automatically. - G When wOOx is generated automatically for Bass and Treble. 1 Press BASS/TREBLE (BTC). ➜ The BASS and TREBLE LEDs will be lighted. ➜ "ADAPT BASS AND TREBLE LEVELS" will be displayed. 2 Use the BASS...
... discs or tapes might be displayed. If this occurs, deactivate wOOx or reduce the volume. "X" denotes the sound level. Automatic DSC-wOOx / VEC-wOOx selection The best wOOx setting is switched off automatically. - G When wOOx is generated automatically for Bass and Treble. 1 Press BASS/TREBLE (BTC). ➜ The BASS and TREBLE LEDs will be lighted. ➜ "ADAPT BASS AND TREBLE LEVELS" will be displayed. 2 Use the BASS...
User manual
Page 19
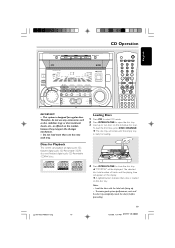
... number of tracks and the playing time will appear on the display. ➜ A lighted button indicates that a disc is ready for loading. 2 DISC CHANGE DISC 1 DISC 2 DISC 3 OPEN•CLOSE CLOCK.TIMER 3 CD CHANGER 2 CD TAPE RECORD TIMER SET DUBBING BAND SHUFFLE TIMER 1 SHUFFLE FMMW 2 SWLW 3 STEREO PRESET RECORD FRONT BACK HSD NR PROGRAM DBB AMPM TIMER TUNING PLAY MODE PROGRAM SET CLOCK SIDE RDS MODE CLEAR 1 DEMO VOLUME 4 Press OPEN•CLOSE to two discs on the individual disc trays. Notes: - To load the third disc, press DISC CHANGE. ➜ The disc tray...
... number of tracks and the playing time will appear on the display. ➜ A lighted button indicates that a disc is ready for loading. 2 DISC CHANGE DISC 1 DISC 2 DISC 3 OPEN•CLOSE CLOCK.TIMER 3 CD CHANGER 2 CD TAPE RECORD TIMER SET DUBBING BAND SHUFFLE TIMER 1 SHUFFLE FMMW 2 SWLW 3 STEREO PRESET RECORD FRONT BACK HSD NR PROGRAM DBB AMPM TIMER TUNING PLAY MODE PROGRAM SET CLOCK SIDE RDS MODE CLEAR 1 DEMO VOLUME 4 Press OPEN•CLOSE to two discs on the individual disc trays. Notes: - To load the third disc, press DISC CHANGE. ➜ The disc tray...

User manual
Page 22
... remote control) to select the desired preset number. ➜ For those radio stations that had been stored in the memory. Note: - English Radio Reception STANDBY-ON MINI HIFI SYSTEM ECO POWER IR SENSOR VEC C BASS/TREBLE PERSONAL DS JOG CONTROL CD 1•2•3 FM•AM TAPE 1•2 CDR/DVD C 1C•D2 • 3 SEARCH•TUNING BTAUNNDER TAPE DEMO STOP STOP•CLEAR PLAY PAUSE L ACUDRX PRESET L PREV SIDE NEXT PROG CLOCK/ TIMER...
... remote control) to select the desired preset number. ➜ For those radio stations that had been stored in the memory. Note: - English Radio Reception STANDBY-ON MINI HIFI SYSTEM ECO POWER IR SENSOR VEC C BASS/TREBLE PERSONAL DS JOG CONTROL CD 1•2•3 FM•AM TAPE 1•2 CDR/DVD C 1C•D2 • 3 SEARCH•TUNING BTAUNNDER TAPE DEMO STOP STOP•CLEAR PLAY PAUSE L ACUDRX PRESET L PREV SIDE NEXT PROG CLOCK/ TIMER...

User manual
Page 23
Radio Reception External Sources MINI HIFI SYSTEM VEC BASS/TREBLE CD 1•2•3 FM•AM TAPE 1•2 CDR/DVD C 1C•D2 • 3 BTAUNNDER TAPE SEARCH•TUNING DEMO STOP STOP•CLEAR PLAY PAUSE L ACUDRX PRESET L PREV SIDE NEXT Listening to External Sources 1 Connect the audio out terminals of the external equipment (TV,VCR, Laser Disc player, DVD player or CD Recorder) to the AUX/CDR IN terminals of this mini system will not...
Radio Reception External Sources MINI HIFI SYSTEM VEC BASS/TREBLE CD 1•2•3 FM•AM TAPE 1•2 CDR/DVD C 1C•D2 • 3 BTAUNNDER TAPE SEARCH•TUNING DEMO STOP STOP•CLEAR PLAY PAUSE L ACUDRX PRESET L PREV SIDE NEXT Listening to External Sources 1 Connect the audio out terminals of the external equipment (TV,VCR, Laser Disc player, DVD player or CD Recorder) to the AUX/CDR IN terminals of this mini system will not...
User manual
Page 26
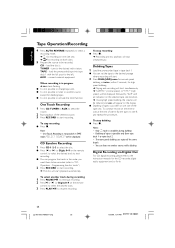
... Tape Operation/Recording 4 Press AUTO REVERSE repeatedly to select a recording mode. ➜ å for recording on one side of tapes is not possible to listen to another source while dubbing. TAPE - AUX - CD Synchro Recording 1 Press CD 1•2•3 to the desired radio station. Programming the disc tracks"). 2 Press RECORD to start recording. Only å mode is in TAPE mode, "SELECT SOURCE" will start playback automatically. To ensure good dubbing, use tapes...
... Tape Operation/Recording 4 Press AUTO REVERSE repeatedly to select a recording mode. ➜ å for recording on one side of tapes is not possible to listen to another source while dubbing. TAPE - AUX - CD Synchro Recording 1 Press CD 1•2•3 to the desired radio station. Programming the disc tracks"). 2 Press RECORD to start recording. Only å mode is in TAPE mode, "SELECT SOURCE" will start playback automatically. To ensure good dubbing, use tapes...
User manual
Page 27
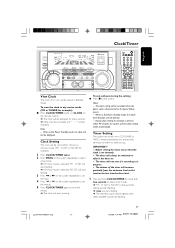
... source will be lighted while other available sources are flashing. To exit without storing the setting G Press Çon the remote control). ➜ The clock will be displayed. Notes: - During clock setting, if no button is pressed within 90 seconds, the system will be set in progress. - Before setting the timer, ensure that the clock is set , "--:--" will not be switched on to CD,TUNER, or TAPE 2 mode automatically at a preset time, serving as an alarm...
... source will be lighted while other available sources are flashing. To exit without storing the setting G Press Çon the remote control). ➜ The clock will be displayed. Notes: - During clock setting, if no button is pressed within 90 seconds, the system will be set in progress. - Before setting the timer, ensure that the clock is set , "--:--" will not be switched on to CD,TUNER, or TAPE 2 mode automatically at a preset time, serving as an alarm...

User manual
Page 28
... the preset time, the selected source will remain on the remote control repeatedly to store the start from the display. To exit without storing the setting G Press Çon the remote control. ➜ The last set and activated. ➜ TIMER will play. If the source selected is TAPE, and if the preset time is displayed, or press the STANDBY ON button. CD - Sleep Timer Setting The sleep timer enables the system to switch to Standby mode automatically at a preset time. 1 Set the clock...
... the preset time, the selected source will remain on the remote control repeatedly to store the start from the display. To exit without storing the setting G Press Çon the remote control. ➜ The last set and activated. ➜ TIMER will play. If the source selected is TAPE, and if the preset time is displayed, or press the STANDBY ON button. CD - Sleep Timer Setting The sleep timer enables the system to switch to Standby mode automatically at a preset time. 1 Set the clock...

User manual
Page 30
... shock. Do not open the system as this will invalidate the warranty. If you try to remedy a problem by playing a cleaning tape once. G Do not use a solution containing alcohol, spirits, ammonia or abrasives. Replace or clean the disc, see "Maintenance". - Cleaning Discs G When a disc becomes dirty, clean it with a mild detergent solution. Problem Solution CD OPERATION "NO DISC" is a risk of tape operation. Wait until the...
... shock. Do not open the system as this will invalidate the warranty. If you try to remedy a problem by playing a cleaning tape once. G Do not use a solution containing alcohol, spirits, ammonia or abrasives. Replace or clean the disc, see "Maintenance". - Cleaning Discs G When a disc becomes dirty, clean it with a mild detergent solution. Problem Solution CD OPERATION "NO DISC" is a risk of tape operation. Wait until the...
User manual
Page 31
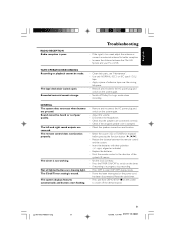
.../OFF to select DIM OFF display mode. - Press DIM to switch on the system again. - Not all lighted buttons are connected correctly. - Replace the batteries. - The timer is erased. Adjust the volume. - Set the clock correctly. - Use only NORMAL (IEC I) or IEC type II (Cr02) tape. - Sound cannot be made. Troubleshooting - The system displays features automatically and buttons start flashing. - Remove and reconnect the AC power plug and switch on the timer. - Point the remote control in progress, stop recording...
.../OFF to select DIM OFF display mode. - Press DIM to switch on the system again. - Not all lighted buttons are connected correctly. - Replace the batteries. - The timer is erased. Adjust the volume. - Set the clock correctly. - Use only NORMAL (IEC I) or IEC type II (Cr02) tape. - Sound cannot be made. Troubleshooting - The system displays features automatically and buttons start flashing. - Remove and reconnect the AC power plug and switch on the timer. - Point the remote control in progress, stop recording...

User manual
Page 32
... above exclusion may have proof of purchase to receive warranty service. BEFORE REQUESTING SERVICE... Warranty coverage begins the day you buy your product. WHAT IS EXCLUDED? Please record the model and serial numbers found on the product, and installation or repair of antenna systems outside of the product. • product repair and/or part replacement because of misuse, accident, unauthorized repair or other document showing that requires modification or...
... above exclusion may have proof of purchase to receive warranty service. BEFORE REQUESTING SERVICE... Warranty coverage begins the day you buy your product. WHAT IS EXCLUDED? Please record the model and serial numbers found on the product, and installation or repair of antenna systems outside of the product. • product repair and/or part replacement because of misuse, accident, unauthorized repair or other document showing that requires modification or...


