

User manual
Page 4
... OR 625 PROGRESSIVE SCAN PICTURE PROBLEMS, IT IS RECOMMENDED THAT THE USER SWITCH THE CONNECTION TO THE 'STANDARD DEFINITION' OUTPUT. This device must accept any interference received, including interference that the...SET COMPATIBILITY WITH THIS MODEL 525p AND 625p DVD PLAYER, PLEASE CONTACT OUR CUSTOMER SERVICE CENTER.' This system complies with the FCC rules, Part 15 and with such new discs. Operation is unable to the following two conditions: - Canada English: This digital apparatus does not exceed the Class B limits for radio noise emissions from digital apparatus as set...
... OR 625 PROGRESSIVE SCAN PICTURE PROBLEMS, IT IS RECOMMENDED THAT THE USER SWITCH THE CONNECTION TO THE 'STANDARD DEFINITION' OUTPUT. This device must accept any interference received, including interference that the...SET COMPATIBILITY WITH THIS MODEL 525p AND 625p DVD PLAYER, PLEASE CONTACT OUR CUSTOMER SERVICE CENTER.' This system complies with the FCC rules, Part 15 and with such new discs. Operation is unable to the following two conditions: - Canada English: This digital apparatus does not exceed the Class B limits for radio noise emissions from digital apparatus as set...
User manual
Page 7
... Other Functions Setting the Sleep timer 33 Sound Control 33 Selecting surround sound 33 Selecting digital sound effects 34 Volume Control 34 Dimming system's display screen 34 Using the remote to your TV 18 Setting the TV shape 18 Step 3: Setting the speakers 19 Test Tone - turning on/off 28 Smart Power - English General Information Supplied accessories 8 Care and safety information 8 Connections Step 1: Placing the speakers and subwoofer .. 9 Step 2: Connecting speakers and subwoofer 10 Step 3: Connecting TV 11 Using Composite Video jack 11 Using Component Video jack...
... Other Functions Setting the Sleep timer 33 Sound Control 33 Selecting surround sound 33 Selecting digital sound effects 34 Volume Control 34 Dimming system's display screen 34 Using the remote to your TV 18 Setting the TV shape 18 Step 3: Setting the speakers 19 Test Tone - turning on/off 28 Smart Power - English General Information Supplied accessories 8 Care and safety information 8 Connections Step 1: Placing the speakers and subwoofer .. 9 Step 2: Connecting speakers and subwoofer 10 Step 3: Connecting TV 11 Using Composite Video jack 11 Using Component Video jack...
User manual
Page 9
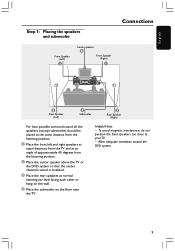
...DVD system. 9 Helpful Hints: - To avoid magnetic interference, do not position the front speakers too close to your TV. - English Step 1: Placing the speakers and subwoofer Front Speaker (Left) 1 Center speaker 2 Front Speaker (Right) 1 Connections 3 Rear Speaker (Left) 4 Subwoofer 3 Rear Speaker (Right) For best possible surround sound, all the speakers (except subwoofer...center speaker above the TV or the DVD system so that the center channel's sound is localized. 3 Place the rear speakers at normal listening ear level facing each other or hang on the wall. 4 Place the subwoofer ...
...DVD system. 9 Helpful Hints: - To avoid magnetic interference, do not position the front speakers too close to your TV. - English Step 1: Placing the speakers and subwoofer Front Speaker (Left) 1 Center speaker 2 Front Speaker (Right) 1 Connections 3 Rear Speaker (Left) 4 Subwoofer 3 Rear Speaker (Right) For best possible surround sound, all the speakers (except subwoofer...center speaker above the TV or the DVD system so that the center channel's sound is localized. 3 Place the rear speakers at normal listening ear level facing each other or hang on the wall. 4 Place the subwoofer ...

User manual
Page 11
... user manual. English Step 3: Connecting TV Option 1 Connections Option 2 1 1 2 2 IMPORTANT! - Connect the DVD system directly to deactivate progressive scan. 11 not supplied) to connect the DVD system's Y Pb Pr jacks to the corresponding Component video input jacks (or labeled as A/ V In, CVBS, Composite or Baseband) on the TV. 2 To hear the TV channels through this DVD system, use the supplied audio cables (white/red) to connect AUDIO IN-TV jacks to the corresponding AUDIO...
... user manual. English Step 3: Connecting TV Option 1 Connections Option 2 1 1 2 2 IMPORTANT! - Connect the DVD system directly to deactivate progressive scan. 11 not supplied) to connect the DVD system's Y Pb Pr jacks to the corresponding Component video input jacks (or labeled as A/ V In, CVBS, Composite or Baseband) on the TV. 2 To hear the TV channels through this DVD system, use the supplied audio cables (white/red) to connect AUDIO IN-TV jacks to the corresponding AUDIO...

User manual
Page 12
... video cable (yellow) to connect the DVD system's VIDEO OUT jack to the video input jack on the RF modulator. 2 Use an RF coaxial cable (not supplied) to connect ANTENNA OUT or TO TV jack on the RF modulator to the ANTENNA IN jack on the TV. 3 Connect the Antenna or Cable TV service signal to your electronics retailer or contact Philips for DVD playback connection, the system's VIDEO OUT setting will need to the corresponding AUDIO OUT jacks...
... video cable (yellow) to connect the DVD system's VIDEO OUT jack to the video input jack on the RF modulator. 2 Use an RF coaxial cable (not supplied) to connect ANTENNA OUT or TO TV jack on the RF modulator to the ANTENNA IN jack on the TV. 3 Connect the Antenna or Cable TV service signal to your electronics retailer or contact Philips for DVD playback connection, the system's VIDEO OUT setting will need to the corresponding AUDIO OUT jacks...
User manual
Page 14
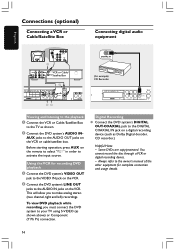
... view DVD playback while recording, you to the AUDIO IN jacks on a digital recording device (such as shown above) or Component (Y Pb Pr) connection. Before starting operation, press AUX on the VCR or cable/satellite box. This will allow you must connect the DVD system to activate the input source. AUX jacks to the AUDIO OUT jacks on the remote to select "AUX" in order to your TV using S-VIDEO (as Dolby Digital decoder, CD recorder.) Helpful...
... view DVD playback while recording, you to the AUDIO IN jacks on a digital recording device (such as shown above) or Component (Y Pb Pr) connection. Before starting operation, press AUX on the VCR or cable/satellite box. This will allow you must connect the DVD system to activate the input source. AUX jacks to the AUDIO OUT jacks on the remote to select "AUX" in order to your TV using S-VIDEO (as Dolby Digital decoder, CD recorder.) Helpful...
User manual
Page 15
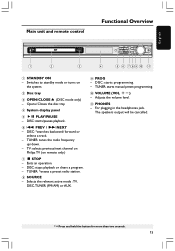
... headphones jack. Opens/ Closes the disc tray. 4 System display panel 5 ÉÅ PLAY/PAUSE - DISC: starts programming. - Switches to standby mode or turns on remote only.) 7 Ç STOP - TUNER: tunes the radio frequency up / down. - TUNER: *erases a preset radio station. 8 SOURCE - The speakers output will be cancelled. * = Press and hold the button for more than two seconds. 15 PHONES - DISC: *searches backward/forward or selects a track. - TV: selects previous/next channel on Philips TV (on the system. 2 Disc tray 3 OPEN /CLOSE 0 (DISC mode only) - DISC...
... headphones jack. Opens/ Closes the disc tray. 4 System display panel 5 ÉÅ PLAY/PAUSE - DISC: starts programming. - Switches to standby mode or turns on remote only.) 7 Ç STOP - TUNER: tunes the radio frequency up / down. - TUNER: *erases a preset radio station. 8 SOURCE - The speakers output will be cancelled. * = Press and hold the button for more than two seconds. 15 PHONES - DISC: *searches backward/forward or selects a track. - TV: selects previous/next channel on Philips TV (on the system. 2 Disc tray 3 OPEN /CLOSE 0 (DISC mode only) - DISC...
User manual
Page 16
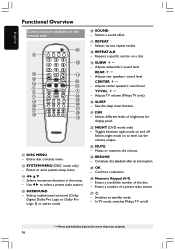
... timer function. ¡ DIM - Enters a track/title number of a preset radio station. ≥B - Repeats a specific section on the remote only 27 8 26 12 10 13 25 14 14 6 6 5 7 24 15 23 16 22 17 21 18 20 19 @ DISC MENU - Adjusts subwoofer's sound level. In TV mode, switches Philips TV on/off . Use 1 2 to standby mode. - Selects a sound effect. & REPEAT - Enters a number of the disc. - Adjusts rear speakers' sound level. Adjusts center speaker's sound level. Toggles between night mode on to level out the volume output. £...
... timer function. ¡ DIM - Enters a track/title number of a preset radio station. ≥B - Repeats a specific section on the remote only 27 8 26 12 10 13 25 14 14 6 6 5 7 24 15 23 16 22 17 21 18 20 19 @ DISC MENU - Adjusts subwoofer's sound level. In TV mode, switches Philips TV on/off . Use 1 2 to standby mode. - Selects a sound effect. & REPEAT - Enters a number of the disc. - Adjusts rear speakers' sound level. Adjusts center speaker's sound level. Toggles between night mode on to level out the volume output. £...
User manual
Page 17
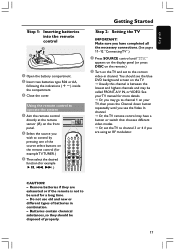
... different types of properly. 17 Using the remote control to operate the system 1 Aim the remote control directly at the remote sensor (iR) on the front panel. 2 Select the source you see the blue DVD background screen on the remote control (for example TV,TUNER.) 3 Then select the desired function (for a long time. - Remove batteries if they should see the Video In channel. ➜ Or, the TV remote control may be disposed of batteries...
... different types of properly. 17 Using the remote control to operate the system 1 Aim the remote control directly at the remote sensor (iR) on the front panel. 2 Select the source you see the blue DVD background screen on the remote control (for example TV,TUNER.) 3 Then select the desired function (for a long time. - Remove batteries if they should see the Video In channel. ➜ Or, the TV remote control may be disposed of batteries...
User manual
Page 19
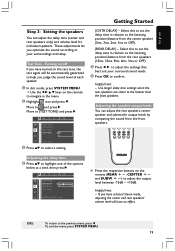
... subwoofer output levels by comparing the sound from the front speakers. Turning on/off If you have turned on the remote (REAR +-, CENTER +and SUBW +-) to adjust the settings that best suit your surroundings and setup. Adjusting the speaker output levels You can adjust the delay time (center and rear speakers only) and volume level for individual speakers. These adjustments let you optimize the sound according to your surround sound needs. 6 Press OK to and press 2. Test Tone - Move to confirm. To exit the menu...
... subwoofer output levels by comparing the sound from the front speakers. Turning on/off If you have turned on the remote (REAR +-, CENTER +and SUBW +-) to adjust the settings that best suit your surroundings and setup. Adjusting the speaker output levels You can adjust the delay time (center and rear speakers only) and volume level for individual speakers. These adjustments let you optimize the sound according to your surround sound needs. 6 Press OK to and press 2. Test Tone - Move to confirm. To exit the menu...
User manual
Page 22
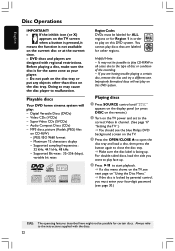
... recording. - Before playing a disc, make sure the disc is not available on the TV. 3 Press the OPEN/CLOSE 0 to open the disc tray and load a disc, then press the button again to the instructions supplied with regional restrictions. Playing discs 1 Press SOURCE control until "DISC" appears on the display panel (or press DISC on the remote.) 2 Turn on the TV power and set to the correct Video In channel. (See page 17 "Setting the TV".) ➜...
... recording. - Before playing a disc, make sure the disc is not available on the TV. 3 Press the OPEN/CLOSE 0 to open the disc tray and load a disc, then press the button again to the instructions supplied with regional restrictions. Playing discs 1 Press SOURCE control until "DISC" appears on the display panel (or press DISC on the remote.) 2 Turn on the TV power and set to the correct Video In channel. (See page 17 "Setting the TV".) ➜...

User manual
Page 24
... Çagain. Always refer to program IMPORTANT! Helpful Hints: - If the DVD system is turned off. Using the menu bar to the instructions supplied with the discs. 24 TIPS: The operating features described here might not be stored. 1 Stop playback, then press PROG on the front panel to enter program mode. 2 Use the numeric keypad (0-9) to enter a valid track number. ➜ "FULL" will appear...
... Çagain. Always refer to program IMPORTANT! Helpful Hints: - If the DVD system is turned off. Using the menu bar to the instructions supplied with the discs. 24 TIPS: The operating features described here might not be stored. 1 Stop playback, then press PROG on the front panel to enter program mode. 2 Use the numeric keypad (0-9) to enter a valid track number. ➜ "FULL" will appear...

User manual
Page 27
... the Setup Menu are using CVBS jack (yellow) to connect the DVD system to enter the menu. You do not need to adjust the video output setting if you to customize the DVD system to suit your TV using the S-Video jack. To exit the menu, press SYSTEM MENU. 27 Then press 3 4 to select one of "Using the Setup Menu" and select : > VIDEO OUT TV SHAPE TV SYSTEM VIDEO OUT PROGRESSIVE SCR SAVER SMART POWER S-VIDEO S-VIDEO YPRPB S-VIDEO Select...
... the Setup Menu are using CVBS jack (yellow) to connect the DVD system to enter the menu. You do not need to adjust the video output setting if you to customize the DVD system to suit your TV using the S-Video jack. To exit the menu, press SYSTEM MENU. 27 Then press 3 4 to select one of "Using the Setup Menu" and select : > VIDEO OUT TV SHAPE TV SYSTEM VIDEO OUT PROGRESSIVE SCR SAVER SMART POWER S-VIDEO S-VIDEO YPRPB S-VIDEO Select...

User manual
Page 29
... surround sound. ON In STOP or NO DISC mode, if no actions are performed for energy saving. turning on the remote. Night mode - ON Select this when you want to an audible level. English DVD Setup Menu Options Smart power - This function can also be accessed via the NIGHT button on /off When the night mode is activated, the high volume outputs will be softened and low volume outputs will switch to standby mode...
... surround sound. ON In STOP or NO DISC mode, if no actions are performed for energy saving. turning on the remote. Night mode - ON Select this when you want to an audible level. English DVD Setup Menu Options Smart power - This function can also be accessed via the NIGHT button on /off When the night mode is activated, the high volume outputs will be softened and low volume outputs will switch to standby mode...
User manual
Page 33
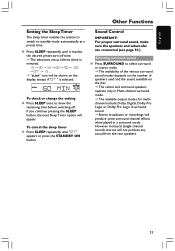
English Other Functions Setting the Sleep Timer The sleep timer enables the system to switch to select surround or stereo mode. ➜ The availability of the various surround sound modes depends on the number of speakers used and the sound available on the disc. ➜ The center and surround speakers operate only in Multi-channel surround mode. ➜ The available output modes for multichannel include: Dolby Digital, Dolby Pro Logic or Dolby Pro Logic II surround sound. ➜ Stereo broadcasts or recordings will...
English Other Functions Setting the Sleep Timer The sleep timer enables the system to switch to select surround or stereo mode. ➜ The availability of the various surround sound modes depends on the number of speakers used and the sound available on the disc. ➜ The center and surround speakers operate only in Multi-channel surround mode. ➜ The available output modes for multichannel include: Dolby Digital, Dolby Pro Logic or Dolby Pro Logic II surround sound. ➜ Stereo broadcasts or recordings will...
User manual
Page 36
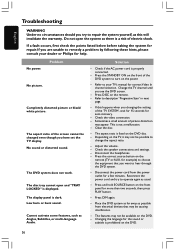
... through the DVD system. - The disc tray cannot open the system as this happens when you changing the setting of the DVD system to turn on the front panel for repair. Press the correct source button on the DVD. 36 Low hum or buzz sound. If you are unable to remedy a problem by following these hints, please consult your TV's manual for help. Adjust the volume. - English Troubleshooting WARNING Under...
... through the DVD system. - The disc tray cannot open the system as this happens when you changing the setting of the DVD system to turn on the front panel for repair. Press the correct source button on the DVD. 36 Low hum or buzz sound. If you are unable to remedy a problem by following these hints, please consult your TV's manual for help. Adjust the volume. - English Troubleshooting WARNING Under...
User manual
Page 37
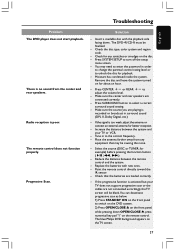
.... - Press CENTER +- or REAR +- Make sure the source you are connected correctly. - If the signal is recorded or broadcast in order to change the parental control rating level or to turn off the setup menu screen. - Replace the batteries with the playback side facing down OPEN/CLOSE 0, press numerical key pad "1" on the TV screen. 37 Check that may need to enter the password in surround sound (DPL II, Dolby Digital, etc.) -
.... - Press CENTER +- or REAR +- Make sure the source you are connected correctly. - If the signal is recorded or broadcast in order to change the parental control rating level or to turn off the setup menu screen. - Replace the batteries with the playback side facing down OPEN/CLOSE 0, press numerical key pad "1" on the TV screen. 37 Check that may need to enter the password in surround sound (DPL II, Dolby Digital, etc.) -
User manual
Page 38
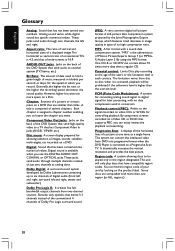
... rates use the DIGITAL AUDIO OUT COAXIAL or OPTICAL jacks.These jacks send audio through two channels, the left and right, center and subwoofer.) Dolby Pro Logic II: It creates five fullbandwidth output channels from disc to six channels of wide-screens is higher than titles. Each chapter is connected to locate the chapter you want. By using menu screens recorded on a Disc. Playback control (PBC): Refers to digital signal for allowing selection of a picture at...
... rates use the DIGITAL AUDIO OUT COAXIAL or OPTICAL jacks.These jacks send audio through two channels, the left and right, center and subwoofer.) Dolby Pro Logic II: It creates five fullbandwidth output channels from disc to six channels of wide-screens is higher than titles. Each chapter is connected to locate the chapter you want. By using menu screens recorded on a Disc. Playback control (PBC): Refers to digital signal for allowing selection of a picture at...
Quick start guide
Page 2
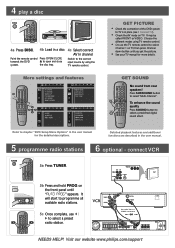
... and additional functions are described in the user manual for more details. Choose the different modes using the TV remote control. Press SURROUND button to open and close system. NEEDS HELP? Visit our website www.philips.com/support 4 play a disc 4a Press DISC. 4b Load in a disc Point the remote control Press OPEN/CLOSE towards the DVD 0 to select "Multi-Channel". To enhance the sound quality Press SOUND button to the correct input source by using TV remote control. • Or, use 1 / 2 to select Channel 1 on...
... and additional functions are described in the user manual for more details. Choose the different modes using the TV remote control. Press SURROUND button to open and close system. NEEDS HELP? Visit our website www.philips.com/support 4 play a disc 4a Press DISC. 4b Load in a disc Point the remote control Press OPEN/CLOSE towards the DVD 0 to select "Multi-Channel". To enhance the sound quality Press SOUND button to the correct input source by using TV remote control. • Or, use 1 / 2 to select Channel 1 on...
Leaflet
Page 3
...; Subwoofer impedance: 3 ohm • Subwoofer driver: 6.5" high efficiency woofer Accessories • Batteries: 2 x AA • Included Accessories: Audio Cable, Video Cable, FM antenna, AM antenna, Quick Use Guide • Remote control: 3139 238 04482 • User Manual: English/ French/ Spanish • Warranty Card: North American version Still Picture Playback • Playback Media: Picture CD • Picture Compression Format: JPEG Tuner/Reception/Transmission • Tuner Bands: FM Stereo, AM • Auto digital tuning • Auto store • Number of Koninklijke Philips...
...; Subwoofer impedance: 3 ohm • Subwoofer driver: 6.5" high efficiency woofer Accessories • Batteries: 2 x AA • Included Accessories: Audio Cable, Video Cable, FM antenna, AM antenna, Quick Use Guide • Remote control: 3139 238 04482 • User Manual: English/ French/ Spanish • Warranty Card: North American version Still Picture Playback • Playback Media: Picture CD • Picture Compression Format: JPEG Tuner/Reception/Transmission • Tuner Bands: FM Stereo, AM • Auto digital tuning • Auto store • Number of Koninklijke Philips...


