
User manual
Page 7
...Sound Control 33 Selecting surround sound 33 Selecting digital sound effects 34 Volume Control 34 Dimming system's display screen 34 Using the remote to operate 'Philips' television 34 Specifications 35 Troubleshooting 36-37 Glossary 38-39 Limited Warranty 40 7 turning on /off 28 Screen saver -... 14 Using the VCR for recording DVD playback 14 Connecting digital audio equipment 14 Digital Recording 14 Functional Overview Main unit and remote control 15 Control buttons available on /off 19 Adjusting the delay time 19 Adjusting the speaker output levels ......... 19 Step 4: ...
...Sound Control 33 Selecting surround sound 33 Selecting digital sound effects 34 Volume Control 34 Dimming system's display screen 34 Using the remote to operate 'Philips' television 34 Specifications 35 Troubleshooting 36-37 Glossary 38-39 Limited Warranty 40 7 turning on /off 28 Screen saver -... 14 Using the VCR for recording DVD playback 14 Connecting digital audio equipment 14 Digital Recording 14 Functional Overview Main unit and remote control 15 Control buttons available on /off 19 Adjusting the delay time 19 Adjusting the speaker output levels ......... 19 Step 4: ...
User manual
Page 8
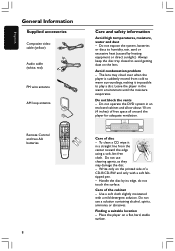
...cabinet and allow about 10 cm (4 inches) of free space all around the player for adequate ventilation. 10 cm (4 inches) 10 cm (4 inches) PHILIPS DVD Home Cinema System 10 cm (4 inches) Care of disc - Use a soft cloth slightly moistened with a soft felttipped pen. - To clean a...hard, stable surface. English General Information Supplied accessories Composite video cable (yellow) Audio cable (white, red) FM wire antenna AM loop antenna Remote Control and two AA batteries 8 Care and safety information Avoid high temperatures, moisture, water and dust - Leave the player in the warm ...
...cabinet and allow about 10 cm (4 inches) of free space all around the player for adequate ventilation. 10 cm (4 inches) 10 cm (4 inches) PHILIPS DVD Home Cinema System 10 cm (4 inches) Care of disc - Use a soft cloth slightly moistened with a soft felttipped pen. - To clean a...hard, stable surface. English General Information Supplied accessories Composite video cable (yellow) Audio cable (white, red) FM wire antenna AM loop antenna Remote Control and two AA batteries 8 Care and safety information Avoid high temperatures, moisture, water and dust - Leave the player in the warm ...
User manual
Page 14
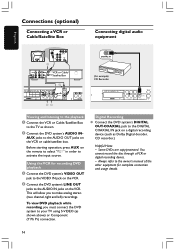
... shown. 2 Connect the DVD system's AUDIO IN- Digital Recording G Connect the DVD system's DIGITAL OUT-COAXIAL jack to the DIGITAL COAXIAL IN jack on the remote to select "AUX" in order to activate the input source. AUX jacks to the AUDIO OUT jacks on the VCR. Always refer to the owner...
... shown. 2 Connect the DVD system's AUDIO IN- Digital Recording G Connect the DVD system's DIGITAL OUT-COAXIAL jack to the DIGITAL COAXIAL IN jack on the remote to select "AUX" in order to activate the input source. AUX jacks to the AUDIO OUT jacks on the VCR. Always refer to the owner...
User manual
Page 15
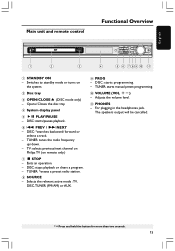
...programming. - For plugging in the headphones jack. TV: selects previous/next channel on Philips TV (on the system. 2 Disc tray 3 OPEN /CLOSE 0 (DISC mode only) - Switches to standby mode or turns on remote only.) 7 Ç STOP - TUNER: tunes the radio frequency up / down.... - TUNER: starts manual preset programming. 0 VOLUME (VOL +-) - DISC: stops playback or clears a program. - English Main unit and remote control Functional Overview 1 2 3 4 5 6 7 8 9 10 11 1 STANDBY ON - DISC: starts/pauses playback. 6 S PREV / T NEXT - The speakers output...
...programming. - For plugging in the headphones jack. TV: selects previous/next channel on Philips TV (on the system. 2 Disc tray 3 OPEN /CLOSE 0 (DISC mode only) - Switches to standby mode or turns on remote only.) 7 Ç STOP - TUNER: tunes the radio frequency up / down.... - TUNER: starts manual preset programming. 0 VOLUME (VOL +-) - DISC: stops playback or clears a program. - English Main unit and remote control Functional Overview 1 2 3 4 5 6 7 8 9 10 11 1 STANDBY ON - DISC: starts/pauses playback. 6 S PREV / T NEXT - The speakers output...
User manual
Page 16
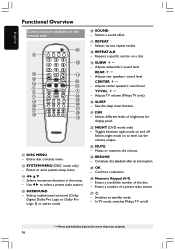
... Press and hold the button for display panel. ™ NIGHT (DVD mode only) - Selects various repeat modes. * REPEAT A-B - CENTER +- Adjusts TV volume (Philips TV only.) ) SLEEP - Toggles between night mode on to level out the volume output. £ MUTE - Continues disc playback after an interruption. ∞ OK... volume. ≤ RESUME - Enters a number of the disc. - Switches to select a preset radio station. % SURROUND - In TV mode, switches Philips TV on the remote only 27 8 26 12 10 13 25 14 14 6 6 5 7 24 15 23 16 22 17 21 18 20 19 @ DISC MENU - ...
... Press and hold the button for display panel. ™ NIGHT (DVD mode only) - Selects various repeat modes. * REPEAT A-B - CENTER +- Adjusts TV volume (Philips TV only.) ) SLEEP - Toggles between night mode on to level out the volume output. £ MUTE - Continues disc playback after an interruption. ∞ OK... volume. ≤ RESUME - Enters a number of the disc. - Switches to select a preset radio station. % SURROUND - In TV mode, switches Philips TV on the remote only 27 8 26 12 10 13 25 14 14 6 6 5 7 24 15 23 16 22 17 21 18 20 19 @ DISC MENU - ...
User manual
Page 17
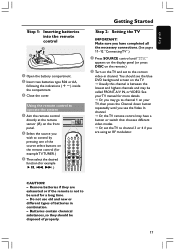
...go to channel 1 on your TV, then press the Channel down button repeatedly until "DISC" appears on the display panel (or press DISC on the remote.) 2 Turn on the TV and set the TV to channel 3 or 4 if you wish to the correct video-in combination. - CAUTION! - ... not to be called FRONT, A/V IN, or VIDEO. Batteries contain chemical substances, so they are using an RF modulator. English Step 1: Inserting batteries into the remote control 3 1 2 1 Open the battery compartment. 2 Insert two batteries type R06 or AA, following the indications (+-) inside the compartment. 3 Close the cover....
...go to channel 1 on your TV, then press the Channel down button repeatedly until "DISC" appears on the display panel (or press DISC on the remote.) 2 Turn on the TV and set the TV to channel 3 or 4 if you wish to the correct video-in combination. - CAUTION! - ... not to be called FRONT, A/V IN, or VIDEO. Batteries contain chemical substances, so they are using an RF modulator. English Step 1: Inserting batteries into the remote control 3 1 2 1 Open the battery compartment. 2 Insert two batteries type R06 or AA, following the indications (+-) inside the compartment. 3 Close the cover....
User manual
Page 18
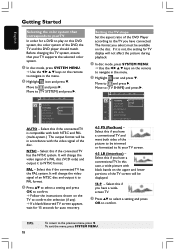
... available on the disc. It will not affect the picture during playback. 1 In disc mode, press SYSTEM MENU. ➜ Use the 1 2 3 4 keys on the remote to navigate in the menu. 2 Highlight icon and press 4. TIPS: 18 To return to confirm. It will change the video signal of an NTSC disc... Selecting the color system that your TV supports the selected color system. 1 In disc mode, press SYSTEM MENU. ➜ Use the 1 2 3 4 keys on the remote to navigate in the menu. 2 Highlight icon and press 4. Before changing the TV system, ensure that corresponds to your TV In order for a DVD to...
... available on the disc. It will not affect the picture during playback. 1 In disc mode, press SYSTEM MENU. ➜ Use the 1 2 3 4 keys on the remote to navigate in the menu. 2 Highlight icon and press 4. TIPS: 18 To return to confirm. It will change the video signal of an NTSC disc... Selecting the color system that your TV supports the selected color system. 1 In disc mode, press SYSTEM MENU. ➜ Use the 1 2 3 4 keys on the remote to navigate in the menu. 2 Highlight icon and press 4. Before changing the TV system, ensure that corresponds to your TV In order for a DVD to...
User manual
Page 19
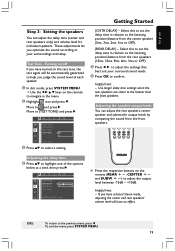
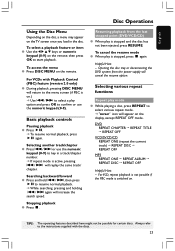
...) and volume level for individual speakers. NIGHT MODE CNTR DELAY REAR DELAY TEST TONE CENTER DELAY SET TO 1 MS G Press the respective buttons on the remote to navigate in relation to the listening position/distance from the rear speakers (15ms, 12ms, 9ms, 6ms, 3ms or OFF). 5 Press 1 2 to ...Adjusting the delay time 4 Press 34 to highlight one of each speaker. 1 In disc mode, press SYSTEM MENU. ➜ Use the 1 2 3 4 keys on the remote (REAR +-, CENTER +and SUBW +-) to adjust the settings that best suit your surroundings and setup. Turning on/off If you optimize the sound according to...
...) and volume level for individual speakers. NIGHT MODE CNTR DELAY REAR DELAY TEST TONE CENTER DELAY SET TO 1 MS G Press the respective buttons on the remote to navigate in relation to the listening position/distance from the rear speakers (15ms, 12ms, 9ms, 6ms, 3ms or OFF). 5 Press 1 2 to ...Adjusting the delay time 4 Press 34 to highlight one of each speaker. 1 In disc mode, press SYSTEM MENU. ➜ Use the 1 2 3 4 keys on the remote (REAR +-, CENTER +and SUBW +-) to adjust the settings that best suit your surroundings and setup. Turning on/off If you optimize the sound according to...

User manual
Page 20
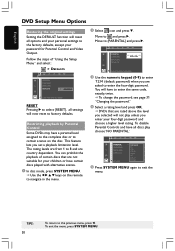
... press 4. To exit the menu, press SYSTEM MENU. On-screen display (OSD) language 1 In disc mode, press SYSTEM MENU. ➜ Use the 1 2 3 4 keys on the remote to confirm. 4 Repeat steps 2~3 for you whenever you set it, regardless of the options below at a time, then press 2. - {AUDIO} (disc's soundtrack) - {SUBTITLE} (disc's subtitles... ENGLISH FRENCH SPANISH Audio, Subtitle and Disc menu language 1 In disc stop mode, stop playback and press SYSTEM MENU. ➜ Use the 1 2 3 4 keys on the remote to and press 2.
... press 4. To exit the menu, press SYSTEM MENU. On-screen display (OSD) language 1 In disc mode, press SYSTEM MENU. ➜ Use the 1 2 3 4 keys on the remote to confirm. 4 Repeat steps 2~3 for you whenever you set it, regardless of the options below at a time, then press 2. - {AUDIO} (disc's soundtrack) - {SUBTITLE} (disc's subtitles... ENGLISH FRENCH SPANISH Audio, Subtitle and Disc menu language 1 In disc stop mode, stop playback and press SYSTEM MENU. ➜ Use the 1 2 3 4 keys on the remote to and press 2.
User manual
Page 21
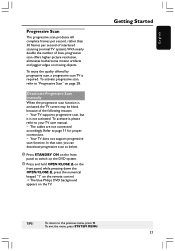
... DVD system. 2 Press and hold OPEN/CLOSE 0 on the front panel, while pressing down the OPEN/CLOSE 0, press the numerical keypad "1" on the remote control. ➜ The blue Philips DVD background appears on the TV. Refer to the previous menu, press 1. Your TV does not support progressive scan function. Deactivate Progressive Scan...
... DVD system. 2 Press and hold OPEN/CLOSE 0 on the front panel, while pressing down the OPEN/CLOSE 0, press the numerical keypad "1" on the remote control. ➜ The blue Philips DVD background appears on the TV. Refer to the previous menu, press 1. Your TV does not support progressive scan function. Deactivate Progressive Scan...
User manual
Page 22
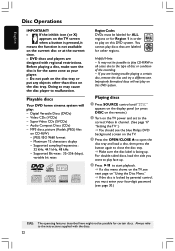
... : 32 kHz, 44.1 kHz, 48 kHz - If you must be possible to start playback. ➜ If a disc menu shows on the TV, see the blue Philips DVD background screen on the current disc or at the current time. - Playing discs 1 Press SOURCE control until "DISC" appears on the display panel (or... press DISC on the remote.) 2 Turn on the TV power and set to play : - For double-sided discs, load the side you want to the correct Video In channel. (See...
... : 32 kHz, 44.1 kHz, 48 kHz - If you must be possible to start playback. ➜ If a disc menu shows on the TV, see the blue Philips DVD background screen on the current disc or at the current time. - Playing discs 1 Press SOURCE control until "DISC" appears on the display panel (or... press DISC on the remote.) 2 Turn on the TV power and set to play : - For double-sided discs, load the side you want to the correct Video In channel. (See...
User manual
Page 23
... S / T again will cancel the resume option. Selecting various repeat functions Repeat play is active, pressing S / T will appear on the remote, then press OK to the menu screen (if PBC is on the remote. TIPS: The operating features described here might not be possible for certain discs. Searching backward/forward G Press and hold...
... S / T again will cancel the resume option. Selecting various repeat functions Repeat play is active, pressing S / T will appear on the remote, then press OK to the menu screen (if PBC is on the remote. TIPS: The operating features described here might not be possible for certain discs. Searching backward/forward G Press and hold...

User manual
Page 25
.... ➜ Use S / T keys to view the previous/next page (if available.) 4 Use 1 2 3 4 keys to navigate within the menu and press OK to turn on the remote. 3 Use 1 2 3 4 keys to select a desired album, then press OK to open the folder (for certain discs. For multi-session discs with the discs. 25 G Use...
.... ➜ Use S / T keys to view the previous/next page (if available.) 4 Use 1 2 3 4 keys to navigate within the menu and press OK to turn on the remote. 3 Use 1 2 3 4 keys to select a desired album, then press OK to open the folder (for certain discs. For multi-session discs with the discs. 25 G Use...

User manual
Page 26
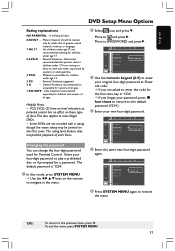
... DVD. SR x1/2, SR x1/4, SR x1/8, PLAY. "XX" - current title/chapter number. You can continue a number of the TV screen. 2 Use 1 2 3 4 keys on the remote to navigate in the menu. ➜ Press 1 2 to move within the enlarged picture on the disc format. English DVD Setup Menu Options Using the menu...
... DVD. SR x1/2, SR x1/4, SR x1/8, PLAY. "XX" - current title/chapter number. You can continue a number of the TV screen. 2 Use 1 2 3 4 keys on the remote to navigate in the menu. ➜ Press 1 2 to move within the enlarged picture on the disc format. English DVD Setup Menu Options Using the menu...

User manual
Page 27
... item will pause. 2 Highlight icon and press 4 to confirm your selection. SETUP MENU Picture Setup Sound Setup Language Setup Feature Setup 3 Use 1 2 3 4 keys on the remote to navigate in "Getting Started." If the Progressive Scan is carried out via the TV, enabling you to customize the DVD system to suit your...
... item will pause. 2 Highlight icon and press 4 to confirm your selection. SETUP MENU Picture Setup Sound Setup Language Setup Feature Setup 3 Use 1 2 3 4 keys on the remote to navigate in "Getting Started." If the Progressive Scan is carried out via the TV, enabling you to customize the DVD system to suit your...

User manual
Page 29
... SYSTEM VIDEO OUT PROGRESSIVE SCR SAVER OFF SMART POWER ON OFF OFF Smart Power is useful for movies with Dolby Digital mode. turning on the remote. This function can also be activated. Night mode - turning on/off When the night mode is only available for watching your favorite action movie without...
... SYSTEM VIDEO OUT PROGRESSIVE SCR SAVER OFF SMART POWER ON OFF OFF Smart Power is useful for movies with Dolby Digital mode. turning on the remote. This function can also be activated. Night mode - turning on/off When the night mode is only available for watching your favorite action movie without...
User manual
Page 30
...) when you are asked to 8 and are rated above the level you selected will not play , choose 'NO PARENTAL.' Move to certain scenes on the remote to navigate in the menu. 2 Select icon and press 4. To exit the menu, press SYSTEM MENU. Follow the steps of certain discs that are country...
...) when you are asked to 8 and are rated above the level you selected will not play , choose 'NO PARENTAL.' Move to certain scenes on the remote to navigate in the menu. 2 Select icon and press 4. To exit the menu, press SYSTEM MENU. Follow the steps of certain discs that are country...
User manual
Page 31
should be printed on the remote to most illegal DVDs. - Parental Guidance suggested. 2 G - Helpful Hints: - Move to {PASSWORD} and press 2. PLEASE ENTER NEW PASSWORD 5 Enter the same new four-digit password ...
should be printed on the remote to most illegal DVDs. - Parental Guidance suggested. 2 G - Helpful Hints: - Move to {PASSWORD} and press 2. PLEASE ENTER NEW PASSWORD 5 Enter the same new four-digit password ...
User manual
Page 32
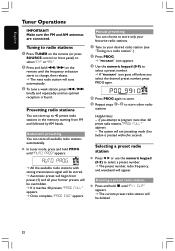
...radio station G Press and hold Ç until an optimal reception is pressed within five seconds. Tuning to radio stations 1 Press TUNER on the remote (or press SOURCE control on front panel) to select "FM" or "AM." 2 Press and hold PROG until the frequency indication starts to ...Repeat steps 1~4 to change, then release. ➜ The next radio station will appear. G In tuner mode, press and hold S / T on the remote until "AUTO PROG" appears. AUTO PROG ➜ All the available radio stations with strong transmission signal will be stored. ➜ Automatic preset will begin from...
...radio station G Press and hold Ç until an optimal reception is pressed within five seconds. Tuning to radio stations 1 Press TUNER on the remote (or press SOURCE control on front panel) to select "FM" or "AM." 2 Press and hold PROG until the frequency indication starts to ...Repeat steps 1~4 to change, then release. ➜ The next radio station will appear. G In tuner mode, press and hold S / T on the remote until "AUTO PROG" appears. AUTO PROG ➜ All the available radio stations with strong transmission signal will be stored. ➜ Automatic preset will begin from...
User manual
Page 34
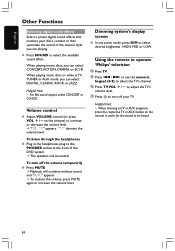
...Select a preset digital sound effects that matches your TV. When listening to TV or AUX programs, press the respective TV or AUX button on the remote) to select the TV's channel. 3 Press TV VOL +/- G Press SOUND to select desired brightness : HIGH, MID or LOW. When playing ...movie discs, you can select: CONCERT, ACTION, DRAMA, or SCI-FI. Using the remote to operate 'Philips' television 1 Press TV. 2 Press S / T or use the numeric keypad (0-9) to increase or decrease the volume level. ➜ "VOL XX" appears.
...Select a preset digital sound effects that matches your TV. When listening to TV or AUX programs, press the respective TV or AUX button on the remote) to select the TV's channel. 3 Press TV VOL +/- G Press SOUND to select desired brightness : HIGH, MID or LOW. When playing ...movie discs, you can select: CONCERT, ACTION, DRAMA, or SCI-FI. Using the remote to operate 'Philips' television 1 Press TV. 2 Press S / T or use the numeric keypad (0-9) to increase or decrease the volume level. ➜ "VOL XX" appears.


