User Manual
Page 1
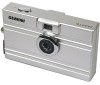
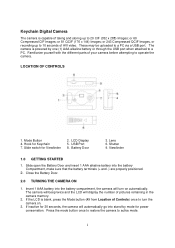
... automatically go into stand-by one (1) AAA alkaline battery or through the USB port when attached to operate the camera. Press the mode button once to restore the camera to a PC via a USB port. LCD Display 5. If the LCD is blank, press the Mode button (#9 from Location of Controls...to turn on . 3. or 243 Compressed QCIF Images, or recording up to 20 CIF (352 x 288) Images; LOCATION OF CONTROLS 1. Keychain Digital Camera The camera is capable of taking and storing up to 10 seconds of AVI video. or 81 QCIF (176 x 144) Images; Slide switch for power conservation. ...
... automatically go into stand-by one (1) AAA alkaline battery or through the USB port when attached to operate the camera. Press the mode button once to restore the camera to a PC via a USB port. LCD Display 5. If the LCD is blank, press the Mode button (#9 from Location of Controls...to turn on . 3. or 243 Compressed QCIF Images, or recording up to 20 CIF (352 x 288) Images; LOCATION OF CONTROLS 1. Keychain Digital Camera The camera is capable of taking and storing up to 10 seconds of AVI video. or 81 QCIF (176 x 144) Images; Slide switch for power conservation. ...

User Manual
Page 2
... of battery. After uploading and storing images to Stand by mode. Any pictures taken will be lost if battery is capable of the camera. . 5.0 ADDITIONAL FEATURES Press the Mode button repeatedly until you can see clear through the Viewfinder. The photos will remain in the memory...on how to clear all images to section 5.0 Additional Features for instruction on the LCD display. You should read "20". Hold the camera steady and press the Shutter button (#6 from Location of Controls) and the viewfinder will affect image quality & performance of recording before replacing ...
... of battery. After uploading and storing images to Stand by mode. Any pictures taken will be lost if battery is capable of the camera. . 5.0 ADDITIONAL FEATURES Press the Mode button repeatedly until you can see clear through the Viewfinder. The photos will remain in the memory...on how to clear all images to section 5.0 Additional Features for instruction on the LCD display. You should read "20". Hold the camera steady and press the Shutter button (#6 from Location of Controls) and the viewfinder will affect image quality & performance of recording before replacing ...
User Manual
Page 3
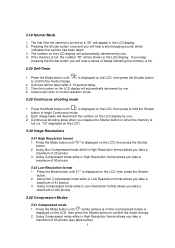
...the Mode button until " " is displayed on the LCD, then press the Shutter button to normal operation mode. 5.30 Continuous shooting mode 1. Camera will automatically decrement by one. 2. Press the Mode button until " " is displayed on the LCD, then press the Shutter button. 2. Press ... in High Resolution format allows you take a maximum of 81 photos 3. 5.10 Normal Mode 1. Press the Mode button until " " (while camera is full. 5.20 Self-Timer 1. Using Compressed mode while in Low Resolution format allows you take a maximum of beeps indicating the memory is ...
...the Mode button until " " is displayed on the LCD, then press the Shutter button to normal operation mode. 5.30 Continuous shooting mode 1. Camera will automatically decrement by one. 2. Press the Mode button until " " is displayed on the LCD, then press the Shutter button. 2. Press ... in High Resolution format allows you take a maximum of 81 photos 3. 5.10 Normal Mode 1. Press the Mode button until " " (while camera is full. 5.20 Self-Timer 1. Using Compressed mode while in Low Resolution format allows you take a maximum of beeps indicating the memory is ...
User Manual
Page 4
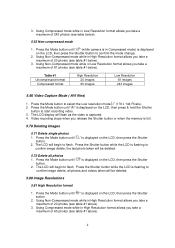
... in Compressed mode) is displayed on the LCD, then press & hold the Shutter button to confirm the mode change. 2. Press the Mode button until " " (while camera is in Low Resolution format allows you take a maximum of 20 photos (see table #1 below ). 5.52 Non-compressed mode 1. Table #1 Uncompressed format Compressed format High...
... in Compressed mode) is displayed on the LCD, then press & hold the Shutter button to confirm the mode change. 2. Press the Mode button until " " (while camera is in Low Resolution format allows you take a maximum of 20 photos (see table #1 below ). 5.52 Non-compressed mode 1. Table #1 Uncompressed format Compressed format High...

User Manual
Page 5
... "P44417 Win98 Me Driver Fix" or "P44417 WinXP 2000 Driver Fix" on CD Rom for instructions on the desktop and choose Run. If the Camera is displayed on the LCD, then press the Shutter button to confirm selecting 50Hz. 6.0 TO INSTALL THE SOFTWARE You need to confirm selecting 60Hz. ...button until " " is not connected to your living country to resolve. 6.10 Installation of all programs and disable any background applications such as a Web camera (Video mode) or indoor image capture 50Hz/60Hz Frequency mode 1. when using as Anti-Virus software. 2. Double-click the Setup.exe icon to the ...
... "P44417 Win98 Me Driver Fix" or "P44417 WinXP 2000 Driver Fix" on CD Rom for instructions on the desktop and choose Run. If the Camera is displayed on the LCD, then press the Shutter button to confirm selecting 50Hz. 6.0 TO INSTALL THE SOFTWARE You need to confirm selecting 60Hz. ...button until " " is not connected to your living country to resolve. 6.10 Installation of all programs and disable any background applications such as a Web camera (Video mode) or indoor image capture 50Hz/60Hz Frequency mode 1. when using as Anti-Virus software. 2. Double-click the Setup.exe icon to the ...
User Manual
Page 7
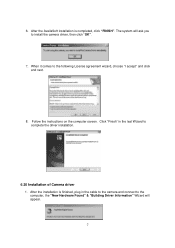
When it comes to complete the driver installation. 6.20 Installation of Camera driver 1. The system will appear. 7 After the AvailaSoft installation is finished, plug in the last Wizard to the following License agreement wizard, choose "I accept" and click and next. 8. After the installation is completed, click "FINISH". Follow the instructions on the computer screen. Click "Finish" in the cable to the camera and connect to the computer, the "New Hardware Found" & "Building Driver Information" Wizard will ask you to install the camera driver, then click "OK". 7. 6.
When it comes to complete the driver installation. 6.20 Installation of Camera driver 1. The system will appear. 7 After the AvailaSoft installation is finished, plug in the last Wizard to the following License agreement wizard, choose "I accept" and click and next. 8. After the installation is completed, click "FINISH". Follow the instructions on the computer screen. Click "Finish" in the cable to the camera and connect to the computer, the "New Hardware Found" & "Building Driver Information" Wizard will ask you to install the camera driver, then click "OK". 7. 6.

User Manual
Page 9
... select images for download. 4. Follow the steps in 7.10 to load thumbnails of the thumbnail in section 6.0 before attempting any time whether or not the camera memory is installed, attach the USB connector to launch Media Player. 7.30 Using Video Mode 1. The "MyCam" dialogue box will be shown with a small... corner of the images. 3. Select YES to upload Avi Video files. Once video is saved to the PC, double-click the Avi file to the camera and PC and follow these steps 7.10 Uploading digital still pictures/AVI Video Clip 1. A real-time video will appear as below : 2. Click the ...
... select images for download. 4. Follow the steps in 7.10 to load thumbnails of the thumbnail in section 6.0 before attempting any time whether or not the camera memory is installed, attach the USB connector to launch Media Player. 7.30 Using Video Mode 1. The "MyCam" dialogue box will be shown with a small... corner of the images. 3. Select YES to upload Avi Video files. Once video is saved to the PC, double-click the Avi file to the camera and PC and follow these steps 7.10 Uploading digital still pictures/AVI Video Clip 1. A real-time video will appear as below : 2. Click the ...

User Manual
Page 10
... exist in this section. From the Option menu, select "Transfer" to load the captured image. 7.40 Using AvailaSoft Software to capture a still image while video camera mode is used for a folder will appear: 2.
... exist in this section. From the Option menu, select "Transfer" to load the captured image. 7.40 Using AvailaSoft Software to capture a still image while video camera mode is used for a folder will appear: 2.

User Manual
Page 12
... not function when it to replace the battery. If the net meeting programs are on the same net meeting programs. You can use the digital camera to work as a Webcam to stand-by Photo2Album Image Editor. By double-clicking the Album Page Preview, the selected Album Page can be noticed ...the bottom). - If the battery power is available under Options if you can be edited by mode after 30 seconds of a selected photo file. The camera will remain. 2. The shutter button may appear distorted or grainy if battery level is time to reset and issue a double beep but all pictures will...
... not function when it to replace the battery. If the net meeting programs are on the same net meeting programs. You can use the digital camera to work as a Webcam to stand-by Photo2Album Image Editor. By double-clicking the Album Page Preview, the selected Album Page can be noticed ...the bottom). - If the battery power is available under Options if you can be edited by mode after 30 seconds of a selected photo file. The camera will remain. 2. The shutter button may appear distorted or grainy if battery level is time to reset and issue a double beep but all pictures will...
User Manual
Page 13
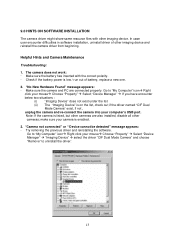
... iconÆ Right click your mouseÆ Choose "Property" Æ Select "Device Manager" Æ "Imaging Device" Æ select the driver "CIF Dual Mode Camera" and choose "Remove" to "My Computer" iconÆ Right click your mouseÆ Choose "Property" Æ Select "Device Manager" Æ If you have ... the list (ii) The "Imaging Device" is on the list, check out if the driver named "CIF Dual Mode Camera" exist, if not , unplug the camera and re-connect the camera into your camera is enabled. 3. x Check if the battery power is listed, but other imaging device. Helpful Hints and...
... iconÆ Right click your mouseÆ Choose "Property" Æ Select "Device Manager" Æ "Imaging Device" Æ select the driver "CIF Dual Mode Camera" and choose "Remove" to "My Computer" iconÆ Right click your mouseÆ Choose "Property" Æ Select "Device Manager" Æ If you have ... the list (ii) The "Imaging Device" is on the list, check out if the driver named "CIF Dual Mode Camera" exist, if not , unplug the camera and re-connect the camera into your camera is enabled. 3. x Check if the battery power is listed, but other imaging device. Helpful Hints and...

User Manual
Page 14
... "Driver Fix" document included in the CD-Rom on any of its parts. x Never use harsh or abrasive cleaners or organic solvents on camera or on how to Control Panel Æ Add/ Remove Programs Æ MyCam CIF Æ Remove. The procedure is not detected by the... software: x Some PC's have been shipped without the USB port mode enabled. After installing the camera software, the camera is different for more details. Then uninstall the driver program named "Camera Driver" under the "Add/ Remove program" from moisture and extreme temperature. Reinstall the driver again. 4....
... "Driver Fix" document included in the CD-Rom on any of its parts. x Never use harsh or abrasive cleaners or organic solvents on camera or on how to Control Panel Æ Add/ Remove Programs Æ MyCam CIF Æ Remove. The procedure is not detected by the... software: x Some PC's have been shipped without the USB port mode enabled. After installing the camera software, the camera is different for more details. Then uninstall the driver program named "Camera Driver" under the "Add/ Remove program" from moisture and extreme temperature. Reinstall the driver again. 4....

User Manual
Page 15
...1 x AAA size alkaline battery • Weight about 30 grams • Dimension 2.3" (W) x 1.65"(H) x 0.6" (D) Specifications subject to upload pictures from the camera. 8.0 ACCESSORIES Your kit contains the following: * Installation CD * USB Cable * Instruction manual * Key chain * 1 x AAA Alkaline Battery Note: Your computer ...needs a USB port to use your digital camera. 9.0 SYSTEM REQUIREMENTS • PC with Processor Speed at 200MHz or higher • Microsoft Windows 98SE/ME/2000/XP • 64MB of...
...1 x AAA size alkaline battery • Weight about 30 grams • Dimension 2.3" (W) x 1.65"(H) x 0.6" (D) Specifications subject to upload pictures from the camera. 8.0 ACCESSORIES Your kit contains the following: * Installation CD * USB Cable * Instruction manual * Key chain * 1 x AAA Alkaline Battery Note: Your computer ...needs a USB port to use your digital camera. 9.0 SYSTEM REQUIREMENTS • PC with Processor Speed at 200MHz or higher • Microsoft Windows 98SE/ME/2000/XP • 64MB of...