
Leaflet
Page 1
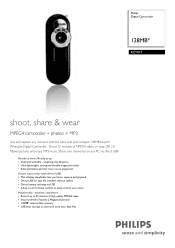
... 25 minutes of high quality MPEG4 video • Snap hundreds of MPEG4 video, or snap 200 2.0 Mpixel pictures and enjoy MP3 music. Philips Digital Camcorder 128MB* KEY019 shoot, share & wear MPEG4 camcorder + photos + MP3 Live and capture any PC via USB • 5-Key in-cord remote control to easily control your music Multimedia - Share...
... 25 minutes of high quality MPEG4 video • Snap hundreds of MPEG4 video, or snap 200 2.0 Mpixel pictures and enjoy MP3 music. Philips Digital Camcorder 128MB* KEY019 shoot, share & wear MPEG4 camcorder + photos + MP3 Live and capture any PC via USB • 5-Key in-cord remote control to easily control your music Multimedia - Share...
Leaflet
Page 2
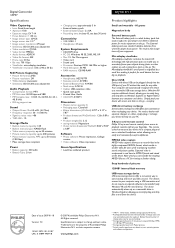
... Snap hundreds of issue 2007-01-18 Version: 7.0 12 NC: 9073 101 01187 UPC: 0 37849 94374 8 © 2007 Koninklijke Philips Electronics N.V. Your computer will be replaced. everyday. MPEG4 video capture MPEG4 video capture allows you to record video in the highly compressed MPEG4... as a removable drive in Windows Explorer allowing you to simply drag and drop files to a PC for music enjoyment on the device. Digital Camcorder 128MB* KEY019/17 Specifications Video Capturing • Lens: Fixed focus length • Aperture: F2.8 • Exposure range: EV 7-14 • Focus ...
... Snap hundreds of issue 2007-01-18 Version: 7.0 12 NC: 9073 101 01187 UPC: 0 37849 94374 8 © 2007 Koninklijke Philips Electronics N.V. Your computer will be replaced. everyday. MPEG4 video capture MPEG4 video capture allows you to record video in the highly compressed MPEG4... as a removable drive in Windows Explorer allowing you to simply drag and drop files to a PC for music enjoyment on the device. Digital Camcorder 128MB* KEY019/17 Specifications Video Capturing • Lens: Fixed focus length • Aperture: F2.8 • Exposure range: EV 7-14 • Focus ...
User manual
Page 3
We hope you enjoy your wearable digital camcorder English 1 Français 23 Deutsch 45 Español 67 Nederlands 89 Italiano 111 Português 133 Svenska 155 Please visit www.philips.com/support and enter your product name to view: · FAQ, Frequently Asked Questions · Latest user manuals · Latest computer software downloads · Firmware upgrade files The model and production numbers can be found next to the USB port. (Please remove the USB cover to see) 1
We hope you enjoy your wearable digital camcorder English 1 Français 23 Deutsch 45 Español 67 Nederlands 89 Italiano 111 Português 133 Svenska 155 Please visit www.philips.com/support and enter your product name to view: · FAQ, Frequently Asked Questions · Latest user manuals · Latest computer software downloads · Firmware upgrade files The model and production numbers can be found next to the USB port. (Please remove the USB cover to see) 1
User manual
Page 5
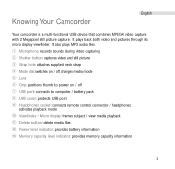
... during video capturing 2 Shutter button: captures video and still picture 3 Strap hole: attaches supplied neck strap 4 Mode dial: switches on / off ; English Knowing Your Camcorder Your camcorder is a multi-functional USB device that combines MPEG4 video capture with 2 Megapixel still picture capture. changes media mode 5 Lens 6 Grip: positions thumb to power on...
... during video capturing 2 Shutter button: captures video and still picture 3 Strap hole: attaches supplied neck strap 4 Mode dial: switches on / off ; English Knowing Your Camcorder Your camcorder is a multi-functional USB device that combines MPEG4 video capture with 2 Megapixel still picture capture. changes media mode 5 Lens 6 Grip: positions thumb to power on...
User manual
Page 6
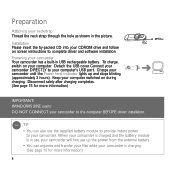
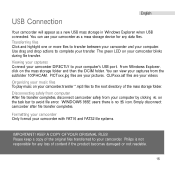
... more information) 4 Detach the USB cover. Preparation Attaching your camcorder Your camcorder has a built-in USB rechargeable battery. To charge, switch on during charging. WINDOWS 98SE users: DO NOT CONNECT your camcorder to complete driver and software installation. Disconnect safely after charging completes...page 15 for more information) IMPORTANT! Installation Please insert the by-packed CD into your computer's USB port. Connect your camcorder DIRECTLY to your CDROM drive and follow on screen instructions to the computer BEFORE driver installation. ➯ TIP • ...
... more information) 4 Detach the USB cover. Preparation Attaching your camcorder Your camcorder has a built-in USB rechargeable battery. To charge, switch on during charging. WINDOWS 98SE users: DO NOT CONNECT your camcorder to complete driver and software installation. Disconnect safely after charging completes...page 15 for more information) IMPORTANT! Installation Please insert the by-packed CD into your computer's USB port. Connect your camcorder DIRECTLY to your CDROM drive and follow on screen instructions to the computer BEFORE driver installation. ➯ TIP • ...
User manual
Page 7
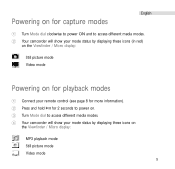
... Press and hold 2; English Powering on for capture modes 1 Turn Mode dial clockwise to power ON and to access different media modes. 4 Your camcorder will show your mode status by displaying these icons (in red) on the Viewfinder / Micro display: Still picture mode Video mode Powering on for playback... modes 1 Connect your remote control (see page 8 for 2 seconds to power on. 3 Turn Mode dial to access different media modes. 2 Your camcorder will show your mode status by displaying these icons on the Viewfinder / Micro display: MP3 playback mode Still picture mode Video mode 5
... Press and hold 2; English Powering on for capture modes 1 Turn Mode dial clockwise to power ON and to access different media modes. 4 Your camcorder will show your mode status by displaying these icons (in red) on the Viewfinder / Micro display: Still picture mode Video mode Powering on for playback... modes 1 Connect your remote control (see page 8 for 2 seconds to power on. 3 Turn Mode dial to access different media modes. 2 Your camcorder will show your mode status by displaying these icons on the Viewfinder / Micro display: MP3 playback mode Still picture mode Video mode 5
User manual
Page 8
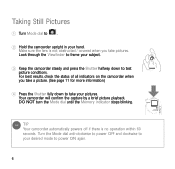
Make sure the lens is no operation within 60 seconds. DO NOT turn the Mode dial until the Memory indicator stops blinking. ➯ TIP Your camcorder automatically powers off if there is not obstructed / covered when you take a picture. (See page 11 for more information) 4 Press the Shutter fully down to ...test picture conditions. Look through the Viewfinder to frame your desired mode to power ON again. 6 Your camcorder will confirm the capture by a brief picture playback. For best results, check the status of all indicators on the...
Make sure the lens is no operation within 60 seconds. DO NOT turn the Mode dial until the Memory indicator stops blinking. ➯ TIP Your camcorder automatically powers off if there is not obstructed / covered when you take a picture. (See page 11 for more information) 4 Press the Shutter fully down to ...test picture conditions. Look through the Viewfinder to frame your desired mode to power ON again. 6 Your camcorder will confirm the capture by a brief picture playback. For best results, check the status of all indicators on the...
User manual
Page 9
...the Memory indicator stops blinking. ➯ TIP Your camcorder automatically powers off if there is not obstructed / covered when you capture. (See page 11 for more information) 4 Press the Shutter again to power ON again. 7 Your camcorder will confirm the capture by saving the captured file.... English 2 Hold the camcorder upright in your subject. 3 Keep the camcorder steady and press the Shutter to . Make sure the lens is no operation within...
...the Memory indicator stops blinking. ➯ TIP Your camcorder automatically powers off if there is not obstructed / covered when you capture. (See page 11 for more information) 4 Press the Shutter again to power ON again. 7 Your camcorder will confirm the capture by saving the captured file.... English 2 Hold the camcorder upright in your subject. 3 Keep the camcorder steady and press the Shutter to . Make sure the lens is no operation within...
User manual
Page 11
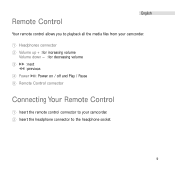
English Remote Control Your remote control allows you to playback all the media files from your camcorder. 1 Headphones connector 2 Volume up + : for increasing volume Volume down − : for decreasing volume 3 22 : next 11 : previous 4 Power 2; : Power on / off and Play / Pause 5 Remote Control connector Connecting Your Remote Control 1 Insert the remote control connector to your camcorder. 2 Insert the headphone connector to the headphone socket. 9
English Remote Control Your remote control allows you to playback all the media files from your camcorder. 1 Headphones connector 2 Volume up + : for increasing volume Volume down − : for decreasing volume 3 22 : next 11 : previous 4 Power 2; : Power on / off and Play / Pause 5 Remote Control connector Connecting Your Remote Control 1 Insert the remote control connector to your camcorder. 2 Insert the headphone connector to the headphone socket. 9
User manual
Page 13
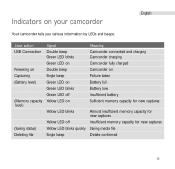
English Indicators on your camcorder Your camcorder tells you various information by LEDs and beeps: User action USB Connection Powering on Capturing (Battery level) (Memory capacity level) (Saving status) Deleting file Signal... Green LED blinks Green LED off Yellow LED on Yellow LED blinks Yellow LED off Yellow LED blinks quickly Single beep Meaning Camcorder connected and charging Camcorder charging Camcorder fully charged Camcorder on Picture taken Battery full Battery low Insufficient battery Sufficient memory capacity for new captures Almost insufficient memory capacity for new captures...
English Indicators on your camcorder Your camcorder tells you various information by LEDs and beeps: User action USB Connection Powering on Capturing (Battery level) (Memory capacity level) (Saving status) Deleting file Signal... Green LED blinks Green LED off Yellow LED on Yellow LED blinks Yellow LED off Yellow LED blinks quickly Single beep Meaning Camcorder connected and charging Camcorder charging Camcorder fully charged Camcorder on Picture taken Battery full Battery low Insufficient battery Sufficient memory capacity for new captures Almost insufficient memory capacity for new captures...
User manual
Page 14
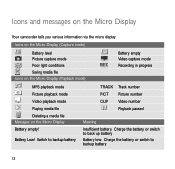
... number Playback paused Meaning Insufficient battery. Charge the battery or switch to backup battery 12 Battery Low! Icons and messages on the Micro Display Your camcorder tells you various information via the micro display: Icons on the Micro Display (Capture mode) Battery level Picture capture mode Poor light conditions Saving media...
... number Playback paused Meaning Insufficient battery. Charge the battery or switch to backup battery 12 Battery Low! Icons and messages on the Micro Display Your camcorder tells you various information via the micro display: Icons on the Micro Display (Capture mode) Battery level Picture capture mode Poor light conditions Saving media...
User manual
Page 15
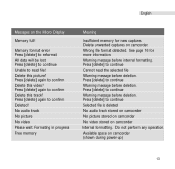
... picture? Do not perform any operation. Available space on camcorder Internal formatting. Press [delete] again to continue Selected file is deleted No audio track stored on camcorder No picture stored on camcorder No video stored on camcorder (shown during power-up) 13 Press [delete] to continue...! Press [delete] again to confirm Deleted! Delete unwanted captures on the Micro Display Memory full! English Messages on camcorder. Formating in progress Free memory Meaning Insufficient memory for more information. Press [delete] again to confirm Delete this track?
... picture? Do not perform any operation. Available space on camcorder Internal formatting. Press [delete] again to continue Selected file is deleted No audio track stored on camcorder No picture stored on camcorder No video stored on camcorder (shown during power-up) 13 Press [delete] to continue...! Press [delete] again to confirm Deleted! Delete unwanted captures on the Micro Display Memory full! English Messages on camcorder. Formating in progress Free memory Meaning Insufficient memory for more information. Press [delete] again to confirm Delete this track?
User manual
Page 17
... directory of the mass storage folder. You can use your camcorder as a new USB mass storage in Windows Explorer when USB connected. Philips is no icon. Viewing your captures Connect your camcorder DIRECTLY to complete your computer. You can view your captures from your camcorder. Use drag and drop actions to your videos. KEEP...
... directory of the mass storage folder. You can use your camcorder as a new USB mass storage in Windows Explorer when USB connected. Philips is no icon. Viewing your captures Connect your camcorder DIRECTLY to complete your computer. You can view your captures from your camcorder. Use drag and drop actions to your videos. KEEP...

User manual
Page 18
Internal Formatting Your camcorder has an internal formatting system. WARNING! BACK UP YOUR DATA VIA USB CONNECTION IF YOU WANT TO KEEP YOUR DATA! (see page 14) 16 The ... used a wrong format system during USB connection. ALL THE DATA IN THE MEMORY WILL BE LOST WHEN YOUR CAMCORDER STARTS INTERNAL FORMATTING! Message on the go. This is to start internal formatting. 2 Your camcorder is activated if you can always use after the screen message Formatting the memory disappears in the micro...
Internal Formatting Your camcorder has an internal formatting system. WARNING! BACK UP YOUR DATA VIA USB CONNECTION IF YOU WANT TO KEEP YOUR DATA! (see page 14) 16 The ... used a wrong format system during USB connection. ALL THE DATA IN THE MEMORY WILL BE LOST WHEN YOUR CAMCORDER STARTS INTERNAL FORMATTING! Message on the go. This is to start internal formatting. 2 Your camcorder is activated if you can always use after the screen message Formatting the memory disappears in the micro...
User manual
Page 19
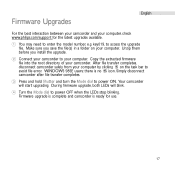
...e.g. Copy the extracted firmware file into the root directory of your computer, check www.philips.com/support for use. 17 English Firmware Upgrades For the best interaction between your camcorder and your camcorder. Your camcorder will blink. 4 Turn the Mode dial to avoid file error. After file transfer completes... before you save the file(s) in a folder on the task bar to power OFF when the LEDs stop blinking. key019, to power ON. Simply disconnect camcorder after file transfer completes. 3 Press and hold Shutter and turn the Mode dial to access the upgrade file. Make sure...
...e.g. Copy the extracted firmware file into the root directory of your computer, check www.philips.com/support for use. 17 English Firmware Upgrades For the best interaction between your camcorder and your camcorder. Your camcorder will blink. 4 Turn the Mode dial to avoid file error. After file transfer completes... before you save the file(s) in a folder on the task bar to power OFF when the LEDs stop blinking. key019, to power ON. Simply disconnect camcorder after file transfer completes. 3 Press and hold Shutter and turn the Mode dial to access the upgrade file. Make sure...
User manual
Page 20
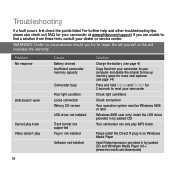
... provided in not installed Software not installed Solution Charge the battery (see page 14) Press and hold Delete and Shutter for your camcorder Check light conditions Check connection Your operation system must be Windows 98SE or later Windows 98SE user only: install the USB driver provided..., consult your dealer or service center. Troubleshooting If a fault occurs, first check the points listed. If you try to reset your camcorder at www.philips.com/support. For further help and other troubleshooting tips, please also check out FAQ for 2 seconds to repair the set yourself, as...
... provided in not installed Software not installed Solution Charge the battery (see page 14) Press and hold Delete and Shutter for your camcorder Check light conditions Check connection Your operation system must be Windows 98SE or later Windows 98SE user only: install the USB driver provided..., consult your dealer or service center. Troubleshooting If a fault occurs, first check the points listed. If you try to reset your camcorder at www.philips.com/support. For further help and other troubleshooting tips, please also check out FAQ for 2 seconds to repair the set yourself, as...
User manual
Page 21
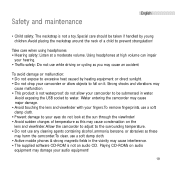
... fields in water. Avoid placing the neckstrap around the neck of temperature as this may cause condensation on audio equipment may harm the camcorder.To clean, use any cleaning agents containing alcohol, ammonia, benzene, or abrasives as you may cause interference. • The supplied ...of a child to water. Avoid exposing the USB socket to prevent strangulation! Playing CD-ROMs on the lens and viewfinder. Allow the camcorder to adjust to excessive heat caused by young children. English Safety and maintenance • Child safety: The neckstrap is not an audio ...
... fields in water. Avoid placing the neckstrap around the neck of temperature as this may cause condensation on audio equipment may harm the camcorder.To clean, use any cleaning agents containing alcohol, ammonia, benzene, or abrasives as you may cause interference. • The supplied ...of a child to water. Avoid exposing the USB socket to prevent strangulation! Playing CD-ROMs on the lens and viewfinder. Allow the camcorder to adjust to excessive heat caused by young children. English Safety and maintenance • Child safety: The neckstrap is not an audio ...