
Leaflet
Page 1
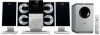
Philips Micro Hi-Fi System MCM309R A 4-disc music system made for enhanced audio enjoyment Watch your Philips GoGear and iPod music via DC276 docking kit. Unlimited listening pleasure • Play and charge your iPod and GoGear • Enjoy MP3/WMA music directly from your portable USB devices • Play MP3/WMA-CD, CD and CD-RW Enrich your sound experience • Digital Sound Control for optimized music style settings • Dynamic Bass Boost for deep and dramatic sound • Incredible Surround™...
Philips Micro Hi-Fi System MCM309R A 4-disc music system made for enhanced audio enjoyment Watch your Philips GoGear and iPod music via DC276 docking kit. Unlimited listening pleasure • Play and charge your iPod and GoGear • Enjoy MP3/WMA music directly from your portable USB devices • Play MP3/WMA-CD, CD and CD-RW Enrich your sound experience • Digital Sound Control for optimized music style settings • Dynamic Bass Boost for deep and dramatic sound • Incredible Surround™...

Leaflet
Page 2
... bass content of the music throughout the range of a button whenever you can enjoy consistent sound even when you are playing. Your digital music will be switched on your Philips Hi-Fi system. from Philips that it easy for you a choice of sound, without the use to high - To counteract this system. Micro Hi-Fi System Highlights MCM309R/37 Play and charge iPod/GoGear Play and charge your iPod and GoGear USB Direct...
... bass content of the music throughout the range of a button whenever you can enjoy consistent sound even when you are playing. Your digital music will be switched on your Philips Hi-Fi system. from Philips that it easy for you a choice of sound, without the use to high - To counteract this system. Micro Hi-Fi System Highlights MCM309R/37 Play and charge iPod/GoGear Play and charge your iPod and GoGear USB Direct...

Leaflet
Page 3
... • Weight incl. Micro Hi-Fi System Specifications MCM309R/37 Sound • Output power (RMS): 2x20W + 60W • Sound Enhancement: Digital Sound Control 4 modes, Dynamic Bass Boost, Incredible Surround Loudspeakers • Main Speaker: Bass Reflex Speaker System, 4" woofer • Subwoofer type: Active Audio Playback • Number of Koninklijke Philips Electronics N.V. All Rights reserved. Packaging: 18 kg Power • Power supply: 120V, 60Hz • Issue date 2009-11-06 Version: 2.1.7 12 NC: 8670 000 30347 UPC: 6 09585 13378...
... • Weight incl. Micro Hi-Fi System Specifications MCM309R/37 Sound • Output power (RMS): 2x20W + 60W • Sound Enhancement: Digital Sound Control 4 modes, Dynamic Bass Boost, Incredible Surround Loudspeakers • Main Speaker: Bass Reflex Speaker System, 4" woofer • Subwoofer type: Active Audio Playback • Number of Koninklijke Philips Electronics N.V. All Rights reserved. Packaging: 18 kg Power • Power supply: 120V, 60Hz • Issue date 2009-11-06 Version: 2.1.7 12 NC: 8670 000 30347 UPC: 6 09585 13378...

User manual
Page 8
...Switching the system to Eco Power Standby mode 16 Power Saving Automatic Standby 16 Adjusting volume and sound 16 Dimming the display screen 16 CD/MP3-CD Operation Discs for playback 17 About MP3 disc 17 Loading a disc 17 Basic playback controls 18~19 Different play modes: SHUFFLE and REPEAT 19 Programming track numbers 19 Erasing the programme 19 Radio Reception Tuning to radio stations 20 Programming radio stations 20~21 Automatic programming Manual programming Tuning to preset radio stations 21 External Sources Using a USB mass storage device 22~23 Dock (optional) Compatible...
...Switching the system to Eco Power Standby mode 16 Power Saving Automatic Standby 16 Adjusting volume and sound 16 Dimming the display screen 16 CD/MP3-CD Operation Discs for playback 17 About MP3 disc 17 Loading a disc 17 Basic playback controls 18~19 Different play modes: SHUFFLE and REPEAT 19 Programming track numbers 19 Erasing the programme 19 Radio Reception Tuning to radio stations 20 Programming radio stations 20~21 Automatic programming Manual programming Tuning to preset radio stations 21 External Sources Using a USB mass storage device 22~23 Dock (optional) Compatible...
User manual
Page 9
... local power supply. wall mounting kit - docking cable Safety Information ● Before operating the system, check that the operating voltage indicated on the typeplate (or the voltage indication beside the voltage selector) of your system is identical with no disc in a very damp room, moisture may condense on the apparatus. ● Install this occur, the CD player would not operate normally. Leave the power on...
... local power supply. wall mounting kit - docking cable Safety Information ● Before operating the system, check that the operating voltage indicated on the typeplate (or the voltage indication beside the voltage selector) of your system is identical with no disc in a very damp room, moisture may condense on the apparatus. ● Install this occur, the CD player would not operate normally. Leave the power on...
User manual
Page 11
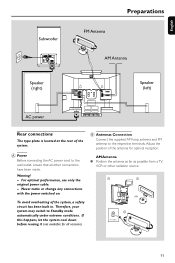
..., use only the original power cable. - Adjust the position of the system, a safety circuit has been built in. Therefore, your system may switch to the respective terminals. B Antennas Connection Connect the supplied AM loop antenna and FM antenna to Standby mode automatically under extreme conditions. English Subwoofer FM Antenna Preparations AM Antenna Speaker (right) Speaker (left) AC power CONNECT TO SUB WOOFER Rear connections The type plate is located at the rear of the system. A Power Before connecting the...
..., use only the original power cable. - Adjust the position of the system, a safety circuit has been built in. Therefore, your system may switch to the respective terminals. B Antennas Connection Connect the supplied AM loop antenna and FM antenna to Standby mode automatically under extreme conditions. English Subwoofer FM Antenna Preparations AM Antenna Speaker (right) Speaker (left) AC power CONNECT TO SUB WOOFER Rear connections The type plate is located at the rear of the system. A Power Before connecting the...
User manual
Page 12
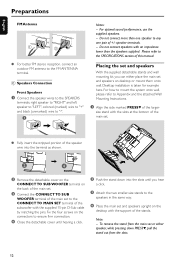
... the supplied 15-pin D-Sub cable by matching the pins. For optimal sound performance, use the supplied speakers. - Do not connect speakers with an impedance lower than one speaker to the CONNECT TO MAIN SET terminal of +/- Fix the four screws on the connectors to Appendix and the attached Wall Mounting Instructions. 1 Align the side marked PRESS4 of the stands. For how to mount the system...
... the supplied 15-pin D-Sub cable by matching the pins. For optimal sound performance, use the supplied speakers. - Do not connect speakers with an impedance lower than one speaker to the CONNECT TO MAIN SET terminal of +/- Fix the four screws on the connectors to Appendix and the attached Wall Mounting Instructions. 1 Align the side marked PRESS4 of the stands. For how to mount the system...

User manual
Page 13
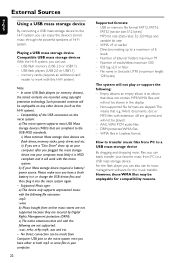
... new or different types of the USB cable (not supplied) to the socket on the set . Using the Remote Control to operate the Player 1 Aim the Remote Control directly at the remote sensor (IR) on the set . English Preparations Connecting a USB device or memory card By connecting a USB mass storage device (including USB flash memory, USB flash players or memory cards) to the Hi-Fi system, you can enjoy the device's stored music through the powerful speakers of properly. 13
... new or different types of the USB cable (not supplied) to the socket on the set . Using the Remote Control to operate the Player 1 Aim the Remote Control directly at the remote sensor (IR) on the set . English Preparations Connecting a USB device or memory card By connecting a USB mass storage device (including USB flash memory, USB flash players or memory cards) to the Hi-Fi system, you can enjoy the device's stored music through the powerful speakers of properly. 13
User manual
Page 14
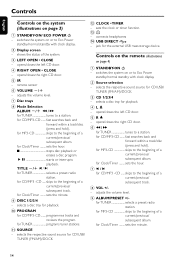
... a disc program starts or interrupts playback. TITLE for TUNER programs tuner stations. ! sets the minute. 9 DISC 1/2/3/4 - programmes tracks and reviews the program. for TUNER selects a preset radio station. adjusts the volume level. 9 ALBUM/PRESET +/- for TUNER tunes to a station. for CD/USB/ TUNER (FM/AM)/DOCK. 3 CD 1/2/3/4 - sets the clock or timer function. #n - switches the system on page 4) 1 STANDBY-ON B - opens/closes the left CD door. 5 Rç - selects the respective sound source for CD/MP3 -CD ...... sets the minute. 14 switches the system on...
... a disc program starts or interrupts playback. TITLE for TUNER programs tuner stations. ! sets the minute. 9 DISC 1/2/3/4 - programmes tracks and reviews the program. for TUNER selects a preset radio station. adjusts the volume level. 9 ALBUM/PRESET +/- for TUNER tunes to a station. for CD/USB/ TUNER (FM/AM)/DOCK. 3 CD 1/2/3/4 - sets the clock or timer function. #n - switches the system on page 4) 1 STANDBY-ON B - opens/closes the left CD door. 5 Rç - selects the respective sound source for CD/MP3 -CD ...... sets the minute. 14 switches the system on...

User manual
Page 15
... a disc program. @ MUTE - for example 15 English turns on the remote control (for the display screen. ( SLEEP - activates/deactivates or selects the sleeper time. ) TIMER ON/OFF - activates/deactivates the timer function. ¡ TIMER - Then select the desired function (for TUNER programs tuner stations. * DIM - starts or interrupts playback. !9 - activates or deactivates the surround sound effect. $ DBB (Dynamic Bass Boost) - selects a track for playback directly. & PROGRAM for this version) • DSC (Digital Sound Control) - repeats a track/disc program/entire disc...
... a disc program. @ MUTE - for example 15 English turns on the remote control (for the display screen. ( SLEEP - activates/deactivates or selects the sleeper time. ) TIMER ON/OFF - activates/deactivates the timer function. ¡ TIMER - Then select the desired function (for TUNER programs tuner stations. * DIM - starts or interrupts playback. !9 - activates or deactivates the surround sound effect. $ DBB (Dynamic Bass Boost) - selects a track for playback directly. & PROGRAM for this version) • DSC (Digital Sound Control) - repeats a track/disc program/entire disc...
User manual
Page 16
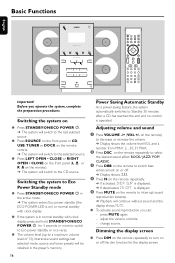
... standby with clock display, press and hold STANDBY-ON/ECO POWER 2 for the display screen. 16 Basic Functions English DISC 2 USB DIRECT DISC 4 Important! Switching the system to the CD source. Adjusting volume and sound 1 Press VOLUME -/+ (VOL +/- Switching the system on ● Press STANDBY-ON/ECO POWER 2. ➜ The system will switch to the last selected source. ● Press SOURCE on the front panel or CD, USB, TUNER or DOCK on the remote control. ➜ The system will switch to Eco Power Standby mode ● Press STANDBY-ON/ECO POWER...
... standby with clock display, press and hold STANDBY-ON/ECO POWER 2 for the display screen. 16 Basic Functions English DISC 2 USB DIRECT DISC 4 Important! Switching the system to the CD source. Adjusting volume and sound 1 Press VOLUME -/+ (VOL +/- Switching the system on ● Press STANDBY-ON/ECO POWER 2. ➜ The system will switch to the last selected source. ● Press SOURCE on the front panel or CD, USB, TUNER or DOCK on the remote control. ➜ The system will switch to Eco Power Standby mode ● Press STANDBY-ON/ECO POWER...
User manual
Page 17
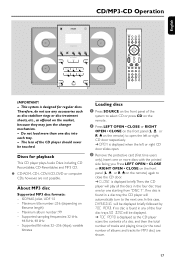
... t one disc into each tray. - This system is displayed briefly.Then, the CD player will automatically turn to open . 3 Remove the protective card (first time users only). Discs for playback This CD player plays Audio Discs including CD Recordables, CD-Rewritables and MP3 CD. ● CD-ROM, CD-I, CDV,VCD, DVD or computer CDs, however, are shown. 17 Maximum title number: 256 (depending on the remote) again to select CD or press CD on the remote. 2 Press LEFT OPEN •...
... t one disc into each tray. - This system is displayed briefly.Then, the CD player will automatically turn to open . 3 Remove the protective card (first time users only). Discs for playback This CD player plays Audio Discs including CD Recordables, CD-Rewritables and MP3 CD. ● CD-ROM, CD-I, CDV,VCD, DVD or computer CDs, however, are shown. 17 Maximum title number: 256 (depending on the remote) again to select CD or press CD on the remote. 2 Press LEFT OPEN •...
User manual
Page 19
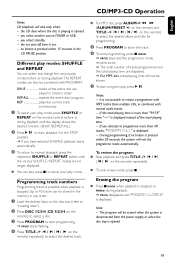
... "Loading discs"). 2 Press DISC 1/2/3/4 (CD 1/2/3/4 on the remote) to select a disc. 3 Press PROGRAM to start playback if in the CD PAUSE position. Up to create a programme with MP3 tracks from the power supply or when the disc tray is displayed. If the total playing time is more than "99:59" then "--:--" is displayed instead of the entire disc are no button is pressed within 20 seconds, the system will...
... "Loading discs"). 2 Press DISC 1/2/3/4 (CD 1/2/3/4 on the remote) to select a disc. 3 Press PROGRAM to start playback if in the CD PAUSE position. Up to create a programme with MP3 tracks from the power supply or when the disc tray is displayed. If the total playing time is more than "99:59" then "--:--" is displayed instead of the entire disc are no button is pressed within 20 seconds, the system will...
User manual
Page 22
... you plugged the mass storage device into the micro system again. - Directory nesting up on any other devices (such as this micro system. AAC,WAV, PCM audio files - For the flash player, you can also use : - USB flash players (USB 2.0 or USB1.1) - memory cards (requires an additional card reader to work with this Hi-Fi system). - b) If your computer. 22 Supported formats: - No Direct connection can easily transfer your favorite music...
... you plugged the mass storage device into the micro system again. - Directory nesting up on any other devices (such as this micro system. AAC,WAV, PCM audio files - For the flash player, you can also use : - USB flash players (USB 2.0 or USB1.1) - memory cards (requires an additional card reader to work with this Hi-Fi system). - b) If your computer. 22 Supported formats: - No Direct connection can easily transfer your favorite music...

User manual
Page 23
... 01 3 Play the USB's audio files as you have not organized MP3/WMA files into any albums on the USB mass storage device This Hi-Fi system will be automatically assigned for details about Windows Media Player and WM DRM (Windows Media Digital Rights Management). 1 Check the USB device has been properly connected. (See Installation: Connecting an additional appliance). 2 Press SOURCE (USB on a CD (See CD/MP3 Operations). if they...
... 01 3 Play the USB's audio files as you have not organized MP3/WMA files into any albums on the USB mass storage device This Hi-Fi system will be automatically assigned for details about Windows Media Player and WM DRM (Windows Media Digital Rights Management). 1 Check the USB device has been properly connected. (See Installation: Connecting an additional appliance). 2 Press SOURCE (USB on a CD (See CD/MP3 Operations). if they...

User manual
Page 25
... MCM309R Micro Hi-Fi System repeatedly or DOCK on the remote to the portable player you use ) to the MCM309R Micro Hi-Fi System by using the dock ● In DOCK mode, directly dock your GoGear or iPod por table player in the cradle. Make sure the dock adapter is compatible. ● Make sure that you have powered on Philips GoGear before selecting DOCK source. ➜ On the display, "GoGear" is displayed if Philips GoGear is connected, or "iPod" is displayed if iPod is connected...
... MCM309R Micro Hi-Fi System repeatedly or DOCK on the remote to the portable player you use ) to the MCM309R Micro Hi-Fi System by using the dock ● In DOCK mode, directly dock your GoGear or iPod por table player in the cradle. Make sure the dock adapter is compatible. ● Make sure that you have powered on Philips GoGear before selecting DOCK source. ➜ On the display, "GoGear" is displayed if Philips GoGear is connected, or "iPod" is displayed if iPod is connected...
User manual
Page 26
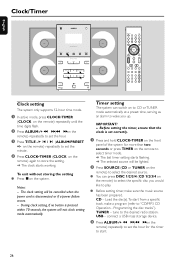
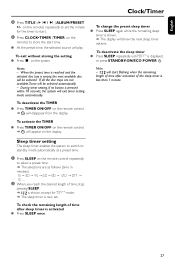
... power cord is set correctly. 1 Press and hold CLOCK•TIMER on the front panel of the system for the timer to the desired radio station. To exit without storing the setting ● Press Çon the remote) to select the specific disc you would like to play. ● Before setting timer, make a program (refer to wake you up. TUNER - USB - on the remote) repeatedly to set the hour. 3 Press TITLE ALBUM/PRESET +/- tune to start...
... power cord is set correctly. 1 Press and hold CLOCK•TIMER on the front panel of the system for the timer to the desired radio station. To exit without storing the setting ● Press Çon the remote) to select the specific disc you would like to play. ● Before setting timer, make a program (refer to wake you up. TUNER - USB - on the remote) repeatedly to set the hour. 3 Press TITLE ALBUM/PRESET +/- tune to start...
User manual
Page 27
... disc will start time. ● At the preset time, the selected source will show the next sleep timer options. During timer setting, if no button is shown. ➜ The display will play. To deactivate the TIMER ● Press TIMER ON/OFF on the remote control. ➜ will appear on the remote control. ➜ will disappear from the display. To activate the TIMER ● Press TIMER ON/OFF on the display. To change the preset sleep timer...
... disc will start time. ● At the preset time, the selected source will show the next sleep timer options. During timer setting, if no button is shown. ➜ The display will play. To deactivate the TIMER ● Press TIMER ON/OFF on the remote control. ➜ will appear on the remote control. ➜ will disappear from the display. To activate the TIMER ● Press TIMER ON/OFF on the display. To change the preset sleep timer...
User manual
Page 28
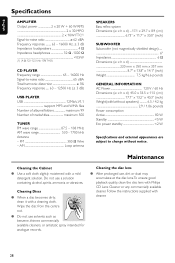
...) CD PLAYER Frequency range 65 - 16000 Hz Signal-to change without speakers 6.5 / 4.2 kg 2.9 / 1.86 pounds Power consumption Active 80 W Standby 5 W Eco power standby 2 W Specifications and external appearance are subject to -noise ratio 65 dBA Total harmonic distortion 3% Frequency response ..... 63 - 12500 Hz (± 3 dB) USB PLAYER USB 12Mb/s,V1.1 support MP3 and WMA files Number of albums/folders maximum 99 Number of tracks/titles maximum 500 TUNER...
...) CD PLAYER Frequency range 65 - 16000 Hz Signal-to change without speakers 6.5 / 4.2 kg 2.9 / 1.86 pounds Power consumption Active 80 W Standby 5 W Eco power standby 2 W Specifications and external appearance are subject to -noise ratio 65 dBA Total harmonic distortion 3% Frequency response ..... 63 - 12500 Hz (± 3 dB) USB PLAYER USB 12Mb/s,V1.1 support MP3 and WMA files Number of albums/folders maximum 99 Number of tracks/titles maximum 500 TUNER...
User manual
Page 29
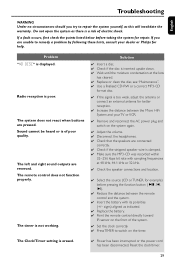
..., adjust the antenna or connect an external antenna for help. The remote control does not function properly. signs) aligned as indicated. ✔ Replace the battery. ✔ Point the remote control directly toward IR sensor on the front of the system. ✔ Set the clock correctly. ✔ Press TIMER to switch on the system again. ✔ Adjust the volume. ✔ Disconnect the headphones. ✔ Check that the speakers are unable to repair the system...
..., adjust the antenna or connect an external antenna for help. The remote control does not function properly. signs) aligned as indicated. ✔ Replace the battery. ✔ Point the remote control directly toward IR sensor on the front of the system. ✔ Set the clock correctly. ✔ Press TIMER to switch on the system again. ✔ Adjust the volume. ✔ Disconnect the headphones. ✔ Check that the speakers are unable to repair the system...


