Leaflet
Page 1
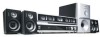
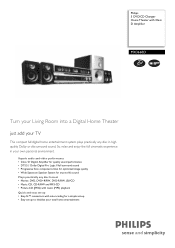
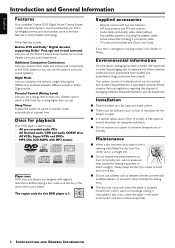
... -life sound Plays practically any disc format • Movies: DVD, DVD+R/RW, DVD-R/RW, (S)VCD • Music: CD, CD-R/RW and MP3-CD • Picture CD (JPEG) with music (MP3) playback Quick and easy set-up • Easy-fit™ connectors with Class D Amplifier MX3660D Turn your Living Room into a Digital Home Theater just add your total home entertainment Superb audio and video performance • Class 'D' Digital Amplifier for quality sound performance • DTS 5.1 Dolby Digital Pro...
... -life sound Plays practically any disc format • Movies: DVD, DVD+R/RW, DVD-R/RW, (S)VCD • Music: CD, CD-R/RW and MP3-CD • Picture CD (JPEG) with music (MP3) playback Quick and easy set-up • Easy-fit™ connectors with Class D Amplifier MX3660D Turn your Living Room into a Digital Home Theater just add your total home entertainment Superb audio and video performance • Class 'D' Digital Amplifier for quality sound performance • DTS 5.1 Dolby Digital Pro...

Leaflet
Page 2
... the packaging box, making setup quick and simple. You can store your MP3 and digital pictures. 5 DVD/CD Changer Home Theater with your music playing simultaneously. or their respective owners. This high efficiency translates into a digital signal and then amplifies the signal digitally. At such a speed, your JPEG's and/or MP3 files on one page in the DVD player, a screen menu will pop up of your system, Philips delivers a Quick Start Guide that uses an...
... the packaging box, making setup quick and simple. You can store your MP3 and digital pictures. 5 DVD/CD Changer Home Theater with your music playing simultaneously. or their respective owners. This high efficiency translates into a digital signal and then amplifies the signal digitally. At such a speed, your JPEG's and/or MP3 files on one page in the DVD player, a screen menu will pop up of your system, Philips delivers a Quick Start Guide that uses an...
User manual
Page 1
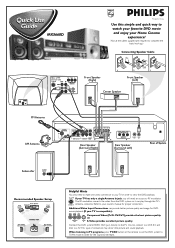
... FL C + SL + SPEAKERS (4 ) Rear Speaker (Surround Right) Pr/Cr Pb/Cb Y Rear Speaker (Surround Left) Rear of connection may distort the picture and sound playback. If your TV is compatible) : Pr/Cr Pb/Cb Y Component Video (Pr/Cr Pb/Cb Y) provides the best picture quality. OR S-VIDEO IN S-Video provides excellent picture quality. Additional Video Input Connections can play through the TV's ANTENNA IN Antenna connector. This type of System Subwoofer AUDIO INPUT Recommended Speaker Setup Helpful Hints You only need an accessory...
... FL C + SL + SPEAKERS (4 ) Rear Speaker (Surround Right) Pr/Cr Pb/Cb Y Rear Speaker (Surround Left) Rear of connection may distort the picture and sound playback. If your TV is compatible) : Pr/Cr Pb/Cb Y Component Video (Pr/Cr Pb/Cb Y) provides the best picture quality. OR S-VIDEO IN S-Video provides excellent picture quality. Additional Video Input Connections can play through the TV's ANTENNA IN Antenna connector. This type of System Subwoofer AUDIO INPUT Recommended Speaker Setup Helpful Hints You only need an accessory...
User manual
Page 2
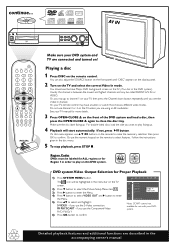
... the blue Philips DVD background screen on the remote control. STANDBY-ON OPEN•CLOSE DVD VIDEO DIGITAL SURROUND SYSTEM SUPER VIDEO PLAY•PAUSE STOP PROGRAM PREV NEXT SURROUND SOURCE VOLUME BASS TREBLE AV IN Make sure your TV, then press the Channel down button repeatedly until "DISC" appears on the display panel. 2 Turn on ! Usually this DVD system. ALL 1 DVD system Video Output Selection for more details. 3 Press OPEN•CLOSE 0 on the front of the DVD system and load a disc, then...
... the blue Philips DVD background screen on the remote control. STANDBY-ON OPEN•CLOSE DVD VIDEO DIGITAL SURROUND SYSTEM SUPER VIDEO PLAY•PAUSE STOP PROGRAM PREV NEXT SURROUND SOURCE VOLUME BASS TREBLE AV IN Make sure your TV, then press the Channel down button repeatedly until "DISC" appears on the display panel. 2 Turn on ! Usually this DVD system. ALL 1 DVD system Video Output Selection for more details. 3 Press OPEN•CLOSE 0 on the front of the DVD system and load a disc, then...
User manual
Page 4
... protection under the terms and conditions of your purchase at http://www.philips.com and thanks for investing in our power to keep you qualify, plus easy access to come. MAC5097 For Customer Use Enter below the Serial No. Warranty Owner Model Verification Registering your product within your right to the "family!" Congratulations on the rear of plug...
... protection under the terms and conditions of your purchase at http://www.philips.com and thanks for investing in our power to keep you qualify, plus easy access to come. MAC5097 For Customer Use Enter below the Serial No. Warranty Owner Model Verification Registering your product within your right to the "family!" Congratulations on the rear of plug...
User manual
Page 5
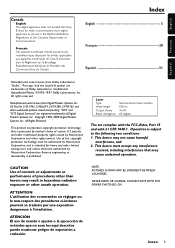
... by method claims of Digital Theater Systems, Inc. All Rights Reversed. Use of Communications. CAUTION Use of controls or adjustments or performance of Dolby Laboratories. NEVER MAKE OR CHANGE CONNECTIONS WITH THE POWER SWITCHED ON. Laser Type Wave length Output Power Beam divergence Semiconductor laser GaAIAs 650nm 7mW 60 degree The set out in hazardous radiation exposure or other unsafe operation. INDEX 3 "Dolby", "Pro-Logic"and the...
... by method claims of Digital Theater Systems, Inc. All Rights Reversed. Use of Communications. CAUTION Use of controls or adjustments or performance of Dolby Laboratories. NEVER MAKE OR CHANGE CONNECTIONS WITH THE POWER SWITCHED ON. Laser Type Wave length Output Power Beam divergence Semiconductor laser GaAIAs 650nm 7mW 60 degree The set out in hazardous radiation exposure or other unsafe operation. INDEX 3 "Dolby", "Pro-Logic"and the...

User manual
Page 7
... 3: Connecting a TV 10 Connecting additional components 10 Preparations Inserting batteries into the remote control 11 Switching on the system 11 Setting up the surround sound system 11-12 Placing the speakers Changing the volume level Setting up the subwoofer 12 System Setup (DVD 12-14 General operation Setting the picture Setting the sound Setting the language Setting the features Basic Functions Selecting the surround sound mode 15 Selecting the digital sound effect 15 Volume control 16 Adjusting the tone 16 Dimming the display screen 16 Contents Operations Discs information...
... 3: Connecting a TV 10 Connecting additional components 10 Preparations Inserting batteries into the remote control 11 Switching on the system 11 Setting up the surround sound system 11-12 Placing the speakers Changing the volume level Setting up the subwoofer 12 System Setup (DVD 12-14 General operation Setting the picture Setting the sound Setting the language Setting the features Basic Functions Selecting the surround sound mode 15 Selecting the digital sound effect 15 Volume control 16 Adjusting the tone 16 Dimming the display screen 16 Contents Operations Discs information...
User manual
Page 8
... surround sound experience. The region code for analog discs. G Do not expose the player, batteries or discs to play a disc. All finalized audio CDR and audio CDRW discs - Five satellite speakers, including five speaker cables - Remote control with two AA batteries - G Do not use the Home Cinema Audio System for the drawer to play : - Before playing a disc, make the packaging easy to the DVD system so you can be sufficient room in DTS and Dolby Digital decoder, R supporting Dolby ProLogic...
... surround sound experience. The region code for analog discs. G Do not expose the player, batteries or discs to play a disc. All finalized audio CDR and audio CDRW discs - Five satellite speakers, including five speaker cables - Remote control with two AA batteries - G Do not use the Home Cinema Audio System for the drawer to play : - Before playing a disc, make the packaging easy to the DVD system so you can be sufficient room in DTS and Dolby Digital decoder, R supporting Dolby ProLogic...
User manual
Page 9
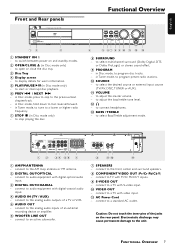
... display details for user's information. 5 PLAY/PAUSEÉÅ(in Tuner mode, to the analog audio outputs of an external recording device or amplifier. 6 WOOFER LINE OUT - in Disc mode, hold down to the AM loop antenna or FM antenna. 2 DIGITAL OUT-OPTICAL - Functional Overview PLAY•PAUSE STOP PROGRAM PREV NEXT SURROUND SOURCE VOLUME BASS TREBLE 4 5 67 8 9 0 ! @ # 8 SURROUND - to adjust the master volume. - to select the desired source or external input source (TV/AV, DISC, TUNER or AUX). ! to the front, center and surround speakers. 8 COMPONENT VIDEO...
... display details for user's information. 5 PLAY/PAUSEÉÅ(in Tuner mode, to the analog audio outputs of an external recording device or amplifier. 6 WOOFER LINE OUT - in Disc mode, hold down to the AM loop antenna or FM antenna. 2 DIGITAL OUT-OPTICAL - Functional Overview PLAY•PAUSE STOP PROGRAM PREV NEXT SURROUND SOURCE VOLUME BASS TREBLE 4 5 67 8 9 0 ! @ # 8 SURROUND - to adjust the master volume. - to select the desired source or external input source (TV/AV, DISC, TUNER or AUX). ! to the front, center and surround speakers. 8 COMPONENT VIDEO...
User manual
Page 10
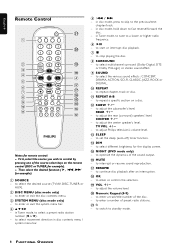
..., ROCK or DIGITAL. 0 REPEAT - to select the desired source (TV/AV, DISC, TUNER or AUX). 2 DISC MENU (disc mode only) - TV VOL +/- - to enter or confirm the selection. ( VOL +/- - to adjust Philips television's volume level. # SLEEP - in Tuner mode, to adjust the volume level. ) Numeric Keypad (0-9) - to select a preset radio station number (1 or 2). - to set the sleep (auto-off) timer function. $ DIM - to stop playing the disc. 8 SURROUND - to enter or exit the disc contents menu. 3 SYSTEM MENU (disc mode only) - to adjust the center speaker's level. to...
..., ROCK or DIGITAL. 0 REPEAT - to select the desired source (TV/AV, DISC, TUNER or AUX). 2 DISC MENU (disc mode only) - TV VOL +/- - to enter or confirm the selection. ( VOL +/- - to adjust Philips television's volume level. # SLEEP - in Tuner mode, to adjust the volume level. ) Numeric Keypad (0-9) - to select a preset radio station number (1 or 2). - to set the sleep (auto-off) timer function. $ DIM - to stop playing the disc. 8 SURROUND - to enter or exit the disc contents menu. 3 SYSTEM MENU (disc mode only) - to adjust the center speaker's level. to...

User manual
Page 11
... S-VIDEO IN L VIDEO IN R Pr/Cr Pb/Cb Y FM Antenna 1 AM Antenna Subwoofer AUDIO INPUT Center Speaker 3 2 AM/FM ANTENNA WOOFER LINE OUT L R OPTICAL COAXIAL DIGITAL OUT AUX TV AUDIO IN AUDIO OUT FR FL C SR FR FL C + SL + SPEAKERS (4 ) 3 Pr/Cr Pb/Cb Y Rear Speaker (Surround Right) Rear Speaker (Surround Left) Rear of the system. Step 1: Connecting antennas AM Indoor Loop Antenna Connect the supplied AM loop antenna to the FM jack. Move the antenna in various directions until the clearest signal...
... S-VIDEO IN L VIDEO IN R Pr/Cr Pb/Cb Y FM Antenna 1 AM Antenna Subwoofer AUDIO INPUT Center Speaker 3 2 AM/FM ANTENNA WOOFER LINE OUT L R OPTICAL COAXIAL DIGITAL OUT AUX TV AUDIO IN AUDIO OUT FR FL C SR FR FL C + SL + SPEAKERS (4 ) 3 Pr/Cr Pb/Cb Y Rear Speaker (Surround Right) Rear Speaker (Surround Left) Rear of the system. Step 1: Connecting antennas AM Indoor Loop Antenna Connect the supplied AM loop antenna to the FM jack. Move the antenna in various directions until the clearest signal...
User manual
Page 12
... make an analog recording. Always refer to the instruction manual of the connected equipment to the S-Video input jack on pages 12-13. Some DVD discs have anti-copying devices, so you will need to be able to record the disc through the home cinema sound system Use the supplied audio cables (white/red) to connect AUDIO IN (TV or AUX) jacks to the corresponding AUDIO OUT jacks on the remote control to the TV broadcast channels...
... make an analog recording. Always refer to the instruction manual of the connected equipment to the S-Video input jack on pages 12-13. Some DVD discs have anti-copying devices, so you will need to be able to record the disc through the home cinema sound system Use the supplied audio cables (white/red) to connect AUDIO IN (TV or AUX) jacks to the corresponding AUDIO OUT jacks on the remote control to the TV broadcast channels...
User manual
Page 13
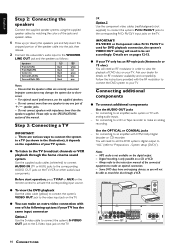
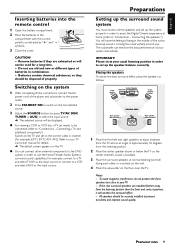
... correct polarity as the input source. Switching on the last selected source. 3 Adjust the SOURCE button (or press TV/AV, DISC, TUNER or AUX) to select the input source. ➜ The selected source will not be used for a long time. - Preparations Setting up the surround sound system You must connect all the connections, connect the AC power cord of properly. IMPORTANT! Notes: - All speakers should be displayed. Batteries contain chemical substances, so they are installed farther away from...
... correct polarity as the input source. Switching on the last selected source. 3 Adjust the SOURCE button (or press TV/AV, DISC, TUNER or AUX) to select the input source. ➜ The selected source will not be used for a long time. - Preparations Setting up the surround sound system You must connect all the connections, connect the AC power cord of properly. IMPORTANT! Notes: - All speakers should be displayed. Batteries contain chemical substances, so they are installed farther away from...
User manual
Page 14
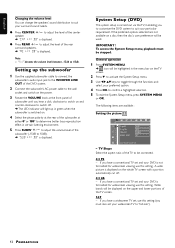
... System Setup menu, press SYSTEM MENU or OK. English Changing the volume level You can change the speakers' sound distribution to suit your particular requirement. G Press CENTER +/- to adjust the level of the DVD system. 2 Connect the subwoofer's AC power cable to the wall socket and switch on and counter-clockwise to 10db. Note: - General operation 1 Press SYSTEM MENU. ➜ icon will light up the subwoofer 1 Use the supplied subwoofer cable to connect the subwoofer's audio input jack to the WOOFER LINE...
... System Setup menu, press SYSTEM MENU or OK. English Changing the volume level You can change the speakers' sound distribution to suit your particular requirement. G Press CENTER +/- to adjust the level of the DVD system. 2 Connect the subwoofer's AC power cable to the wall socket and switch on and counter-clockwise to 10db. Note: - General operation 1 Press SYSTEM MENU. ➜ icon will light up the subwoofer 1 Use the supplied subwoofer cable to connect the subwoofer's audio input jack to the WOOFER LINE...
User manual
Page 15
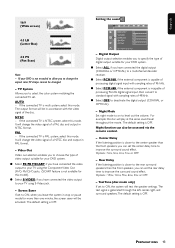
..., the screen saver will test the speaker settings. Digital Output Digital output selection enables you to choose the type of a PAL disc and output in PAL format. - For example, the disc will be accessed via the remote control. - Rear Delay If the listening position is not encoded to allow you have connected the digital output (COAXIAL or OPTICAL) to a multichannel decoder receiver. ¶ Select PCM 96K if the external component is capable of processing digital signal input with...
..., the screen saver will test the speaker settings. Digital Output Digital output selection enables you to choose the type of a PAL disc and output in PAL format. - For example, the disc will be accessed via the remote control. - Rear Delay If the listening position is not encoded to allow you have connected the digital output (COAXIAL or OPTICAL) to a multichannel decoder receiver. ¶ Select PCM 96K if the external component is capable of processing digital signal input with...

User manual
Page 17
... stereo mode. ➜ The availability of the various surround sound modes depend on the disc.The available output modes are delivered through the subwoofer. It requires connection of surround. Front left, center and right join two surround speakers to optimize certain musical styles. Bass rumble, explosions and low frequency effects you have two-channel (front left & right) of speakers used . Selecting the digital sound effect The digital sound effects allow you to select from the surround speakers. English Basic Functions Selecting...
... stereo mode. ➜ The availability of the various surround sound modes depend on the disc.The available output modes are delivered through the subwoofer. It requires connection of surround. Front left, center and right join two surround speakers to optimize certain musical styles. Bass rumble, explosions and low frequency effects you have two-channel (front left & right) of speakers used . Selecting the digital sound effect The digital sound effects allow you to select from the surround speakers. English Basic Functions Selecting...
User manual
Page 19
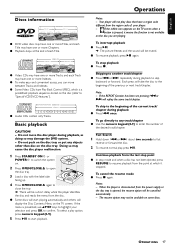
... 2 INDEX 3 G Video CDs may have Play Back Control (PBC), which it means the function is presented, use 341 2 keys to open the disc tray. AUDIO CD TRACKS 1 2 3 4 5 6 7 8 9 10 11 12 ... If the REPEAT function has been set, pressing S or T will display the Disc Contents Menu on . 2 Press OPEN/CLOSE 0 to highlight your player. - OPERATIONS 17 G Playback stops at which is disconnected from the region code of your selection and...
... 2 INDEX 3 G Video CDs may have Play Back Control (PBC), which it means the function is presented, use 341 2 keys to open the disc tray. AUDIO CD TRACKS 1 2 3 4 5 6 7 8 9 10 11 12 ... If the REPEAT function has been set, pressing S or T will display the Disc Contents Menu on . 2 Press OPEN/CLOSE 0 to highlight your player. - OPERATIONS 17 G Playback stops at which is disconnected from the region code of your selection and...

User manual
Page 20
..., select or press PROGRAM to enter program mode. ➜ "P 00:00" is displayed. 2 Use the numeric keypad (0-9) to input the track number in the order you want by programming the order of the tracks to be carried out directly via the menu bar 1 Press SYSTEM MENU and select bar. Changing subtitle language This operation works only on the disc format. Repeat play , press REPEAT A-B again. Repeat A-B You can play a specific section...
..., select or press PROGRAM to enter program mode. ➜ "P 00:00" is displayed. 2 Use the numeric keypad (0-9) to input the track number in the order you want by programming the order of the tracks to be carried out directly via the menu bar 1 Press SYSTEM MENU and select bar. Changing subtitle language This operation works only on the disc format. Repeat play , press REPEAT A-B again. Repeat A-B You can play a specific section...
User manual
Page 24
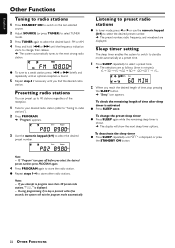
... OTHER FUNCTIONS Presetting radio stations You can preset up to select a preset time. ➜ The selections are displayed. Sleep timer setting The sleep timer enables the system to switch to standby mode automatically at a preset time. 1 Press SLEEP repeatedly to 40 stations regardless of time after sleep timer is displayed, or press the STANDBY ON button. G Repeat steps 1-4 to select the desired preset number. Program Listening to preset radio stations G In tuner mode, press 1 or 2 or use the...
... OTHER FUNCTIONS Presetting radio stations You can preset up to select a preset time. ➜ The selections are displayed. Sleep timer setting The sleep timer enables the system to switch to standby mode automatically at a preset time. 1 Press SLEEP repeatedly to 40 stations regardless of time after sleep timer is displayed, or press the STANDBY ON button. G Repeat steps 1-4 to select the desired preset number. Program Listening to preset radio stations G In tuner mode, press 1 or 2 or use the...
User manual
Page 26
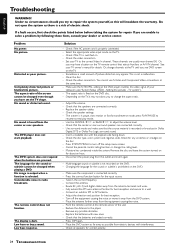
... poor picture. The remote control does not function. Or, you to adjust the volume level. - Sometimes a small amount of picture distortion may not allow you may have set the TV shape. Clean the disc. - You cannot use S-Video and Component Video connections at the remote sensor of electric shock. TV system"). - Replace the speaker cables. - Check that the speakers are unable to resume normal play mode. - Use surround mode and make sure that the source material is...
... poor picture. The remote control does not function. Or, you to adjust the volume level. - Sometimes a small amount of picture distortion may not allow you may have set the TV shape. Clean the disc. - You cannot use S-Video and Component Video connections at the remote sensor of electric shock. TV system"). - Replace the speaker cables. - Check that the speakers are unable to resume normal play mode. - Use surround mode and make sure that the source material is...


