
Leaflet
Page 2
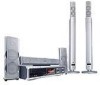
... owners. Select your eye perceives a sharper picture with Cinema Center Speaker™. Packaging: 34.2 kg Convenience • Remote Control: Multi-functional • Twin Subs™ Twin Subs™ give an incredible 'through the screen' experience which suppresses...used by the field with Seating Control™ by four multi-directional woofers and a high frequency tweeter positioned precisely at one /album/all six channels of Koninklijke Philips Electronics N.V. DVD/SACD home theater system Progressive Scan MX5600D/37 Specifications Product highlights Power ...
... owners. Select your eye perceives a sharper picture with Cinema Center Speaker™. Packaging: 34.2 kg Convenience • Remote Control: Multi-functional • Twin Subs™ Twin Subs™ give an incredible 'through the screen' experience which suppresses...used by the field with Seating Control™ by four multi-directional woofers and a high frequency tweeter positioned precisely at one /album/all six channels of Koninklijke Philips Electronics N.V. DVD/SACD home theater system Progressive Scan MX5600D/37 Specifications Product highlights Power ...
User manual
Page 2
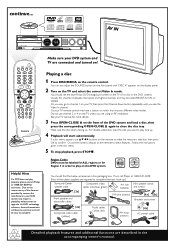
... automatically. You should see the Video In channel. Usually this DVD system. See your TV, then press the Channel down button repeatedly until "DISC X" appears on the display panel. 2 Turn on the remote control. You should find the below accessories in the disc menu. 5 To... a disc menu appears, use the numeric keypad on the TV unless you want to play properly, please contact Philips at 1-800-531-0039. (Not all the cables supplied are described in the DVD system). continue... SUPER VIDEO OPEN•CLOSE DISC 1 DISC 2 DISC 3 DISC 4 DISC 5 DISC 1 DISC 2...
... automatically. You should see the Video In channel. Usually this DVD system. See your TV, then press the Channel down button repeatedly until "DISC X" appears on the display panel. 2 Turn on the remote control. You should find the below accessories in the disc menu. 5 To... a disc menu appears, use the numeric keypad on the TV unless you want to play properly, please contact Philips at 1-800-531-0039. (Not all the cables supplied are described in the DVD system). continue... SUPER VIDEO OPEN•CLOSE DISC 1 DISC 2 DISC 3 DISC 4 DISC 5 DISC 1 DISC 2...
User manual
Page 10
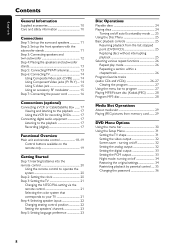
...playback 17 Recording (digital 17 Functional Overview Main unit and remote control 18-19 Control buttons available on the remote only 19 Getting Started Step 1: Inserting batteries into the remote control 20 Using the remote control to operate the system 20 Step 2: Setting the clock 20 Step 3: Setting ...the TV 21 Changing the NTSC/PAL setting via the remote control 21 Selecting the color system that corresponds to program 27 Playing ...
...playback 17 Recording (digital 17 Functional Overview Main unit and remote control 18-19 Control buttons available on the remote only 19 Getting Started Step 1: Inserting batteries into the remote control 20 Using the remote control to operate the system 20 Step 2: Setting the clock 20 Step 3: Setting ...the TV 21 Changing the NTSC/PAL setting via the remote control 21 Selecting the color system that corresponds to program 27 Playing ...

User manual
Page 11
... station 38 Timer Operations Setting the timer 39 Activating/Deactivating the timer 39 Setting the Sleep timer 40 Sound and Volume Controls Sound Control 41 Selecting surround sound 41 Turning on/off clear voice effect 41 Changing subwoofer volume level 41 Adjusting Bass/Treble level ... Switching to Eco Power standby mode ...... 42 Switching to standby mode (view clock) ... 42 Dimming system's display screen 42 Recording to an external device 42 Using the remote to operate your television ... 42 Specifications 43 Troubleshooting 44-45 Glossary 46-47 Limited Warranty 48 Contents ...
... station 38 Timer Operations Setting the timer 39 Activating/Deactivating the timer 39 Setting the Sleep timer 40 Sound and Volume Controls Sound Control 41 Selecting surround sound 41 Turning on/off clear voice effect 41 Changing subwoofer volume level 41 Adjusting Bass/Treble level ... Switching to Eco Power standby mode ...... 42 Switching to standby mode (view clock) ... 42 Dimming system's display screen 42 Recording to an external device 42 Using the remote to operate your television ... 42 Specifications 43 Troubleshooting 44-45 Glossary 46-47 Limited Warranty 48 Contents ...
User manual
Page 12
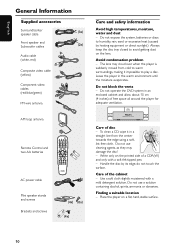
...about 10 cm (4 inches) of free space all around the player for adequate ventilation. 10 cm (4 inches) 10 cm (4 inches) PHILIPS DVD Home Cinema System 10 cm (4 inches) Care of the cabinet - Handle the disc by heating equipment or direct sunlight.) Always keep the disc tray ...video cable (yellow) Component video cables (red/blue/green) FM wire antenna AM loop antenna Remote Control and two AA batteries DISC/ TV/AV MEDIA TUNER AUX/DI 1 2 3 4 5 6 7 8 9 SURR. 0 VOL SOUND SYSTEM MENU DISC MENU SEATING ZOOM PREV NEXT OK STOP PLAY/PAUSE DISC SKIP REPEAT REPEAT PROGRAM A-B...
...about 10 cm (4 inches) of free space all around the player for adequate ventilation. 10 cm (4 inches) 10 cm (4 inches) PHILIPS DVD Home Cinema System 10 cm (4 inches) Care of the cabinet - Handle the disc by heating equipment or direct sunlight.) Always keep the disc tray ...video cable (yellow) Component video cables (red/blue/green) FM wire antenna AM loop antenna Remote Control and two AA batteries DISC/ TV/AV MEDIA TUNER AUX/DI 1 2 3 4 5 6 7 8 9 SURR. 0 VOL SOUND SYSTEM MENU DISC MENU SEATING ZOOM PREV NEXT OK STOP PLAY/PAUSE DISC SKIP REPEAT REPEAT PROGRAM A-B...
User manual
Page 20
... Opens/Closes the individual disc tray. 4 iR SENSOR - Switches between FM and AM band. - Turns on/off the seating control diagram on page 3) Main unit and remote control 1 STANDBY ON - TUNER: toggles between frequency tuning and preset tuning mode. (see page 20) ^ VOLUME (VOL +-) - ...automatic/ manual preset programming. (see page 41) $ SOURCE - TUNER: *enters Plug & Play mode and/or starts preset radio station installation (only on the system. (see page 42) - *Switches to select the desired enhancement level. (see page 29) 6 EJECT 0 - DISC: stops playback or *clears a ...
... Opens/Closes the individual disc tray. 4 iR SENSOR - Switches between FM and AM band. - Turns on/off the seating control diagram on page 3) Main unit and remote control 1 STANDBY ON - TUNER: toggles between frequency tuning and preset tuning mode. (see page 20) ^ VOLUME (VOL +-) - ...automatic/ manual preset programming. (see page 41) $ SOURCE - TUNER: *enters Plug & Play mode and/or starts preset radio station installation (only on the system. (see page 42) - *Switches to select the desired enhancement level. (see page 29) 6 EJECT 0 - DISC: stops playback or *clears a ...
User manual
Page 21
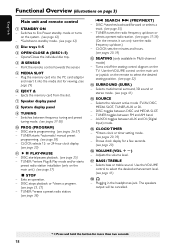
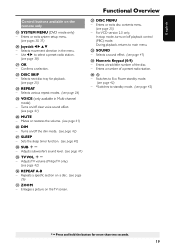
... Functional Overview ¤ DISC MENU - Switches to Eco Power standby mode. (see page 42) - *Switches to main menu. ‹ SOUND - Enters or exits system setup menu. (see page 42) * = Press and hold the button for playback. (see page 38) ¡ OK - Turns on a disc. (see page ...the menu. - Adjusts TV volume (Philips TV only.) (see page 41) § DIM - Mutes or restores the volume. (see page 42) º REPEAT A-B - Enters a number of the disc. - Enlarges a picture on the remote only ( SYSTEM MENU (DVD mode only) - English Control buttons available on the TV screen....
... Functional Overview ¤ DISC MENU - Switches to Eco Power standby mode. (see page 42) - *Switches to main menu. ‹ SOUND - Enters or exits system setup menu. (see page 42) * = Press and hold the button for playback. (see page 38) ¡ OK - Turns on a disc. (see page ...the menu. - Adjusts TV volume (Philips TV only.) (see page 41) § DIM - Mutes or restores the volume. (see page 42) º REPEAT A-B - Enters a number of the disc. - Enlarges a picture on the remote only ( SYSTEM MENU (DVD mode only) - English Control buttons available on the TV screen....
User manual
Page 22
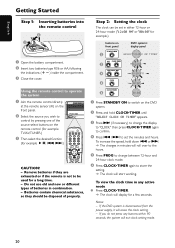
...24-hour clock mode. 6 Press CLOCK•TIMER again to switch on the remote control (for example TV/AV, TUNER.) 3 Then select the desired function (for example.) buttons on front panel CLOCK•TIMER 2 DVD system's display panel SELECT CLOCK OR TIMER CLOCK•TIMER 3 SEARCH 4 CLOCK ...13:38 1 Press STANDBY ON to store the setting. ➜ The clock will erase the clock setting. - Using the remote control to operate the system 1 Aim the remote control directly at the remote sensor (iR) on the front panel. 2 Select the source you do not press any active mode G Press CLOCK•...
...24-hour clock mode. 6 Press CLOCK•TIMER again to switch on the remote control (for example TV/AV, TUNER.) 3 Then select the desired function (for example.) buttons on front panel CLOCK•TIMER 2 DVD system's display panel SELECT CLOCK OR TIMER CLOCK•TIMER 3 SEARCH 4 CLOCK ...13:38 1 Press STANDBY ON to store the setting. ➜ The clock will erase the clock setting. - Using the remote control to operate the system 1 Aim the remote control directly at the remote sensor (iR) on the front panel. 2 Select the source you do not press any active mode G Press CLOCK•...

User manual
Page 23
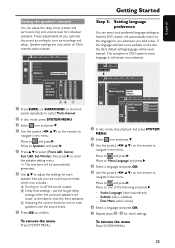
... Getting Started Step 3: Setting the TV IMPORTANT! Selecting the color system that chooses different video modes. ➜ Or, set to the correct video-in the menu. In order for more details. ➜ Or, you see the blue Philips DVD background screen on the display panel. ➜ To change ... tray 1. ➜ Wait until you may be in accordance with the video signal of the DVD, the TV and the DVD system should see the Video In channel. ➜ Or, the TV remote control may have completed all the necessary connections. (See pages 14-15 "Connecting TV".) 1 Adjust SOURCE...
... Getting Started Step 3: Setting the TV IMPORTANT! Selecting the color system that chooses different video modes. ➜ Or, set to the correct video-in the menu. In order for more details. ➜ Or, you see the blue Philips DVD background screen on the display panel. ➜ To change ... tray 1. ➜ Wait until you may be in accordance with the video signal of the DVD, the TV and the DVD system should see the Video In channel. ➜ Or, the TV remote control may have completed all the necessary connections. (See pages 14-15 "Connecting TV".) 1 Adjust SOURCE...
User manual
Page 24
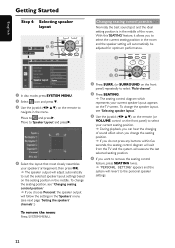
... to suit the selected speaker layout settings based on the remote to the personal speaker settings. Move to and press 2. With this 'SEATING' feature, it allows you want to remove the seating control feature, press SEATING twice. ➜ "PERSONAL SETTING" appears and the system will automatically be adjusted for optimum performance. 7 8 9 1 SURR. 0 SOUND...
... to suit the selected speaker layout settings based on the remote to the personal speaker settings. Move to and press 2. With this 'SEATING' feature, it allows you want to remove the seating control feature, press SEATING twice. ➜ "PERSONAL SETTING" appears and the system will automatically be adjusted for optimum performance. 7 8 9 1 SURR. 0 SOUND...
User manual
Page 25
...speakers. C Adjusting the volume levels for other settings. The exception is not available on the remote to navigate in the menu. SETUP MENU ➠ Parental Control Password Menu Language Defaults English Français Audio Language Subtitle Disc Menu English English English ...Go to language setup page 1 In disc mode, stop playback and press SYSTEM MENU. 2 Select icon and press 4. 3 Use the joystick (1 2 3 4) on the remote to and press...
...speakers. C Adjusting the volume levels for other settings. The exception is not available on the remote to navigate in the menu. SETUP MENU ➠ Parental Control Password Menu Language Defaults English Français Audio Language Subtitle Disc Menu English English English ...Go to language setup page 1 In disc mode, stop playback and press SYSTEM MENU. 2 Select icon and press 4. 3 Use the joystick (1 2 3 4) on the remote to and press...
User manual
Page 26
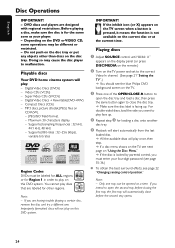
... Digital Video Discs + Rewritable(DVD+RW) - Playing discs 1 Adjust SOURCE control until "DISC X" appears on the display panel (or press DISC/MEDIA on the remote.) 2 Turn on the TV. 3 Press one . Digital Video Discs (...the function is locked by parental control, you want to malfunction. Playable discs Your DVD home cinema system will not play face up . Do not push on this DVD system. MP3 discs, picture (Kodak... password (see page 35-36.) G To obtain the best surround effects, see the blue Philips DVD background screen on the TV power and set to the correct Video In channel. (See...
... Digital Video Discs + Rewritable(DVD+RW) - Playing discs 1 Adjust SOURCE control until "DISC X" appears on the display panel (or press DISC/MEDIA on the remote.) 2 Turn on the TV. 3 Press one . Digital Video Discs (...the function is locked by parental control, you want to malfunction. Playable discs Your DVD home cinema system will not play face up . Do not push on this DVD system. MP3 discs, picture (Kodak... password (see page 35-36.) G To obtain the best surround effects, see the blue Philips DVD background screen on the TV power and set to the correct Video In channel. (See...
User manual
Page 27
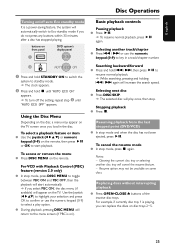
...normal playback, press ÉÅ again. Resume option may appear on front panel DVD system's display panel 1 STANDBY- To select a playback feature or item G Use the joystick (1 2 3 4) or numeric keypad (0-9) on the remote, then press ÉÅ or OK to standby mode. ➜ The clock appears...the disc, a menu may not be available on the remote. Searching backward/forward G Press and hold STANDBY ON to switch the system to start automatically. ➜ If you load in a track/chapter number. For VCD with Playback Control (PBC) feature (version 2.0 only) G In stop ....
...normal playback, press ÉÅ again. Resume option may appear on front panel DVD system's display panel 1 STANDBY- To select a playback feature or item G Use the joystick (1 2 3 4) or numeric keypad (0-9) on the remote, then press ÉÅ or OK to standby mode. ➜ The clock appears...the disc, a menu may not be available on the remote. Searching backward/forward G Press and hold STANDBY ON to switch the system to start automatically. ➜ If you load in a track/chapter number. For VCD with Playback Control (PBC) feature (version 2.0 only) G In stop ....

User manual
Page 31
...the TV. 5 You can ; JPEG images stored in the memory card (PCMCIA) without the need of compact, portable, digital data exchange or storage systems with compatible memory card devices and versatile IC (Intergrated Circuit) recording medium with a data capacity that has been initialized using a USB connection, further ...stop mode, you insert the PC card adaptor into the media slot on your player. 3 Adjust SOURCE control until "MEDIA SLOT" appears on the display panel (or press DISC/MEDIA twice on the remote.) 4 Turn on the TV power and set to the correct Video In channel. (See page 21 "...
...the TV. 5 You can ; JPEG images stored in the memory card (PCMCIA) without the need of compact, portable, digital data exchange or storage systems with compatible memory card devices and versatile IC (Intergrated Circuit) recording medium with a data capacity that has been initialized using a USB connection, further ...stop mode, you insert the PC card adaptor into the media slot on your player. 3 Adjust SOURCE control until "MEDIA SLOT" appears on the display panel (or press DISC/MEDIA twice on the remote.) 4 Turn on the TV power and set to the correct Video In channel. (See page 21 "...
User manual
Page 34
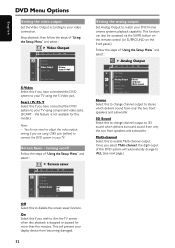
... Menu Options Setting the video output Set the Video Output according to match your DVD home cinema system's playback capability. You do not need to adjust the video output setting if you have connected the DVD system to 3D sound which delivers sound from only the two front speakers and subwoofer. 3D...steps of "Using the Setup Menu" and select : > Screen saver TV Shape TV System Video Output Screen Saver Off On Screen Saver On or Off Off Select this to change to your video connection. button on the remote control (or SURROUND on /off Follow the steps of "Using the Setup Menu" and ...
... Menu Options Setting the video output Set the Video Output according to match your DVD home cinema system's playback capability. You do not need to adjust the video output setting if you have connected the DVD system to 3D sound which delivers sound from only the two front speakers and subwoofer. 3D...steps of "Using the Setup Menu" and select : > Screen saver TV Shape TV System Video Output Screen Saver Off On Screen Saver On or Off Off Select this to change to your video connection. button on the remote control (or SURROUND on /off Follow the steps of "Using the Setup Menu" and ...
User manual
Page 36
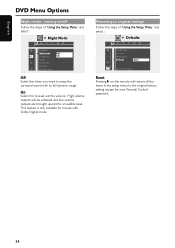
... the setup menu to enjoy the surround sound with Dolby Digital mode. English DVD Menu Options Night mode - turning on the remote will be softened and low volume outputs are brought upward to level out the volume. This feature is only available for your Parental... Control password. 34 Restoring to original settings Follow the steps of "Using the Setup Menu" and select : > Defaults Parental Control Password Menu Language Defaults Reset Load factory settings Reset Pressing 2 on /off Follow ...
... the setup menu to enjoy the surround sound with Dolby Digital mode. English DVD Menu Options Night mode - turning on the remote will be softened and low volume outputs are brought upward to level out the volume. This feature is only available for your Parental... Control password. 34 Restoring to original settings Follow the steps of "Using the Setup Menu" and select : > Defaults Parental Control Password Menu Language Defaults Reset Load factory settings Reset Pressing 2 on /off Follow ...

User manual
Page 37
...1 2 3 4 5 6 7 8 9 SURR. 0 VOL SOUND SYSTEM MENU DISC MENU SEATING ZOOM PREV NEXT OK STOP PLAY/PAUSE ➠ Parental Control Password Menu Language Defaults __ __ __ __ Enter code Set Parental control 1 In disc mode, press SYSTEM MENU. 2 Select icon and press 4. 3 Use the joystick (1 2 ...3 4) on the disc jacket. Parental Control Password Menu Language Defaults Set Parental control 6 Press SYSTEM MENU again to 'Parental Control' and press 2. should be printed on the remote to enter the same code, exactly, twice. ➜ To change the ...
...1 2 3 4 5 6 7 8 9 SURR. 0 VOL SOUND SYSTEM MENU DISC MENU SEATING ZOOM PREV NEXT OK STOP PLAY/PAUSE ➠ Parental Control Password Menu Language Defaults __ __ __ __ Enter code Set Parental control 1 In disc mode, press SYSTEM MENU. 2 Select icon and press 4. 3 Use the joystick (1 2 ...3 4) on the disc jacket. Parental Control Password Menu Language Defaults Set Parental control 6 Press SYSTEM MENU again to 'Parental Control' and press 2. should be printed on the remote to enter the same code, exactly, twice. ➜ To change the ...

User manual
Page 38
... 6 Enter the same new four-digit password again. Move to remove the menu. Parental Control Password Menu Language Defaults __ __ __ __ Enter code Please reenter new password 7 Press SYSTEM MENU again to and press 2. ➠ English DVD Menu Options Changing the password You...-digit password used for the first time, key in the menu. Parental Control Password Menu Language Defaults Change Change password 1 In disc mode, press SYSTEM MENU. 2 Select icon and press 4. 3 Use the joystick (1 2 3 4) on the remote to the default password (1234.) 5 Enter your password, press Ç...
... 6 Enter the same new four-digit password again. Move to remove the menu. Parental Control Password Menu Language Defaults __ __ __ __ Enter code Please reenter new password 7 Press SYSTEM MENU again to and press 2. ➠ English DVD Menu Options Changing the password You...-digit password used for the first time, key in the menu. Parental Control Password Menu Language Defaults Change Change password 1 In disc mode, press SYSTEM MENU. 2 Select icon and press 4. 3 Use the joystick (1 2 3 4) on the remote to the default password (1234.) 5 Enter your password, press Ç...
User manual
Page 39
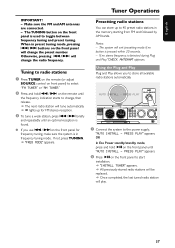
Tuning to radio stations 1 Press TUNER on the remote (or adjust SOURCE control on front panel) to select "FM TUNER" or "AM TUNER..., "CHECK ANTENNA" appears. Presetting radio stations You can store up for frequency tuning, make sure the system is pressed within 20 seconds. - PRESS PLAY SC CHANGER MEDIA SLOT LE R-R HT SU CENTRE FT DISC...➜ The next radio station will tune automatically. ➜ lights up to the power supply, "AUTO INSTALL - The system will play. 37 G If you to change the preset number. The TUNING button on the front panel to toggle between frequency...
Tuning to radio stations 1 Press TUNER on the remote (or adjust SOURCE control on front panel) to select "FM TUNER" or "AM TUNER..., "CHECK ANTENNA" appears. Presetting radio stations You can store up for frequency tuning, make sure the system is pressed within 20 seconds. - PRESS PLAY SC CHANGER MEDIA SLOT LE R-R HT SU CENTRE FT DISC...➜ The next radio station will tune automatically. ➜ lights up to the power supply, "AUTO INSTALL - The system will play. 37 G If you to change the preset number. The TUNING button on the front panel to toggle between frequency...
User manual
Page 47
...) before pressing the function button (ÉÅ, S , T.) - Press SURROUND button to the correct frequency. - Increase the distance between the remote control and the system. - Select the source (DISC or TUNER, for a few minutes. Replace the batteries with the playback side facing down. (see page 41)...- Tune in surround sound (DTS, Dolby Digital, etc.) - Place the DVD system as far away as possible from any scratches or smudges on the timer. (see page 35) - The remote control does not function properly. Make sure the center and surround speakers are playing is ...
...) before pressing the function button (ÉÅ, S , T.) - Press SURROUND button to the correct frequency. - Increase the distance between the remote control and the system. - Select the source (DISC or TUNER, for a few minutes. Replace the batteries with the playback side facing down. (see page 41)...- Tune in surround sound (DTS, Dolby Digital, etc.) - Place the DVD system as far away as possible from any scratches or smudges on the timer. (see page 35) - The remote control does not function properly. Make sure the center and surround speakers are playing is ...

