User manual
Page 1
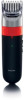
...your scissors away and put trimmer in direct sunlight or store at www.philips.com/norelco Features A B I Cleaning Brush Full Two-Year Warranty 45-Day Money-Back Guarantee 1 2 3 9 9 4 5 6 7 8 9 10 11 12 13 14 15 16 17 18 19 Put It To The Test Like many new ...the Guide Comb Attachment w Guide Comb Attachment must be pulled into any object into a tub or sink. We guarantee precise, professional results or Philips Norelco will "click" into water. w It will appear in this appliance is (almost) completely empty. w Battery performance is best if you...
...your scissors away and put trimmer in direct sunlight or store at www.philips.com/norelco Features A B I Cleaning Brush Full Two-Year Warranty 45-Day Money-Back Guarantee 1 2 3 9 9 4 5 6 7 8 9 10 11 12 13 14 15 16 17 18 19 Put It To The Test Like many new ...the Guide Comb Attachment w Guide Comb Attachment must be pulled into any object into a tub or sink. We guarantee precise, professional results or Philips Norelco will "click" into water. w It will appear in this appliance is (almost) completely empty. w Battery performance is best if you...

User manual
Page 2
...The selected trimming length setting will not change when you the full purchase price. Cleaning w Clean the comb attachment after each new Philips Norelco product, Model QT4021, QT4019 against the direction of hair growth. w Use a soft, dry cloth to cutters. After Each Use: 1 Make sure the...Allow Trimmer to run until the battery is empty/depleted. 3 Turn Trimmer OFF. 4 Use a screwdriver to remove the housing of the Trimmer (fig. 15). 5 Separate the housing parts with a screwdriver (fig. 16). 6 Cut the wires close to the battery holder with household scissors (fig. 17). ...
...The selected trimming length setting will not change when you the full purchase price. Cleaning w Clean the comb attachment after each new Philips Norelco product, Model QT4021, QT4019 against the direction of hair growth. w Use a soft, dry cloth to cutters. After Each Use: 1 Make sure the...Allow Trimmer to run until the battery is empty/depleted. 3 Turn Trimmer OFF. 4 Use a screwdriver to remove the housing of the Trimmer (fig. 15). 5 Separate the housing parts with a screwdriver (fig. 16). 6 Cut the wires close to the battery holder with household scissors (fig. 17). ...
