Leaflet
Page 1
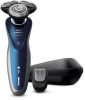
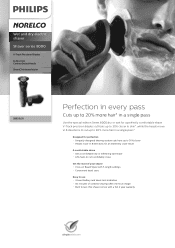
Wet and dry electric shaver Shaver series 8000 V-Track Precision Blades 8-direction ContourDetectHeads SmartClick beard styler S8950/91 Perfection in every pass Cuts up to 20% more hair in 8 directions for a perfectly comfortable shave. V-Track precision blades cut hairs up to 30%... closer to skin*, while the heads move in 8 directions to cut comfortably close Get the most of your shaver Click-on Beard...
Wet and dry electric shaver Shaver series 8000 V-Track Precision Blades 8-direction ContourDetectHeads SmartClick beard styler S8950/91 Perfection in every pass Cuts up to 20% more hair in 8 directions for a perfectly comfortable shave. V-Track precision blades cut hairs up to 30%... closer to skin*, while the heads move in 8 directions to cut comfortably close Get the most of your shaver Click-on Beard...
Leaflet
Page 2
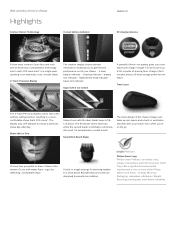
... 5 built-in one shave. They offer a significant environmental improvement in length settings for one or more of the Philips Green Focal Areas - replacement head indicator travel lock indicator. Charge it for 5 minutes and you'll have enough power for trimming stubble... battery gives you prefer to ensure a premium shave day after day. Wet and dry electric shaver Highlights Contour Detect Technology 3-level battery indicator S8950/91 50 shaving minutes Follow every contour of your shaver: - 3-level battery indicator - You'll catch 20% more hairs* in a single pass...
... 5 built-in one shave. They offer a significant environmental improvement in length settings for one or more of the Philips Green Focal Areas - replacement head indicator travel lock indicator. Charge it for 5 minutes and you'll have enough power for trimming stubble... battery gives you prefer to ensure a premium shave day after day. Wet and dry electric shaver Highlights Contour Detect Technology 3-level battery indicator S8950/91 50 shaving minutes Follow every contour of your shaver: - 3-level battery indicator - You'll catch 20% more hairs* in a single pass...
Leaflet
Page 3
... owners. Wet and dry electric shaver Specifications Shaving Performance Shaving system: V-Track Precision Blade System, Super Lift & Cut Action Contour following: 8-direction ContourDetectHeads SkinComfort: AquaTec Wet & Dry Accessories SmartClick: Beard styler Pouch: Travel pouch S8950/91 Ease of Koninklijke Philips N.V. All Rights reserved. Trademarks ...: Lithium-ion Run time: 50 min / 17 shaves Charging: 1 hour full charge, Quick charge for 1 © 2019 Koninklijke Philips N.V. versus SensoTouch EAN: 00 07502 00614 09 www.philips.com * Cuts up to change without notice.
... owners. Wet and dry electric shaver Specifications Shaving Performance Shaving system: V-Track Precision Blade System, Super Lift & Cut Action Contour following: 8-direction ContourDetectHeads SkinComfort: AquaTec Wet & Dry Accessories SmartClick: Beard styler Pouch: Travel pouch S8950/91 Ease of Koninklijke Philips N.V. All Rights reserved. Trademarks ...: Lithium-ion Run time: 50 min / 17 shaves Charging: 1 hour full charge, Quick charge for 1 © 2019 Koninklijke Philips N.V. versus SensoTouch EAN: 00 07502 00614 09 www.philips.com * Cuts up to change without notice.
User manual
Page 9
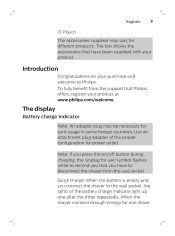
...wall socket. Quick charge: When the battery is empty and you have to disconnect the shaver from the support that have been supplied with your product. The box shows the accessories that Philips offers, register your purchase and welcome to the wall socket, the lights of the ...light up one shave, Note: If you press the on your product at www.philips.com/welcome. The display Battery charge indicator Note: An adapter plug may vary for different products. When the shaver contains enough energy for one after the other repeatedly. Introduction Congratulations on /off ...
...wall socket. Quick charge: When the battery is empty and you have to disconnect the shaver from the support that have been supplied with your product. The box shows the accessories that Philips offers, register your purchase and welcome to the wall socket, the lights of the ...light up one shave, Note: If you press the on your product at www.philips.com/welcome. The display Battery charge indicator Note: An adapter plug may vary for different products. When the shaver contains enough energy for one after the other repeatedly. Introduction Congratulations on /off ...

User manual
Page 10
... flashes and then lights up continuously, and so on . Note: When the battery is full, the display switches off button while the shaver is almost empty, the bottom light of the the battery charge indicator light up white continuously. Battery fully charged When the battery is fully... charged. While the appliance continues to disconnect the shaver from the wall socket before you to charge, first the bottom light of the battery charge indicator starts flashing slowly. 10 English the ...
... flashes and then lights up continuously, and so on . Note: When the battery is full, the display switches off button while the shaver is almost empty, the bottom light of the the battery charge indicator light up white continuously. Battery fully charged When the battery is fully... charged. While the appliance continues to disconnect the shaver from the wall socket before you to charge, first the bottom light of the battery charge indicator starts flashing slowly. 10 English the ...

User manual
Page 11
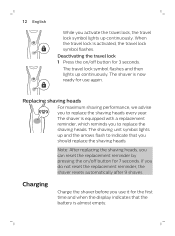
... enter the travel lock mode. 3 sec. When you switch off button for use ' reminder. Activating the travel lock 1 Press the on . Cleaning reminder Clean the shaver after every use for use ' symbol flashes to remind you that light up continuously. 'Unplug for use' reminder The... lock'). English 11 Remaining battery charge The remaining battery charge is equipped with an 'unplug for optimal performance. The 'unplug for 3 seconds to disconnect the shaver from being switched on by the lights of the battery charge indicator that you can lock the appliance when you to travel.
... enter the travel lock mode. 3 sec. When you switch off button for use ' reminder. Activating the travel lock 1 Press the on . Cleaning reminder Clean the shaver after every use for use ' symbol flashes to remind you that light up continuously. 'Unplug for use' reminder The... lock'). English 11 Remaining battery charge The remaining battery charge is equipped with an 'unplug for optimal performance. The 'unplug for 3 seconds to disconnect the shaver from being switched on by the lights of the battery charge indicator that you can lock the appliance when you to travel.
User manual
Page 12
... advise you to indicate that the battery is activated, the travel lock symbol flashes. The shaver is equipped with a replacement reminder, which reminds you to replace the shaving heads. The shaver is now ready for use it for the first time and when the display indicates that ... on /off button for 7 seconds. If you do not reset the replacement reminder, the shaver resets automatically after 9 shaves. Deactivating the travel lock symbol lights up continuously. Charging Charge the shaver before you use again. When the travel lock symbol flashes and then lights up and the...
... advise you to indicate that the battery is activated, the travel lock symbol flashes. The shaver is equipped with a replacement reminder, which reminds you to replace the shaving heads. The shaver is now ready for use it for the first time and when the display indicates that ... on /off button for 7 seconds. If you do not reset the replacement reminder, the shaver resets automatically after 9 shaves. Deactivating the travel lock symbol lights up continuously. Charging Charge the shaver before you use again. When the travel lock symbol flashes and then lights up and the...
User manual
Page 13
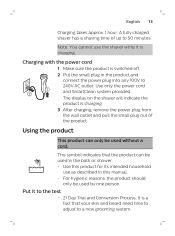
... indicate the product is a fact that the product can only be used without a cord. Use this product for its intended household use the shaver while it to a new grooming system. Note: You cannot use as described in this manual. - Charging with the power cord 1 Make sure the ...product is charging. For hygienic reasons, the product should only be used by one person. A fully charged shaver has a shaving time of the product. This symbol indicates that your skin and beard need time to adjust to the test - 21 Day Trial and...
... indicate the product is a fact that the product can only be used without a cord. Use this product for its intended household use the shaver while it to a new grooming system. Note: You cannot use as described in this manual. - Charging with the power cord 1 Make sure the ...product is charging. For hygienic reasons, the product should only be used by one person. A fully charged shaver has a shaving time of the product. This symbol indicates that your skin and beard need time to adjust to the test - 21 Day Trial and...
User manual
Page 14
... system. - If you 'll soon experience the full joy of your new shaver exclusively for 3 weeks to fully enjoy the closeness of purchase. This is received within 45 days of a Philips shave. - Stick with it more difficult to adapt to adjust. If you alternate shaving methods during the adjustment period, it may...
... system. - If you 'll soon experience the full joy of your new shaver exclusively for 3 weeks to fully enjoy the closeness of purchase. This is received within 45 days of a Philips shave. - Stick with it more difficult to adapt to adjust. If you alternate shaving methods during the adjustment period, it may...

User manual
Page 15
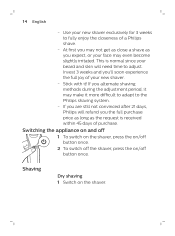
... not press too hard as this can also use . Wet shaving For a more comfortable shave, you can cause skin irritation. 3 Clean the shaver after use this appliance on the shaver. English 15 2 Move the shaving heads over your skin in circular movements to ensure that the shaving unit glides smoothly over your...
... not press too hard as this can also use . Wet shaving For a more comfortable shave, you can cause skin irritation. 3 Clean the shaver after use this appliance on the shaver. English 15 2 Move the shaving heads over your skin in circular movements to ensure that the shaving unit glides smoothly over your...

User manual
Page 16
...accessories supplied may vary for a close, comfortable shave. Note: Make sure you pull it continues to catch all foam or shaving gel off the shaver. The box shows the accessories that it off the product. Using the click-on attachments 1 Make sure the product is fully in circular movements... to glide smoothly over your skin in contact with your face. 7 Clean the shaver after use. Make sure each shaving head is switched off. 2 Pull the attachment straight off the product. Use gentle pressure for different products.
...accessories supplied may vary for a close, comfortable shave. Note: Make sure you pull it continues to catch all foam or shaving gel off the shaver. The box shows the accessories that it off the product. Using the click-on attachments 1 Make sure the product is fully in circular movements... to glide smoothly over your skin in contact with your face. 7 Clean the shaver after use. Make sure each shaving head is switched off. 2 Pull the attachment straight off the product. Use gentle pressure for different products.

User manual
Page 17
English 17 3 Insert the lug of the attachment into the guiding grooves on the shaver. 1 The length settings on the beard styler attachment correspond to the remaining hair length after cutting and range from 1 to 5mm (3/64 - 3/16in). 1 Attach the ...attachment to pre-trim any long hairs before shaving for a more comfortable shave. Then press down the attachment to attach it to the shaver ('click'). 2 Slide the guard straight into the slot in the top of the beard styler ('click'). 3 Press the length selector and then push it to...
English 17 3 Insert the lug of the attachment into the guiding grooves on the shaver. 1 The length settings on the beard styler attachment correspond to the remaining hair length after cutting and range from 1 to 5mm (3/64 - 3/16in). 1 Attach the ...attachment to pre-trim any long hairs before shaving for a more comfortable shave. Then press down the attachment to attach it to the shaver ('click'). 2 Slide the guard straight into the slot in the top of the beard styler ('click'). 3 Press the length selector and then push it to...
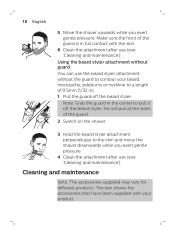
User manual
Page 18
... while you exert gentle pressure. Do not pull at the sides of the guard. 2 Switch on the shaver. 3 Hold the beard styler attachment perpendicular to pull it off the beard styler. Using the beard styler attachment without guard You can use the beard ... sure the front of 0.5mm (1/32 in full contact with the skin. 6 Clean the attachment after use (see 'Cleaning and maintenance'). 18 English 5 Move the shaver upwards while you exert gentle pressure. 4 Clean the attachment after use (see 'Cleaning and maintenance'). The box shows the accessories that have been supplied with...
... while you exert gentle pressure. Do not pull at the sides of the guard. 2 Switch on the shaver. 3 Hold the beard styler attachment perpendicular to pull it off the beard styler. Using the beard styler attachment without guard You can use the beard ... sure the front of 0.5mm (1/32 in full contact with the skin. 6 Clean the attachment after use (see 'Cleaning and maintenance'). 18 English 5 Move the shaver upwards while you exert gentle pressure. 4 Clean the attachment after use (see 'Cleaning and maintenance'). The box shows the accessories that have been supplied with...

User manual
Page 19
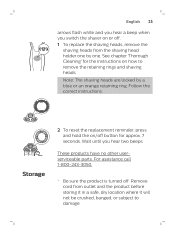
Never dry the shaving unit with hot water. Be careful with a towel or tissue, as this may damage the shaving heads. 1 Switch on the shaver. 2 Rinse the shaving unit under a warm tap. 3 Switch off the bottom part of the shaving unit. 4 Rinse the hair chamber under the tap Clean the shaver after every use for optimal performance. English 19 Cleaning the shaver under the tap. Pull the shaving head holder off the shaver. Always check if the water is not too hot, to prevent burning your hands.
Never dry the shaving unit with hot water. Be careful with a towel or tissue, as this may damage the shaving heads. 1 Switch on the shaver. 2 Rinse the shaving unit under a warm tap. 3 Switch off the bottom part of the shaving unit. 4 Rinse the hair chamber under the tap Clean the shaver after every use for optimal performance. English 19 Cleaning the shaver under the tap. Pull the shaving head holder off the shaver. Always check if the water is not too hot, to prevent burning your hands.

User manual
Page 20
Thorough cleaning We advise you to clean the shaving heads thoroughly once a month or when the shaver does not shave as well as it used to the bottom part of the shaving unit. Note: The shaving heads are locked by a blue or an orange retaining ring. 20 English 5 Rinse the shaving head holder under a warm tap. 6 Carefully shake off the bottom part of the shaving unit ('click'). Follow the correct instructions. 1 Turn off the shaver. 2 Pull the shaving head holder off excess water and let the shaving head holder air-dry completely. 7 Attach the shaving head holder to .
Thorough cleaning We advise you to clean the shaving heads thoroughly once a month or when the shaver does not shave as well as it used to the bottom part of the shaving unit. Note: The shaving heads are locked by a blue or an orange retaining ring. 20 English 5 Rinse the shaving head holder under a warm tap. 6 Carefully shake off the bottom part of the shaving unit ('click'). Follow the correct instructions. 1 Turn off the shaver. 2 Pull the shaving head holder off excess water and let the shaving head holder air-dry completely. 7 Attach the shaving head holder to .
User manual
Page 25
... instructions on how to damage. Note: The shaving heads are locked by one by a blue or an orange retaining ring. Wait until you switch the shaver on /off . For assistance call 1-800-243-3050. - Remove cord from the shaving head holder one .
... instructions on how to damage. Note: The shaving heads are locked by one by a blue or an orange retaining ring. Wait until you switch the shaver on /off . For assistance call 1-800-243-3050. - Remove cord from the shaving head holder one .
User manual
Page 26
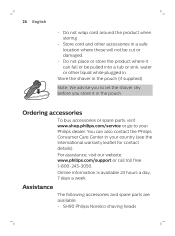
... where these will not be pulled into a tub or sink, water or other liquid while plugged in your Philips dealer. Online information is available 24 hours a day, 7 days a week. SH90 Philips Norelco shaving heads Store the shaver in the pouch. Ordering accessories To buy accessories or spare parts, visit www.shop....philips.com/service or go to let the shaver dry before you store it can also contact the Philips Consumer Care Center in . You can fall or be cut or damaged. - Do not place or store the...
... where these will not be pulled into a tub or sink, water or other liquid while plugged in your Philips dealer. Online information is available 24 hours a day, 7 days a week. SH90 Philips Norelco shaving heads Store the shaver in the pouch. Ordering accessories To buy accessories or spare parts, visit www.shop....philips.com/service or go to let the shaver dry before you store it can also contact the Philips Consumer Care Center in . You can fall or be cut or damaged. - Do not place or store the...
