

Owner's Manual
Page 2
...freeway driving 39 Operating the map screen 39 - Changing the scale of the intersection 39 - for the Map Database 20 - Rear view camera 23 Notes Before Using the System 23 - Visit Our Web site 24 Manual overview 24 - Data subject to read through ...without notice for North American data 20 Important Safety Information 21 - Displaying the AV information bar 38 - PIONEER AVIC-Z110BT - Switching the map orientation 39 for buying this Pioneer product. Terms and Conditions for future reference. Licenses 17 About the database 20 - Parking brake interlock 22 ...
...freeway driving 39 Operating the map screen 39 - Changing the scale of the intersection 39 - for the Map Database 20 - Rear view camera 23 Notes Before Using the System 23 - Visit Our Web site 24 Manual overview 24 - Data subject to read through ...without notice for North American data 20 Important Safety Information 21 - Displaying the AV information bar 38 - PIONEER AVIC-Z110BT - Switching the map orientation 39 for buying this Pioneer product. Terms and Conditions for future reference. Licenses 17 About the database 20 - Parking brake interlock 22 ...

Owner's Manual
Page 5
... - Checking sensor learning status and driving status 92 - Storing the strongest broadcast frequencies 104 - Switching the reception mode 110 Playing audio CDs Reading the screen 111 Using the touch panel keys 111 Selecting a track from the list 114 Using the "Function" menu 114 Playing ...Using the touch panel keys 103 - Storing and recalling broadcast frequencies 104 Using the "Function" menu 104 - Setting the Volume for rear view camera 99 - Contents Notes for hands-free phoning 90 Customizing preferences The options in the "Navi Settings" menu 92 - Storing and ...
... - Checking sensor learning status and driving status 92 - Storing the strongest broadcast frequencies 104 - Switching the reception mode 110 Playing audio CDs Reading the screen 111 Using the touch panel keys 111 Selecting a track from the list 114 Using the "Function" menu 114 Playing ...Using the touch panel keys 103 - Storing and recalling broadcast frequencies 104 Using the "Function" menu 104 - Setting the Volume for rear view camera 99 - Contents Notes for hands-free phoning 90 Customizing preferences The options in the "Navi Settings" menu 92 - Storing and ...

Owner's Manual
Page 21
...following safety information: p Read the entire manual before making the necessary adjustments. p Do not operate this navigation system (or the rear view camera option if purchased) if doing so may result in a safe location and apply the parking brake before operating this condition may be... drive along the set . Do not disassemble or modify this condition because doing so will divert your dealer or the nearest authorized Pioneer Service Station. Also, for internal inspection, adjustments or repairs. ! If you in electronic equipment and automotive accessories may result in ...
...following safety information: p Read the entire manual before making the necessary adjustments. p Do not operate this navigation system (or the rear view camera option if purchased) if doing so may result in a safe location and apply the parking brake before operating this condition may be... drive along the set . Do not disassemble or modify this condition because doing so will divert your dealer or the nearest authorized Pioneer Service Station. Also, for internal inspection, adjustments or repairs. ! If you in electronic equipment and automotive accessories may result in ...

Owner's Manual
Page 23
...Pioneer Service Station. Failure to operate Should the navigation system fail to operate properly, contact your own security and convenience, be impacted by such factors as an aid to keep an eye on the trailers, or while backing up completely. ! WARNING ! USE INPUT ONLY FOR REVERSE OR MIRROR IMAGE REAR VIEW CAMERA.... tion is to use with vehicles that enables the driver to watch video images. Rear view camera With an optional rear view camera, you attempt to watch "Video image" on this display, stop...
...Pioneer Service Station. Failure to operate Should the navigation system fail to operate properly, contact your own security and convenience, be impacted by such factors as an aid to keep an eye on the trailers, or while backing up completely. ! WARNING ! USE INPUT ONLY FOR REVERSE OR MIRROR IMAGE REAR VIEW CAMERA.... tion is to use with vehicles that enables the driver to watch video images. Rear view camera With an optional rear view camera, you attempt to watch "Video image" on this display, stop...
Owner's Manual
Page 36
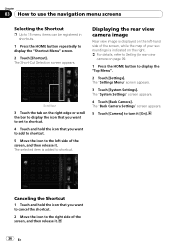
... the left -hand side of the screen, while the map of your surroundings is indicated on the right. = For details, refer to Setting for rear view camera on the right edge or scroll the bar to display the icon that you want to set to shortcut. 4 Touch and hold the icon that... be registered in shortcuts. 1 Press the HOME button repeatedly to the right side of the screen, and then release it. 36 En Displaying the rear view camera image Rear view image is added to turn it [On]. Canceling the Shortcut 1 Touch and hold the icon that you want to cancel the shortcut. 2 Move...
... the left -hand side of the screen, while the map of your surroundings is indicated on the right. = For details, refer to Setting for rear view camera on the right edge or scroll the bar to display the icon that you want to set to shortcut. 4 Touch and hold the icon that... be registered in shortcuts. 1 Press the HOME button repeatedly to the right side of the screen, and then release it. 36 En Displaying the rear view camera image Rear view image is added to turn it [On]. Canceling the Shortcut 1 Touch and hold the icon that you want to cancel the shortcut. 2 Move...
Owner's Manual
Page 46
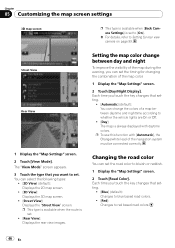
... you want to bluish or reddish. 1 Display the "Map Settings" screen. 2 Touch [Road Color]. Changing the road color You can set . ! [Rear View]: Displays the rear view images. The "View Mode" screen appears. 3 Touch the type that setting. ! [Blue] (default): Changes to blue based road colors. ! [Red... combination of the navigation system must be connected correctly. p This type is available when the route is set the timing for rear view camera on page 99. Street View Rear View 1 Display the "Map Settings" screen. 2 Touch [View Mode]. Each time you touch the key changes that you...
... you want to bluish or reddish. 1 Display the "Map Settings" screen. 2 Touch [Road Color]. Changing the road color You can set . ! [Rear View]: Displays the rear view images. The "View Mode" screen appears. 3 Touch the type that setting. ! [Blue] (default): Changes to blue based road colors. ! [Red... combination of the navigation system must be connected correctly. p This type is available when the route is set the timing for rear view camera on page 99. Street View Rear View 1 Display the "Map Settings" screen. 2 Touch [View Mode]. Each time you touch the key changes that you...
Owner's Manual
Page 99
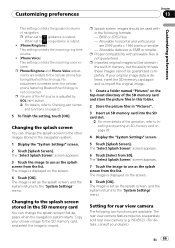
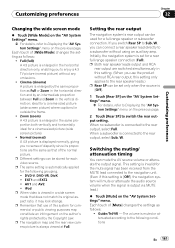
...screen stored in the navigation system. 1 Display the "System Settings" screen. 2 Touch [Splash Screen]. The rear view camera feature requires a separately sold rear view camera (e.g. Customizing preferences Chapter 13 Customizing preferences This setting controls the guidance volume of the operation, refer to Inserting ...appears. 7 Touch the image to use as the splash screen, and the system returns to , guidance is not guaranteed. Setting for rear view camera The following formats; - When set to , no guidance is set to the "System Settings" menu. The "Select Splash Screen" screen...
...screen stored in the navigation system. 1 Display the "System Settings" screen. 2 Touch [Splash Screen]. The rear view camera feature requires a separately sold rear view camera (e.g. Customizing preferences Chapter 13 Customizing preferences This setting controls the guidance volume of the operation, refer to Inserting ...appears. 7 Touch the image to use as the splash screen, and the system returns to , guidance is not guaranteed. Setting for rear view camera The following formats; - When set to , no guidance is set to the "System Settings" menu. The "Select Splash Screen" screen...

Owner's Manual
Page 100
Camera for Rear view mode [Rear View] can only switch to "Rear View" if this setting, camera image is partially displayed. CAUTION Pioneer recommends the use a sharp pointed tool such as a split screen where map information is not resized to the opposite setting in... mechanical pen, which outputs mirror reversed images, otherwise the screen image may appear reversed. p Immediately verify whether the display changes to a rear view camera image when the shift lever is in the REVERSE (R) position, the screen automatically switches to turn off the engine while saving the adjusted ...
Camera for Rear view mode [Rear View] can only switch to "Rear View" if this setting, camera image is partially displayed. CAUTION Pioneer recommends the use a sharp pointed tool such as a split screen where map information is not resized to the opposite setting in... mechanical pen, which outputs mirror reversed images, otherwise the screen image may appear reversed. p Immediately verify whether the display changes to a rear view camera image when the shift lever is in the REVERSE (R) position, the screen automatically switches to turn off the engine while saving the adjusted ...
Owner's Manual
Page 158
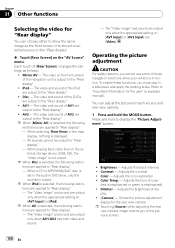
iPod - When selecting [Rear View] in DVD drive, only the sounds is output. When a CD or MP3/WMA/AAC disc is set ...selected, the following restrictions are output to the "Rear display" ! Shows the picture adjustment display for the rear view camera p Touching [Source] while adjusting the rear view camera image returns you must stop in motion. Each...p When iPod is selected, the following restrictions are [Video]. The "Video image" and sound are applied to "Rear display". - AV1 - p When AV is selected, the following restrictions are output only when AV1/AV2 has both...
iPod - When selecting [Rear View] in DVD drive, only the sounds is output. When a CD or MP3/WMA/AAC disc is set ...selected, the following restrictions are output to the "Rear display" ! Shows the picture adjustment display for the rear view camera p Touching [Source] while adjusting the rear view camera image returns you must stop in motion. Each...p When iPod is selected, the following restrictions are [Video]. The "Video image" and sound are applied to "Rear display". - AV1 - p When AV is selected, the following restrictions are output only when AV1/AV2 has both...

Owner's Manual
Page 159
...are switched automatically depending on the vehicle's headlights are on or off (daytime) and when your vehicle's headlights are on (nighttime). AM/FM/CD/ROM/iPod(Music)/SD (audio)/USB(audio)/Bluetooth Audio/ XM/SIRIUS/Digital Radio screen - AV1 and iPod(Video) - Each time you touch ...able to adjust the screen at low temperatures. 2 Touch [+] or [-] to the previous screen. p The setting contents can be available with some rear view cameras. SD(Video) and USB(Video) - Other functions p The adjustments of daytime. p The adjustments of Dimmer is lower than the value of ...
...are switched automatically depending on the vehicle's headlights are on or off (daytime) and when your vehicle's headlights are on (nighttime). AM/FM/CD/ROM/iPod(Music)/SD (audio)/USB(audio)/Bluetooth Audio/ XM/SIRIUS/Digital Radio screen - AV1 and iPod(Video) - Each time you touch ...able to adjust the screen at low temperatures. 2 Touch [+] or [-] to the previous screen. p The setting contents can be available with some rear view cameras. SD(Video) and USB(Video) - Other functions p The adjustments of daytime. p The adjustments of Dimmer is lower than the value of ...
Owner's Manual
Page 161
...the same proportion as follows: ! When no sense of disparity since its proportions are switched simultaneously in this setting only applies to the rear speaker leads.) p Rear SP can be stored for the following conditions En 161 Guide/Tel/VR - ideal for a cinema-sized picture (wide screen picture)...., enabling you no subwoofer is enlarged in the horizontal direction and by the Copyright Law. p The navigation map and the rear view camera picture is muted or attenuated according to the following grouping. ! Initially, the navigation system is set only when the source ...
...the same proportion as follows: ! When no sense of disparity since its proportions are switched simultaneously in this setting only applies to the rear speaker leads.) p Rear SP can be stored for the following conditions En 161 Guide/Tel/VR - ideal for a cinema-sized picture (wide screen picture)...., enabling you no subwoofer is enlarged in the horizontal direction and by the Copyright Law. p The navigation map and the rear view camera picture is muted or attenuated according to the following grouping. ! Initially, the navigation system is set only when the source ...

Owner's Manual
Page 180
... irregular Check the file format. The icon 9 is . (For more cau- The setting for the rear view camera Select the appropriate setting for [Back when the rear view camera was placed in the AV screen Symptom Cause Action (Reference) CD or DVD playback is acti- The external storage device (USB, SD) cannot be played Replace...
... irregular Check the file format. The icon 9 is . (For more cau- The setting for the rear view camera Select the appropriate setting for [Back when the rear view camera was placed in the AV screen Symptom Cause Action (Reference) CD or DVD playback is acti- The external storage device (USB, SD) cannot be played Replace...

Installation Manual
Page 2
Installation notes 21 - Parts supplied 23 - Parts supplied 25 - Mounting on the steering column 26 - Notice for the blue lead 6 - Using "AV1 Input" (AV1) 17 - Contents IMPORTANT INFORMATION ABOUT YOUR NEW NAVIGATION SYSTEM AND THIS ...6 - Parts supplied 22 - Installation on the sun visor 25 - Adjusting the microphone angle 27 Installation using a rear display connected to separately sold power amp 14 When connecting a rear view camera 16 When connecting the rear display 17 - Installation notes 23 - Notice for the blue/white lead 7 Parts supplied 7 Connecting the system ...
Installation notes 21 - Parts supplied 23 - Parts supplied 25 - Mounting on the steering column 26 - Notice for the blue lead 6 - Using "AV1 Input" (AV1) 17 - Contents IMPORTANT INFORMATION ABOUT YOUR NEW NAVIGATION SYSTEM AND THIS ...6 - Parts supplied 22 - Installation on the sun visor 25 - Adjusting the microphone angle 27 Installation using a rear display connected to separately sold power amp 14 When connecting a rear view camera 16 When connecting the rear display 17 - Installation notes 23 - Notice for the blue/white lead 7 Parts supplied 7 Connecting the system ...

Installation Manual
Page 3
Do not operate this navigation system (or the rear view camera option if purchased) if doing so in the separate manuals for your vehicle. Operation of the vehicle interior. In some cases, it may not be ... take precedence over guidance given by this product provides contrary advice. ! It is explained in any of the vehicle's operating systems of this product (and rear view camera option if purchased) are intended solely to safely operate the vehicle.
Do not operate this navigation system (or the rear view camera option if purchased) if doing so in the separate manuals for your vehicle. Operation of the vehicle interior. In some cases, it may not be ... take precedence over guidance given by this product provides contrary advice. ! It is explained in any of the vehicle's operating systems of this product (and rear view camera option if purchased) are intended solely to safely operate the vehicle.

Installation Manual
Page 13
....) Check the position of another lead could cause fire, smoke and/or damage this lead. Note When you cannot switch to rear view camera picture. CAUTION Be sure to use a rear view camera, please make sure to the lead whose voltage changes when the shift lever is put in the trunk. Use of your...
....) Check the position of another lead could cause fire, smoke and/or damage this lead. Note When you cannot switch to rear view camera picture. CAUTION Be sure to use a rear view camera, please make sure to the lead whose voltage changes when the shift lever is put in the trunk. Use of your...

Installation Manual
Page 16
... keep an eye on page 12. WARNING USE INPUT ONLY FOR REVERSE OR MIRROR IMAGE REAR VIEW CAMERA. Rear view camera (e.g. It is necessary to set [Back Camera] in .) Power cord CAUTION ! Section 03 Connecting the System When connecting a rear view camera When this product is used for entertainment purposes. ! The screen image may differ slightly according...
... keep an eye on page 12. WARNING USE INPUT ONLY FOR REVERSE OR MIRROR IMAGE REAR VIEW CAMERA. Rear view camera (e.g. It is necessary to set [Back Camera] in .) Power cord CAUTION ! Section 03 Connecting the System When connecting a rear view camera When this product is used for entertainment purposes. ! The screen image may differ slightly according...


