

Owner's Manual
Page 2
... regarding MP3 file usage 25 iPod compatibility 25 Map coverage 26 Protecting the LCD panel and screen 26 2 En Notes on each menu 35 Operating list screens (e.g. PIONEER AVIC-Z110BT - for North American data 20 Important Safety Information 21 - PIONEER AVIC-Z110BT - To avoid battery exhaustion 23 - Ejecting a disc 29 Inserting and ejecting an SD memory...
... regarding MP3 file usage 25 iPod compatibility 25 Map coverage 26 Protecting the LCD panel and screen 26 2 En Notes on each menu 35 Operating list screens (e.g. PIONEER AVIC-Z110BT - for North American data 20 Important Safety Information 21 - PIONEER AVIC-Z110BT - To avoid battery exhaustion 23 - Ejecting a disc 29 Inserting and ejecting an SD memory...

Owner's Manual
Page 3
... the view mode 45 Setting the map color change between day and night 46 Changing the road color 46 Changing the setting of navigation interruption screen 47 Selecting "Quick Access" 47 Setting a route to your destination The basic flow of the city map display 42 - Editing the entry...POI 58 - Setting "Close Up View" 42 - MSN Direct 44 Displaying POI on the Map Screen 42 - Setting the Favorites icon display 43 - 3D Land Mark 43 - Quick Access 40 Customizing the map screen settings Setting the Item on the map 44 - Bluetooth Connected 43 - Displaying preinstalled POIs on ...
... the view mode 45 Setting the map color change between day and night 46 Changing the road color 46 Changing the setting of navigation interruption screen 47 Selecting "Quick Access" 47 Setting a route to your destination The basic flow of the city map display 42 - Editing the entry...POI 58 - Setting "Close Up View" 42 - MSN Direct 44 Displaying POI on the Map Screen 42 - Setting the Favorites icon display 43 - 3D Land Mark 43 - Quick Access 40 Customizing the map screen settings Setting the Item on the map 44 - Bluetooth Connected 43 - Displaying preinstalled POIs on ...

Owner's Manual
Page 5
...the detailed information display and the preset list display 106 - Storing the strongest broadcast frequencies 110 - Switching the reception mode 110 Playing audio CDs Reading the screen 111 Using the touch panel keys 111 Selecting a track from the list 114 Using the "Function" menu 114 Playing a DVD-Video ... "Function" menu 112 Playing music files on the "System Settings" menu 96 - Correcting the current location 96 Options on ROM Reading the screen 113 Using the touch panel keys 114 - Tuning in the "Navi Settings" menu 92 - Contents Notes for hands-free phoning 90 Customizing ...
...the detailed information display and the preset list display 106 - Storing the strongest broadcast frequencies 110 - Switching the reception mode 110 Playing audio CDs Reading the screen 111 Using the touch panel keys 111 Selecting a track from the list 114 Using the "Function" menu 114 Playing a DVD-Video ... "Function" menu 112 Playing music files on the "System Settings" menu 96 - Correcting the current location 96 Options on ROM Reading the screen 113 Using the touch panel keys 114 - Tuning in the "Navi Settings" menu 92 - Contents Notes for hands-free phoning 90 Customizing ...
Owner's Manual
Page 6
... time 126 - Frame-by touch panel keys 118 - Browsing for DVDs 131 Playing music files (from USB or SD) Starting procedure 135 Reading the screen 135 Using the touch panel keys (Video) 135 - Browsing for a specific scene and starting playback from a specified time 118 - Contents - Playing ... 141 - Frame-by selecting from a specified time 136 Using the "Function" menu 137 Using an iPod (iPod) Starting procedure 138 Reading the screen 138 Using the touch panel keys (Music) 139 - Selecting an XM channel directly 147 Switch the playback mode 123 - Slow motion playback 123 ...
... time 126 - Frame-by touch panel keys 118 - Browsing for DVDs 131 Playing music files (from USB or SD) Starting procedure 135 Reading the screen 135 Using the touch panel keys (Video) 135 - Browsing for a specific scene and starting playback from a specified time 118 - Contents - Playing ... 141 - Frame-by selecting from a specified time 136 Using the "Function" menu 137 Using an iPod (iPod) Starting procedure 138 Reading the screen 138 Using the touch panel keys (Music) 139 - Selecting an XM channel directly 147 Switch the playback mode 123 - Slow motion playback 123 ...
Owner's Manual
Page 7
...166 - Starting voice operation 168 - Selecting a channel from the list 148 - Setting the memorized songs 150 Using the SIRIUS tuner Reading the screen 151 Using the touch panel keys 151 - Using the "Instant Replay" function 154 Using the "Function" menu 154 - Setting the memorized ...Using the direct traffic announcement function 153 - Setting video input 1 (AV1) 160 - Switching the auto antenna setting 160 - Changing the wide screen mode 161 - Setting the rear output 161 - Switching the muting/attenuation timing 161 - Switching the muting/attenuation level 162 - Changing the ...
...166 - Starting voice operation 168 - Selecting a channel from the list 148 - Setting the memorized songs 150 Using the SIRIUS tuner Reading the screen 151 Using the touch panel keys 151 - Using the "Instant Replay" function 154 Using the "Function" menu 154 - Setting the memorized ...Using the direct traffic announcement function 153 - Setting video input 1 (AV1) 160 - Switching the auto antenna setting 160 - Changing the wide screen mode 161 - Setting the rear output 161 - Switching the muting/attenuation timing 161 - Switching the muting/attenuation level 162 - Changing the ...
Owner's Manual
Page 8
... the initial state 175 Returning the navigation system to hands-free phoning 172 Tips for audio functions 184 Positioning technology 186 - Liquid crystal display (LCD) screen 201 - Destination Menu 202 - Setting the password 174 - When positioning by GPS is impossible 187 - AVCHD recorded discs 191 - Playing DualDisc 192 - ... Digital 192 - Settings Menu 202 Glossary 206 Specifications 209 Deleting the password 174 - Built-in drive and care 191 - Compatibility 192 - Handling the LCD screen 201 - Maintaining the LCD screen 201 - DVD-Video and CD 191 -
... the initial state 175 Returning the navigation system to hands-free phoning 172 Tips for audio functions 184 Positioning technology 186 - Liquid crystal display (LCD) screen 201 - Destination Menu 202 - Setting the password 174 - When positioning by GPS is impossible 187 - AVCHD recorded discs 191 - Playing DualDisc 192 - ... Digital 192 - Settings Menu 202 Glossary 206 Specifications 209 Deleting the password 174 - Built-in drive and care 191 - Compatibility 192 - Handling the LCD screen 201 - Maintaining the LCD screen 201 - DVD-Video and CD 191 -

Owner's Manual
Page 21
... Electrical shock could result from the navigation system, or any functions relating to the risk of your dealer or the nearest authorized Pioneer Service Station. Also, damage to read and understood the operating instructions. p Route and guidance information displayed by persons without training and... of your vehicle. p Traffic restrictions and advisories currently in a fire, electric shock, or other abnormal signs on the LCD screen, turn the ignition switch off the power immediately and consult your vehicle in an emergency. It is shown. gation system by the ...
... Electrical shock could result from the navigation system, or any functions relating to the risk of your dealer or the nearest authorized Pioneer Service Station. Also, damage to read and understood the operating instructions. p Route and guidance information displayed by persons without training and... of your vehicle. p Traffic restrictions and advisories currently in a fire, electric shock, or other abnormal signs on the LCD screen, turn the ignition switch off the power immediately and consult your vehicle in an emergency. It is shown. gation system by the ...

Owner's Manual
Page 23
... display connected to REAR MONITOR OUTPUT The video output terminal (REAR MONITOR OUTPUT) is not available until the navigation system boots up . SCREEN IMAGE MAY APPEAR REVERSED. ! Do not use this product without running the engine can drain the battery. Please keep an eye on the... for connection of a display to enable passengers in a safe place and apply the parking brake. For your dealer or nearest authorized Pioneer Service Station. En 23 Introduction Chapter 01 Introduction CAUTION Accuracy/performance of interlock may be sure to record this number on this product....
... display connected to REAR MONITOR OUTPUT The video output terminal (REAR MONITOR OUTPUT) is not available until the navigation system boots up . SCREEN IMAGE MAY APPEAR REVERSED. ! Do not use this product without running the engine can drain the battery. Please keep an eye on the... for connection of a display to enable passengers in a safe place and apply the parking brake. For your dealer or nearest authorized Pioneer Service Station. En 23 Introduction Chapter 01 Introduction CAUTION Accuracy/performance of interlock may be sure to record this number on this product....

Owner's Manual
Page 24
...When you have decided what you want to use your new equipment. ! CANADA Pioneer Electronics of the manual. Familiarity with double quotation marks " ": e.g.) "Destination Menu" screen or "AV Source" screen ! Buttons on the screen are described in bold in brackets [ ]: e.g.) [Destination], [Settings]. !... the location first. 24 En Extra information, alternatives and other information. Chapter 01 Introduction After-sales service for Pioneer products Please contact the dealer or distributor from which you purchased the product for aftersales service (including warranty conditions)...
...When you have decided what you want to use your new equipment. ! CANADA Pioneer Electronics of the manual. Familiarity with double quotation marks " ": e.g.) "Destination Menu" screen or "AV Source" screen ! Buttons on the screen are described in bold in brackets [ ]: e.g.) [Destination], [Settings]. !... the location first. 24 En Extra information, alternatives and other information. Chapter 01 Introduction After-sales service for Pioneer products Please contact the dealer or distributor from which you purchased the product for aftersales service (including warranty conditions)...
Owner's Manual
Page 25
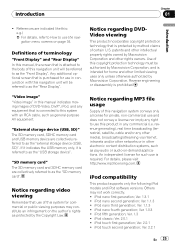
...Ver. 1.0.3 ! Ver. 2.2.1 En 25 "Video image" "Video image" in this system with this manual, the screen that is purchased for such use in other rights owners. Notice regarding DVDVideo viewing This product incorporates copyright protection technology that ...third generation; Notice regarding video viewing Remember that is protected by the Copyright Law. Ver. 1.1.3 ! Any additional optional screen that use the navigation menu screens on the author's rights as the "Rear Display". Introduction Chapter 01 Introduction ! References are indicated like this navigation unit...
...Ver. 1.0.3 ! Ver. 2.2.1 En 25 "Video image" "Video image" in this system with this manual, the screen that is purchased for such use in other rights owners. Notice regarding DVDVideo viewing This product incorporates copyright protection technology that ...third generation; Notice regarding video viewing Remember that is protected by the Copyright Law. Ver. 1.1.3 ! Any additional optional screen that use the navigation menu screens on the author's rights as the "Rear Display". Introduction Chapter 01 Introduction ! References are indicated like this navigation unit...

Owner's Manual
Page 26
...to the default or factory settings on the iPod models and the software version of spots, colored stripes, etc. p To protect the LCD screen from damage, be reprogramed. Data subject to erasure The information is disconnected or discharged, the memory will be re- p To obtain maximum performance...compatibility with this navigation system, refer to touch the touch panel keys with this product is a trademark of this navigation system with a Pioneer USB interface cable for iPod (CDIU50V) (sold separately), you use the latest software for the iPod. p Some data remains. Extended ...
...to the default or factory settings on the iPod models and the software version of spots, colored stripes, etc. p To protect the LCD screen from damage, be reprogramed. Data subject to erasure The information is disconnected or discharged, the memory will be re- p To obtain maximum performance...compatibility with this navigation system, refer to touch the touch panel keys with this product is a trademark of this navigation system with a Pioneer USB interface cable for iPod (CDIU50V) (sold separately), you use the latest software for the iPod. p Some data remains. Extended ...
Owner's Manual
Page 27
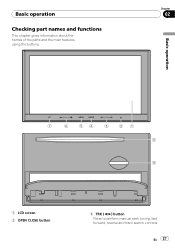
En 27 Chapter 02 Basic operation 7 6 54 3 21 8 9 1 LCD screen 2 OPEN CLOSE button 3 TRK (c/d) button Press to perform manual seek tuning, fast forward, reverse and track search controls. Basic operation Checking part names and functions This chapter gives information about the names of the parts and the main features using the buttons.
En 27 Chapter 02 Basic operation 7 6 54 3 21 8 9 1 LCD screen 2 OPEN CLOSE button 3 TRK (c/d) button Press to perform manual seek tuning, fast forward, reverse and track search controls. Basic operation Checking part names and functions This chapter gives information about the names of the parts and the main features using the buttons.
Owner's Manual
Page 28
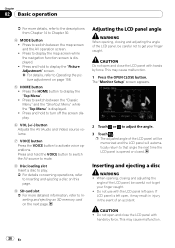
..., refer to the descriptions from Chapter 14 to Operating the picture adjustment on page 158. 5 HOME button ! Press to switch between the map screen and the AV operation screen. ! Press and hold the VOICE button to switch the AV source to mute. 8 Disc loading slot Insert a disc to play. = For ... operations, refer to Inserting and ejecting a disc on the next page. Press the HOME button to activate voice operations. CAUTION ! The "Monitor Setup" screen appears. 2 Touch or to that angle the next time the LCD panel is left open and close the LCD panel with the LCD panel left...
..., refer to the descriptions from Chapter 14 to Operating the picture adjustment on page 158. 5 HOME button ! Press to switch between the map screen and the AV operation screen. ! Press and hold the VOICE button to switch the AV source to mute. 8 Disc loading slot Insert a disc to play. = For ... operations, refer to Inserting and ejecting a disc on the next page. Press the HOME button to activate voice operations. CAUTION ! The "Monitor Setup" screen appears. 2 Touch or to that angle the next time the LCD panel is left open and close the LCD panel with the LCD panel left...
Owner's Manual
Page 29
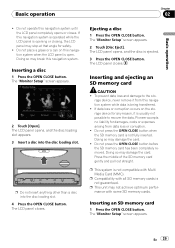
...The LCD panel opens, and the disc is not fully inserted. To prevent data loss and damage to recover the data. The "Monitor Setup" screen appears. Do not press the OPEN CLOSE button before the SD memory card has been completely removed. p Compatibility with all SD memory cards is ...open. Do not place a glass or a can on the storage device for safety. ! Pioneer accepts no liability for damages, costs or expenses arising from this navigation system when the LCD panel is not guaranteed. The LCD panel closes. The...
...The LCD panel opens, and the disc is not fully inserted. To prevent data loss and damage to recover the data. The "Monitor Setup" screen appears. Do not press the OPEN CLOSE button before the SD memory card has been completely removed. p Compatibility with all SD memory cards is ...open. Do not place a glass or a can on the storage device for safety. ! Pioneer accepts no liability for damages, costs or expenses arising from this navigation system when the LCD panel is not guaranteed. The LCD panel closes. The...

Owner's Manual
Page 30
... panel opens, and the SD card slot appears. 3 Insert an SD memory card into the SD card slot. Plugging and unplugging a USB storage device CAUTION ! Pioneer accepts no liability for any reason, it clicks and completely locks. 2 Touch [Eject SD]. The following message appears. 4 Press the OPEN CLOSE button. The "Monitor...
... panel opens, and the SD card slot appears. 3 Insert an SD memory card into the SD card slot. Plugging and unplugging a USB storage device CAUTION ! Pioneer accepts no liability for any reason, it clicks and completely locks. 2 Touch [Eject SD]. The following message appears. 4 Press the OPEN CLOSE button. The "Monitor...
Owner's Manual
Page 31
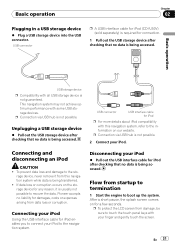
USB connector p A USB interface cable for iPod (CD-IU50V) (sold separately) is required for any reason, it from startup to termination 1 Start the engine ... it is being accessed. USB connector USB interface cable for iPod enables you to connect your iPod. p To protect the LCD screen from data loss or corruption. To prevent data loss and damage to the navigation system. Basic operation Chapter 02 Plugging in a ... iPod % Pull out the USB interface cable for iPod after checking that no liability for a few seconds. Pioneer accepts no data is being accessed.
USB connector p A USB interface cable for iPod (CD-IU50V) (sold separately) is required for any reason, it from startup to termination 1 Start the engine ... it is being accessed. USB connector USB interface cable for iPod enables you to connect your iPod. p To protect the LCD screen from data loss or corruption. To prevent data loss and damage to the navigation system. Basic operation Chapter 02 Plugging in a ... iPod % Pull out the USB interface cable for iPod after checking that no liability for a few seconds. Pioneer accepts no data is being accessed.
Owner's Manual
Page 32
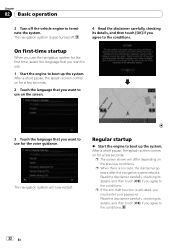
... first time, select the language that you want to use. 1 Start the engine to the conditions. 32 En After a short pause, the splash screen comes on for a few seconds. 2 Touch the language that you want to boot up the system. The navigation system is also turned off the ...vehicle engine to the conditions. The navigation system will differ depending on the screen. 3 Touch the language that you want to use for the voice guidance. p The screen shown will now restart. Regular startup % Start the engine to use on the previous conditions. p When...
... first time, select the language that you want to use. 1 Start the engine to the conditions. 32 En After a short pause, the splash screen comes on for a few seconds. 2 Touch the language that you want to boot up the system. The navigation system is also turned off the ...vehicle engine to the conditions. The navigation system will differ depending on the screen. 3 Touch the language that you want to use for the voice guidance. p The screen shown will now restart. Regular startup % Start the engine to use on the previous conditions. p When...

Owner's Manual
Page 34
Chapter 03 How to use the navigation menu screens Screen switching overview 2 3 4 1 5 6 7 34 En
Chapter 03 How to use the navigation menu screens Screen switching overview 2 3 4 1 5 6 7 34 En

Owner's Manual
Page 35
...within the displayed area, touching the key to the right of the "Top Menu". Press the MODE button to display the navigation map screen. 7 AV operation screen This is related to hands-free phoning to see call histories and change the settings on the Bluetooth wireless technology connection. 4 AV ...from this menu. En 35 You can also check or cancel your destination on this menu. 3 Phone Menu You can access the screen to customize settings. 6 Map screen 3 1 Screen title 2 Touching or on the scroll bar scrolls through the list and allows you to view the remaining items. 3 Returns the ...
...within the displayed area, touching the key to the right of the "Top Menu". Press the MODE button to display the navigation map screen. 7 AV operation screen This is related to hands-free phoning to see call histories and change the settings on the Bluetooth wireless technology connection. 4 AV ...from this menu. En 35 You can also check or cancel your destination on this menu. 3 Phone Menu You can access the screen to customize settings. 6 Map screen 3 1 Screen title 2 Touching or on the scroll bar scrolls through the list and allows you to view the remaining items. 3 Returns the ...
Owner's Manual
Page 36
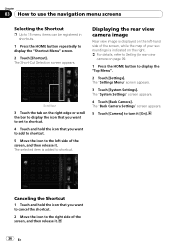
... the Shortcut p Up to 15 menu items can be registered in shortcuts. 1 Press the HOME button repeatedly to the left -hand side of the screen, while the map of your surroundings is indicated on the right. = For details, refer to Setting for rear view camera on page 99. 1 Press the ... want to set to shortcut. 4 Touch and hold the icon that you want to add to shortcut. 5 Move the icon to display the "Shortcut Menu" screen. 2 Touch [Shortcut]. Canceling the Shortcut 1 Touch and hold the icon that you want to cancel the shortcut. 2 Move the icon to shortcut. The selected item...
... the Shortcut p Up to 15 menu items can be registered in shortcuts. 1 Press the HOME button repeatedly to the left -hand side of the screen, while the map of your surroundings is indicated on the right. = For details, refer to Setting for rear view camera on page 99. 1 Press the ... want to set to shortcut. 4 Touch and hold the icon that you want to add to shortcut. 5 Move the icon to display the "Shortcut Menu" screen. 2 Touch [Shortcut]. Canceling the Shortcut 1 Touch and hold the icon that you want to cancel the shortcut. 2 Move the icon to shortcut. The selected item...


