
Manual
Page 2
...Diagram 14 Connecting the Power Cord 14 Key Finder 16 • Remote Controller Before Using This Product 17 About This Product 17 About This Manual 18 To Ensure Safe Driving 18 Resetting the Microprocessor 19 Precaution 19 In Case of Trouble 19 Using the Remote Controller 20 • Batteries... Basic Operation 21 To Listen to Music 21 Basic Operation of Tuner 23 • Band • Manual and Seek Tuning • Preset Tuning Basic Operation of Multi-CD Player 24 • Disc Search • Disc Number Search (for 6-Disc, 12...
...Diagram 14 Connecting the Power Cord 14 Key Finder 16 • Remote Controller Before Using This Product 17 About This Product 17 About This Manual 18 To Ensure Safe Driving 18 Resetting the Microprocessor 19 Precaution 19 In Case of Trouble 19 Using the Remote Controller 20 • Batteries... Basic Operation 21 To Listen to Music 21 Basic Operation of Tuner 23 • Band • Manual and Seek Tuning • Preset Tuning Basic Operation of Multi-CD Player 24 • Disc Search • Disc Number Search (for 6-Disc, 12...

Manual
Page 8
... is black. Do not route wiring in the electrical system, be sure to disconnect the battery cable before beginning installation. • Refer to the owner's manual for other units, then make connections correctly. • Secure the wiring with ignition switch ON/ OFF operations. If you are away from the ground of... shift, handbrake and seat rails. Connect the connectors of the same colors correctly. • If this product to another product, refer to the supplied Installation manuals of damage to a terminal coupled with cable clamps or adhesive tape.
... is black. Do not route wiring in the electrical system, be sure to disconnect the battery cable before beginning installation. • Refer to the owner's manual for other units, then make connections correctly. • Secure the wiring with ignition switch ON/ OFF operations. If you are away from the ground of... shift, handbrake and seat rails. Connect the connectors of the same colors correctly. • If this product to another product, refer to the supplied Installation manuals of damage to a terminal coupled with cable clamps or adhesive tape.

Manual
Page 14
... Orange To lighting switch terminal. If not, keep the Audio Mute lead free of the parking brake. Fuse resistor For details, consult the vehicle owner's manual. Connection method Ground side Clamp the parking brake switch power supply side lead. Clamp firmly with power regardless of the parking brake switch. Yellow/black...
... Orange To lighting switch terminal. If not, keep the Audio Mute lead free of the parking brake. Fuse resistor For details, consult the vehicle owner's manual. Connection method Ground side Clamp the parking brake switch power supply side lead. Clamp firmly with power regardless of the parking brake switch. Yellow/black...

Manual
Page 18
... brake and then re-engage it can be detected. In order to help you benefit fully from their operation by reading through the manual before you have stopped your listening enjoyment. All are designed for the easiest possible use these complicated functions are selected while driving, ..."YOU CANNOT USE THIS FUNCTION WHILE DRIVING" is intended to use the system. - About This Manual This product features a number of the parking brake cannot be assumed that the system has not detected that the parking brake is especially ...
... brake and then re-engage it can be detected. In order to help you benefit fully from their operation by reading through the manual before you have stopped your listening enjoyment. All are designed for the easiest possible use these complicated functions are selected while driving, ..."YOU CANNOT USE THIS FUNCTION WHILE DRIVING" is intended to use the system. - About This Manual This product features a number of the parking brake cannot be assumed that the system has not detected that the parking brake is especially ...

Manual
Page 19
Precaution • Keep this manual handy as a reference for operating procedures and precautions. • Always keep the volume low enough for the first time after installation. • When the machine fails to operate properly, contact your dealer or nearest authorized PIONEER Service Station. In Case of Trouble Should this product from moisture. •...
Precaution • Keep this manual handy as a reference for operating procedures and precautions. • Always keep the volume low enough for the first time after installation. • When the machine fails to operate properly, contact your dealer or nearest authorized PIONEER Service Station. In Case of Trouble Should this product from moisture. •...
Manual
Page 23
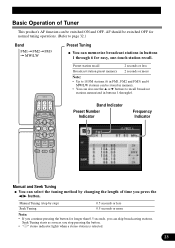
... stations (6 in buttons 1 through 6. Seek Tuning starts as soon as you can be switched ON and OFF. Band Indicator Preset Number Indicator Frequency Indicator Manual and Seek Tuning Manual Tuning (step by step) Seek Tuning 0.5 seconds or less 0.5 seconds or more • If you continue pressing the button for normal tuning operations...
... stations (6 in buttons 1 through 6. Seek Tuning starts as soon as you can be switched ON and OFF. Band Indicator Preset Number Indicator Frequency Indicator Manual and Seek Tuning Manual Tuning (step by step) Seek Tuning 0.5 seconds or less 0.5 seconds or more • If you continue pressing the button for normal tuning operations...

Manual
Page 24
... • When a 12-Disc Multi-CD Player is connected and you want to select disc 7 to 12, press the 1 to the multi-CD player owner's manual. • If there are no discs in the multi-CD player magazine, "NO DISC" is displayed.
... • When a 12-Disc Multi-CD Player is connected and you want to select disc 7 to 12, press the 1 to the multi-CD player owner's manual. • If there are no discs in the multi-CD player magazine, "NO DISC" is displayed.

Manual
Page 52
... already been read . Other Functions Switching the Multi-CD Player It is possible to connect up to the 50-Disc type multi-CD player's owner's manual.)
... already been read . Other Functions Switching the Multi-CD Player It is possible to connect up to the 50-Disc type multi-CD player's owner's manual.)
Manual
Page 63
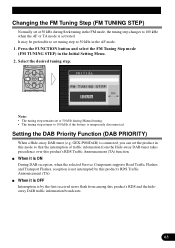
... temporarily disconnected. Setting the DAB Priority Function (DAB PRIORITY) When a Hide-away DAB tuner (e.g. GEX-P900DAB) is connected, you can set at 50 kHz during Manual tuning. • The tuning step returns to 100 kHz when the AF or TA mode is activated. When it is ON During DAB reception, when...
... temporarily disconnected. Setting the DAB Priority Function (DAB PRIORITY) When a Hide-away DAB tuner (e.g. GEX-P900DAB) is connected, you can set at 50 kHz during Manual tuning. • The tuning step returns to 100 kHz when the AF or TA mode is activated. When it is ON During DAB reception, when...

Manual
Page 73
... operations with this product's indications. The currently received Service has a Dynamic Label. When DAB reception is received, the icon on Hide-away DAB Tuner's Operation Manual.) DAB status Indications XTRA TEXT DAB The currently received Service has a Secondary Service Component. About This Product's Indications The following is an explanation of this... "About the "DAB READY" Indicator" on the right lights. Program Type ID code Service Label Service Component Label Indications that described in the DAB Operation Manual.
... operations with this product's indications. The currently received Service has a Dynamic Label. When DAB reception is received, the icon on Hide-away DAB Tuner's Operation Manual.) DAB status Indications XTRA TEXT DAB The currently received Service has a Secondary Service Component. About This Product's Indications The following is an explanation of this... "About the "DAB READY" Indicator" on the right lights. Program Type ID code Service Label Service Component Label Indications that described in the DAB Operation Manual.

Manual
Page 74
..., and then changes to page 32.) Changing the Label When operating with the button at step 2, indications are in the Hide-away DAB Tuner's Operation Manual.) • Changing the Label (Refer to page 25.) • Changing Display Indications (Refer to page 26.) • Operating Annoucements with Function Menu (Refer to blank...
..., and then changes to page 32.) Changing the Label When operating with the button at step 2, indications are in the Hide-away DAB Tuner's Operation Manual.) • Changing the Label (Refer to page 25.) • Changing Display Indications (Refer to page 26.) • Operating Annoucements with Function Menu (Refer to blank...


