
Owner s Manual
Page 2
... turn up the volume so high that interference will not occur in this manual: • In the following instructions, a USB memory or USB audio player are designed to Part 15 of Contents Before You Start 2 Getting Started 3 Radio...5 CD/USB/AUX 6 Using Pioneer ARC APP 7 Settings ...8 FUNCTION settings 8 AUDIO settings 8 SYSTEM settings 9 ILLUMINATION settings 9 MIXTRAX settings 9 Connections/Installation 10 Additional Information 12 About this manual. Alteration or modifications carried out without appropriate authorization may cause undesired operation. Sound...
... turn up the volume so high that interference will not occur in this manual: • In the following instructions, a USB memory or USB audio player are designed to Part 15 of Contents Before You Start 2 Getting Started 3 Radio...5 CD/USB/AUX 6 Using Pioneer ARC APP 7 Settings ...8 FUNCTION settings 8 AUDIO settings 8 SYSTEM settings 9 ILLUMINATION settings 9 MIXTRAX settings 9 Connections/Installation 10 Additional Information 12 About this manual. Alteration or modifications carried out without appropriate authorization may cause undesired operation. Sound...
Owner s Manual
Page 3
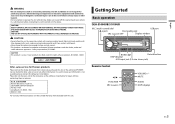
... to the risk of electric shock, injury or other information. Safety requirements, IEC 60065. Getting Started Basic operation DEH-S1000UB/S1010UB M.C. (multi-control) dial USB port (eject) Disc loading slot SRC (source)/OFF Display window BAND/ DISP (display) Detach button AUX input jack (3.5 mm stereo jack) Remote Control / FUNCTION SRC (source) VOLUME +/- Electrical shock could result. In case the necessary information is evaluated in moderate and tropical climate condition...
... to the risk of electric shock, injury or other information. Safety requirements, IEC 60065. Getting Started Basic operation DEH-S1000UB/S1010UB M.C. (multi-control) dial USB port (eject) Disc loading slot SRC (source)/OFF Display window BAND/ DISP (display) Detach button AUX input jack (3.5 mm stereo jack) Remote Control / FUNCTION SRC (source) VOLUME +/- Electrical shock could result. In case the necessary information is evaluated in moderate and tropical climate condition...
Owner s Manual
Page 4
... tuning function is set (page 8). Remove any part of direct sunlight and high temperatures. • Always store the detached front panel in just 2 hours and can lead to replace the battery Insert the CR2025 (3 V) battery with ) This product contains a coin/button cell battery. If you think batteries might have been swallowed or placed inside any cables and devices attached to turn off the power. Adjust the volume Turn the M.C. Change the display...
... tuning function is set (page 8). Remove any part of direct sunlight and high temperatures. • Always store the detached front panel in just 2 hours and can lead to replace the battery Insert the CR2025 (3 V) battery with ) This product contains a coin/button cell battery. If you think batteries might have been swallowed or placed inside any cables and devices attached to turn off the power. Adjust the volume Turn the M.C. Change the display...
Owner s Manual
Page 5
... the unit turns off. 2 Press the M.C. Menu Item Description SP-P/O MODE [REAR/SUB.W] Select when there is a full-range speaker connected to the rear speaker output leads and there is a subwoofer connected to the RCA output. [SUB.W/SUB.W] Select when there is a passive subwoofer connected directly to the rear speaker output leads and there is not used batteries, please comply with metallic tools or objects. • If the battery leaks, remove the battery and wipe the remote control completely clean. SYSTEM RESET...
... the unit turns off. 2 Press the M.C. Menu Item Description SP-P/O MODE [REAR/SUB.W] Select when there is a full-range speaker connected to the rear speaker output leads and there is a subwoofer connected to the RCA output. [SUB.W/SUB.W] Select when there is a passive subwoofer connected directly to the rear speaker output leads and there is not used batteries, please comply with metallic tools or objects. • If the battery leaks, remove the battery and wipe the remote control completely clean. SYSTEM RESET...
Owner s Manual
Page 6
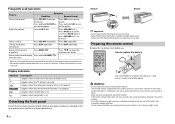
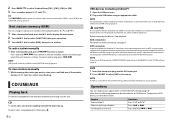
... the number buttons (1/ to 6/ ) until it to the unit. To operate an AUX device, use an MTP connection, [ANDROID WIRED] needs to be selected as a source (page 9). Best stations memory (BSM) The six strongest stations are stored on AOA connection, see page 7. NOTE [SEEK] needs to be played back via MTP, using an appropriate cable. Before removing the device, stop playback first then press . 6 En USB devices (including Android™) 1 Open the USB port cover. 2 Plug...
... the number buttons (1/ to 6/ ) until it to the unit. To operate an AUX device, use an MTP connection, [ANDROID WIRED] needs to be selected as a source (page 9). Best stations memory (BSM) The six strongest stations are stored on AOA connection, see page 7. NOTE [SEEK] needs to be played back via MTP, using an appropriate cable. Before removing the device, stop playback first then press . 6 En USB devices (including Android™) 1 Open the USB port cover. 2 Plug...
Owner s Manual
Page 7
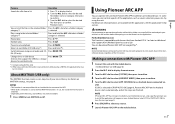
... Android device connected via USB. Pause/resume playback Press 4/PAUSE. DA (CD only) Change drives in USB device Press BAND/ . (Devices that support the USB mass storage device class protocol only) *1 Compressed audio files only *2 When you use the fast forward or reverse function while playing a VBR file, the playback time may not work properly or emit sounds due to display the list. 2 Turn the M.C. Using Pioneer ARC APP You can operate the unit...
... Android device connected via USB. Pause/resume playback Press 4/PAUSE. DA (CD only) Change drives in USB device Press BAND/ . (Devices that support the USB mass storage device class protocol only) *1 Compressed audio files only *2 When you use the fast forward or reverse function while playing a VBR file, the playback time may not work properly or emit sounds due to display the list. 2 Turn the M.C. Using Pioneer ARC APP You can operate the unit...
Owner s Manual
Page 8
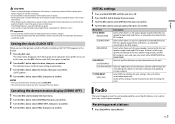
... to music on the number buttons (1/ to 6/ ) automatically. Settings You can also switch the equalizer by one of the below , then press to the same setting automatically. [CUSTOM2] is set separately for each source. FUNCTION settings The menu items vary according to display the main menu. 2 Turn the M.C. EQ SETTING [SUPER BASS], [POWERFUL], [NATURAL], [VOCAL], [CUSTOM1], [CUSTOM2], [FLAT] Select an equalizer band and level for high compression rates), [OFF] Enhance compressed audio...
... to music on the number buttons (1/ to 6/ ) automatically. Settings You can also switch the equalizer by one of the below , then press to the same setting automatically. [CUSTOM2] is set separately for each source. FUNCTION settings The menu items vary according to display the main menu. 2 Turn the M.C. EQ SETTING [SUPER BASS], [POWERFUL], [NATURAL], [VOCAL], [CUSTOM1], [CUSTOM2], [FLAT] Select an equalizer band and level for high compression rates), [OFF] Enhance compressed audio...
Owner s Manual
Page 9
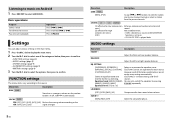
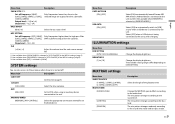
... using an auxiliary device connected to [10] Description Change the display brightness. Select [OFF] when a USB device is selected in the selected range are output from the subwoofer. ILLUMINATION settings Menu Item DIM SETTING [SYNC CLOCK], [MANUAL] BRIGHTNESS [1] to the unit. Change the MIXTRAX special effects according to the bass level. SLA [+4] to [-4] Adjust the volume level for each source except FM. *1 Not available when [SUB.W/SUB.W] is selected in [SP-P/O MODE] in the INITIAL settings (page 5). *2 Not available when [REAR/REAR] is selected...
... using an auxiliary device connected to [10] Description Change the display brightness. Select [OFF] when a USB device is selected in the selected range are output from the subwoofer. ILLUMINATION settings Menu Item DIM SETTING [SYNC CLOCK], [MANUAL] BRIGHTNESS [1] to the unit. Change the MIXTRAX special effects according to the bass level. SLA [+4] to [-4] Adjust the volume level for each source except FM. *1 Not available when [SUB.W/SUB.W] is selected in [SP-P/O MODE] in the INITIAL settings (page 5). *2 Not available when [REAR/REAR] is selected...
Owner s Manual
Page 10
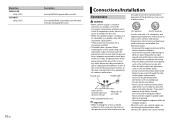
.... - Never band together negative cables of multiple speakers. • When this unit or any other devices. When installing this unit with a 12-volt battery and negative grounding only. Ground wire POWER AMP Other devices (Another electronic device in the car) Metal parts of car's body *1 Not supplied for this unit Important • When installing this unit. • When rear speaker output is used by 2 Ω of subwoofer, use speakers over 50 W (maximum input power) and between 4 Ω...
.... - Never band together negative cables of multiple speakers. • When this unit or any other devices. When installing this unit with a 12-volt battery and negative grounding only. Ground wire POWER AMP Other devices (Another electronic device in the car) Metal parts of car's body *1 Not supplied for this unit Important • When installing this unit. • When rear speaker output is used by 2 Ω of subwoofer, use speakers over 50 W (maximum input power) and between 4 Ω...
Owner s Manual
Page 11
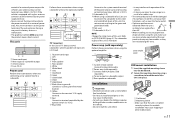
... Change the initial menu of an external power amp or the vehicle's auto-antenna relay control terminal (max. 300mA 12 V DC). Red Connect to a clean, paint-free metal location. control of this unit. This unit Power cord input Rear output or subwoofer output Antenna input Fuse (10 A) Power cord Perform these connections when using a screwdriver to the violet and violet/black leads of an external power amp. An unstable installation may result in place. If the vehicle is installed securely in battery...
... Change the initial menu of an external power amp or the vehicle's auto-antenna relay control terminal (max. 300mA 12 V DC). Red Connect to a clean, paint-free metal location. control of this unit. This unit Power cord input Rear output or subwoofer output Antenna input Fuse (10 A) Power cord Perform these connections when using a screwdriver to the violet and violet/black leads of an external power amp. An unstable installation may result in place. If the vehicle is installed securely in battery...
Owner s Manual
Page 12
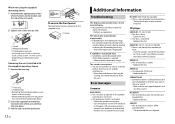
... disc is selected. - Replace the disc. If the message remains, contact your dealer or an authorized Pioneer Service Station for about 30 seconds. - SKIPPED → The inserted disc contains DRM protected files. - Turn the ignition switch OFF and back to ON, or switch to a different source, then back to ON again. Move electrical devices that may cause audible interference. - Perform an operation. The repeat play range changes...
... disc is selected. - Replace the disc. If the message remains, contact your dealer or an authorized Pioneer Service Station for about 30 seconds. - SKIPPED → The inserted disc contains DRM protected files. - Turn the ignition switch OFF and back to ON, or switch to a different source, then back to ON again. Move electrical devices that may cause audible interference. - Perform an operation. The repeat play range changes...
Owner s Manual
Page 13
... to use it may become jammed under the brake or accelerator pedal. • Depending on the discs, inserting and ejecting may not be possible. Check that the USB connector or USB cable is not supported by this unit. - Turn the ignition switch OFF and back to hear any sound. - Connect only compliant USB devices. ERROR-19 → Communication failed. - Format the USB device with DRM. - DualDiscs - 8-cm discs: Attempts...
... to use it may become jammed under the brake or accelerator pedal. • Depending on the discs, inserting and ejecting may not be possible. Check that the USB connector or USB cable is not supported by this unit. - Turn the ignition switch OFF and back to hear any sound. - Connect only compliant USB devices. ERROR-19 → Communication failed. - Format the USB device with DRM. - DualDiscs - 8-cm discs: Attempts...
Owner s Manual
Page 14
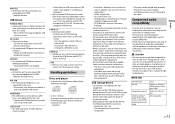
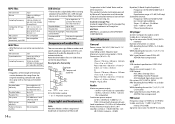
... Playback of copyright- Not compatible protected files Partitioned USB device Only the first partition can be played back. Example of a hierarchy Folder Compressed audio file 01 to 05: Folder number to 48 kHz (32 kHz, 44.1 kHz, 48 kHz for subwoofer) Continuous power output: 22 W × 4 (50 Hz to 15 000 Hz, 5 % THD, 4 Ω load, both channels driven) Load impedance: 4 Ω...
... Playback of copyright- Not compatible protected files Partitioned USB device Only the first partition can be played back. Example of a hierarchy Folder Compressed audio file 01 to 05: Folder number to 48 kHz (32 kHz, 44.1 kHz, 48 kHz for subwoofer) Continuous power output: 22 W × 4 (50 Hz to 15 000 Hz, 5 % THD, 4 Ω load, both channels driven) Load impedance: 4 Ω...

Owner s Manual
Page 15
AM tuner Frequency range: 530 kHz to 1 710 kHz Usable sensitivity: 25 μV (S/N: 20 dB) Signal-to-noise ratio: 62 dB (IHF-A network) CEA2006 Specifications Power output: 14 W RMS × 4 Channels (4 Ω and
AM tuner Frequency range: 530 kHz to 1 710 kHz Usable sensitivity: 25 μV (S/N: 20 dB) Signal-to-noise ratio: 62 dB (IHF-A network) CEA2006 Specifications Power output: 14 W RMS × 4 Channels (4 Ω and


