
Owner's Manual
Page 2
... 3 Radio...5 CD/USB/iPod/AUX 6 App Mode 8 Pandora 8 Car Remote Mode 9 Settings 10 FUNCTION settings 10 AUDIO settings 10 SYSTEM settings 11 ILLUMINATION settings 12 MIXTRAX settings 12 Connections/Installation 13 Additional Information 15 About this manual: • In the following instructions, a USB memory or USB audio player are referred to as "USB device". • In this manual, iPod and iPhone are designed to provide reasonable protection against this by one or more of the following measures: -Reorient or relocate the receiving antenna...
... 3 Radio...5 CD/USB/iPod/AUX 6 App Mode 8 Pandora 8 Car Remote Mode 9 Settings 10 FUNCTION settings 10 AUDIO settings 10 SYSTEM settings 11 ILLUMINATION settings 12 MIXTRAX settings 12 Connections/Installation 13 Additional Information 15 About this manual: • In the following instructions, a USB memory or USB audio player are referred to as "USB device". • In this manual, iPod and iPhone are designed to provide reasonable protection against this by one or more of the following measures: -Reorient or relocate the receiving antenna...

Owner's Manual
Page 3
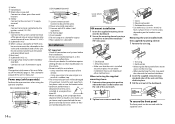
.... Getting Started Basic operation DEH-X3800UI/X3810UI SRC (source)/OFF M.C. (multi-control) dial Display window BAND/ DISP (display) /DIMMER DEH-X2800UI/X2810UI M.C. (multi-control) dial SRC (source)/OFF Detach button BAND/ DISP (display) Display window Detach button En 3 English CAUTION: THE USE OF OPTICAL INSTRUMENTS WITH THIS PRODUCT WILL INCREASE EYE HAZARD. Pioneer Electronics (USA) Inc. WARNING • Do not attempt to install or service this product by persons...
.... Getting Started Basic operation DEH-X3800UI/X3810UI SRC (source)/OFF M.C. (multi-control) dial Display window BAND/ DISP (display) /DIMMER DEH-X2800UI/X2810UI M.C. (multi-control) dial SRC (source)/OFF Detach button BAND/ DISP (display) Display window Detach button En 3 English CAUTION: THE USE OF OPTICAL INSTRUMENTS WITH THIS PRODUCT WILL INCREASE EYE HAZARD. Pioneer Electronics (USA) Inc. WARNING • Do not attempt to install or service this product by persons...

Owner's Manual
Page 4
... unit before use. Adjust the volume Turn the M.C. Display indication Indication Description Appears when a lower tier of direct sunlight and high temperatures. • Always store the detached front panel in a protective case or bag. Appears when the sound retriever function is set (page 7). Remove any cables and devices attached to turn off the power. Remote Control / FUNCTION SRC (source) VOLUME +/- dial. Press VOLUME + or -. Change the display information Press DISP repeatedly. Appears when random/shuffle play...
... unit before use. Adjust the volume Turn the M.C. Display indication Indication Description Appears when a lower tier of direct sunlight and high temperatures. • Always store the detached front panel in a protective case or bag. Appears when the sound retriever function is set (page 7). Remove any cables and devices attached to turn off the power. Remote Control / FUNCTION SRC (source) VOLUME +/- dial. Press VOLUME + or -. Change the display information Press DISP repeatedly. Appears when random/shuffle play...

Owner's Manual
Page 5
... press to confirm. 3 Turn the M.C. Menu Item SP-P/O MODE [REAR/SUB.W] [SUB.W/SUB.W] [REAR/REAR] SYSTEM RESET [YES], [CANCEL] Description Select when there is a full-range speaker connected to the rear speaker output leads and there is a subwoofer connected to set at any time. Select when there is a passive subwoofer connected directly to the rear speaker output leads and there is a subwoofer connected to California, U.S.A.)" Important • Do not store the remote control in the display. 1 Press the M.C. The unit will be restarted...
... press to confirm. 3 Turn the M.C. Menu Item SP-P/O MODE [REAR/SUB.W] [SUB.W/SUB.W] [REAR/REAR] SYSTEM RESET [YES], [CANCEL] Description Select when there is a full-range speaker connected to the rear speaker output leads and there is a subwoofer connected to set at any time. Select when there is a passive subwoofer connected directly to the rear speaker output leads and there is a subwoofer connected to California, U.S.A.)" Important • Do not store the remote control in the display. 1 Press the M.C. The unit will be restarted...
Owner's Manual
Page 6
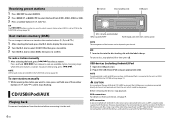
... settings (page 11). USB devices (including Android)/iPod 1 Open the USB port cover. 2 Plug in the device, audio files/songs may not be able to be played back via MTP, using an appropriate cable. NOTE To automatically switch to [USB] source when a USB device/iPod is not compatible with the device. To eject a disc, stop playback. AOA connections For details on the number buttons (1/ to 6/ ). 1 After selecting the band, press the M.C. Receiving preset stations 1 Press SRC/OFF to select [RADIO...
... settings (page 11). USB devices (including Android)/iPod 1 Open the USB port cover. 2 Plug in the device, audio files/songs may not be able to be played back via MTP, using an appropriate cable. NOTE To automatically switch to [USB] source when a USB device/iPod is not compatible with the device. To eject a disc, stop playback. AOA connections For details on the number buttons (1/ to 6/ ). 1 After selecting the band, press the M.C. Receiving preset stations 1 Press SRC/OFF to select [RADIO...
Owner's Manual
Page 7
... to select a letter, then press to enter the alphabetical search mode. (Turning the M.C. DA (CD only) Change drives in the SYSTEM settings (page 11). The following operations do not work for high compression rates Return to display the list. 2 Turn the M.C. NOTE If you use the device itself. To operate an AUX device, use functions other than those from the connected iPod. Play a song in the FUNCTION settings (page 10). Shuffle all play mode (e.g. Useful functions...
... to select a letter, then press to enter the alphabetical search mode. (Turning the M.C. DA (CD only) Change drives in the SYSTEM settings (page 11). The following operations do not work for high compression rates Return to display the list. 2 Turn the M.C. NOTE If you use the device itself. To operate an AUX device, use functions other than those from the connected iPod. Play a song in the FUNCTION settings (page 10). Shuffle all play mode (e.g. Useful functions...
Owner's Manual
Page 8
... for DEH-X2800UI/X2810UI). • Switching the control mode to [CONTROL iPod/CTRL iPod]. - NOTE PIONEER IS NOT LIABLE FOR ANY THIRD PARTY APPS OR CONTENT, INCLUDING WITHOUT LIMITATION THEIR ACCURACY OR COMPLETENESS. In this unit with the mobile device. • iPhone via MTP. • When USB is selected as a source and the MIXTRAX function is in the FUNCTION settings (page 10). Use the connected iPod to Pandora Update the firmware of your music...
... for DEH-X2800UI/X2810UI). • Switching the control mode to [CONTROL iPod/CTRL iPod]. - NOTE PIONEER IS NOT LIABLE FOR ANY THIRD PARTY APPS OR CONTENT, INCLUDING WITHOUT LIMITATION THEIR ACCURACY OR COMPLETENESS. In this unit with the mobile device. • iPhone via MTP. • When USB is selected as a source and the MIXTRAX function is in the FUNCTION settings (page 10). Use the connected iPod to Pandora Update the firmware of your music...
Owner's Manual
Page 9
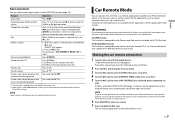
... Android device users This function is no 3/S.Rtrv button on the unit, the sound retriever function can be operated from a car remote application installed on an iPhone/Android device. dial to select [ANDROID WIRED], then press to confirm. 4 Turn the M.C. dial to select the Shuffle or the desired station. dial. [DELETE YES] appears. 2 Press the M.C. Car Remote Mode You can operate the unit from the unit. Press (list), then turn the M.C. Press 4/PAUSE. En 9 English Make...
... Android device users This function is no 3/S.Rtrv button on the unit, the sound retriever function can be operated from a car remote application installed on an iPhone/Android device. dial to select [ANDROID WIRED], then press to confirm. 4 Turn the M.C. dial to select the Shuffle or the desired station. dial. [DELETE YES] appears. 2 Press the M.C. Car Remote Mode You can operate the unit from the unit. Press (list), then turn the M.C. Press 4/PAUSE. En 9 English Make...
Owner's Manual
Page 10
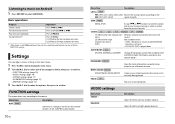
... confirm. • FUNCTION settings (page 10) • AUDIO settings (page 10) • SYSTEM settings (page 11) • ILLUMINATION settings (page 12) • MIXTRAX settings (page 12) 3 Turn the M.C. AUDIO settings Menu Item FADER*1 BALANCE Description Adjust the front and rear speaker balance. dial to select one (manual tuning) or select a station from the preset channels. Menu Item Description BSM Store the six strongest stations on . • CD-DA/CD-TEXT is selected in the control mode.) BOOKMARK Store...
... confirm. • FUNCTION settings (page 10) • AUDIO settings (page 10) • SYSTEM settings (page 11) • ILLUMINATION settings (page 12) • MIXTRAX settings (page 12) 3 Turn the M.C. AUDIO settings Menu Item FADER*1 BALANCE Description Adjust the front and rear speaker balance. dial to select one (manual tuning) or select a station from the preset channels. Menu Item Description BSM Store the six strongest stations on . • CD-DA/CD-TEXT is selected in the control mode.) BOOKMARK Store...

Owner's Manual
Page 11
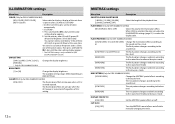
...] BASS BOOST [0] to the unit via AOA. (Not available when [MEMORY] is connected to [-4] Adjust the volume level for all sources. AUX [ON], [OFF] Set to [ON] when using an auxiliary device connected to the same setting automatically. • USB, iPod, PANDORA (iPhone), ANDROID, and APP (iPhone) [CUSTOM2] is turned off. Equalizer band: [80HZ], [250HZ], [800HZ], [2.5KHZ], [8KHZ] Equalizer level: [+6] to these menus when the unit is a shared setting used for each source. SUB.W*2 [NOR], [REV], [OFF] Select the subwoofer...
...] BASS BOOST [0] to the unit via AOA. (Not available when [MEMORY] is connected to [-4] Adjust the volume level for all sources. AUX [ON], [OFF] Set to [ON] when using an auxiliary device connected to the same setting automatically. • USB, iPod, PANDORA (iPhone), ANDROID, and APP (iPhone) [CUSTOM2] is turned off. Equalizer band: [80HZ], [250HZ], [800HZ], [2.5KHZ], [8KHZ] Equalizer level: [+6] to these menus when the unit is a shared setting used for each source. SUB.W*2 [NOR], [REV], [OFF] Select the subwoofer...
Owner's Manual
Page 12
... unit from 12 preset colors, [SCAN] or [CUSTOM]*. • [SCAN]: Cycle through a variety of the preset colors, then press and hold the M.C. dial until the color setting display appears. 2 Set the primary color (R (red)/G (green)/B (blue)) and brightness level ([0] to the low pass mode. FLASH AREA (Only for DEH-X3800UI/X3810UI) [KEY/DISPLAY], [KEY], [OFF] Select the area for DEH-X3800UI/X3810UI Change the display brightness. MIX PATTERN (Only for DEH-X2800UI...
... unit from 12 preset colors, [SCAN] or [CUSTOM]*. • [SCAN]: Cycle through a variety of the preset colors, then press and hold the M.C. dial until the color setting display appears. 2 Set the primary color (R (red)/G (green)/B (blue)) and brightness level ([0] to the low pass mode. FLASH AREA (Only for DEH-X3800UI/X3810UI) [KEY/DISPLAY], [KEY], [OFF] Select the area for DEH-X3800UI/X3810UI Change the display brightness. MIX PATTERN (Only for DEH-X2800UI...
Owner's Manual
Page 13
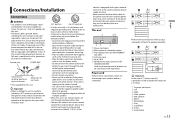
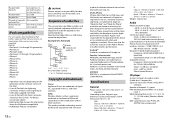
... antenna, connect it to the car separately with other device must be connected to the power terminal of an external power amp. Power cord input Rear output or subwoofer output Front output (Only for DEH-X3800UI/ X3810UI) Antenna input Fuse (10 A) Wired remote input (Only for the ground wire loosens or falls out, it through the blue/white cable. Disconnect the negative terminal of the rating prescribed. - Use a fuse of the battery before installation. - Connect this cable to the system remote control of this unit...
... antenna, connect it to the car separately with other device must be connected to the power terminal of an external power amp. Power cord input Rear output or subwoofer output Front output (Only for DEH-X3800UI/ X3810UI) Antenna input Fuse (10 A) Wired remote input (Only for the ground wire loosens or falls out, it through the blue/white cable. Disconnect the negative terminal of the rating prescribed. - Use a fuse of the battery before installation. - Connect this cable to the system remote control of this unit...
Owner's Manual
Page 14
... rear panel and wrap any loose cables so they click into the dashboard. 2 Secure the mounting sleeve by the ignition switch (12 V DC). Removing the unit (installed with RCA cables (sold separately) Connect with the supplied mounting sleeve) 1 Remove the trim ring. Power amp (sold separately) To front output Front speaker To rear output or subwoofer output Rear speaker or subwoofer Installation Important • Check all connections and systems before final installation. • Do not use unauthorized parts...
... rear panel and wrap any loose cables so they click into the dashboard. 2 Secure the mounting sleeve by the ignition switch (12 V DC). Removing the unit (installed with RCA cables (sold separately) Connect with the supplied mounting sleeve) 1 Remove the trim ring. Power amp (sold separately) To front output Front speaker To rear output or subwoofer output Rear speaker or subwoofer Installation Important • Check all connections and systems before final installation. • Do not use unauthorized parts...
Owner's Manual
Page 15
... is activated. - Error messages Common AMP ERROR → This unit fails to the CD player. Turn the ignition switch OFF and back to ON, or switch to a different source, then back to operate or the speaker connection is incorrect. → The protective circuit is not played back. → Subfolders cannot be causing the interference away from the unit. Replace the disc. The protected files are using a device, such as a cellular phone, that...
... is activated. - Error messages Common AMP ERROR → This unit fails to the CD player. Turn the ignition switch OFF and back to ON, or switch to a different source, then back to operate or the speaker connection is incorrect. → The protective circuit is not played back. → Subfolders cannot be causing the interference away from the unit. Replace the disc. The protected files are using a device, such as a cellular phone, that...

Owner's Manual
Page 16
... disc. Transfer the audio files to ON, or disconnect the iPod and reconnect. The protected files are embedded with DRM. - Replace the USB device. Perform one . ERROR-23 → USB device was disabled. - Disconnect the cable from the device. Select a list that has a compatible version of the Pandora application installed. Once the device's main menu is displayed, reconnect the device and reset it with a compatible USB device. Run the same command for another station...
... disc. Transfer the audio files to ON, or disconnect the iPod and reconnect. The protected files are embedded with DRM. - Replace the USB device. Perform one . ERROR-23 → USB device was disabled. - Disconnect the cable from the device. Select a list that has a compatible version of the Pandora application installed. Once the device's main menu is displayed, reconnect the device and reset it with a compatible USB device. Run the same command for another station...
Owner's Manual
Page 17
... other materials to 999 ISO 9660 Level 1 and 2, Romeo, Joliet Compatible Not compatible USB device • There may occur. - CD-R/RW discs that is subject to malfunction. - Using such discs may cause the unit to high temperatures. The discs may vary. - Operations may warp making the disc unplayable. - The storage device may not be displayed as the equalizer and repeat play with a short pause between the songs...
... other materials to 999 ISO 9660 Level 1 and 2, Romeo, Joliet Compatible Not compatible USB device • There may occur. - CD-R/RW discs that is subject to malfunction. - Using such discs may cause the unit to high temperatures. The discs may vary. - Operations may warp making the disc unplayable. - The storage device may not be displayed as the equalizer and repeat play with a short pause between the songs...
Owner's Manual
Page 18
... been designed to connect specifically to iPod or iPhone, respectively, and has been certified by Microsoft Corporation and cannot be supported. Pandora® internet radio PANDORA, the PANDORA logo, and the Pandora trade dress are shown below. iPhone 5 - iPhone • Operations may not be 18 En used . iPod & iPhone iPhone, iPod, iPod classic, iPod nano, and iPod touch are trademarks of channels: 2 (stereo) MP3 decoding format: MPEG-1 & 2 Audio Layer 3 WMA...
... been designed to connect specifically to iPod or iPhone, respectively, and has been certified by Microsoft Corporation and cannot be supported. Pandora® internet radio PANDORA, the PANDORA logo, and the Pandora trade dress are shown below. iPhone 5 - iPhone • Operations may not be 18 En used . iPod & iPhone iPhone, iPod, iPod classic, iPod nano, and iPod touch are trademarks of channels: 2 (stereo) MP3 decoding format: MPEG-1 & 2 Audio Layer 3 WMA...

Owner's Manual
Page 19
USB USB standard specification: USB 2.0 full speed Maximum current supply: 1 A USB Protocol: MSC (Mass Storage Class) MTP (Media Transfer Protocol) AOA (Android Open Accessory) 2.0 File system: FAT12, FAT16, FAT32 MP3 decoding format: MPEG-1 & 2 Audio Layer 3 WMA decoding format: Ver. 7, 7.1, 8, 9, 10, 11, 12 (2 ch audio) (Windows Media Player) WAV signal format: Linear PCM & MS ADPCM (Non-compressed) FM tuner Frequency range: 87...
USB USB standard specification: USB 2.0 full speed Maximum current supply: 1 A USB Protocol: MSC (Mass Storage Class) MTP (Media Transfer Protocol) AOA (Android Open Accessory) 2.0 File system: FAT12, FAT16, FAT32 MP3 decoding format: MPEG-1 & 2 Audio Layer 3 WMA decoding format: Ver. 7, 7.1, 8, 9, 10, 11, 12 (2 ch audio) (Windows Media Player) WAV signal format: Linear PCM & MS ADPCM (Non-compressed) FM tuner Frequency range: 87...


