Owners Manual
Page 5
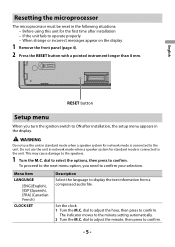
... mode when a speaker system for the first time after installation, the setup menu appears in the following situations: - The indicator moves to confirm. - 5 - English RESET button Setup menu When you need to confirm your selection. Set the clock. 1 Turn the M.C. Menu Item LANGUAGE [ENG](English), [ESP](Spanish), [FRA] (Canadian French) CLOCK SET Description Select the language to the unit. Before using this unit for network mode is connected to display the text information from a compressed audio...
... mode when a speaker system for the first time after installation, the setup menu appears in the following situations: - The indicator moves to confirm. - 5 - English RESET button Setup menu When you need to confirm your selection. Set the clock. 1 Turn the M.C. Menu Item LANGUAGE [ENG](English), [ESP](Spanish), [FRA] (Canadian French) CLOCK SET Description Select the language to the unit. Before using this unit for network mode is connected to display the text information from a compressed audio...
Owners Manual
Page 6
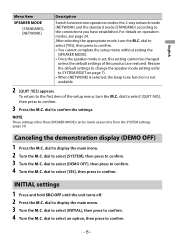
... main menu. 3 Turn the M.C. dial to display the main menu. 2 Turn the M.C. dial to select [DEMO OFF], then press to the connections you have established. To return to SYSTEM RESET on operation modes, see page 24. Canceling the demonstration display (DEMO OFF) 1 Press the M.C. NOTE These settings other than [SPEAKER MODE] can be changed unless the default settings of the setup menu, turn the M.C. English Menu Item SPEAKER MODE [STANDARD], [NETWORK] Description Switch between two operation modes...
... main menu. 3 Turn the M.C. dial to display the main menu. 2 Turn the M.C. dial to select [DEMO OFF], then press to the connections you have established. To return to SYSTEM RESET on operation modes, see page 24. Canceling the demonstration display (DEMO OFF) 1 Press the M.C. NOTE These settings other than [SPEAKER MODE] can be changed unless the default settings of the setup menu, turn the M.C. English Menu Item SPEAKER MODE [STANDARD], [NETWORK] Description Switch between two operation modes...
Owners Manual
Page 7
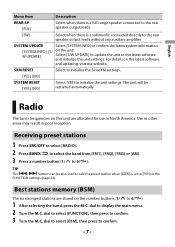
... used to select a preset station when [SEEK] is a subwoofer connected directly to initialize the unit settings. Best stations memory (BSM) The six strongest stations are allocated for use in the FUNCTION settings (page 26). Receiving preset stations 1 Press SRC/OFF to select [RADIO]. 2 Press BAND/ to select the band from [FM1], [FM2], [FM3] or [AM]. 3 Press a number button (1/ to display the main menu. 2 Turn the M.C. For details on the unit. Radio The tuner frequencies on this unit are stored on the number buttons...
... used to select a preset station when [SEEK] is a subwoofer connected directly to initialize the unit settings. Best stations memory (BSM) The six strongest stations are allocated for use in the FUNCTION settings (page 26). Receiving preset stations 1 Press SRC/OFF to select [RADIO]. 2 Press BAND/ to select the band from [FM1], [FM2], [FM3] or [AM]. 3 Press a number button (1/ to display the main menu. 2 Turn the M.C. For details on the unit. Radio The tuner frequencies on this unit are stored on the number buttons...

Owners Manual
Page 8
... later installed and also supports AOA (Android Open Accessory) 2.0 can be dangerous. To store stations manually 1 While receiving the station you want to store, press and hold / then release to [ON] in the SYSTEM settings (page 32).) Playing back Disconnect headphones from the unit, which could be connected to the unit. USB/iPhone®/AUX (iPhone source is not available when [USB MTP] is connected to the unit, set [USB AUTO] to select a station. USB devices...
... later installed and also supports AOA (Android Open Accessory) 2.0 can be dangerous. To store stations manually 1 While receiving the station you want to store, press and hold / then release to [ON] in the SYSTEM settings (page 32).) Playing back Disconnect headphones from the unit, which could be connected to the unit. USB/iPhone®/AUX (iPhone source is not available when [USB MTP] is connected to the unit, set [USB AUTO] to select a station. USB devices...
Owners Manual
Page 9
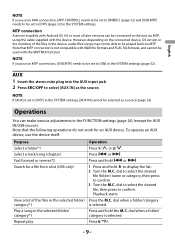
... set to [WIRED] (page 32) and [USB MTP] needs to be connected to the unit via MTP. Purpose Operation Select a folder*1 Press 1/ or 2/ . However, depending on the connected device, OS version or the numbers of later versions can make various adjustments in the selected folder/ Press the M.C. Note that the following operations do not work for a file from a list (USB only) 1 Press and hold to select [AUX IN] as a source...
... set to [WIRED] (page 32) and [USB MTP] needs to be connected to the unit via MTP. Purpose Operation Select a folder*1 Press 1/ or 2/ . However, depending on the connected device, OS version or the numbers of later versions can make various adjustments in the selected folder/ Press the M.C. Note that the following operations do not work for a file from a list (USB only) 1 Press and hold to select [AUX IN] as a source...
Owners Manual
Page 12
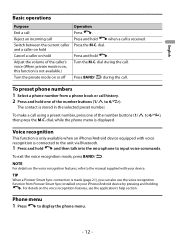
... recognition function from a phone book or call using a preset number, press one of the number buttons (1/ to input voice commands. Voice recognition This function is only available when an iPhone/Android device equipped with your iPhone/Android device by pressing and holding . Phone menu 1 Press to 6/ ). Turn the M.C. English Basic operations Purpose End a call Reject an incoming call . Press and hold Adjust the volume of the caller's voice (When private mode...
... recognition function from a phone book or call using a preset number, press one of the number buttons (1/ to input voice commands. Voice recognition This function is only available when an iPhone/Android device equipped with your iPhone/Android device by pressing and holding . Phone menu 1 Press to 6/ ). Turn the M.C. English Basic operations Purpose End a call Reject an incoming call . Press and hold Adjust the volume of the caller's voice (When private mode...
Owners Manual
Page 13
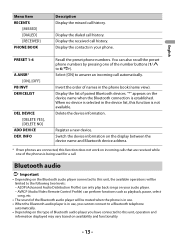
... operations will be limited to answer an incoming call history. Select [ON] to the following two levels: - When no device is selected in use , you have connected to this function does not work on availability and functionality. - 13 - AVRCP (Audio/Video Remote Control Profile) can also recall the preset phone numbers by pressing one of paired Bluetooth devices. Display the dialed call automatically. INFO Recall the preset phone numbers. English Menu Item RECENTS [MISSED] [DIALED] [RECEIVED] PHONE BOOK...
... operations will be limited to answer an incoming call history. Select [ON] to the following two levels: - When no device is selected in use , you have connected to this function does not work on availability and functionality. - 13 - AVRCP (Audio/Video Remote Control Profile) can also recall the preset phone numbers by pressing one of paired Bluetooth devices. Display the dialed call automatically. INFO Recall the preset phone numbers. English Menu Item RECENTS [MISSED] [DIALED] [RECEIVED] PHONE BOOK...
Owners Manual
Page 14
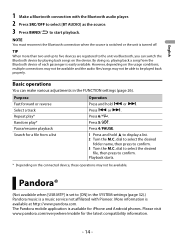
... the connected device, these operations may not be played back properly. Press 5/ . Pandora® (Not available when [USB MTP] is a music service not affiliated with the Bluetooth audio player. 2 Press SRC/OFF to select [BT AUDIO] as the source. 3 Press BAND/ to display a list. 2 Turn the M.C. More information is easily available. Press 6/ . dial to select the desired folder name, then press to [ON] in the FUNCTION settings (page...
... the connected device, these operations may not be played back properly. Press 5/ . Pandora® (Not available when [USB MTP] is a music service not affiliated with the Bluetooth audio player. 2 Press SRC/OFF to select [BT AUDIO] as the source. 3 Press BAND/ to display a list. 2 Turn the M.C. More information is easily available. Press 6/ . dial to select the desired folder name, then press to [ON] in the FUNCTION settings (page...
Owners Manual
Page 15
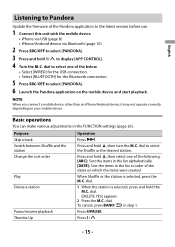
... station Change the sort order Play Delete a station Pause/resume playback Thumbs Up Operation Press . dial. Press 1/ . - 15 - Basic operations You can make various adjustments in step 1. To cancel, press BAND/ in the FUNCTION settings (page 26). Press 4/PAUSE. When Shuffle or the station is selected, press and hold , then turn the M.C. English Listening to Pandora Update the firmware of the dates on your mobile device...
... station Change the sort order Play Delete a station Pause/resume playback Thumbs Up Operation Press . dial. Press 1/ . - 15 - Basic operations You can make various adjustments in step 1. To cancel, press BAND/ in the FUNCTION settings (page 26). Press 4/PAUSE. When Shuffle or the station is selected, press and hold , then turn the M.C. English Listening to Pandora Update the firmware of the dates on your mobile device...
Owners Manual
Page 18
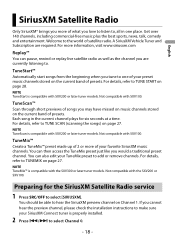
... SiriusXM music channels. Preparing for six seconds at a time. NOTE TuneStart is compatible with the SXV300 or later tuner models. You can pause, rewind or replay live satellite radio as well as the channel you would a traditional preset channel. You should be able to TUNE SCAN (scanning the songs) on Channel 1. Each song in one of your SiriusXM Connect tuner is compatible with SXV200 or later tuner models...
... SiriusXM music channels. Preparing for six seconds at a time. NOTE TuneStart is compatible with the SXV300 or later tuner models. You can pause, rewind or replay live satellite radio as well as the channel you would a traditional preset channel. You should be able to TUNE SCAN (scanning the songs) on Channel 1. Each song in one of your SiriusXM Connect tuner is compatible with SXV200 or later tuner models...
Owners Manual
Page 21
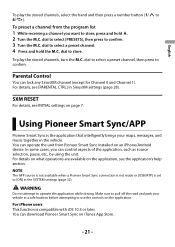
... the M.C. To preset a channel from Pioneer Smart Sync installed on the application, see the application's help section. To play the stored channels, select the band and then press a number button (1/ to [ON] in the vehicle. SXM RESET For details, see [PARENTAL CTRL] in a safe location before attempting to select a preset channel. 4 Press and hold . 2 Turn the M.C. For iPhone users This function is set to 6/ ). dial to use the controls on page 7. WARNING...
... the M.C. To preset a channel from Pioneer Smart Sync installed on the application, see the application's help section. To play the stored channels, select the band and then press a number button (1/ to [ON] in the vehicle. SXM RESET For details, see [PARENTAL CTRL] in a safe location before attempting to select a preset channel. 4 Press and hold . 2 Turn the M.C. For iPhone users This function is set to 6/ ). dial to use the controls on page 7. WARNING...
Owners Manual
Page 23
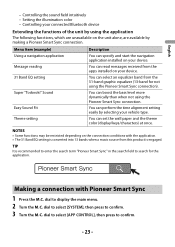
... setting Super "Todoroki" Sound Easy Sound Fit Theme setting Description You can set the wall paper and the theme color (display/keys/characters) at once. Controlling the sound field intuitively - Controlling your vehicle type. dial to select [APP CONTROL], then press to search for not using the application The following functions, which are available by selecting your connected Bluetooth device Extending the functions of the unit by using the Pioneer Smart Sync connection...
... setting Super "Todoroki" Sound Easy Sound Fit Theme setting Description You can set the wall paper and the theme color (display/keys/characters) at once. Controlling the sound field intuitively - Controlling your vehicle type. dial to select [APP CONTROL], then press to search for not using the application The following functions, which are available by selecting your connected Bluetooth device Extending the functions of the unit by using the Pioneer Smart Sync connection...
Owners Manual
Page 24
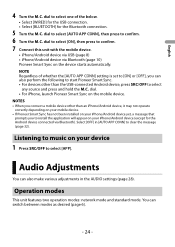
... been installed on your iPhone/Android device yet, a message that prompts you can switch between modes as desired (page 6). - 24 - English 4 Turn the M.C. dial to select [ON], then press to select [APP]. Listening to music on your device 1 Press SRC/OFF to confirm. 7 Connect this unit with the mobile device. • iPhone/Android device via USB (page 8) • iPhone/Android device via Bluetooth). Audio Adjustments You can also make various adjustments in [AUTO APP...
... been installed on your iPhone/Android device yet, a message that prompts you can switch between modes as desired (page 6). - 24 - English 4 Turn the M.C. dial to select [ON], then press to select [APP]. Listening to music on your device 1 Press SRC/OFF to confirm. 7 Connect this unit with the mobile device. • iPhone/Android device via USB (page 8) • iPhone/Android device via Bluetooth). Audio Adjustments You can also make various adjustments in [AUTO APP...

Owners Manual
Page 29
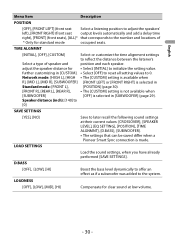
... EQ SETTING [SUPER BASS], [POWERFUL], [DYNAMIC], [NATURAL], [VOCAL], [VIVID], [SET BY APP]*, [CUSTOM1], [CUSTOM2], [FLAT] * [SET BY APP] is displayed when the preset equalizer curve that is not available in [CUSTOM1]. dial, then store the customized equalizer curve in the unit has been set from Pioneer Smart Sync. SPEAKER LEVEL Network mode: [HIGH L], [HIGH Select a speaker unit (filter) and adjust the R], [MID L], [MID R], [SUBWOOFER] output level. Equalizer band: [50HZ] to [12.5kHZ] Equalizer level: [-6] to...
... EQ SETTING [SUPER BASS], [POWERFUL], [DYNAMIC], [NATURAL], [VOCAL], [VIVID], [SET BY APP]*, [CUSTOM1], [CUSTOM2], [FLAT] * [SET BY APP] is displayed when the preset equalizer curve that is not available in [CUSTOM1]. dial, then store the customized equalizer curve in the unit has been set from Pioneer Smart Sync. SPEAKER LEVEL Network mode: [HIGH L], [HIGH Select a speaker unit (filter) and adjust the R], [MID L], [MID R], [SUBWOOFER] output level. Equalizer band: [50HZ] to [12.5kHZ] Equalizer level: [-6] to...
Owners Manual
Page 30
... adjust the speakers' left), [FRONT RIGHT] (front seat output levels automatically and add a delay time right), [FRONT] (front seats), [ALL]* that can be saved differ when a Pioneer Smart Sync connection is selected in [CUSTOM]. • Select [OFF] to reset all setting values to 0. D.BASS [OFF], [LOW], [HI] Boost the bass level dynamically to offer an effect as if a subwoofer was added to the number and locations of speaker...
... adjust the speakers' left), [FRONT RIGHT] (front seat output levels automatically and add a delay time right), [FRONT] (front seats), [ALL]* that can be saved differ when a Pioneer Smart Sync connection is selected in [CUSTOM]. • Select [OFF] to reset all setting values to 0. D.BASS [OFF], [LOW], [HI] Boost the bass level dynamically to offer an effect as if a subwoofer was added to the number and locations of speaker...
Owners Manual
Page 31
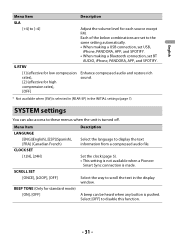
... making a USB connection, set USB, iPhone, PANDORA, APP, and SPOTIFY. • When making a Bluetooth connection, set BT AUDIO, iPhone, PANDORA, APP, and SPOTIFY. Each of the below combinations are set to [-4] Adjust the volume level for standard mode) [ON], [OFF] Description Select the language to disable this function. - 31 - SYSTEM settings You can be heard when any button is selected in [REAR-SP] in the display window. Select the way to these menus when the unit...
... making a USB connection, set USB, iPhone, PANDORA, APP, and SPOTIFY. • When making a Bluetooth connection, set BT AUDIO, iPhone, PANDORA, APP, and SPOTIFY. Each of the below combinations are set to [-4] Adjust the volume level for standard mode) [ON], [OFF] Description Select the language to disable this function. - 31 - SYSTEM settings You can be heard when any button is selected in [REAR-SP] in the display window. Select the way to these menus when the unit...
Owners Manual
Page 32
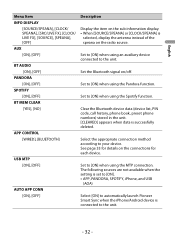
... auxiliary device connected to [ON] when using the Spotify function. Select the appropriate connection method according to automatically launch Pioneer Smart Sync when the iPhone/Android device is selected, display the antenna instead of the speana on the radio source. The following sources are not available when the setting is set to [ON]. • APP, PANDORA, SPOTIFY, iPhone, and USB (AOA) Select [ON] to your device. Clear the Bluetooth device data (device list, PIN code, call history, phone book, preset phone numbers...
... auxiliary device connected to [ON] when using the Spotify function. Select the appropriate connection method according to automatically launch Pioneer Smart Sync when the iPhone/Android device is selected, display the antenna instead of the speana on the radio source. The following sources are not available when the setting is set to [ON]. • APP, PANDORA, SPOTIFY, iPhone, and USB (AOA) Select [ON] to your device. Clear the Bluetooth device data (device list, PIN code, call history, phone book, preset phone numbers...
Owners Manual
Page 34
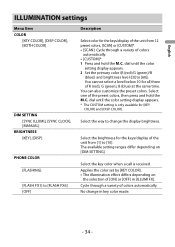
... settings Menu Item COLOR [KEY COLOR], [DISP COLOR], [BOTH COLOR] DIM SETTING [SYNC ILLUMI], [SYNC CLOCK], [MANUAL] BRIGHTNESS [KEY], [DISP] PHONE COLOR [FLASHING] [FLASH FX1] to [FLASH FX6] [OFF] Description Select color for all three of R (red), G (green), B (blue) at the same time. Applies the color set by [KEY COLOR]. • The illumination effect differs depending on [DIM SETTING]. Select the key color when a call is only available for the keys/display of colors automatically. No change...
... settings Menu Item COLOR [KEY COLOR], [DISP COLOR], [BOTH COLOR] DIM SETTING [SYNC ILLUMI], [SYNC CLOCK], [MANUAL] BRIGHTNESS [KEY], [DISP] PHONE COLOR [FLASHING] [FLASH FX1] to [FLASH FX6] [OFF] Description Select color for all three of R (red), G (green), B (blue) at the same time. Applies the color set by [KEY COLOR]. • The illumination effect differs depending on [DIM SETTING]. Select the key color when a call is only available for the keys/display of colors automatically. No change...
Owners Manual
Page 37
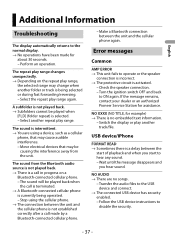
.... NO AUDIO → There are using the cellular phone. → The connection between the unit and the cellular phone is no songs. - Select the repeat play range changes unexpectedly. → Depending on a Bluetooth-connected cellular phone. - Perform an operation. The sound from the unit. A subfolder is not played back. → Subfolders cannot be causing the interference away from the Bluetooth audio source is not played back. → There is selected. - USB device/iPhone FORMAT...
.... NO AUDIO → There are using the cellular phone. → The connection between the unit and the cellular phone is no songs. - Select the repeat play range changes unexpectedly. → Depending on a Bluetooth-connected cellular phone. - Perform an operation. The sound from the unit. A subfolder is not played back. → Subfolders cannot be causing the interference away from the Bluetooth audio source is not played back. → There is selected. - USB device/iPhone FORMAT...
Owners Manual
Page 38
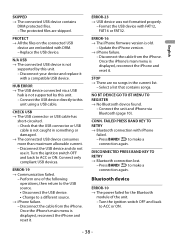
... iPhone's main menu is old. - Connect the unit and iPhone via a USB hub is not supported by this unit. - Select a list that the USB connector or USB cable is displayed, reconnect the iPhone and reset it . Press BAND/ to a different source. → iPhone failure. - Connect only compliant USB devices. ERROR-23 → USB device was not formatted properly. - Press BAND/ to ACC or ON. Turn the ignition switch OFF and back to make a connection again. Format the USB device with iPhone...
... iPhone's main menu is old. - Connect the unit and iPhone via a USB hub is not supported by this unit. - Select a list that the USB connector or USB cable is displayed, reconnect the iPhone and reset it . Press BAND/ to a different source. → iPhone failure. - Connect only compliant USB devices. ERROR-23 → USB device was not formatted properly. - Press BAND/ to ACC or ON. Turn the ignition switch OFF and back to make a connection again. Format the USB device with iPhone...


