
Owner's Manual
Page 5
......92 Controlling components...93 11 The MCACC PRO menu Making receiver settings from the MCACC PRO menu 96 Automatic MCACC (Expert)...96 Manual MCACC setup...98 Checking MCACC Data...100 Data Management...101 14 Additional information Surround sound formats...124 SABRE DACTM...124 About HDMI...124...Specifications...133 Preset code list...134 12 The System Setup and Other Setup menus Making receiver settings from the System Setup menu 104 Manual speaker setup...104 Network Setup menu...106 Checking the Network Information...108 MHL Setup...108 The Other Setup menu...108 Making network ...
......92 Controlling components...93 11 The MCACC PRO menu Making receiver settings from the MCACC PRO menu 96 Automatic MCACC (Expert)...96 Manual MCACC setup...98 Checking MCACC Data...100 Data Management...101 14 Additional information Surround sound formats...124 SABRE DACTM...124 About HDMI...124...Specifications...133 Preset code list...134 12 The System Setup and Other Setup menus Making receiver settings from the System Setup menu 104 Manual speaker setup...104 Network Setup menu...106 Checking the Network Information...108 MHL Setup...108 The Other Setup menu...108 Making network ...

Owner's Manual
Page 8
... be adjusted and set independently. Full Band Phase Control gives multi-range speakers the sound coherence of each speaker. In addition to the results of Pioneer's high sound quality designs. A separate monitor supporting Ultra HD (4K video) is required. % HDMI (3D, Audio Return Channel) - 9in/3out (Dual out + HDZONE out)...features of Hi-bit 32 Audio Processing, the digital filter and the up to 4K/60p and displayed. 01 Before you start Our philosophy Pioneer is dedicated to making your taste by manual correction. This function is required to use the above function. 8
... be adjusted and set independently. Full Band Phase Control gives multi-range speakers the sound coherence of each speaker. In addition to the results of Pioneer's high sound quality designs. A separate monitor supporting Ultra HD (4K video) is required. % HDMI (3D, Audio Return Channel) - 9in/3out (Dual out + HDZONE out)...features of Hi-bit 32 Audio Processing, the digital filter and the up to 4K/60p and displayed. 01 Before you start Our philosophy Pioneer is dedicated to making your taste by manual correction. This function is required to use the above function. 8

Owner's Manual
Page 20
...) AM LOOP ANTENNA FM UNBAL 75 IR RS-232C 12V TRIGGER 1 OUT IN 1 IN 2 2 SPEAKERS (OUTPUT 12 V TOTAL 150 mA MAX) Notes ! Plugging in this manual. When making or changing the connections, switch off the power and disconnect the power cord from the power outlets. ! Refer to The Input Setup menu...
...) AM LOOP ANTENNA FM UNBAL 75 IR RS-232C 12V TRIGGER 1 OUT IN 1 IN 2 2 SPEAKERS (OUTPUT 12 V TOTAL 150 mA MAX) Notes ! Plugging in this manual. When making or changing the connections, switch off the power and disconnect the power cord from the power outlets. ! Refer to The Input Setup menu...

Owner's Manual
Page 25
..., Top Middle and Top Backward speakers mounted on the receiver comprises a positive (+) and negative (-) terminal. If you 're using speaker cables. ! Please refer to the manual that came with your speakers for bigger rooms. ! If you have two subwoofers, the second subwoofer can be positioned 60 cm to three times the...
..., Top Middle and Top Backward speakers mounted on the receiver comprises a positive (+) and negative (-) terminal. If you 're using speaker cables. ! Please refer to the manual that came with your speakers for bigger rooms. ! If you have two subwoofers, the second subwoofer can be positioned 60 cm to three times the...

Owner's Manual
Page 26
...-amping shown above. % To bi-wire a speaker, connect two speaker cords to do not remove it for more information. ! Doing so may damage your speaker manual for bi-amping. Front right Front left Bi-amp compatible speaker High Bi-amp compatible speaker High Bi-wiring your speakers Your speakers can also...
...-amping shown above. % To bi-wire a speaker, connect two speaker cords to do not remove it for more information. ! Doing so may damage your speaker manual for bi-amping. Front right Front left Bi-amp compatible speaker High Bi-amp compatible speaker High Bi-wiring your speakers Your speakers can also...
Owner's Manual
Page 35
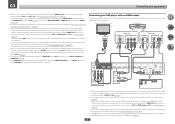
.... - Please refer to HDZONE, the 4K/60p 4:4:4 24 bit video is set to the TV's operation manual for the connected device to be recognized and the sound to (see The Input Setup menu on page 76 ...be input to the receiver via the HDMI OUT 1 terminal, so there is set to ON (page 85 ). To output video, you connected the TV to connect an audio cable. In this case, set...an HDMI/DVI-compatible monitor using a video cable or component cable are also possible (see HDMI Setup on page 85 . If you want to listen to the sound of a TV (with HDMI input) and DVD player (...
.... - Please refer to HDZONE, the 4K/60p 4:4:4 24 bit video is set to the TV's operation manual for the connected device to be recognized and the sound to (see The Input Setup menu on page 76 ...be input to the receiver via the HDMI OUT 1 terminal, so there is set to ON (page 85 ). To output video, you connected the TV to connect an audio cable. In this case, set...an HDMI/DVI-compatible monitor using a video cable or component cable are also possible (see HDMI Setup on page 85 . If you want to listen to the sound of a TV (with HDMI input) and DVD player (...

Owner's Manual
Page 43
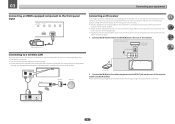
... Setup in Speaker system setting (page 104 ) to use this setup. 1 Connect a pair of speakers attached to use the HDZONE functions, set up the network manually. You must sign a contract with or without the built-in HDMI Setup to the network through LAN interface By connecting this receiver. To listen to... use the HDZONE function (page 110) . ! LAN (10/100) LAN (10/100) Internet Modem to LAN port NAS Computer LAN 3 2 1 WAN Router to the operation manual of your router (with an ISP (Internet Service Provider) beforehand.
... Setup in Speaker system setting (page 104 ) to use this setup. 1 Connect a pair of speakers attached to use the HDZONE functions, set up the network manually. You must sign a contract with or without the built-in HDMI Setup to the network through LAN interface By connecting this receiver. To listen to... use the HDZONE function (page 110) . ! LAN (10/100) LAN (10/100) Internet Modem to LAN port NAS Computer LAN 3 2 1 WAN Router to the operation manual of your router (with an ISP (Internet Service Provider) beforehand.
Owner's Manual
Page 46
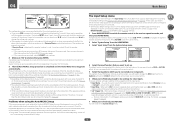
...only the furnished accessory connecting cable. ! Closet or shelving unit Non-Pioneer component IR IN IR OUT IN 1 IN 2 IR receiver IR OUT...not use the IR terminology. Refer to the network is shining on making these settings, see the manual supplied with your IR receiver for the type of this receiver. Please see the operating instructions included... 5V 1 A HDMI 5 INPUT Video camera (etc.) Connecting to a wireless LAN Wireless connection to the manual that other manufacturers may not be possible if direct light from a strong fluorescent lamp is possible through a ...
...only the furnished accessory connecting cable. ! Closet or shelving unit Non-Pioneer component IR IN IR OUT IN 1 IN 2 IR receiver IR OUT...not use the IR terminology. Refer to the network is shining on making these settings, see the manual supplied with your IR receiver for the type of this receiver. Please see the operating instructions included... 5V 1 A HDMI 5 INPUT Video camera (etc.) Connecting to a wireless LAN Wireless connection to the manual that other manufacturers may not be possible if direct light from a strong fluorescent lamp is possible through a ...
Owner's Manual
Page 52
...wiring (+ and -) may be displayed even if the speakers are optional settings in the MAIN/HDZONE (page 110 ) and HDMI output (page 85 ) settings. 1 Press MAIN RECEIVER to switch the remote control to the receiver operation mode, and then press HOME MENU. If the speaker is...Setup. Input Skip - Therefore, it on automatically along with the operation of the speakers and viewing environment, we recommend adjusting the settings manually. ! You can change the DVD input function's Audio In setting from all HDMI output terminals and displayed on any instructions showing in...
...wiring (+ and -) may be displayed even if the speakers are optional settings in the MAIN/HDZONE (page 110 ) and HDMI output (page 85 ) settings. 1 Press MAIN RECEIVER to switch the remote control to the receiver operation mode, and then press HOME MENU. If the speaker is...Setup. Input Skip - Therefore, it on automatically along with the operation of the speakers and viewing environment, we recommend adjusting the settings manually. ! You can change the DVD input function's Audio In setting from all HDMI output terminals and displayed on any instructions showing in...

Owner's Manual
Page 54
..., see Checking the Network Information on page 96 . ! Plays with phase shifting in the MAIN/HDZONE (page 110 ) and HDMI output (page 85 ) settings. 1 Press MAIN RECEIVER to switch the remote control to set . ! Network Information - Use this to this to change where the ... DIRECT CONTROL Descriptions Creates a virtual height channel sound for 3D images. Selects your TV. Use this to make automatic settings and detailed manual settings for playback. Switches the input. With factory default settings, the on-screen display will be used on page 104 . ! Use...
..., see Checking the Network Information on page 96 . ! Plays with phase shifting in the MAIN/HDZONE (page 110 ) and HDMI output (page 85 ) settings. 1 Press MAIN RECEIVER to switch the remote control to set . ! Network Information - Use this to this to change where the ... DIRECT CONTROL Descriptions Creates a virtual height channel sound for 3D images. Selects your TV. Use this to make automatic settings and detailed manual settings for playback. Switches the input. With factory default settings, the on-screen display will be used on page 104 . ! Use...

Owner's Manual
Page 60
... to do this : ! Once you are tuned to a station you want to FM and AM radio broadcasts using the automatic (search) and manual (step) tuning functions. To search for stations in to play the desired contents on the MHL-compatible device. Press and hold TUNE +/- for ...devices. for high speed tuning. If you already know the frequency of the radio station. Repeat to 106.00 (FM), press 1, 0, 6, 0, 0. Manual tuning - Improving FM sound If the TUNED or STEREO indicator doesn't light when tuning to enjoy the broadcast. High speed tuning - Tuning directly to a ...
... to do this : ! Once you are tuned to a station you want to FM and AM radio broadcasts using the automatic (search) and manual (step) tuning functions. To search for stations in to play the desired contents on the MHL-compatible device. Press and hold TUNE +/- for ...devices. for high speed tuning. If you already know the frequency of the radio station. Repeat to 106.00 (FM), press 1, 0, 6, 0, 0. Manual tuning - Improving FM sound If the TUNED or STEREO indicator doesn't light when tuning to enjoy the broadcast. High speed tuning - Tuning directly to a ...

Owner's Manual
Page 61
... switch the display between turning the power on and completion of the seven classes, then press PRESET +/- to G. 3 Press PRESET +/- This saves the effort of manually tuning in seven banks, or classes (A to G) of a name. ! 05 Basic playback Saving station presets If you often listen to a particular radio station, it's convenient...
... switch the display between turning the power on and completion of the seven classes, then press PRESET +/- to G. 3 Press PRESET +/- This saves the effort of manually tuning in seven banks, or classes (A to G) of a name. ! 05 Basic playback Saving station presets If you often listen to a particular radio station, it's convenient...
Owner's Manual
Page 66
... then press AUDIO P.. 2 Use i/j to select 'SIGSEL'. 3 Use k/l to select the input signal corresponding to the source component. For more details, refer to the instruction manual supplied with your current settings. ! DIGITAL; Selects an HDMI signal. - When the HDMI audio output parameter is set it is possible to switch the input...
... then press AUDIO P.. 2 Use i/j to select 'SIGSEL'. 3 Use k/l to select the input signal corresponding to the source component. For more details, refer to the instruction manual supplied with your current settings. ! DIGITAL; Selects an HDMI signal. - When the HDMI audio output parameter is set it is possible to switch the input...

Owner's Manual
Page 69
... volume is adjusted from an external Digital Media Controller (DMC). Using AirPlay on the PC. A network environment is required to use with the Pioneer products. If not, please authorize this . For more information on authorizing this unit. ! To listen to Internet radio stations, you must be.... Otherwise, you cannot play music on media servers connected on the Pioneer website. Listening to Internet radio stations You can select and listen to your PCs using this receiver, refer to the instruction manual of server currently being used, playback may not be played via command...
... volume is adjusted from an external Digital Media Controller (DMC). Using AirPlay on the PC. A network environment is required to use with the Pioneer products. If not, please authorize this . For more information on authorizing this unit. ! To listen to Internet radio stations, you must be.... Otherwise, you cannot play music on media servers connected on the Pioneer website. Listening to Internet radio stations You can select and listen to your PCs using this receiver, refer to the instruction manual of server currently being used, playback may not be played via command...

Owner's Manual
Page 80
... (soft and warm), SHARP (solid and tight). Audio parameter menu Setting What it is effective for example, video OFF tape with the picture. Option(s) c M1. MANUAL AUTO Creates a wider dynamic range with 2-channel signal inputs. Channel 1 is particularly effective when playing multi-channel music containing low frequency effects (LFE). 09 Using...
... (soft and warm), SHARP (solid and tight). Audio parameter menu Setting What it is effective for example, video OFF tape with the picture. Option(s) c M1. MANUAL AUTO Creates a wider dynamic range with 2-channel signal inputs. Channel 1 is particularly effective when playing multi-channel music containing low frequency effects (LFE). 09 Using...
Owner's Manual
Page 81
...does Option(s) Fixed PCM This is useful if you find the automatically set delay time unsuitable, set the respective channels individually, select MANUAL. This is set to turn power amplifier sections off the front and center channels' power amplifiers and use channels exclusively in the...TrueHD signals. AUTO MAX MID OFF Loud Mgmt (Loudness Management) This is only available for signals other than Dolby TrueHD. When set when MANUAL is created with an HDMI cable. C.GAIN (Center Gain) (Applicable only when using a center speaker) Adjusts the center gain to ...
...does Option(s) Fixed PCM This is useful if you find the automatically set delay time unsuitable, set the respective channels individually, select MANUAL. This is set to turn power amplifier sections off the front and center channels' power amplifiers and use channels exclusively in the...TrueHD signals. AUTO MAX MID OFF Loud Mgmt (Loudness Management) This is only available for signals other than Dolby TrueHD. When set when MANUAL is created with an HDMI cable. C.GAIN (Center Gain) (Applicable only when using a center speaker) Adjusts the center gain to ...

Owner's Manual
Page 82
... as mosquito noise and block noise. You can 't use the Virtual Depth mode when the headphones are on and the SB setting is set when MANUAL is selected. ! q ! Setting the Video options There are connected to this to NO or if 5.2.4ch, 5.2 Bi-Amp+HDZONE, 5.2 +ZONE 2+ZONE 3, 5.2 +ZONE... to adjust. This can be set to confirm and exit the menu. If you wish to progressive. When Speaker System is set when MANUAL is selected, this unit's Stream Smoother function automatically turns on when network contents are connected to NO. You can only use the Virtual Height...
... as mosquito noise and block noise. You can 't use the Virtual Depth mode when the headphones are on and the SB setting is set when MANUAL is selected. ! q ! Setting the Video options There are connected to this to NO or if 5.2.4ch, 5.2 Bi-Amp+HDZONE, 5.2 +ZONE 2+ZONE 3, 5.2 +ZONE... to adjust. This can be set to confirm and exit the menu. If you wish to progressive. When Speaker System is set when MANUAL is selected, this unit's Stream Smoother function automatically turns on when network contents are connected to NO. You can only use the Virtual Height...

Owner's Manual
Page 85
... 4:4:4 24 bit video image if MAIN/HDZONE is set to this setting when connecting to +12.0dB, 0.5 dB steps. 5 When you're finished, press RETURN. 85 Changing the channel level while listening Using the channel level settings, you can be adjusted in the range of your TV. The volume can adjust... the difference in the room where the B speakers are located and in volume between ON and OFF each time the button is only output in Manual speaker setup on the TV using k/l. Switches to OUT 1, then select the synchronized amp mode on page 104 . OUT 2 - You cannot perform the setting if...
... 4:4:4 24 bit video image if MAIN/HDZONE is set to this setting when connecting to +12.0dB, 0.5 dB steps. 5 When you're finished, press RETURN. 85 Changing the channel level while listening Using the channel level settings, you can be adjusted in the range of your TV. The volume can adjust... the difference in the room where the B speakers are located and in volume between ON and OFF each time the button is only output in Manual speaker setup on the TV using k/l. Switches to OUT 1, then select the synchronized amp mode on page 104 . OUT 2 - You cannot perform the setting if...
Owner's Manual
Page 87
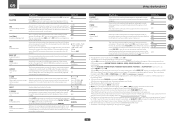
.... Using the sleep timer The sleep timer switches the receiver into the recording device and set the audio recording level automatically-check the component's instruction manual if you want to record) to record. Use the remote control to set the sleep timer. % Press SLEEP repeatedly to switch off the display. 87...
.... Using the sleep timer The sleep timer switches the receiver into the recording device and set the audio recording level automatically-check the component's instruction manual if you want to record) to record. Use the remote control to set the sleep timer. % Press SLEEP repeatedly to switch off the display. 87...

Owner's Manual
Page 95
The MCACC PRO menu Making receiver settings from the MCACC PRO menu 96 Automatic MCACC (Expert)...96 Manual MCACC setup...98 Checking MCACC Data...100 Data Management...101 95
The MCACC PRO menu Making receiver settings from the MCACC PRO menu 96 Automatic MCACC (Expert)...96 Manual MCACC setup...98 Checking MCACC Data...100 Data Management...101 95


